-
Posts
183 -
Joined
-
Last visited
Content Type
Profiles
Forums
Events
Blogs
Gallery
Store
Everything posted by RemingtonSteel
-
Frodo, I applaud your resourcefulness, in taking on this project. I think it is a great way for someone with very limited funds (for the time being) to get a leather sewing machine that will stitch through some thick leather. When reading down in the post, I was tending to agree with Gymnast that you would also need a speed reducer. However after watching Big Dog Forge's video and seeing the patcher operating without a speed reducer, I think you could go either way, but like you said, "try and see". Regardless good for you for doing this! I look forward to your new thread covering your progress on the project. Best of Luck, Steve
-

Calling ALL 441 Clone Experts!
RemingtonSteel replied to RemingtonSteel's topic in Leather Sewing Machines
Wizcrafts, When I got home (well before I read your comment), I turned the screw about 45 degrees and that loosened the lever up considerably to the point I turned it back about 25 degrees. The lever now takes about 5 lbs of force (measured with a digital scale) to move it up or down. It looks to be about the same amount of force that I see used in video demonstrations of the 441 style machines. I should note that it was pretty stiff before the thunk, and it may just have been my imagination that it got even stiffer. Tonight, I also replace the friction wheel on the bobbin winder, and wound a bobbin to test it out, and then sewed a couple feet of stitches. Between the two, I have not heard any sounds that would make me concerned that something was bent or binding. If anything, now that I completely re-timed the machine, I think it is running better than it did before. Otherwise, I would totally agree with your advice that a video would help diagnose if something was bent and or binding.- 11 replies
-
- timing
- ferdco pro 2000
-
(and 1 more)
Tagged with:
-
Dikman, I just created a post with original JUKI 441 Instruction Manual and Parts List. These should help you for when you get your new machine. I hope it is soooon!
-
A few members have been gracious enough to provide me links to both the JUKI Engineers Manual and Parts List. These in addition to the ones found doing internet searches, are photocopies of the manuals or part list that are saved as pdf documents. Although full of good information, the images and text are not always the clearest. When searching the internet the other night, trying to find a solution to a problem that I had, I came across these original JUKI pdf documents on their website. Both the images and text are very sharp in these documents, even when zooming in! The "Instruction Manual" is really a combination of setup and operation instructions for the machine, as well as the adjustments found in the Engineers Manual. You just have to get past the first 23 pages in Japanese before you get to the English section, while the Parts List is mostly all in english. As always most of the information found in these pdf documents apply to 441 clones as well. Instruction Manual: https://www.juki.co.jp/industrial_j/download_j/manual_j/tsc441_tsn421_tsh411_tsu471/menu/tsn 421_tsc 441/pdf/tsn 421_tsc 441_instruction_2k.pdf#page=1 Parts List: https://www.juki.co.jp/industrial_j/download_j/manual_j/tsc441_tsn421_tsh411_tsu471/menu/tsn 421_tsc 441/pdf/partslist.pdf#page=1 I printed both of these out (2 sided printing) to add to a handy reference book that I am compiling. Pro Tip: For the instruction Manual, print page 1 only, then do another print with the page range of 26-49 to skip printing all of the Japanese pages.
-

Calling ALL 441 Clone Experts!
RemingtonSteel replied to RemingtonSteel's topic in Leather Sewing Machines
Thanks for the info and photo. Mine has actually become tighter after the "thunk" the other night, and has not loosened even after oiling. I have to place my palm under the knob and push it up or cup my hand around it to pull it down. I agree I don't want it moving around while sewing, but I do desire a little more ease in the lever when changing from forward to reverse and back. I appreciate the photo, because as I was making my timing adjustments last night, I thought it might be the horizontal bolt on the left that controlled the stitch length lever tightness. Much appreciated Bob!- 11 replies
-
- timing
- ferdco pro 2000
-
(and 1 more)
Tagged with:
-

Calling ALL 441 Clone Experts!
RemingtonSteel replied to RemingtonSteel's topic in Leather Sewing Machines
And the prize money goes to @Gregg From Keystone Sewing! Gregg, thanks for pointing me in the right direction. When I got home, and placed the needle bar in the lowest position, the connecting rod eccentric cam had the screws facing toward the front of the machine (yes, a full 180 degrees past where they should be. So I started on the steps above, and when I went to loosen the two allen screws, I found that they were barely finger tight. The only thing holding the cam in place was the single small set screw. When the needle encountered too much resistance for the set screw, the cam shifted 180 degrees. I think maybe the previous owner made an adjustment and never tightened the two main screws with any torque. Once I loosened the set screw, i was able to align the reference dot on the cam with the reference line on the shaft. That got me where I needed to be so that I could fine tune the timing using Uwe's technique. Now it is sewing in forward and reverse like nothing ever happened. The only issue that I could think of mentioning right now is that the stitch length lever is very stiff to move up and down. Any recommendations to fix that issue beside a good oiling? Thanks again to Gregg for his insight and pointing me in the right direction, and to Uwe for producing such a high quality video on needle hook timing.- 11 replies
-
- timing
- ferdco pro 2000
-
(and 1 more)
Tagged with:
-

Calling ALL 441 Clone Experts!
RemingtonSteel replied to RemingtonSteel's topic in Leather Sewing Machines
So to test Gregg's assumption, this is what I am thinking: If I am correct, the two allen screws along with the set screw of the connection rod eccentric cam (CREC), should be pretty visible from the back when the needle bar is down in its lowest position. If they are not, then Gregg's assumption is most likely correct. If correct, I am thinking these are the steps I should take to correct the issue. Set stitch length to "0". Mark the (CREC) position on the shaft as a reference mark (to reset to this position if the following does not work.) Loosen the CREC screws and set screw. Place the needle bar in its lowest position. Rotate the CREC until the shuttle moves to its furthest counter clockwise position, with needle bar still in lowest position - this should also bring the screws into position on the back. Tighten the CREC screws and set screw - regardless of where the shuttle hook is in the raceway. If shuttle hook is not in the correct position (tip sticking out 1 mm ), loosen the hook driving shaft crank screw and set to correct position. Use Uwe's technique to check shuttle hook timing, and adjust if needed. Do these steps sound right? Can anyone verify that the CREC screws should be facing close to the rear of the machine when the needle bar is in its lowest position?- 11 replies
-
- timing
- ferdco pro 2000
-
(and 1 more)
Tagged with:
-

Calling ALL 441 Clone Experts!
RemingtonSteel replied to RemingtonSteel's topic in Leather Sewing Machines
CowboyBob, yes, it does... the driver looks like it makes a complete cycle when I turn the handwheel one revolution, just not at the correct time, or direction it should based on needle bar position. Gregg, Thanks for the reply. Although the Ferdco Engineers Manual is for the most part identical to the Juki TSC-441 manual that I currently have, I appreciate the link none the less.. It makes sense that it might be the connection rod eccentric cam, as after pouring through the Juki TSC-441 Parts List, it appears to be one of the only components that ties the "Needle Bar/Upper Feed Mechanism" assembly to the "Hook Driving Shaft" assembly. With two allen screws and a set screw, I find it hard to fathom that the eccentric cam could have slipped out of sync by approx 180 degrees (which I base on the shuttle position and the fact that it turns counter clockwise upon needle lift when the needle bar is at its lowest point.) However, based on the torque of the motor which is multiplied by the speed reducer, I guess anything is possible. Well that is at least one adjustment I can look at when I get home.- 11 replies
-
- timing
- ferdco pro 2000
-
(and 1 more)
Tagged with:
-
I have been tweaking and practicing on my new Ferdco Pro 2000 for the last several days without so much as a missed stitch. Last night I thought I would try 4 layers of 11/12 oz veg tanned (5/8" thick stack), to see how the machine would handle that. Good Idea, bad execution, as I used some older leather that was given to me and although not cracking by any means, it might have been a little too dry, and tough for this test. At about 2 inches into the test piece, there was a loud thunk and the needle snapped in half. So I removed the material, checked to make sure the shuttle area and race was clear of debris and installed a new needle. Upon bringing the needle down by hand, I noticed that shuttle did not appear to be in the correct position. Uh oh, timing issue. I just happened to have watched Uwe's video on shuttle hook timing earlier in the day and even printed out his gauge templates on card stock to bring home from work. However upon further examination of the machine (after watching Uwe's video again), I believe that it is not a shuttle hook timing issue, but rather a shuttle driver timing issue. Diagnosis/Observation: When the needle bar is brought down to its lowest position, 25.9 mm above the needle plate, I believe that the shuttle driver should be in the farthest counter clockwise position with the tip of the shuttle hook sticking out about 1 mm. Then as the needle bar starts to rise, the shuttle should start to turn clockwise so the shuttle hook can catch the loop being formed in the top thread, as the needle rises. On my machine, with the needle bar down in its furthest position (26.5 mm), the shuttle appears to be a full 180 degrees off. When the needle starts to rise, the shuttle starts to turn counter clockwise, instead of clockwise. That is why I am thinking that this is a shuttle driver timing issue. I did an internet search for this problem last night, but found no solution. I am hoping that @CowboyBob, @Cobra Steve, @Wizcrafts, @SolarLeatherMachines, @Gregg From Keystone Sewing, @Uwe, or any of you other 441 experts can point me to a solution for this issue.
- 11 replies
-
- timing
- ferdco pro 2000
-
(and 1 more)
Tagged with:
-

Clutch motor question/request
RemingtonSteel replied to econojames's topic in Leather Sewing Machines
I am new to industrial sewing machines as well. I have just had mine over a week, but for what it is worth, my clutch motor takes a long time to stop spinning after I turn off the power as well. Most likely an indicator of good bearings in the motor. Congrats on the new machine, and good luck with mastering that clutch! -

Everything Ferdco Pro 2000
RemingtonSteel replied to RemingtonSteel's topic in Leather Sewing Machines
Took your advice and backed out the big bolt several turns, with not much luck. Tonight I backed it out another 1 1/2 turns which I think is as far as it would go, and that helped. Now after about a 1/4" depression on the foot pedal, as CowboyBob mentioned, the break is released before the clutch engages, and I can turn the handwheel, but there is still some resistance. This also helped to slow the startup speed a little bit, and the clutch can now be feather a little as well. I don't think the original owner knew how to make these tweaks, which may be one of the reasons he went back to hand sewing his pack saddles. The needle that came on the unit turned out to be a #25 Schmetz and looks to be a diamond point. Today I received my first few packets of needles - Oregon #24 and #25 794LL. So I ran a line of stitching with the Schmetz #25 (on the top) then I ran a line of stitching with the Oregon #24 (on the bottom). The holes still appear large on the smaller Oregon #24 needle, even though it is the recommended needle size, based on the thread size (277 top, 207 bottom). I do like the way the stitches lay in the stitching grove with the LL point needles. Going to have to try other point styles to find the ones I like best for western holsters. The feet are still marking the leather, but not as bad since I backed off the tension, but not sure how much further I can back it off. -

Everything Ferdco Pro 2000
RemingtonSteel replied to RemingtonSteel's topic in Leather Sewing Machines
After playing with it yesterday, I could probably live with the clutch motor if I had to, but I don't have the very slow speed control that I see with servo motors. To me it will be well worth the extra cost to get a servo motor for the extra control. Clutch motor questions: With the power on, I cannot turn the handwheel by hand if the clutch isn't engaged. It is as if there is a break to stop the machine when the clutch is disengaged, which would make sense. I obviously can't turn the handwheel by hand once I do engage the clutch as the motor takes over. So how do you use the handwheel with a clutch motor? Right now I find it very difficult to stop the machine at the exact top or bottom of the stroke. Can you turn the handwheel by hand with a servo motor, or is there even a need to? Also the clutch motor has a 6v power outlet to supply power to the 6v 17w incandescent work light, that barely provides any additional light to the work area. Going to have to upgrade that as well once I upgrade to a servo motor. -

Everything Ferdco Pro 2000
RemingtonSteel replied to RemingtonSteel's topic in Leather Sewing Machines
I thought the same thing, and had already reduced the foot pressure before reading this. After reading this, I have backed off the pressure some more (now about 10 complete turns), but it is still making the marks, but not as much. I just found in the manual that the "Normal height of presser spring regulator is 30 mm." Right now I am at 35 mm, a and am not sure how much more I can/should back it off, but I will play around with it some more. I was thinking the same thing. The son said his father had used it for awhile then went back to hand sewing (pack saddles), as he preferred it more. The son used it to sew one holster a few years back... So I am guessing not much use. Partial illusion. With the belt on, there is about a 1/4" space between the belt and the left side of the cutout in the table. CowboyBob is spot on, as it is not vertical as I don't have it connected yet. I put the minimal amount of assembly into it so that I could clean it up and lubricate it in the driveway. I then disassembled it to move it to its new home in the house where everything was assembled correctly including the work lamp and spool holder. -

Everything Ferdco Pro 2000
RemingtonSteel replied to RemingtonSteel's topic in Leather Sewing Machines
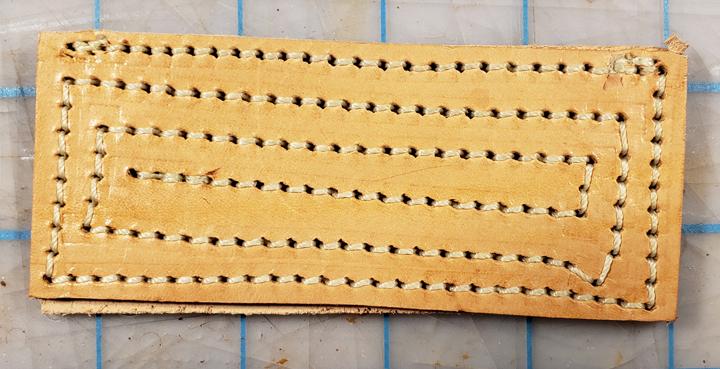
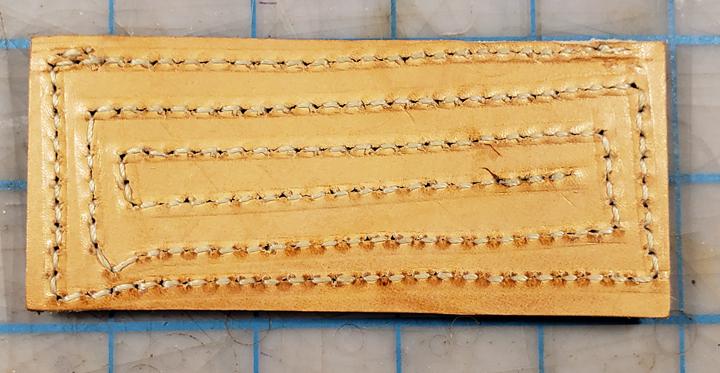
So the machine came with one needle in the unit but I don't know what size it is (22, 23, 24, 25), and came with 5 spools of DABOND polyester, 3 Pheasant Beige ( #207, #277, #346) and 2 Black (#207, #277). So I loaded up some beige 277 on top and 207 on the bobbin. Watched a video on how to thread both correctly, and played around withe a few stitch runs to get the the tension adjusted. Then I sewed two pieces of 7/8 oz together and here is the result: Front Back Don't judge me too harshly on the straightness of the stitch or stitch placement, as this was my first attempt at sewing leather on this machine. I just wanted to show the what the machine is stitching upon setting it up in my work-space. The stitch is approx 6 spi. The only thing I do not like at this time (besides the clutch motor) is that it has a closed center toe, which makes it hard to see needle placement in the leather. I think the needle size is way too large for this piece as the holes on the top appear to be excessive. All in all though the machine appears to stitch without much issue at this time, and I am very pleased with the purchase. -

Everything Ferdco Pro 2000
RemingtonSteel replied to RemingtonSteel's topic in Leather Sewing Machines
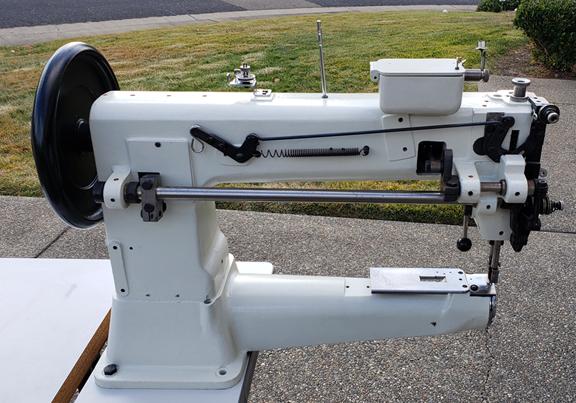
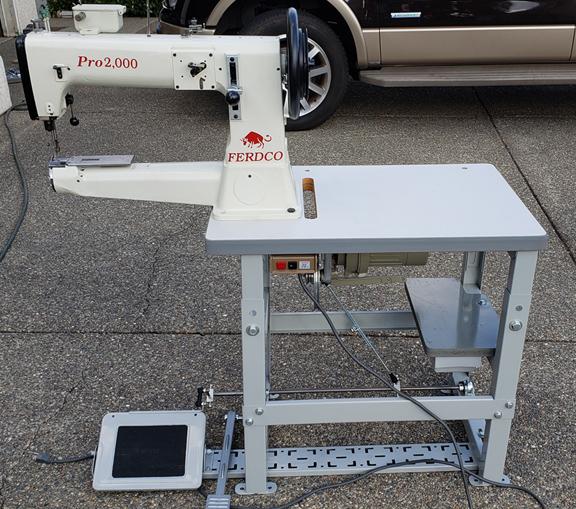
I spent several hours today cleaning up the table and machine. Then thoroughly lubricated the machine with Lily White oil. Here are some photos of the machine: After cleaning all of the dust and dirt off, the machine, it looks brand new. The table would look new as well, if the edging was not all cracked and deteriorating, but that can be replaced. What I did find wrong: The roller edge guide is frozen in the slide block, but I have that soaking in penetrating oil as I type. The bobbin winder does not work, but upon removing it from the machine, I found the broken friction O-ring sitting in the machine (already ordered 2 replacements). The big question now is, will it sew? -

What is the right bobbin thread tension?
RemingtonSteel replied to Gymnast's topic in Leather Sewing Machines
How much does a Fig weight? Could it be one Newton?- 28 replies
-
- thread tension
- lower thread tension
-
(and 1 more)
Tagged with:
-

Industrial Sewing Tutorials?
RemingtonSteel replied to Bransen111's topic in Leather Sewing Machines
Dikman and Blue62 both give sound advice. My experience is that the fundamentals are essentially the same, regarding running straight stitches. Running a stitch is running a stitch whether it is fabric or leather. Backstitching to lock in your thread when you start and end a stitch run, is the same, and so on. The big difference is in the machines. Learning how to use your industrial machine (vs a consumer/home machine), and how to adjust the tension properly for different thickness of leather and thread will be key to your success.. With fabric (I have sewn a lot of throw pillow cases over the years for my wife) on a home machine, I don’t ever remember worrying about thread and needle size or thread tension too much. It was kind of pick a stitch, and set it and forget it. With leather, you will need to learn what thickness of thread to use, based on the item you are making (wallet vs belt, vs ...), the thickness of the combined leather being sewn, and aesthetics of the project. Then depending on the thickness of the combined leather and the size thread you use, you need to select the appropriate needle size. It looks like with the 2700 Pro your max material thickness is around 3/8 of an inch, but is more than adequate for wallets. Like any skill, it will gets easier with practice. -

Show & Tell: Thumb Controller For Needle Positioning
RemingtonSteel replied to Uwe's topic in Leather Sewing Machines
Uwe, I have always been fascinated with CNC machines, as well as Arduino, but I have never had the time to play with either. So this may be a dumb question, but can a stepper motor be put in neutral so that zero torque is used to hold the motor shaft in place? If yes, couldn't you have a switch that would do just that so you could use the hand wheel if so desired? Regardless, an awesome project that makes me want to find the time to learn both. Well done. I am glad this thread was revived or I might have missed it. -
Forester, yet another beautiful holster you have created. I am glad you lined this one... helps to protect the finish of the weapon. Very nice, I may just have to make one like that for one of my semi autos. Looks to be a buscadero type design. I could be wrong, but I believe Buscadero refers more to the type of gun belt, and how the holster hangs from the belt. That style gun belt was made popular by western movies , but it really did not exist in the in the old west. Professor is on the right track thought, in the sense that Forester's holster resembles that of a western style single action revolver holster (cowboy holster), in which case, the belt would slide between the holster and the holster skirt (back piece of leather). The holster and skirt are made from one piece of leather (two if you lined it) that gets folded completely over to make an upside down U. The holster then gets attached (held down) to the skirt via a strap as seen above (Solid skirt holster), or the holster is passed through two slits in the skirt (Mexican loop holster). The pocket formed between the fold at the top and the lower strap (or loop) is where the belt gets passed through.
-

Everything Ferdco Pro 2000
RemingtonSteel replied to RemingtonSteel's topic in Leather Sewing Machines
Thanks, I thought it should not be an issue, but it never hurts to ask. I think I will stick to the Lily White that I purchased, as I like the idea of it being clear with less staining properties. Thank for the adjustment info and for the Juki 441 manual. It will make a nice supplement to the Pro 2000 Operations and Parts manual that came with the machine. -

Everything Ferdco Pro 2000
RemingtonSteel replied to RemingtonSteel's topic in Leather Sewing Machines
JJN, Great info thanks! Just ordered their catalog. Still would like to know what adjustment did you need to make to get the new feet to work with the Pro 2000? -
I have my new (to me) Ferdco Pro 2000, so I thought I would start a new thread to help compile as much information as I can on the machine. As it is a 19 year old machine which was mostly sitting around without being used for the last 8 years or so, I think it prudent to thoroughly clean and re-lubricated as much of the machine as I can without taking it apart. I will post some picture when I get around to it, but in the meantime, I do have some questions. The Ferdco manual says to use hydraulic fluid with an additive (can't remember off the top of my head) mixed in, as the lubricating oil. It appears that most 441 clone manufacturers suggest lily white oil. I would assume that it is safe to use lily white oil, but thought I would ask. Any suggestions on what should absolutely be done before I put the machine into service? From another post just after I purchased the unit: @JJN, Where did you get that attachments, and what adjustments did you need to make to get them to work on the Pro 2000? I assume that I can buy any 441 clone bobbins without issue, as I would imagine that they would at least be interchangeable.
-

3d printed skull holster . . .
RemingtonSteel replied to Chakotay's topic in Gun Holsters, Rifle Slings and Knife Sheathes
Very Coooooool! Lovit -

Arthur Morgan Double Gun Rig.
RemingtonSteel replied to Forester's topic in Gun Holsters, Rifle Slings and Knife Sheathes
Forester, clever idea bringing Arthur’s gun belt rig to life. I liked Arthur Morgan, just hated that he was mixed up with a gang of thieves and murderers. Made it hard for me to play. I grew up watching John Wayne, so there is good and evil. The whole idea of good people doing bad things just doesn’t seem right. Regardless, beautiful work, and interesting way to attach the holster straps. Nice even staining and finish. I bet you had lots of fun with all of them bullet loops. Overall a job very well done bringing the holster to life. You executed the task flawlessly. I applaud your work. l am not sure where Forester got his buckle, but Chisholm's Trail Old West Leather has a large selection of Movie and Period reproduction buckles. http://www.westernleatherholster.com/western-belt-buckles/


.jpg.655e5f8455b5070044f9e64923fc646a.jpg)
