-
Posts
183 -
Joined
-
Last visited
Content Type
Profiles
Forums
Events
Blogs
Gallery
Store
Everything posted by RemingtonSteel
-
I've been wondering that as well. Maybe the CCP subsidizes the shipping cost to the US in order to undercut American made and sold goods.
-
It looks like Tandy Leather once again is trying to stay relevant in the leather crafting market. Although the Craftool Pro series of tools was a definite step up from the standard Craftool lineup, for the last two years, they have been trying to win back the serious hobbyist/small business as well as leather professionals alike by bringing in more professional grade tools. First they started with a new line of machines called TandyPro, which now also includes the Cobra series of sewing machines, as well as the Cowboy Outlaw. Just recently they add some Barry King tools as well as the TandyPro hand tools lineup made by a Chinese firm and are labeled Since: TandyPro® Hand Tools — Tandy Leather, Inc. Although made in China, these tools actually look like pro quality tools. I haven't been able to get down to my Tandy store to check them out in person to see if their quality matches their looks. Anyone here have any hands on experience with these tools? I would prefer a tool work exceptionally well, rather than look good, but if I can have a quality tool with looks to match, all that much better.
- 9 replies
-
- tandy
- since tools
-
(and 1 more)
Tagged with:
-
Yes it would, but new ones are too pricy for me even before shipping. May take you awhile to find a used one. I am not an expert by any means in this area, and don't claim to be. Having said that, many parts can be swapped out with Juki TSC-441 parts as Ferdinand based his machine on the Juki TSC-441. His first machines were actually Jukis that he modified to sew heavier and thicker leather, and they still had the Juki decal as shown in the top photo posted by DonInReno. Later I believe he switched to having his own heads cast, but I am not sure how many parts if any he may have still purchased from Juki, and how many were his own. Other 441 parts from other vendors such as feet from Cobra, Cowboy, TechSew, and Artisan, although they may fit, may have to be altered or the machine adjusted to use them. As an example, feet from other vendors may fit the Ferdco, but the overall length of the foot may be slightly different. You would then either have to grind down the foot if too long, or adjust your machine to sew properly with this new foot length. Having to adjust the machine would be fine if it was a one time thing, but would not be recommended if you had to switch back and forth between the original Ferdco feet and the new vendors feet (the info about the feet I credit to JJN as he clued me into this.)
-
Conner, yes you are mostly correct. If mounting the head on a different table or a stand, you could use the same motor, and speed reducer (if it came with one.) The only thing you may need to alter/replace is the connector rods (connects foot pedal to actuating arm on motor), and the chain for the presser foot lifter, if they are not long enough. Below is a photo (provided by JerseyFirefighter on a different thread ) that shows a Ferdco that Keystone Sewing was selling with an additional flat bed attachment. To me, this would be the best way to mount a 441, if one need both a cylinder arm and flatbed machine. I hope you are correct about Hoffman Brothers, but I have my doubts. HB purchased Ferdco around 2011-2012(?), and the page on the HB website regarding Leather Machines (https://hoffmanbrothers.com/leather-machines/) points to https://www.Ferdco.com, which hasn't been updated since the purchase. I believe that Keystone Sewing Machines, was one of the last companies still selling Ferdco but I noticed they no longer list Ferdcos on their website. Unfortunately Gregg From Keystone Sewing is not longer with us to add to this discussion. My personal experience with HB is that I emailed them right after getting my Pro 2000 looking for extra feet, and they never responded to my email.
-
David, Welcome to the world of Leather. I live in the Sacramento area as well, so I know what you mean, but don't despair. You have probably already discovered that there is a Tandy Leather in Sacramento on Northgate just off of Hwy 80. They do have some upholstery leather, but not a great selection. My recommendation to you would be The Hide & Leather House out of Napa CA, which is the only business left of Sawyer of Napa and the Sawyer Tannery. The Sawyer Tannery was the largest tannery west of the Mississippi in its heyday, and was the last tannery in the west to close down. In fact the term "Nappa Leather" and the quality associated with it, was directly tied to the quality of leather and garments coming out of this tannery. The Hide House claims that they stock over 3,000 types of leather, if you ever visit their facility, you will believe it. It's about 1hr and 40mins from Sac, and well worth the drive, however they sell online as well. If you get a CA resellers license (which is not difficult), you can set up a Wholesale Account with them for discounted purchases. I get my Hermann Oak veg tan from them. Website: The Hide & Leather House, Inc. (hidehouse.com) Tour: I agree with Uwe, but I couldn't resist the opportunity of sharing this information with a fellow leather craftsman in the Sacramento area. I hope this helps, and maybe we can meet up for a beer sometime. Best of Luck! Steve
-
Conner congrats on the purchase! From looking at the literature I have, Ferdco only lists the HH in the Pro 2000HHFB package which listed for $7,095, but you could get the head only for $6,545. I don't see a Pro 2000HH package which would have been mounted on a table like the standard 2000 or the 2000H. So either someone purchased the head only and built their own flatbed table (not likely), or I would say that you what you do indeed have is the Pro 2000HHFB with the original table. I don't think Ferdco would have put on the FB decal (even if there was enough room) as one, it is self evident, and two, it has no bearing on that actual head itself. If you are going to be sewing items without contours to it (fairly flat items), stick with the flatbed for now, as you can always remount it down the road if that situation changes. Curious, did you get any attachments with it, like a holster or stirrup plate, different feet, roller guide, etc? Also, I would really be interested in knowing the capacity of the HH. If you put the needle in the top most position, and using the foot pedal to raise the presser foot to its highest, what is the distance from the needle plate to the bottom of the walking foot? I sewed with the clutch motor for awhile, and you get used to it. However, if your really want to sew at a snails pace for some items, but really take off on long straightaways like belts, , I highly recommend the FS-550 servo motor.
-
3 tank panels for Harley's....
RemingtonSteel replied to pzarkov's topic in Motorcycles and Biker Gear
Cool use of that one stamp for backgrounding. I would really like to see pictures of them mounted on the tank when you are done. -
Are you asking if you can buy new 29Ks online, used 29Ks, or both? If you are asking about new, there are several companies that make a Singer 29K clone, such as TechSew's 2900 Leather Patcher. Or, are you asking if 29K71 parts are available online? If this is the question, then yes many new/replacement parts can be found online. Here is just one of many sites you will find if you search for Singer 29K71 parts.
-
Buying from Offer Up shouldn't be any different than buying from CL, FB or any other type of classified, as it is just another way to put buyers in contact with sellers. It is still ultimately the buyers responsibility to do their homework to make sure they are getting what they are paying for, in working order or not. JJN found my Ferdco Pro 2000 on CL for me (still can't thank him enough), and like him, I spent a good part of a day driving up and back to pick it up. It's an awesome machine, and I love it even more now that I put a servo motor on it. As far as those Ferdcos go, $1,400 for a 441 clone with a 16 inch arm, looks like a great deal, even if they were ridden hard and put away wet. Ferdinand, aptly named his 441 clone the Super Bull, as it will plow through anything you throw at it. I believe that the model shown is actually the Pro 2000HHFB. HH - Super High Lift, and FB = Flat Bed. The Pro 2000HHFB sold complete (stand, motor, speed reducer, and accessory kit) for $7,095 when it was released in 2000. There is the standard 2000, the high lift 2000H and the super high lift 2000HH. The standard will sew through 3/4 inch, so it makes me wonder what the H and the HH will sew through. Considering most 441 clones max out at a sewing height of 3/4 inch, that makes these HH at $1,400 even a better deal if they are still sewing. My only concern, is that on my Pro 2000, I have to have the Presser Spring Regulator backed out almost all the way, so as not to mark up my leather with the walking foot. The one in the picture show has the Regulator cranked down almost all the way down. If I was in a few hour drive of the area and needed/wanted a 441 clone, I would go look at them.
-
BigSiouxSaddlery, sorry, but I can't find an emoji that has egg on it's face so this one will have to do . You have my apologies and my respect. Curious about the needle point though... my guess of LL is based on the direction of the angled stitch, as my LL sample above matches the angle of Jacob's sample.
-
Oh, and here is a handy Schmetz guide to Cutting points/Needles for stitching leather that can be downloaded if the above link ever dies: leather-needles.pdf @BigSiouxSaddlery below sounds like she has a tremendous amount of experience with the Landis, and would know more about your machine than I ever would.
-
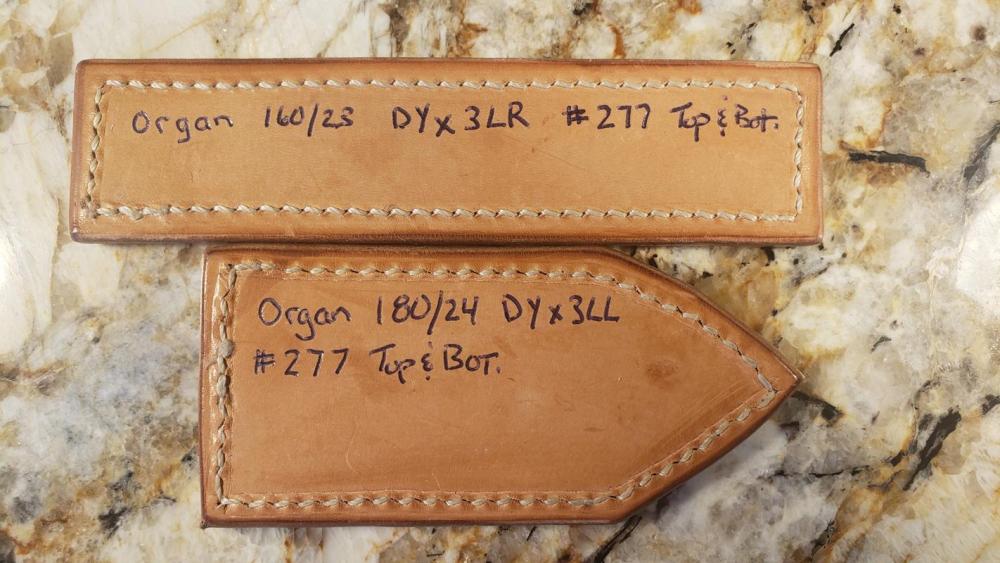
Jacob, first you are welcome for the explanation of the two stitch types. However, after rereading your original post, I think I understand your question better, so correct me if I am wrong. On the top, the stitches are straight and inline with each other (what you expected to see.) On the back the stitches are angled and look exactly like English style saddle stitching (not what you expected to see... expecting to see straight stitching like on top), which gives you the impression that the Landis is a saddle stitch machine even though you purchased what you thought was a lock stitch machine. If that is what you are thinking, you are correct, it does look like saddle stitching, even though it is not. This has more to do with the point style of the needle, than the machine being used. You mentioned that the needle is a #200 Schmetz, but you don't tell us what point type it is. My guess from looking at the picture of the back side stitching is that you are using a LL point needle. Different needle point types can create different looking stitches on the front and/or back of the project, as seen in the two samples below. Shown is the back side of both samples where the top sample uses a LR point needle, and the bottom uses a LL point needle. If you are looking to have straight stitches on both the front and the back of the project, you would want one of the following leather point style needles: S (Spear), Di (Diamond), D (Triangular), or R (Round). The point style you choose has as much to do with appearance as it does the strength of the stitch. As an example A spear point needle, if used on short stitch lengths, although creating straight stitches on front and back, can create a weak seam as there will be very little leather if any between stitch holes. Because the point of the LL needle is angled, you can sew these short stitch length and your project will be stronger as the holes will not connect with each other. Here is Schmetz's page on leather needle points. I hope this helps a little more with understanding the nuances of machine sewing.
-
Like JJN, I put the Family Sew FS-550 from Toledo on my 441 clone.
-

Bullet loops
RemingtonSteel replied to Davm's topic in Gun Holsters, Rifle Slings and Knife Sheathes
Just flipped through Packing Iron, and it looks to me that the majority of rigs had the shell belts sewn in. I personally use the same method as Dwight and Dikman (same hole) as I didn't have a sewing machine when I started, and it was easier than hand sewing. As far as wobbly loops, that can be caused by a few things that I can think of off the top of my head. Leather strap used for the loops is too thin (not enough body). Loops are spaced too far apart (should be close or barely touching). The slots you made are too wide (too much play in the slot). Cartridge too large for this method. I design my loops so that when the belt is lying flat, the loops are touching. The reason I do this is that once you put on the belt and it curves around your body, a natural space is created between the loops by the curvature of the belt. This leads me to another point: Dwight's steps above are spot on, and I do essentially the same, but I do not wet my loop strap nearly as much as Dwight does. However, I make sure my belt is not lying flat, but rather has a curve in it when I cinch down each loop. The reason being is that same curve around the body also tends to open up the the loops a bit, so you want them cinched tight while the belt is curved. One other factor that may determine the method you use, is the size of the cartridge/shell. I think the same slot method looks good/works well on cartridges lower than .45 cal. My personal opinion is that on .45 cal the loops start to stand too proud off the belt. The larger the circumference, the more proud they will stand. Put a strap around a 12 gauge shotgun shell and put it through a slot and you will see what I mean. IMHO .45 cal will look better if you use separate slots or sew, so that the cartridge lies flat against the belt. Also once you figure out how to upload photos, it becomes easier. -

Verdigris
RemingtonSteel replied to JamesRiley's topic in Gun Holsters, Rifle Slings and Knife Sheathes
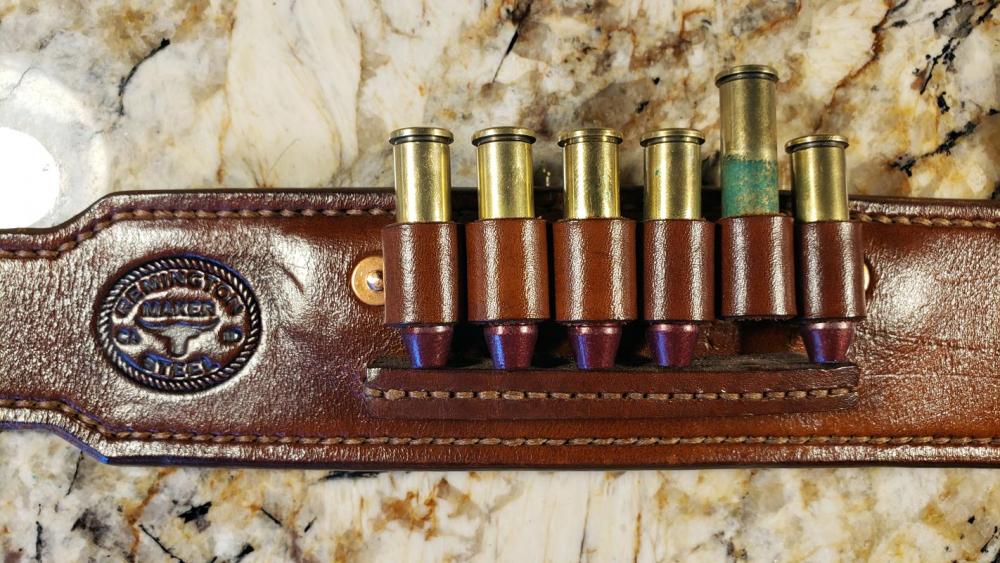
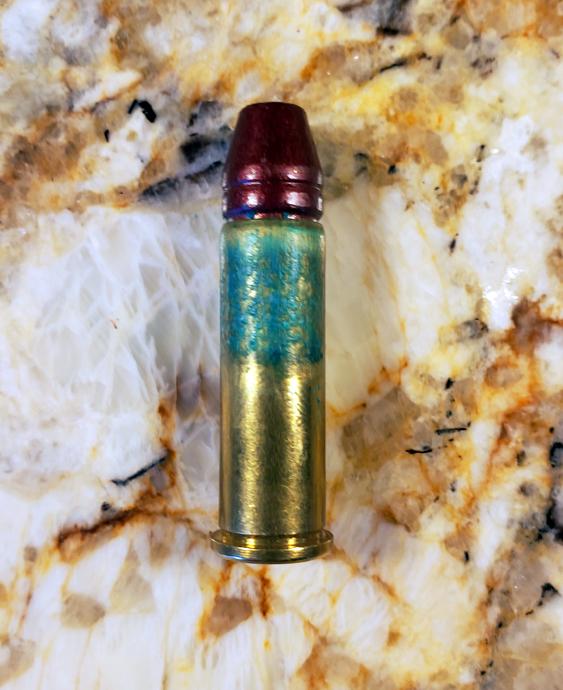
There is Corrosion and there is Oxidation. Corrosion on brass generally happens when brass is exposed to water for long periods of time. It is generally identified by reddish or pink splotches on the surface. Corrosion can and will weaken brass over time, so brass fittings on boats for an example should be cleaned, polished, and protected with a polyurethane or lacquer to protect them (but more often they are not.) Oxidation on brass happens over time as the brass is exposed to air. Oxidation can appear as a blackish, green, or blue patina on the surface of the brass. The patina in no way diminishes the strength of the brass, and has the beneficial effect of actually protecting brass from corrosion. Verdigris is (a type of heave duty) oxidation that is accelerated by the brass being also exposed to certain acids. Verdigris can be natural or man made and is often purposefully applied to brass artwork to protect it from the elements. This explains why most boat owners do not worry about keeping their brass clean, polished and protected, as the oxidation does that for them. So to answer your question, I wouldn't worry about the verdigris effecting the strength of brass cartridges. They are going to be weakened more by the process of shooting and reloading, which is stretching and then compressing the brass, over and over again. Over time your casings will spit, which is why it is suggested that you only reload them a certain number of times. The bigger concern as stated by JamesRiley is do you want this gunk in your firearms? Might be OK in a revolver, but I definitely would not want to run it through my lever action rifle. Regarding the use of rivets... Not really sure it matters either way... personal preference I think. I made this shell belt about three years ago. This particular set of cartridges have been sitting in the loops for just over a year due to covid. As you can see lots of verdigris in just one year, but look at the copper rivets that I used to secure the loop ends to the belt. Almost three year in the same leather, and they are as shinny as the day I put them in. I am not a chemist or metallurgist, so I can't explain why... maybe something to do with the zinc that is in the brass. Bottom line, there are plenty of old rigs in the book Packing Iron where the makers used rivets in addition to sewing on the billet and buckle straps for extra strength, and they have stood the test of time... so put em in if you like them or leave em out if you don't. -
Jacob, I think you may have answered your own question within your question. I am certainly no expert, but let me try to add a little more clarification. In Saddle Stitching the top and bottom threads alternate with every stitch hole and Saddle Stitching is done by hand. On hole one you start with two equal lengths of thread with one end coming out the top and the other coming out the bottom. On the first actual stitch, both the top and bottom needles pass through hole two and the threads are cinched tight, with the top thread becoming the bottom thread and the bottom thread becoming the top thread... rinse and repeat through the whole stitching process. If you were to use two different color threads, say red and blue tied together, and you started with the knot in hole one, if you looked form the top you would see a red stitch followed by a blue, followed by a red, followed by a blue, etc. looking at the bottom of the leather you would see just the opposite, blue followed by red, followed by blue, followed by a red... you get the idea. With lock stitching the top thread always remains the top thread, and the bottom thread always remains the bottom thread, and is almost always done on a machine. The machine passes the needle through the leather carrying the top thread, and on the upstroke of the needle a loop in the top thread is formed. The shuttle which holds the bobbin, essentially pass the lower thread through the loop made by the top thread. The two threads (top and bottom) are now looped around each other forming the stitch. As the needle continues to rise, if the tension on both the top and bottom threads is set correctly, the stitch is pulled up into the center of the leather essentially locking the stitch in place, hence Lock Stitch. This is why Bob suggested tightening up the tension on your machine. If you have a red thread as the top thread of your lock stitch machine, and a blue thread in the bobbin as your lower thread, all of your top stitching will be red and all of your bottom stitching will be blue. If I may make an additional suggestion to follow up Bob's, adjust you machines tension when sewing two pieces of 7-9 oz. leather. Most of your sheaths will have a minimum of two layers (top and bottom pieces), and if you put in a welt, which is highly recommended, that is three to four layers. Ideally you want your stitch pulled halfway up into the project. But because many do not like to keep readjusting the tension every time they change the number of layers of a project, if you are pulling into the center of two layers, that tension should work for a project with three to four layers as well. The stitch will not be in the center, but it will be far enough in to lock the stitch and keep it hidden. That is a great find you made. Nothing like working on a craft as a hobby with a piece of that crafts history. Be patient, and you will get it dialed in.. Enjoy.
-

Verdigris
RemingtonSteel replied to JamesRiley's topic in Gun Holsters, Rifle Slings and Knife Sheathes
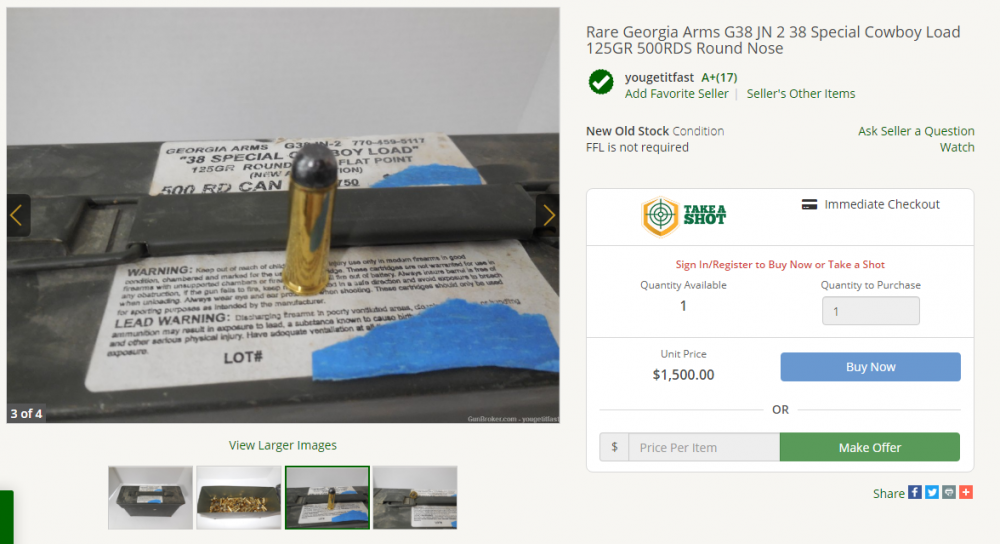
Peanuts... how about this: .38 cowboy loads 500 for $1,500... that $3 a pop. Had to include a picture cause I didn't want you to think I was pulling your leg. Sorry to the rest of you all leather workers for getting a little off topic, but many of us here are into Cowboy Action Shooting, and yes guns in general. -

Glock carry set
RemingtonSteel replied to Josh Ashman's topic in Gun Holsters, Rifle Slings and Knife Sheathes
Great coloring... very unique. Clean lines, clean stitching... what's not to like! Oh, and I always like a good roller buckle for a CCW rig. -
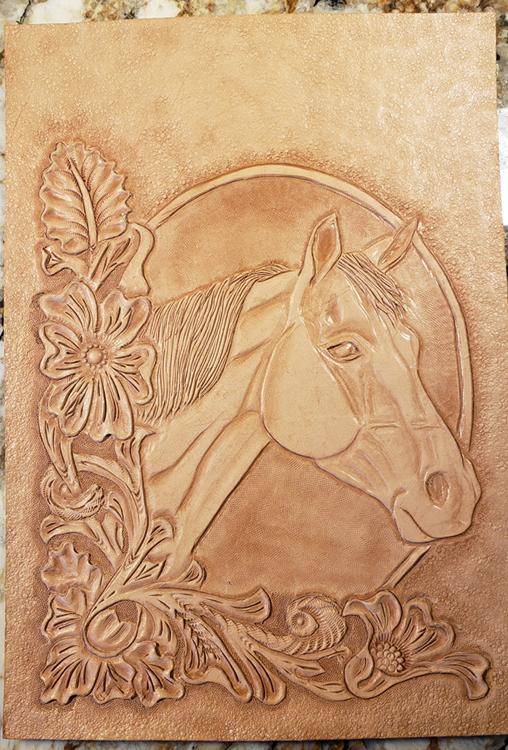
Bruce, you are either a perfectionist, humble or both, in addition to being your own worst critic. I actually don't believe you, cause I can see with my own eyes the quality of the work you are doing. If you don't trust yourself, trust the objective viewpoints of fellow members here. You've got to know that if JLS and Josh are throwing compliments your way, your doing good. I was going to follow that up with "Trust me, I wouldn't lie to you", but I realized that I already have. When I said in a previous post that "I would be thrilled if my florals looked as good as this", was the lie. Truth be told, I would be thrilled if my florals looked half as good as yours do. As you can see below, my carving ability is not even close to being in your league, but I am working on it.
-
Joe Meling has a good video on "bar grounding made simple" on YouTube. I don't know about simple, but it helped get me pointed in the right direction.
-

Verdigris
RemingtonSteel replied to JamesRiley's topic in Gun Holsters, Rifle Slings and Knife Sheathes
Yeah, due to the virus, I haven't shot for just about a year now. It is interesting, that the six .38 cartridges that sit in my shotgun belt and are used for on the clock reloads all pretty much look like this. The ones that are in my gun belt look pretty much like they did the day I reloaded them. Both my shell and gun belts were made from the same side of leather, as well as being stained and finished they same way. Not sure why those six from the shell belt have developed verdigris while the ones in my gun belt did not, as they were hanging right next to each other. From now on though, if I have to take any time off between matches, I am going to take the cartridges out before I put the belt in storage. Now that the restrictions have lightened up and we can get back to shooting, I am not sure if I will yet. I have been trying to find small pistol primers, and there are none to be had in the stores or online, not to mention the inflated price even if I could find some. -

Verdigris
RemingtonSteel replied to JamesRiley's topic in Gun Holsters, Rifle Slings and Knife Sheathes
So just to be clear, your saying you don't like my pretty verdigris cartridges. I'll have you know that it took me well over a year of sitting on my butt waiting for it develop just to get it to this stage. Geez, either there is just no accounting for art appreciation, or turquois is not your most favorite color. -
Been following this thread, and am anxious to hear what you eventually end up with. As far as searching goes, you may need to expand your search to a greater radius than the East Bay as you may not find what you are looking for locally. I was looking in a 50 mile radius, and was not finding anything. Another member on here pointed me to a CL ad in Redding that was not coming up in my searches.. I live in Sacramento area (grew up in the East Bay), and drove the 2 1/2 hours to the Redding area to buy mine. It was well worth the drive for me.
-
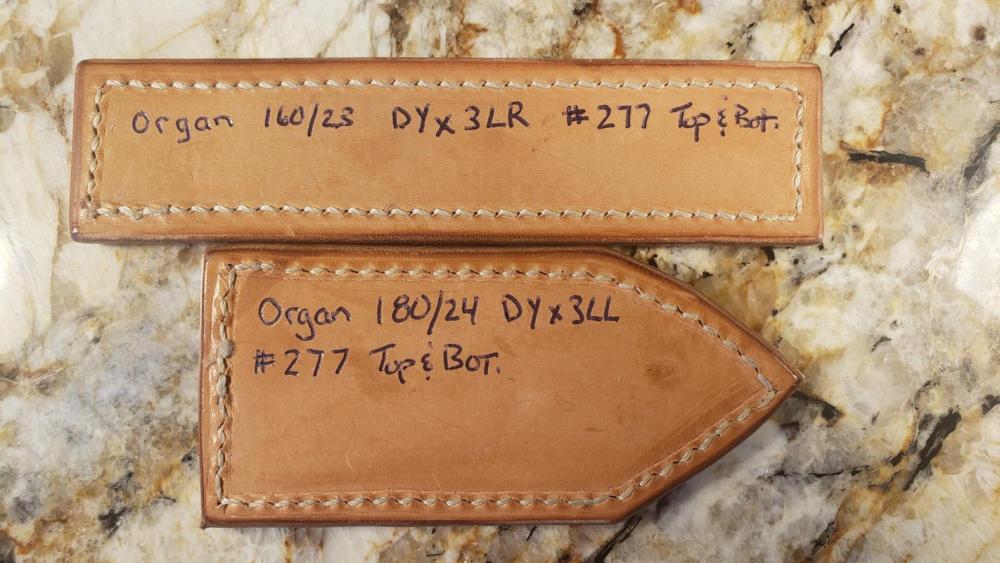
Perfection in Leatherworking... Many strive for this, but few ever achieve it. As Wizcrafts and Handstitched have mentioned, not enough pressure, and the leather will lift off the needle plate on the upstroke (not good) while too much tension can leave unsightly marks on both the front and back of your leather. IMHO, the best you can hope to achieve is no marks on the top, and minimal marks on the bottom. Regardless, you are most likely going to have some marks on the bottom left by the machine. The only way I can sew and not leave marks is to hand stitch, but that defeats the purpose of getting a machine. Having said that, my first attempts at using my machine yielded results that look like your bottom stitch above, but my marks are left buy the needle plate. After I found that happy compromise between not enough and too much pressure on the presser spring, I was able to virtually remove all marks from the top side (still there but you have to really look hard to see), and have minimized the marks on the bottom side. In my personal experience (others can chime in on this with their experience) the needle you use can also impact the amount of marking on the back of your leather piece. The below photo shows two samples of stitching two layers of 7/8 oz. leather together. Both pieces were sewn on the same machine (441 clone) with the same feet, and presser spring settings. You can clearly see that the top piece which uses a #23 LR point needle had less marking on the bottom than the piece sewn with an #24 LL point needle. You also might try tapping on the seams with a cobblers hammer, or using a modeling spoon (which I did not do on the samples) to minimize/remove the marks left by the machine. I personally am not a big fan of the cobblers hammer technique as it can make the stitching look a little mushy for my taste. FWIW, I find it useful to sew some samples with different weight threads, every time I try a new needle size or needle point style. I clearly mark the back side with the Brand, Size, Part Number and Thread for both top and bottom. That way I have a clear reference to look at when deciding what type of needle and thread I want to use on a project. That is a beautiful machine you have. Good Luck with it and enjoy!


