


RemingtonSteel
-
Posts
183 -
Joined
-
Last visited
Content Type
Profiles
Forums
Events
Blogs
Gallery
Store
Everything posted by RemingtonSteel
-
Cowboy action rig
RemingtonSteel replied to blue62's topic in Gun Holsters, Rifle Slings and Knife Sheathes
Tequila, it's hard to summarize in a paragraph, but I tried my best. My SASS alias is Remington Steel, as my first single action revolver was a 44 cal. Steel frame Remington 1858 New Model Army revolver. Unless you have been out to CA to compete I doubt we have meet, but another new interest is RVingl, so maybe one day we will meet. Probably should have also mentioned CAS is lot of fun, if you can find primers and powder so you can reload, as you typically go through 120 rounds (not counting shotgun shells or reloads) at a match. -
Cowboy action rig
RemingtonSteel replied to blue62's topic in Gun Holsters, Rifle Slings and Knife Sheathes
PastorBob, Cowboy Action Shooting (CAS) is considered a three-gun sport consisting of 2 single action revolvers, 1 lever action rifle and 1 shotgun . So, yes, you are limited to 10 rounds for revolvers, but not in the way you are visualizing. Each stage in CAS is comprised of 10 rounds in revolvers (5 rounds in each with hammer down on empty cylinder), 10 rounds rifle, and anywhere from 2-6 for shotgun. All three weapons are fired on a stage, and your are timed. Each miss adds 5 seconds to your stage time, and without going into a great amount of detail, time is also added if you don't shoot the targets in the correct order for that stage. So speed, accuracy, and a clear mind rule the day. There are usually 6 stages to a match, and a stage may require a single round reload in either the rifle, a revolver, or both, so this is where the bullet slide comes into play. If interested in finding out more, I suggest you check out the Single Action Shooting Society (SASS) here: SASS - Home of Cowboy Action Shooting (sassnet.com). blue62, I would be proud to wear that rig at a match. Well done. I agree, although not traditional of the old west, I think the blue stitching makes a great accent against the black leather. Great stamp job on the gun belt. QUESTION: Why the single loop on one holster, and a double loop on the other? Different length barrels? -
LeatherLegion, very nice dog collars indeed... wink, wink, cough cough. But shouldn't those really be in the Adults Only-NSFW forum?
-
I agree with JLSleather on much of what he said, especially the part about your skills. For the number of belts that you have made, your skill level is well above most leatherworkers that have that many or more belts under their belt (pun intended.) To me geometric patterns are the most difficult patterns to stamp. One misaligned stamp can really detract from the overall project for people like me that have an eye for detail. This particular geometric for me is always a challenge. On yours I can see some clipping at the top of the half circles due to the slightest misalignment of the stamp, which is the main reason it is so challenging. However, your stamps have good even depth, and are very crisp, the belt was cased properly as you have nice burnishing in the stamps, so all in all, I would say you pretty much nailed it! I would buy that belt and wear it with pride. Stop being so critical of yourself and start selling those belts. With all do respect to JLSleather (and I do respect him and his work), this is the part I don't agree with. IMHO, the guy that uses an embossing machine is a manufacturer, where as the guy who stamps it by hand is a craftsman. Many people, including me, are willing to pay more for an item to support independent craftsman than they would a manufacturer. Just like I would pay a little more for a product made in the USA over one of the exact same quality made in a foreign country, or pay a little bit more to support a local brick and mortar business vs buying from Amazon, when theses things are possible. The only other advise I can give regarding pricing that others have yet to make is this. If you get to the point where you are taking in more orders than you have the time to make (within a reasonable timeframe), it is time to increase you prices (economics 101 - law of supply and demand!). Beautiful belt, you have got me wanting to make one with this pattern again. I have to ask though, who is the stamp manufacturer and what is the number of the geometric box stamp. That particular one creates a very nice cross hatched look in background and I have not seen it before?
-
shooter saddlebag
RemingtonSteel replied to WyattEarp's topic in Gun Holsters, Rifle Slings and Knife Sheathes
Wyatt. very nice job... great tooling on that project! How long have you been tooling (5 years), as from the looks of it, I would say a very long time. JW, you can find that pattern pack here. Single strap version, not double strap: http://www.willghormley-maker.com/OWC.html -
Looks good. Not too bad for just getting back into it. IMHO, next time I would leave a wider border around the carving on the reinforcement piece for the stitching, so it doesn’t get lost in, or cover up the carving.
-
Yeah, I was thinking those looked more like drawer pulls than conchos. I think I had some night stands from Bombay Company that had those pulls... Still, they would look pretty cool on a dog collar.
-
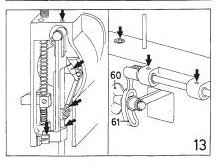
@Rosch22, I have a 441 clone, and the height of the walking foot and the presser foot can be adjusted for different thicknesses of leather. I don't have a Adler 167, so I am not a hundred percent sure, but I think the Adler 167 and its sub models has a similar adjustment. This is an excerpt from an Adler 167 manual that I found, that talks about the adjustment. Loosen the nut and move the connection rod slide up to get a higher stroke which in turn increases the foot lift height. Mark/note where it is currently at so you can set it back to that position if this does not help. Give it a try and let us know it it works for you. FYI, many here call the connection rod slide the "banana slide" as its curve resembles that of a banana.

-
Help needed with tension issues on 441 clone.
RemingtonSteel replied to Watts's topic in Leather Sewing Machines
Watts, Have you decreased/loosened the presser foot tension spring to prevent the foot from marking up the leather? The reason I ask is that if it is loosened too much, the leather will actually lift up off the needle plate a little bit on the up stroke of the needle. The action of the leather lifting off of the needle plate can also cause the upper thread/knot to not be pulled into the leather. Just something else to look at just incase you did. -
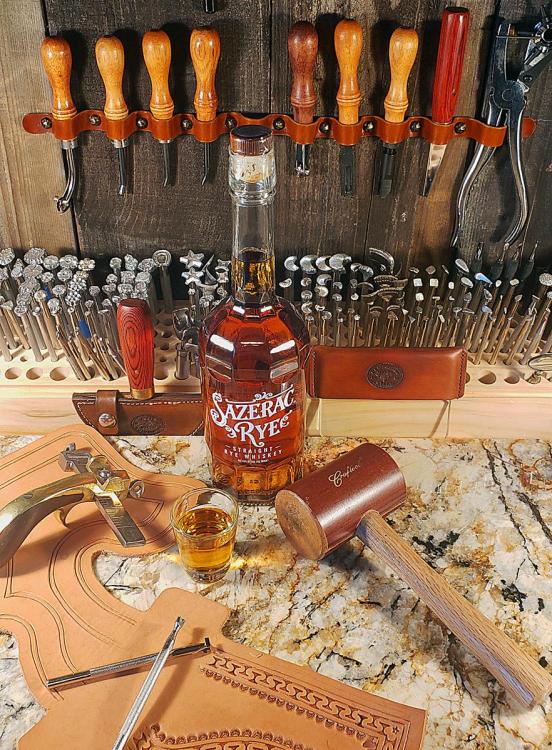
I really hate it when leatherworkers like you post pictures of their work like this. It just becomes one more item I have to add to my list of cool projects to try. Really love the pattern on the top weight, and I think that is the one I will to try to duplicate. Also I really like a good quality Rum as much as the next guy, but in my opinion a good Rye goes better with leather.
-
New Tandy Craftool Pro Stitch Master made by Sailrite
RemingtonSteel replied to Treesner's topic in Leather Sewing Machines
@bgstewart7, From Tandy's website on the CRAFTOOL® PRO STITCH MASTER SEWING MACHINE (Craftool® Pro Stitch Master Sewing Machine — Tandy Leather, Inc.): From Sailrite's website on the Sailrite® Leatherwork® Sewing Machine Package (Sailrite® Leatherwork® Sewing Machine Package (110V) - Sailrite): Based on both of these sites (same machine), I would say Yes to the #20 needle, but No to the v-138 thread. Having said that, manufacturers often put the highest specs that the machine will run smoothly and reliably with. That does not mean that it can not sew with v-138, and you would not know until you try. Doing so could void the warranty so do it at your own risk, but I would not recommend it. I really hope this is not something you need the machine to do, but were just wondering about. Not to be rude, but if this is something you need the machine to do, you probably should have asked this question before purchasing. The bright side is that Tandy has a decent return policy (14 days on this machine), so you might be able to return the machine if you do need one that sews with heaver thread. This is definitely a nice little compact machine, which is great for someone who is tight on space and sewing light weight leather products. If you keep it, I hope you enjoy it and that it serves you well. -
Here is a video on YT that covers 7 different stitch types, one of which is baseball stitch. 7 Different Ways to Stitch Leather by Hand - YouTube
-
fredk, I was thinking the same thing, then I tried it. What size snaps and Chicago screws are you using? My Chicago screws don't even come close to fitting in the base of my Line 24 snaps. My Chicago screws do say heavy duty, so maybe that is the reason.
-
Oh, man you got me there. Can't argue with that one.
-
Chuck, super cool gift. Nice job as always on the leather work. Sorry about the problems you had with the sunburst, that seems to happen on the most important projects, but then again that is how we learn. Your recovery is spot on, as I wouldn't have known you had an issue with it if you hadn't brought it up. Love the choice of wood for the pencils, as it pairs nicely with the case. Also, I didn't know that leather working and wood working was "redneck stuff"... Guess I'm a redneck too.
-
YinTx, from the work you post here, that I have seen, I didn’t think anything was above your comfort zone. Maybe you should work less comfortably in the future
-
Deluxe Set of six (5) Leather Round Coasters Handmade Marble
RemingtonSteel replied to Adonis's topic in Art
Not necessarily something I would incorporate into my leather work (western gear), but I have to say, very cleaver technique to get that marbled look. In the video, you said you use Fiebing's leather paint, but the constancy looks more like dye than paint. Is it paint or did you just misspeak? -
FWIW - I clicked on the Tippmann Ad Banner at the top of the page to look at their clicker presses and noticed that Tippmann has the Boss on sale right now. Standard package regular price $1,350.00, sale price $999.00 (Tippmann Boss Leather Sewing Machine - Tippmann Industrial) and the Deluxe Package regular price $1,575.00, sale price $1,209.00 ( Tippmann Boss Leather Sewing Machine Deluxe Package - Tippmann Industrial ). Those are significant savings, so if anyone is looking to pick up a new Boss, now is the time to do it. They also have selected accessories on sale as well as their clicker presses. I was curious if Tandy also had them on sale as well, because your wholesale discount applies if you have one, and I noticed that they no longer list them on their website. I guess now that they are carrying the Cowboy Outlaw, they only have room in the hand stitcher lineup for one machine.
-
Cowboy Holster Tutorial
RemingtonSteel replied to Jim's topic in Gun Holsters, Rifle Slings and Knife Sheathes
@KustomKreator, This is a long time overdue, but it you are still interested, Double K Leather has the Callahan Holster Pattern along with the Callahan Shoulder Holster Pattern here: https://www.doublekleather.com/product-category/educational-resources/patterns *** Jim Simmons' Plains and Ranger Gun Belt Templates and Instructions *** Also Jim provided us with his method for making and sizing both the Plains and Ranger style gun belts in a thread years ago that is buried somewhere deep on this forum, that I stumble upon from time to time. I requested that it be pinned, just as this thread along with the California Holster threads are, as it is a valuable resource that should be easily accessible, but it never was. So here is the next best thing. For those looking for Jim's pdf's on his Plains and Ranger Gun Belt templates along with Instructions pdfs, here are links for those files. The Ranger Belt Instructions file #2 also has the instructions for the Plains Gun Belt. These belts go great with Jim's Cowboy Holster tutorial in this thread, as well as the California Holster thread also pinned in this category. Clicking on the links will download the files. Ranger_Gun_Belt.pdf Ranger_Belt_Instructions_1.pdf Ranger_Belt_Instructions_2.pdf Plains_Gun_Belt.pdf *If you can print on 11" x 17" (tabloid) paper, the templates will print to the correct scale. I hope you find these as useful as I did. For those of us who make western style holsters and rigs, we all owe Jim a debt of gratitude for making these resources available to the community. @Jim AKA @Brazos Jack If you are still out there and possibly lurking here, I just want you to know how deeply gratefully I am to you for passing on your knowledge. I doubt that I would be able to make the quality rigs that I do, if it were not for you. - Thank You! You sure are missed around here. -
@MikeRock, I know this may be a little late, but there is a pinned thread just above this one, that does have a tutorial by Jim Simmons on making a Mexican Loop holster. Don’t be fooled by the photo on the cover of the pdf, as it covers both types of holsters. I used this tutorial to create my first holster, and still use many of the techniques he teaches today. There is no pattern, but he walks you through creating your own. In my opinion this is something a holster maker should really know how to do anyway, as it allows you to customize things such as the holster’s cant, recurve, length, toe style, etc. Here is a link: Hope this helps, even if it is a little late in coming.
-
Looking for a vertical wallet pattern
RemingtonSteel replied to PalmieriLeather's topic in Patterns and Templates
HBCrafts, Welcome to leatherworker.net. I think you misunderstood the quoted post. The OP (original poster) was looking for a template to make a wallet like the one he is showing a picture of, but did not make the wallet that is pictured. But if you are looking at getting into making wallets, there are links above to wallet templates made by a well respected leatherworker by the name of Nigel Armitage. Search for him on YouTube and you will find several videos that he has made that are very informative. He has a couple excellent ones on proper saddle stitching techniques. Also Aaron of Makers Leather Supply (also mentioned above) has a bunch of videos on various wallet types and make his own line of acrylic templates as well. Here is the link for Aaron's template for this type of wallet Vertical Wallet Acrylic Template Set – Maker's Leather Supply -
questions regarding an old leather belt
RemingtonSteel replied to DoctorX's topic in Getting Started
I found and old stitching horse (~ 100 yrs old) at an antique shop, and the leather strap that that goes from the foot pedal to the clams looked original. It was severely dried out and cracked. When you are a leatherworker, it would be easy enough to make a new one, but I wanted to save the original if I could. I applied numerous heavy coats of pure neatsfoot oil, and the leather softened up and regained its flexibility and strength. Still using that strap three years later. Leather is as you know an animals skin, and contains natural oils that get removed through the tanning process. Casing, staining/dying, wet molding, and other things we do to the leather, can further dry the leather. It only makes sense to me to add back some oil to the leather to give it back the moisture it needs to remain flexible and prolong its life. That is why many veg tan leatherworkers apply a coat of pure neatsfoot oil or extra virgin olive oil to their project at one stage or another. Then at the final stage of production a protectant of some kind is usually applied. -
Sbrownn, you are not wrong. Jacob who is new to both leather work and stitching, thought his Landis 1 was making a saddle stitch purely on the observation that the back side looked like saddle stitch even though it was a lock stitch.
-
Hays3100 your question is way too open ended, so maybe that is why no one has answered yet, I would narrow your question down by coming up with a figure you are willing to spend to try out this hobby. Also what you think you might want to make will determine what tools you would need. For example are you going to make knife sheaths, then you would need stitching tools as there are multiple layers of leather. Will it have snaps or rivets, then you will need punches and setters for those. Are you going to stamp or tool decorations into the leather, then you will need a swivel knife, and either stamps, carving tools or both, and a mallet. Will it have a natural finish or are you going to paint or stain it... you get the point. A starter set should really be tailored to what you intend to do when working with leather. A tool that you do not need for your project is not very useful. As far as Amazon starter kits go, most are kits put together with tools made in China. Some are good, some are just OK, and some are just plain bad. Years ago, you could trust Amazon reviews, but nowadays there are way too many fake reviews, they can't be trusted. so it really is hit and miss with buying on Amazon, although if sold and shipped by Amazon, and you are a prime member, return shipping is easy and free. One of the biggest names in leathercrafting for beginners is Tandy Leather, an American company that sells tools under the name of Craftool brand, and they have been around for years. And yes, many of their tools are made overseas as well. They sell everything a beginner would need and much much more to get started in this craft. Many here started in leatherworking using Tandy tools and supplies, and many still use them. Although their prices are fair, you could still walk into a Tandy as a beginner buying their first tools and walk out $500 poorer. Some of this depends on what you consider a starter set. You can see if there is a Tandy near you and go talk with a sales associate and they could help you pick out tools individually, base on what you think you might like to get into. Second you can buy individual tools or kits direct from Tandy online. Here is a like for kits: Kits — Tagged "Kits: Tool Sets" — Tandy Leather, Inc., Or you can find a new and used kits like this on eBay: LEATHERCRAFT DELUXE KIT TANDY CHECKBOOK COVER MONEY HOLDER KEY FOB BILLFOLD | eBay Tandy Leathercraft Beginners Tooling Kit 4900-00 | eBay 2013 Tandy Leather Factory Leathercraft Set Punch Tools Deluxe 55502 47 pieces | eBay Or you could bid on something like this: Vintage Leather Craft Outfit Lot-50 Plus Tandy Craftool Lot-Custom Dovetail Box | eBay, Or our one of our vendors here SLC (Springfield Leather Company) sells tool that are on par with quality and price of Tandy, you could check them out as well: Springfield Leather Company Or if you are looking for the most amount of tools for the least amount of money, pick a kit on Amazon and take your chances. Maybe if you posted a few links to kits you are looking at and also mention what you intend to make with leather, some of the other members here could chime in with a thumbs up or down, or even with a differing opinion than me. Anyway, welcome to the club... you will most likely enjoy it, even if your wallet doesn't. EDIT: Oh, and cute baby by the way, I can see why you would want to keep the price down.
-
@BigSiouxSaddlery You were so right in your assessment that it was a LR point needle . I just finished re-reading Schmetz's page on the LR and LL point needles, and it turns out that the direction of the loop (clockwise or counterclockwise) formed by the bobbin/lower thread can also impact the angle of the stitch. Damn. Now that is what I call luck!
