


kgg
-
Posts
3,374 -
Joined
-
Last visited
Content Type
Profiles
Forums
Events
Blogs
Gallery
Store
Everything posted by kgg
-
Singer double needle thread snagging and skipped stitch on one side
kgg replied to DMH's topic in Leather Sewing Machines
That is good information. kgg -
Singer double needle thread snagging and skipped stitch on one side
kgg replied to DMH's topic in Leather Sewing Machines
@DMH you may want to consider thread from Coats their Tristar line. From their website ( https://www.coats.com/en/products/threads/tristar/tristar/ ) they say : Tristar cuts cleanly without separation of the plies at thread trimming. Its low friction finish reduces the effects of needle heat and abrasion. It is perfect for multi-directional sewing and it also eliminates the need for right-twist thread for twin needle lockstitch applications, simplifying thread ordering and inventory. As a note: Kava as a house brand for Quebec produced in Canada by Kava Inc. also known as Cansew Inc., a Montreal-based company with its own factory and dyeing facilities at 7609 St. Hubert St., Montreal, Quebec. I haven't used thread from the Cansew or Kava manufacturer, that I can remember, but have been very satisfied with the results of American & Efird bonded nylon threads. As I am starting to run low on V92 and V138 I am planning on giving the Coats Nylbond and the Cansew bonded nylon thread CB138 a try in the near future. -
Singer double needle thread snagging and skipped stitch on one side
kgg replied to DMH's topic in Leather Sewing Machines
A couple of questions: i) what size of thread are you using with what size of needle????? ii) Which tension are you adjusting, the top tensions or the bobbin tensions??? iii) To set the bobbin thread tensions are you doing a drop test???? iv) Have you checked all the guides / feed dogs / needle plates to ensure one hasn't got a rough spot??? v) Have you replaced the needles with new ones??? vi) Are the needles going down in the center of the presser feet / feed dog / needle plate??? vii) Needles installed all the way up into the guage and the gauge is set / originated properly??? kgg -
This would definitely not be my choice for sewing upholstery or canvas. You really need at least a walking foot machine. My understanding this machine is really only designed for thin fabric. An #18 needle is only rated for V69 (T70) max thread. Here is a good reference chart for needle size vs thread size ( https://www.tolindsewmach.com/thread-chart.html ). kgg
-
Those are for mounting the upper belt cover and they are 15/64-28 L=10. My understanding is that machine is a high speed drop feed zig zag machine for fabric installing a larger needle will probably cause problems. What are you planning on sewing???? kgg
-
Not that this is going to be overly helpful as I'm in Canada but I have only once tried to buy leather online. My experience may differ from others but I opened the package up, examined it and promptly return it. Unless you are dealing with a very reputable company I figure you are going to get a much poorer grade of leather, probably someone's returned piece. I now only buy leather that I can eye, touch, feel and compare pieces. Yes it is slightly more costly per piece with travel (3 -4 hour drive) but at least I get decent quality. kgg
-
Dyeing leather
kgg replied to Samalan's topic in Dyes, Antiques, Stains, Glues, Waxes, Finishes and Conditioners.
In think they just gave up doing retakes. Title says it all " Tandy Skills Dying " Example at 0:44 clean area between spilled dye and the jar of dye and a patch of leather with the person dunking the brush in the bottle then at 0:46 there is dye around the leather patch before he gets the first brush of dye to the leather patch. By the end there is more dye on the sheet of paper covering the table then on the leather pieces. My real beef is they show no prepping of the leather. kgg -
I agree with @AlZilla not overly a great deal. Personally I would go with a Juki DNU-1541S or clone say something like a Cowboy CB-1541S rather then the Consew 206RB-5. My experience is that I had for a very short period of time a Consew 206RB-5 in hopes it would replace my walking foot Juki DU-1181n since it was a compound feed. In the end I kept the Juki DU-1181N and got rid of the Consew. kgg
-
Yes and No. Depends on what you need. Chain Stitch i) more flexible which helps the seam from breaking under stress ii) the seam will unravel if thread breaks from wear or being cut Lockstitch i) more secure as each stitch is locked into place ii) you will not loss the seam if a section of the seam becomes damaged from wear or a cut The chainstitch is more cost effective labour wish as there is no bobbin that has to be rewound. Once you got the spool hooked up that's it it until it runs out. kgg
-
Dyeing leather
kgg replied to Samalan's topic in Dyes, Antiques, Stains, Glues, Waxes, Finishes and Conditioners.
You should put a link to the video. I need a chuckle. kgg -
The 12 oz is roughly 3/16" (4.78mm) thick so two layers would only give you about 1/16" ( 1.6mm ) of max sewing thickness left. Depending on how tough/dry the veg tan leather is, needle selection and thread size a class 341 may Not work. My experience with a Techsew 2750 Pro (Juki LS-341 clone) with a speed reducer using 6.5 oz chrome tan, V138 and a #25 needle it will happily chug along doing 3 layers and says NO to 4 layers. For me this is the cross over to the Warlock Class 441 clone. Since you are going to do flat articles like wallets a flatbed attachment is going to be a must have item. My rule of thumb is buy a new machine that will do 90 percent of your items and a good used machine to cover off the other 10 percent. In your case buy a new Class 341 / 1341 clone unless you can afford a new Juki LS-1341 ($6,000 USD) that will cover off your items and for the heavy stuff buy either a motorized or manual "one armed bandit" Class 441. Here is a link to a good needle size to thread size chart ( https://www.tolindsewmach.com/thread-chart.html ). kgg
-
Not really my impression it is sorta a frankenstein clone of the Juki LS-1341 and Juki LS-1342. The Juki LS-1341 has a no vertical stroke (top knob near the handwheel) and has a wide guage throat plate where as the 1342 has a narrow throat plate. The Kolam 1341 has a wide guage throat plate and vertical stroke knob. With some of the "1341" clones they are using various thread bobbin baskets and some are using PFAFF. It appears to be their "house" brand clone. I could not find: i) any specs on this machine other then $3000 - $3250 USD depending on "style stand" which I assume means table style. ii) Thread/ needle capacity; servo motor size / type (brushless or brushed") , needle positioner or speed reducer. iii) whether they are using Juki compliant parts throughout. iv) is there a table top attachment available v) other then it "comes with a warranty" I could not find what and how long the warranty is good for. Keep in mind some clones spec the thread capacity on what can be stuffed through the max size needle that will fit in the needle bar where Juki rates their machine on what max thread can be used at max rated sewing capacity and there is a difference. Personally I think if you need more sewing capacity (thread size or item thickness) then a LS-341 or clone you need to move to a Class 441 machine (Juki TSC-441 or clone). However it all comes down to what you want/need/desire to sew with what size of thread and how deep your pocket book is. What are you planning on sewing with what size of thread??? kgg
-
Juki LS1341 - presser foot adjustment
kgg replied to MackProvisions's topic in Leather Sewing Machines
As a note the difference between a 1341 and 341 is minimal. You probably don't have the manuals for your machine so here a some that will be helpful as well as a needle size to thread size chart link ( https://www.tolindsewmach.com/thread-chart.html ) : kgg Juki LS-1340&42 Servcie Manual.pdf Juki_LS-341N_Engineers_Manual.pdf Juki_LS-341N_Instruction_Manual.pdf -
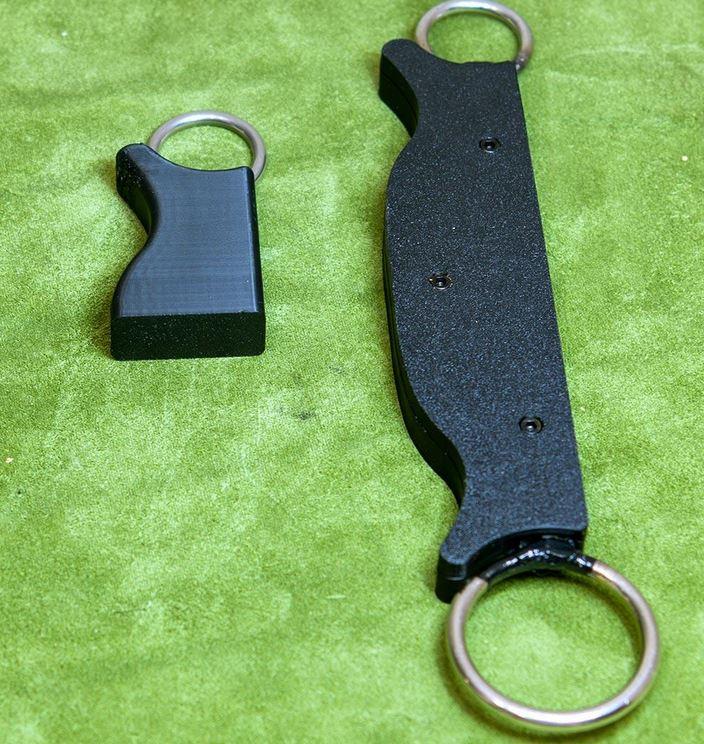
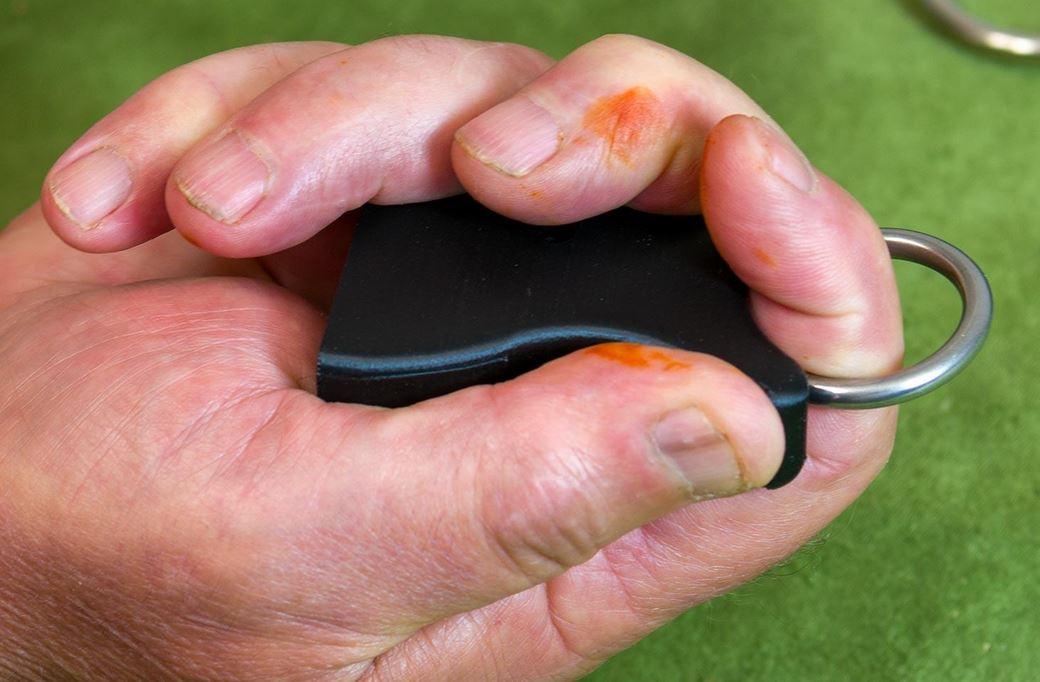
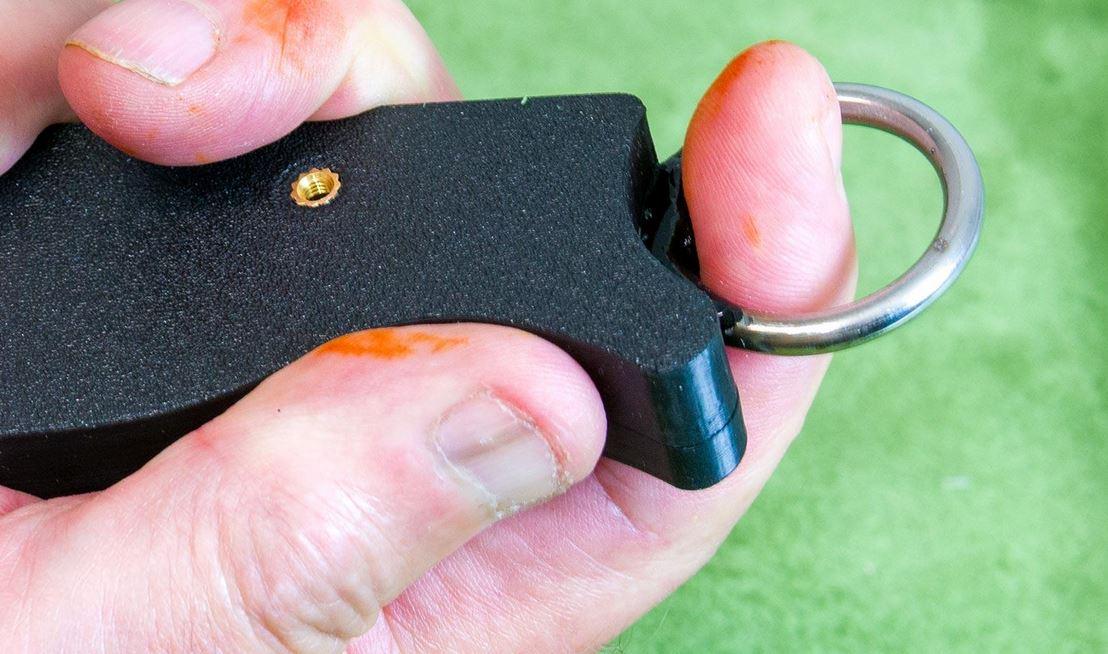
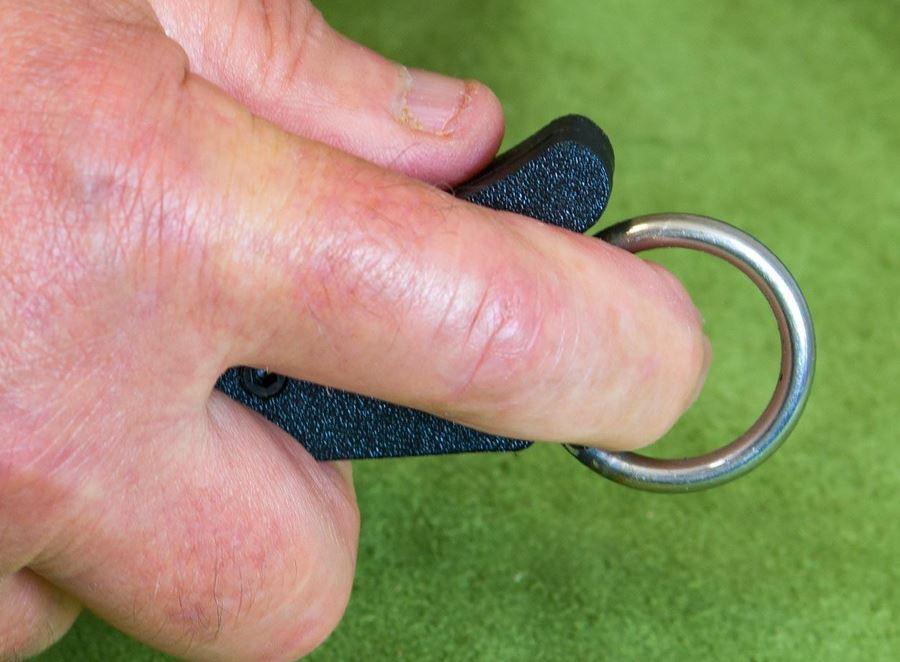
I have tried a few different tools like the bone folder style but was never pleased. I just could never seemed get the right amount of pressure to give the detail I thought should be there. When I did get the pressure right I somehow always managed to gouge the leather. Probably just me. My solution, design another tool. I made a folder using stainless steel welded rings combined with 3D printed parts. Cost very cheap probably less then a $1 and other costs. kgg
-
Thread Lubricating Cup for Singer 111w155 . What is it?
kgg replied to LMP's topic in Leather Sewing Machines
With today's modern bonded threads overheating of thread isn't as common a problem like it once was. Back in the 1940's the machine used cotton or nylon thread and it wasn't until the mid 1950's bonded polyester was used. Threads that were dry or fiberious or unbonded would overheat, then fray which lead to threads breaking under tension and speed particularly in a factory environment. The pad in the thread pot would lube the thread as it past under the oiled pad. The pad would provide just enough oil to reduce the friction as the thread made it's way to the eye of the needle from the spool of thread. That little bit of oil then reduced friction which reduced heat which reduced thread breaks then in turn gave consistent stitches, reduced down time and a better product. kgg -
The Cowboy labelled CB6900 is the down-under (Australian) version of the North America CB341 where both are clones of the Juki LS-341. Another option for those occasional needs would be a manual class 441 machine. There are three capable "one armed bandits", Tippmann Boss, Cowboy Outlaw and Weaver's Master Tool Cub. kgg
-
I think the problem is related to the thread and needle configuration you have selected. A good reference chart for needle to thread size is located here ( https://www.tolindsewmach.com/thread-chart.html ) The #19/120 is too large for thin acrylic, causing inconsistent penetration and hook timing issues Inconsistent top stitches like loose loops every few stitches on thin acrylic canvas probably the result of an oversized needle creating slack in the coated acrylic canvas holes, mismatched tensions, or threading issues in this industrial walking foot machine. My understanding is the Coats Tkt 036 thread is a all purpose core-spun polyester probably Coats Epic and more linty / woolly then the bonded polyester like Coats Dabond. If the item is being sewn for an outdoor item or upholstery maybe change to Coats Dabond. I would suggest: i) Change needle first: Drop to #14/90 or #16/100 sharp/microtex (not leather point). The #19/120 is made for V92 and properly leaving a small gap where top thread doesn't catch consistently on the thin acrylic canvas. ii) Top thread tension. If the the top and bobbin tension isn't balanced properly where the top thread tension is to great it will cause top-side loops. iii) Stitch length properly should be about 4mm and sewn slowly so to help reduce hook timing issues. kgg
-
Be careful. Juki rates their machines on what it can sew at max thickness not what you can stuff through the eye of the needle. Example: Juki LS-1341 rated for a #24 (180) needle which can accept V207 however the spec for max thread size is V138. Some clones would spec it as being able to sew V207. kgg
-
@keenbean Just to tag in on @Wizcrafts comments: The Juki TL Haruka uses HAx1 needles with a shank diameter of 1.63mm and uses up to max #18 needle which means the max thread size is V69 (metric 40). Typically the largest thread size for a domestic machine. The machine weight is about 25 lb. The Juki LS-1341 is a cylinder arm uses 135x17 and 135 x16 (leather) needles with a shank diameter of 2mm and uses up to max #24 needle which means the max thread size is V138 (metric 20). The head weight alone is about 82 lbs. The Juki LU-1508NH is a flatbed uses MTx190 needles with a shank diameter of 2mm and uses up to max #25 needle which means the max thread size is V207 (metric 15). The head weight alone is about 93 lbs. The Juki TU-1508NH is a cylinder arm that would be the equivalent to the flatbed Juki LU-1508NH. The head weight alone is about 97 lbs. The Class 441 machines like the Juki TSC-441 cylinder arm uses 794 needles with a shank diameter of 2.5mm and uses up to max #28 needle which means the max thread size is V415 (metric 7). Think of a needles with similar shank diameter as a 2.5" finishing nail, big hole. The head weight alone is about 123 lbs. kgg
-
New to the forum and wanted to introduce myself
kgg replied to Second_Chance_Leather's topic in Member Gallery
In my area I owe one of the smallest properties, 120 acres with 250 acres of crown land attached to one side. I probably only use about 10 or so but to have a dog boarding kennel in my township you need 100 acres. The closest neighbour is about 1 mile away. You will go through a brief period of withdrawal just like any other bad habit. Ease back and treat it as want not as a necessity. You just got to cut the apron string. kgg -
To me I think it probably has more to do to a individual machine problem then a manufacturing problem as a result of wear, over‑tightening/under‑tightening, or a damaged screw or clamp. If you are able to check the machine inspect the needle‑bar clamp and screw for wear and or other damage like a buckle needle bar, stripped screw / clamp and check that it is tightened properly and then if all is good re‑time the hook‑to‑needle as per the service manual, if not replace damaged parts then re-time. The PFAFF 2545 is manufactured in the P F A F F Industriesysteme und Maschinen GmbH factory in Taicang, near Shanghai, China. My experience: The Juki DU-1181n is a decent walking foot machine but the quality is nowhere near that of my Juki DNU-1541S. The difference is the 1181N is made in China and the 1541S is made in Japan. kgg
-
Is backstitching with a leather point needle a problem?
kgg replied to Gymnast's topic in Leather Sewing Machines
I have on occasion had this happen but only when I am sewing leather using multi layers say 6 oz that has not be glued together first. My thought is it was probably my fault because: I didn't hold the layers tight enough together so a layer moved slightly or the needle wasn't the correct size for the thickness leather I was trying to sew or the needle bent slightly when I tried to push the sewing thickness limit of both the machine and or the needle. I have stop using the servo motor to do reverse stitching and just handwheel the machine in reverse for those couple of stitches. Also if you do the typical forward few stitches then reverse to lock and then continue to the seam you are basically have a lot of bulk in those holes. To help reduce that bulk start and reduce possible cutting of the thread set the needle in about 3 stitches and Reverse then go forward. Another factor is the individual machine, maybe the forward and reverse are not properly setup. A simple check to that is put a piece of paper or cardboard under the presser foot and without thread in the needle do a few stitches forward and then do a reverse. If the machine is setup properly the needle will fall into same holes made when forward stitching. kgg -
Interesting, I'm just finishing two 6' dog leads one is 1/2" and the other is 3/4". The 1/2" lead only had the interior of the hand and the fold over section at the clip end glued but was still sewn along the edges with V138 bonded nylon. The 3/4" x 6' was two pieces of 6.5 oz glue together and sewn along the edges along the edges with V138 bonded nylon. How I glued: i) I have a slightly raised metal edge along the edge of my work table that I push the strap up against ii) I use a small piece of 3/4" x 3/4" x 10" long aluminum angle that I push up against the other edge of the strap. iii) I apply contact cement to the strap basically in 10" sections as I move the 10" AL angle along the length. w and let dry then reapply a second coat of contact cement. iv) Then I hang the strap of the door to the room to dry. v) Wipe the metal edging and 10" AL angle so there is no excess contact cement. vi) Lay the second piece up against the raised edge and apply contact cement and hang the strap over the door. vii) Clean metal edges and apply a second coat to the first strap. Rinse and repeat for the second strap. Let dry hanging over door. I do two coats as I have found the first coat gets sucked into the leather and sometimes doesn't bond properly. viii) Clean metal edges and lay a strap up against the work table edge. ix) Apply second strap to the first strap in small sections while pushing both straps up against the work table raised edge, like one inch or less lengths. x) I then use a 4" metal roller to roll the complete strap to get rid of any possible bubbles. I robbed my roller from the kitchen draw, I guess it was supposedly used for baking. xi) I then have a flat piece of metal that I put on top of the now freshly glued strap and clamp it down for about 24 hours to cure under pressure. xii) I then sew along the edges, about 4 or 5mm in, with V138 bonded nylon. I do like that idea and will try incorporating it on the next one. kgg
-
I am going to assume you are going to basically do the full length of the belt. I wonder if you moved up to a thicker leather that you may not need a inner reinforcement. My daily belt is two layers of chrome tan 6.5 oz glued and sewn with V138 about 4/5 mm along the edges. It shows no bowing up in the typical back section. After a little digging Nexbelt uses a " super-high-density microfiber " material so from that what I found that may help: For a super-high-density microfiber belt stiffener, products often use a material simply referred to as "high density microfibre" or "SHC". This material is a non-woven fabric made from ultra-fine polyester fibers engineered for superior support and structure in leather goods, including belts. Recommended Microfiber Materials Specific products are available on the market that are well-regarded for their performance as a stiffening core. SHC (Super High Density Microfibre): This material comes in various thicknesses (e.g., 0.45mm, 0.6mm, 0.8mm) and is specifically recommended for use in belts and straps. It is valued for its strength and ability to provide a firm, stable structure. Microfiber Leather Stiffener Reinforcement Fabric: Described as "Italy leather fiber (super micro fiber)", this material is used in high-end branded bags and can also be used for belts. It has a texture and feel very close to real leather, making it an excellent choice for a refined finished product. Alternative Stiffener Materials While microfiber is a great option, especially for a leather-like feel, other non-microfiber materials offer different properties depending on the desired stiffness and application. Texon: This is a very stiff and strong board-like material, typically used for extreme structure such as the bottoms of bags, but it is suitable for applications requiring maximum rigidity. Salpa (Bonded Leather): A natural material made from milled leather scraps and natural binders, Salpa provides general reinforcement and is popular for lining belts, offering a good balance of firmness and a natural feel. Nylon or Polyester Webbing: For very heavy-duty, tactical applications, a core made from super-high-density nylon strapping can be used, with some even incorporating extremely strong fibers like Dyneema® (known as the world's strongest fiber) for maximum strength and minimal stretch. The best "super-high-density microfiber" material is typically marketed as SHC (Super High Density Microfibre) or as "microfiber leather stiffener". When choosing, consider the required thickness and the desired final feel of the belt, as these specific microfiber products offer excellent structure while maintaining a soft hand. kgg
-
No problem. I've had one for about 5 years. kgg