


kgg
-
Posts
3,344 -
Joined
-
Last visited
Content Type
Profiles
Forums
Events
Blogs
Gallery
Store
Everything posted by kgg
-
Not even close. The machine appears to have been repainted with the name tag also painted over. From the factory i) setup for binding ii) factory needle system was 134-35 LR iii) Max size of needle is a metric 100 (#16) iv) Max thread size is metric 40 (V69) Value: Unknown. If it was used in a commercial environment it may need unknown repairs so it would be wise to have someone check the machine over before purchasing. How much are they asking??? Most importantly what do you want / need to sew????? kgg
-
Looks like a Consew 206RB-3 from the 1970's. Based on exterior condition, wouldn't be my choice for that price. kgg
-
Lets face it, It ain't a hobby it's an addiction. Just depends on which rabbit hole you go down. The worst is buying a machine that will not do what you thought it would. I think a lot of use have done that at some point. No one machine will do everything. My personal thoughts If you are: i) sewing wallets and typical belts, a Class 341/1341 like a Juki LS-341 / LS- 1341 or clone with a table top attachment would be a good choice. ii) sewing thick / tough leather with V207 and above, a Class 441 like a Juki TSC-441 or clone or one armed bandit is needed. The thing a lot of people forget is if you buy a Class 441 machine the needle is basically the size of a 2 1/2" finishing nail which is going to punch a really large hole that may not be suitable for say a wallet. The 90 percent rule: Buy a new machine that meets 90 percent of your sewing needs / wants. For the other 10 percent buy a good used machine. kgg
-
An alternative to the class 441 machines like the machines you listed ( CB3200 and the Cobra Classes 3 and 4 ) would be the one armed bandits. Those that are currently available are the Tippmann Boss (~$1000), the Cowboy Outlaw (~$1500) and the Weaver Master Tool Cub (~$2150). kgg
-
The Techsew 2700 is a Juki LS-341 clone. I would use the engineering manuals or video's for the Juki LS-341 or LS-1341. kgg
-
Sorry to here that. I would post on ( https://www.kijiji.ca/ ). Post an advert of each machine with photo's and a realistic price. kgg
-
Since you ordered #18 needles order V69 which you get A&E thread as well as others from wawak,com. kgg
-
Simple answer, No. The difference of going from a fabric needle (135 x 17 ) to a leather point needle (135 x 16 ) is the tip of the needle. The fabric needle (135 x 17 ) will attempt to push a hole through rather then slice a hole in the material. You will have to check the top thread tension, bobbin tension and presser foot tension. Also a bonded polyester thread would probably provide better UV protection then Bonded Nylon thread. kgg
-
Juki LS-1341 Needle size/ range confusion?
kgg replied to RFRLEATHER's topic in Leather Sewing Machines
Here is a link to the actual Juki LS-1341 brochure which will give you the definitive comparison on all specs for the 1340 series machines. ( https://www.juki.co.jp/industrial_e/admin/pdata/filedata/332/ls1340.pdf ). If the machine was new yes. With used machines it could be iffy on the smaller thread sizes which will be an individual machine ability depending wear of internal parts typically whether it was a hobbyist machine or a machine that was used in a commercial environment. No, but I don't use threads less then V92. The only then is you have to change your top thread tension and bobbin thread tension when going from thread size to another, when you change to a different spool of thread, thread type and even color. Not going to happen that is why a lot of use have more then one machine. Machines for the most part setup to basically do one function. My thoughts: i) The Juki LS-1341 is basically a functional Juki DNU-1541S in cylinder arm form. The main concern I would have with the LS-1341 in thin material is the material being sucked down into the feed dog as the hole is fairly large. This may not be the best machine for your needs and maybe a Pfaff 335 or clone or a post bed machine would be better options as they are inclined towards smaller thread sizes. ii) How thick is the thickness material including folded over seams that you want / need to sew with what size of thread?? You really need to ask what was overhauled internally and externally for the machine, like timing belt, bushings, thread tensioner, thread guides, etc. What is the asking price for the machine. kgg -
My thoughts: i) #20 needle is for V92 thread not V69. reference chart ( https://www.tolindsewmach.com/thread-chart.html ). An incorrect sized needle for the thread size can cause skipped stitches as the loop sometimes does not form properly which gives you skip stitches. ii) With a fabric backed material I would try a 135 x 16 x 18 to cut through the vinyl rather the 135 X 17 x 20 rather then punching through with an oversized hole. Think of it more like trying to punch a hole in piece of paper with your finger rather then a needle. The fabric needles are meant to push apart/separate fibres so as not to weaken the fabric where as the fabric on your vinyl is probably more for stability to help it from over stretching. kgg
-
Yes, the Cobra does come with a reducer which does allow for slower sewing and greater punching power due to the increased torque provided by the speed reduce. The cost for a 3:1 speed reducer, at least in Canada, is about $100 CAD. I have never owned any of the Cobra equipment but from my experience I had for a very short period of time a Consew RB206-5 that I hoped to replace my Juki DU-1181N with as it was supposed to be similar to the Juki DNU-1541S. It wasn't good enough to replace the Juki 1181N so I sold the Consew. Bottom Line, do an honest test using a sample of your stuff on both machines. You may have to send a sample to a vendor. I could not find a weight for the head of the Cobra 18 listed so you may want to call them keeping in mind the Juki DNU head alone weights 80.46 lbs (36.5 kg). kgg
-
I don't understand your question. Are looking to purchase this class of machine or ???? As a note the Class 18 is a clone of the Juki DNU-1541S and if you want quality build and stitch wise by a Juki but they are going to be expensive. If you looking to buy a machine what are you planning on sewing, thread size, thickness of material??? kgg
-
Can't see the video's with a message of unspported format and MIME type found. kgg
-
Using neatsfoot oil
kgg replied to Mungo's topic in Dyes, Antiques, Stains, Glues, Waxes, Finishes and Conditioners.
Depends. I use JoJoba rather then neatsfoot oil. What I do is oil the flesh side first using an airbrush to get constancy over the area, let sit, maybe re-oil, then airbrush dye on, let sit and airbrush oil on again. If I'm dying the other side I will follow the same process. I found the grain side will suck up more oil or dye much faster and suck then the flesh side. kgg -
For me since both were used in a production environment I would pass as I have see a couple that looked in very good shape exterior wise but the internals were on there last legs needing almost a complete rebuild. I find that Juki machines built in Japan have a better build quality then those that are made in China. If you are going to get the use out of a machine take some of your stuff to a Juki dealer. Test ride the LS-1341 and the DSC-246. That said you really can't compare a used machine against a new one, just to many possible variables. When it comes to binding I am presently using a Techsew 2750 Pro and previous to that a KOBE 1341. I stupidly sold the KOBE but the Techsew does work. However I 3D printed table tops that allow me to use standard inline attachments so I can use all flatbeds attachments on my cylinder arm machines (class 314/1341 and 441). kgg
-
The Juki DSC-246: i) dsc-246 hand lift is 9mm and by knee is 15mm vs Juki LS-1341 hand lift is 9mm and by knee is 16mm ii) the thread ranges on the dsc-246 uses needles sized from 90 to 160 (#14 to #23) so that means it should handle V46 to V138 in thinner items vs Juki L-1341 needle size of 100 to 180 (#16 to #24) which means it can handle V69 to V138 in heavier stuff or V207 in thin. iii) the max stitch length is 6mm for both machines iv) use a "M" style bobbin for both machines dsc-246 loads from the cylinder arm front vs ls-1341 loads from the cylinder arm top v) cylinder arm diameter is smaller on the dsc-246 then the LS-1341 vi) Since we all jam up a machine at some point in time the LS-1341 has a safety clutch while I don't think the DSC-246 has one. In a nut shell if you need / want to use with thicker thread and with heavier / thicker items or seams buy a LS-1341. If you want a binding machine buy the DSC-246. Parts / accessories for the DSC-246 are not as common as for the LS-1341. I sort think of the LS-1341 as the cylinder bed version of the DNU-1541S flatbed. How much are they asking for the machines?? Keep in mind you may want to consider a new LS-1341 clone for about $2700. I would like to know if these machines were used in a commercial environment or by a hobbyist. If they were used in a commercial environment then I would be very wary as they would more then likely have been rode hard and put away wet. kgg
-
Before you get some suggestions you need to tell use a couple of things. i) What size of needle are you using? ii) What size of thread are you using as a top thread and in the bobbin? iii) What system of needles are you using?? Typically for fabric type materials 135 X 17 X (needle size) and for leather 35 X 16 X (needle size). That said sometimes with certain types of vinyl you would use a leather needle. iv) How thick is the thickest part you are trying to sew?? The changes could range from incorrect top thread path, wrong size needle for threads, incorrect system of needle, dull needle or wrong needle for the type of material all the way up to replacing worn parts or re-timing the machine. If possible post a couple photo's of top thread path from the spool of thread to the eye of the needle and what you trying to sew. kgg
-
The number 19 needle is to small for Tex 135 thread. In thin you need a #22, medium a #23 and thick #24. Here is a good needle to thread reference chart ( https://www.tolindsewmach.com/thread-chart.html ) kgg
-
CB341 having issues with sewing near edge of leather
kgg replied to Chapelworx's topic in Leather Sewing Machines
The Cowboy CB341 is basically a clone of the Juki LS-341. The difference between The Juki LS-341 and the Juki LS-1341 in a nutshell is a larger needlebar stroke, presser foot lift, and a double-tension system. So look for video's related to Juki LS-341 and the Juki LS-1341. kgg -
Wholesale hardware suppliers beyond Buckleguy, Tandy, Weaver, Ohio etc.
kgg replied to PheesOriginal's topic in Suppliers
Yes they are still around Harness Hardware Inc ( https://www.harnesshardware.ca/contact ) and about 3 minutes from Arron Martin. kgg -
CB341 having issues with sewing near edge of leather
kgg replied to Chapelworx's topic in Leather Sewing Machines
I agree with @Wizcrafts. I do have a couple of questions: i) are you using a edge guide or free handing? ii) are you using a table top attachment? A lot of machines have a natural pull to the left which can cause wandering which seems to be worse on cylinder arm as the contact surface is very small along with fighting gravity. iii) what size of thread are you using? iv) what size of needle? Here is a link to a good needle size to thread size chart ( https://www.tolindsewmach.com/thread-chart.html ) v) what system of needle are you using? (135 x 16 x needle size) is used for leather while the (135 x 17 x needle size) is used for fabric. I do see blowout on the underside which could indicate you are using a fabric needle. kgg -
Yes you are correct a lot of the "1341" clones are indeed Class 341 machines regardless of what their labels say. My two cents worth and I could be wrong. That said the Juki LS-1341 does not have the vertical stroke knob as it only came with the Juki LS-1342 and the Juki LS-1342-7 (reference: https://www.juki.co.jp/industrial_e/products_e/lether_e/cylinderbed_e/detail.php?cd=LS-1341_LS-1342_LS-1342-7_E ) That said the Jianglong machines are hybrid's being they have the vertical stroke knob of the Juki LS-1342 / LS-1342-7, the larger throat plate of the Juki LS-1341 and older Juki LS-341, the bobbin size used in the Jianglong varies from the 25.4mm ("M") used in the Juki LS-1340 series and older Juki LS-341 to your 28mm which was used in the Juki LU-1508 and older Juki LU-563 along with Durkopp Adler 867 and 868 and is actually a "U" size bobbin that has a larger capacity then the "M" which also means the bobbin case has to be that of maybe a Juki LU-563 or 1508 or a Durkopp Adler (867, 868). I suspect it is more similar to a Durkopp Adler bobbin case as it has a coiled bobbin spring rather then a flat spring and a different shape then the Juki's. kgg
-
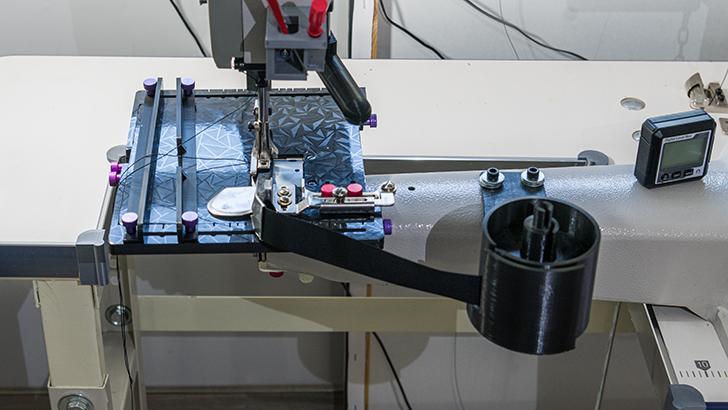
What I done with my cylinder arm machines Class 1341 and Class 441 is I 3D printed table top attachments for three reasons: i) I am a cheap old geezer and there is a considerable cost difference between your standard inline binding attachments vs the 90 degree ones. ii) As I have quite a collection from 1/4" up to 3 1/2" I wanted to be able to use the standard inline binding attachments that I have on all my machines whether they are a flatbed or cylinder arm machine. That said I will coincide you can get tighter bends with a 90 degree binding attachment then with a standard inline. iii) None of the table top attachments for cylinder arm machines that I have seen have the ability to accept standard inline attachments. Here is a sample of what I mean. First photo is a Class 1341 and the second is a Class 441 with a standard inline binding attachment using a swing-away binding attachment. kgg
.jpg.a99f9558247d9363f91a1f848f588421.jpg)
-
Wholesale hardware suppliers beyond Buckleguy, Tandy, Weaver, Ohio etc.
kgg replied to PheesOriginal's topic in Suppliers
The last time I was there their stock was pretty slim pickings. May have just been between restocking. The place that I would recommend but forgot to include the link is https://en.cuirdizazzo.com/ in Montreal. kgg -
What Machine Do I Need to Sew 12 mm Leather
kgg replied to OscarRush's topic in Leather Sewing Machines
For sewing the 12mm or so of leather as previously stated you need a Class 441 machine like the Juki TSC-441 or clone. Finding Tippmann, Cobra machines on that side of the pond will probably be a chore. Since you are in the UK: For New: I would contact Franklin Co. for Cowboy machines https://www.franklinco.co.uk/about/ For Used: I would contact places like https://leathermachinery.co.uk/ as they seem to have a selection of used machines. Another option would be to import a 441 class clone machine directly from China for probably about the same price as a good used machine would cost in the UK. kgg