.jpg.d60258221c476480a6e073a8805645bb.jpg)


nylonRigging
-
Posts
478 -
Joined
-
Last visited
Content Type
Profiles
Forums
Events
Blogs
Gallery
Store
Everything posted by nylonRigging
-
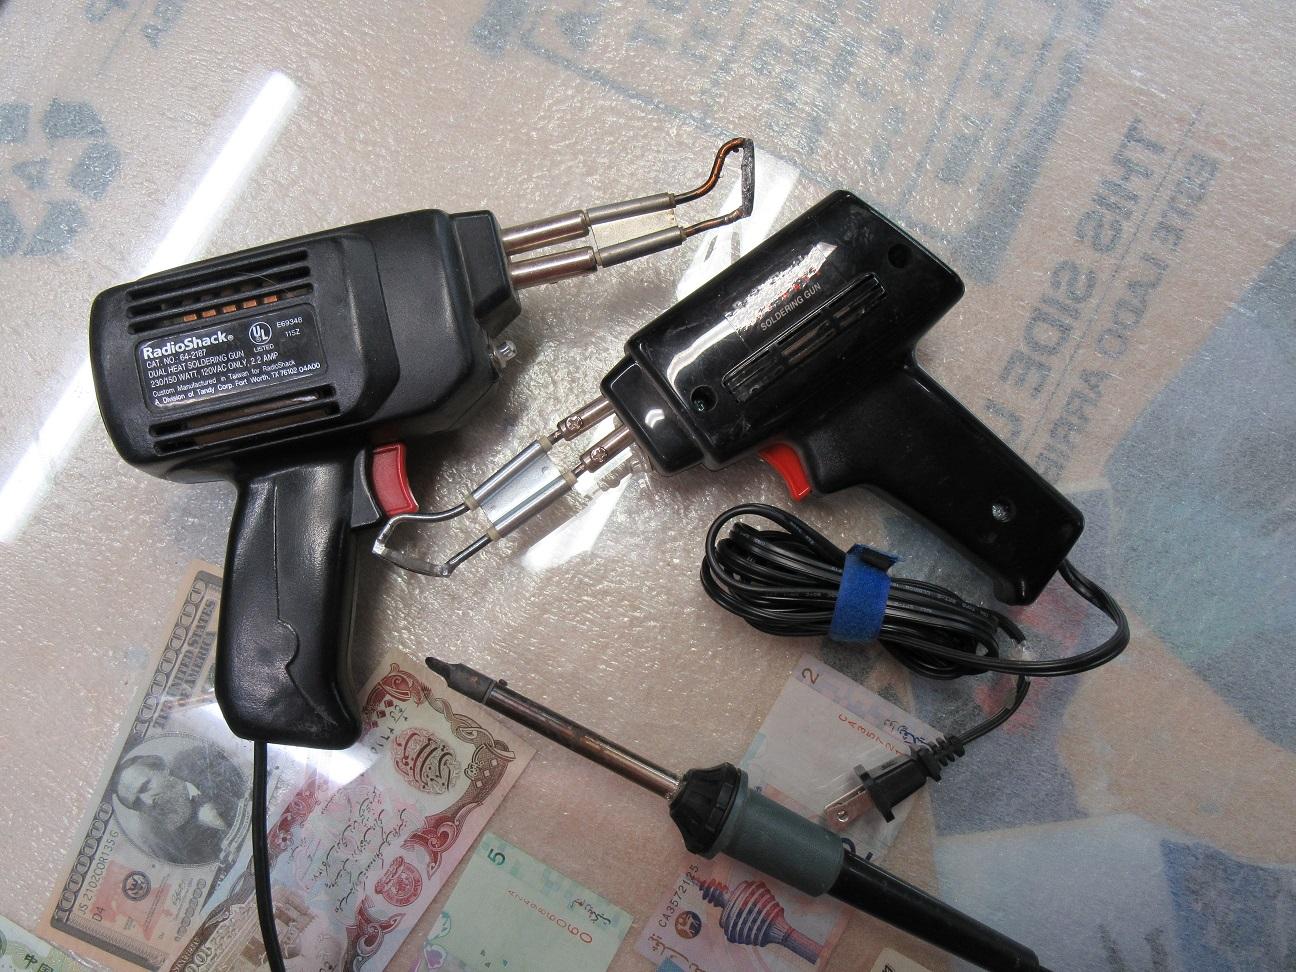
That will work great . All a Hot-knife is, is a glorified soldering iron . Until I bought production hot knives, all I used to do is just buy those Radio Shack 100 watt solder guns . Then put/fix a two-prong blade on it, in-place of the solder tips . The smaller watt Solder wands work great also for specific jobs . I cried the day they quit selling those radio shack solder guns with the 2 screws tightening on the end . . I still got a couple of them and one I never used & I always keep my eye's peeled at junk stores for those old 100 watt guns . - .

-
Nice fix to the tension and multi-height . Easy straight forward fix . Belts look good also . Sleeping, I love that feeling when my eye's blast open and the answer to a sew problem that I been haggling with all day just pop into my head . Sometimes the simple is hardest to see. .
-
Where to buy a New Sewing Table on the west coast??
nylonRigging replied to Stu10's topic in Leather Sewing Machines
what ( DrmCa ) . say's , there are tables with wiring switch off ebay or amazon ..etc . . I would concentrate on a 'plywood Lam. top' , over getting those cheaper pressboard top tables sold . Then just get a servo and put under it . wire it up and get it running .go over to ace hardware a get a belt ...etc . If you not all that handy with ( DIY ) from scratch , you better off ( pay more money) getting a hold of a shop/local Tech. around here that does repair and have them set one up. so all you have to do is drop your head in, put the belt on and and tun power On and sew . . -
- Fresh glue and spray adhesive is pretty obvious (common sense) a No Go . You can set anything on fire if you try hard enough or not paying attention . Flame and burning-off thread tails, cauterizing fraying edges is pretty everyday common practice and nothing to really worry about . Bic Lighters by every machine and keeping a good hot knife is good tools to have and learn . .
-
The Top belt drive pulley has sides, so belt rides in a Chanel, so it cant walk right or left . . On the belt not riding on the bottom drive pulley and walking off to side . The surface might be worn and making the belt walk off . ( best Guess ) .. surface wear/friction over years . Surfaces do not always wear-out even and flat . I have seen this before . As for the rest of questions, cant comment as I have never owned that model . .
-
- What ( trash treasure ) says .. with the machine strung-up so wrong, wakes one wonder if you have needle correct to the Bobbin assembly. Obvious you have tension problems from Pic's . Along with, You using a upper-end Thread size that this machine can handle . it will do #135 nicely, but it needs to be set-up right and proper to run it . but It obvious you not strung-up appropriately from your spool of thread, tension assembly and down to the needle itself . You stated in your 1st Post that ..." it was working when bought it ". . but not now, when you started sewing at home . ' But' , Was this machine actually already strung-up and sewing #135 when you bought it ? . before bringing home ? What Needle ? are you using . Are you using a 22 size/hole ? . is it a 135x5 ? . or 'even better' been change up to a 135x17 needle ? Do the throat plate and the feed dogs have a nice clean and large enough hole to accommodate your #135 thread with 22 needle ? Also is your 'Bobbin tension' with the larger 135 thread needs to be set-up proper . There is so much wrong with the pic's and your descriptions along with you not knowing what to do, you should probably use a person to actually use hands-on and set of eye's to string-up and setup to run larger Thread on the 111 . .
-
What's up with this thread I was given?
nylonRigging replied to williaty's topic in Leather Sewing Machines
excuse me for my misuse of the the word 'manufacture' , inplace of word importer . Also pardon me, I have nothing to bitch about sewing with different Threads bought from different vendors because I should have ordered Thread direct from Serafil or Amann in the first place . . -
What's up with this thread I was given?
nylonRigging replied to williaty's topic in Leather Sewing Machines
Precisely.. it is All Quality Control of material . It has to do with free market of course with price and profit . . Most of fabric and threads are manufactured overseas because they have FAR LESS EPA burden, regulatory control, Taxes and Labor cost than USA forcibly mandates . But it boils down to what the manufacture is willing to order and pass for acceptable quality of thread he is buying from the factory and going to sell to it's distributors, that gets sold retail sales to your or my machines . And I not saying ALL imports are crap that are coming in here and fall on my cutting table or Thread running threw the machines . But Manufacturing overseas at a better cost on the bottom-end . Should not release the burden from the manufacturer that is subcontracting the runs of Threads or other fabric materials from keeping good QC that falls on the end to it's customers . When I find a distributor that I see has good smooth running Thread coming to my door I am a loyal customer ...LOL . past few years I have really been struggling to source out better quality of materials I use in the shop and Facts don't lie that it is a real crapshoot sometimes buying Import runs . and 'especially Thread' because I not ordering a few rolls of a color . I ordering box's of one color . . -
What's up with this thread I was given?
nylonRigging replied to williaty's topic in Leather Sewing Machines
I think it all depends most on where your sourcing materials you sew with . Thread is biggest most important item, that most people overlook . It all your machine eats and it holds all your work together . And Crappy Thread can make the most perfect job look bad . Where does the Thread you buy, Come From ????? I would like to also throw out there, that maybe poor quality threads are Maybe ? Imports that your supplier is buying and selling . ( Poor Quality Control ) All threads are not equal, and I think a lot of Threads these days is just crappy manufacturing with poor quality control of Cheep Import manufacturing . I have experienced several 'Import' items over the years that are complete Crap when put up against US manufactured product . especially import Binding tapes, webbing, fabrics that are hideously out of spec. and poor weave . As well as most of the Cordura Copy import fabrics I find the Urethane PU spray backing is total crap and the Asian imports scrimp on the Chem. process there also . The Urethane finish on the backing of US manufactured rolls is far superior to the cheap imports . . -
What's up with this thread I was given?
nylonRigging replied to williaty's topic in Leather Sewing Machines
Ya, Black is usually the most stiff I find for color . Don't know if maybe the dye is heat-set, or it is just the mineral/Chem. used in that specific color ? I know commercial dyeing is 'Chemical science' and is really in depth knowledge of a trade with sourcing Mineral and Veg. properties of color . I am sure that all the different colors dye can show in the end process, a different finish to a weave or thread . - ( williaty ) : ..." I played with the red and black threads in my hands and they were a hell of a lot different. The black thread felt soft and supple like I'd expect bonded nylon to be ". It, your (black thread) might have been a manufactured 'soft finish ' thread . I have some that is soft finish and they do tension different from the other bonded nylons . I got some Silver-grey soft finish 69, that is the most different to tension from the rest . I buy one color of #69 Lb. nylon cones that I love and is a med. Tan/beaver, I have bought it from 2 different sources and it is rough as a cob compared to other colors . . -
I bet you did Not pick that up and carry by yourself to your truck ...LOL . Did you get a table set-up with it also ? or just the Head by itself ? Class 7's are a BadAss , ever see one sew through silver dollar ? .
-
Popular & Affordable Used Machines for making Bags?
nylonRigging replied to JC2019's topic in Leather Sewing Machines
I dont run a Juki 1181, but I do run Juki double needles . but I would not hesitate for second to run a du1181 for full-time setup, it is a sound machine . My daily workhorse is a consew walker and bernina 217 setup in 2 station that I jump on the most everyday, but I run 6 other stations with singers, artisan, mitsubishi . also a serger head put up on the shelf that comes in handy once in a while . I been through a LOT of machines but my personal sew workspace is tightly limited to right at 7 to 8 sew stations at one-time, with keeping 2 cutting tables and shelved material and fabrics ..etc . New & Used .. Keep in mind also that the Consew rb206 is a BIG seller for a everyday workhorse and have huge following for a good reason . I see them used all over the place, with a good buys popping up regularly . And new heads under 1-K and full table setups starting in around the 1200-$ range . Also what ( dikman ) say's . ( For good used ) buy, If you run into one, I would not hesitate to setup a used 111 or 211 Singer . They are still to this day a Great machine . I see them popup for sale around here in the NW area and I really not looking for one, and I sure you can catch them around your area down south in CA. if you keep your eyeout for them because they are out there in huge numbers still being used . . edit add: you also asked on the one Post about shipping a machine . ..." I am in northern california so I would need it shipped. I wonder which shipping carrier they use ". When you have anyone ship a machine to you from anywhere in the US, normally truck shipping will not deliver to a residence and only business, and the driver and truck don't normally have a forklift to remove a large package anyway. So what happens is that whoever the person shipping is using for there carrier . a machine will be trucked to a local carrier terminal that the carrier is associated with in your town or a town close by . Then you just drive over and sign for it and pick your machine up there . . -
Popular & Affordable Used Machines for making Bags?
nylonRigging replied to JC2019's topic in Leather Sewing Machines
( other good brands also ) but Juki is a good brand and they build off of common parent machine designs that are widely used world wide, so part are everywhere and reasonable price . also (rockyaussie) said that the small cylinder bed copies is a good choice also, and he is correct . It all just depends 'what you want to sew' when you start your purchase . ( IMHO ) .. I always recommend that a person buys on there 1st purchase a good everyday workhouse, and then build there other machine stations around it . Your daily workhorse is the machine most jump behind used everyday for doing your work . Your everyday workhorse choice besides have good selection of produced parts and a design machine that is not going away anytime soon . It also needs to have a good common produced selection of Presser Feet, of different size/shape available . Or at least a supply of reasonable price presser feet for you to cut and shape trim to your liking . . -
Popular & Affordable Used Machines for making Bags?
nylonRigging replied to JC2019's topic in Leather Sewing Machines
Your in CA. . don't know your exact Addy. And if you were to drive over and pickup yourself . but if you were to go ( new machine ) . and good everyday workhorse, walkfoot, with Juki parts reasonable and plentiful . Alberoni over in Anaheim, has ( Juki DU-1181 ) for 1150-$ . And that would keep your in your budget for buying a new machine about shipping cost, if you cant drive to pickup . for example last time I bought from them . shipping a new machine on truck ( farther than you would need ) , up I-5 N. to Portland OR. was right about 140-$ . . -
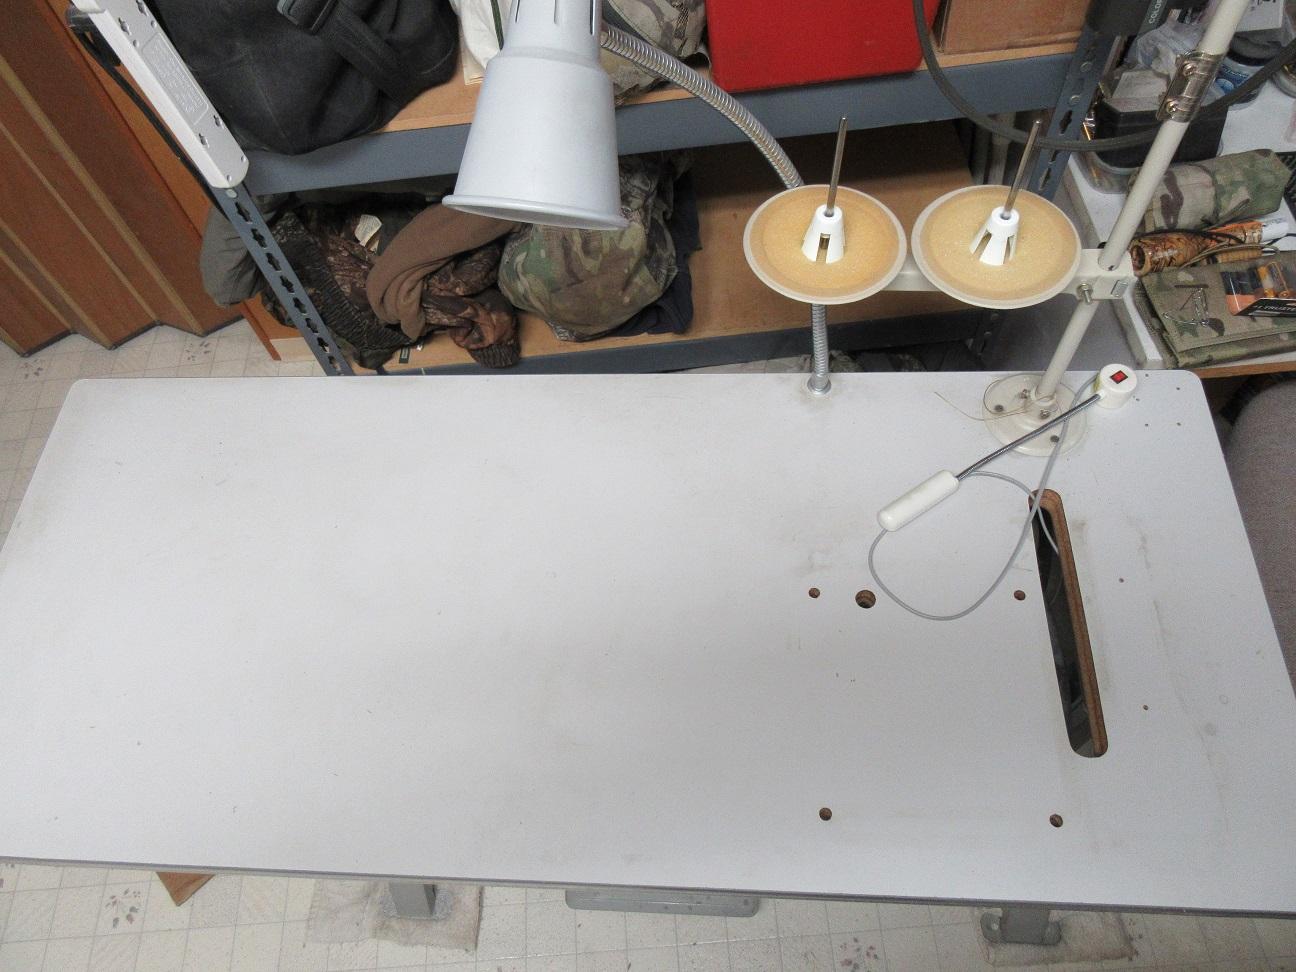
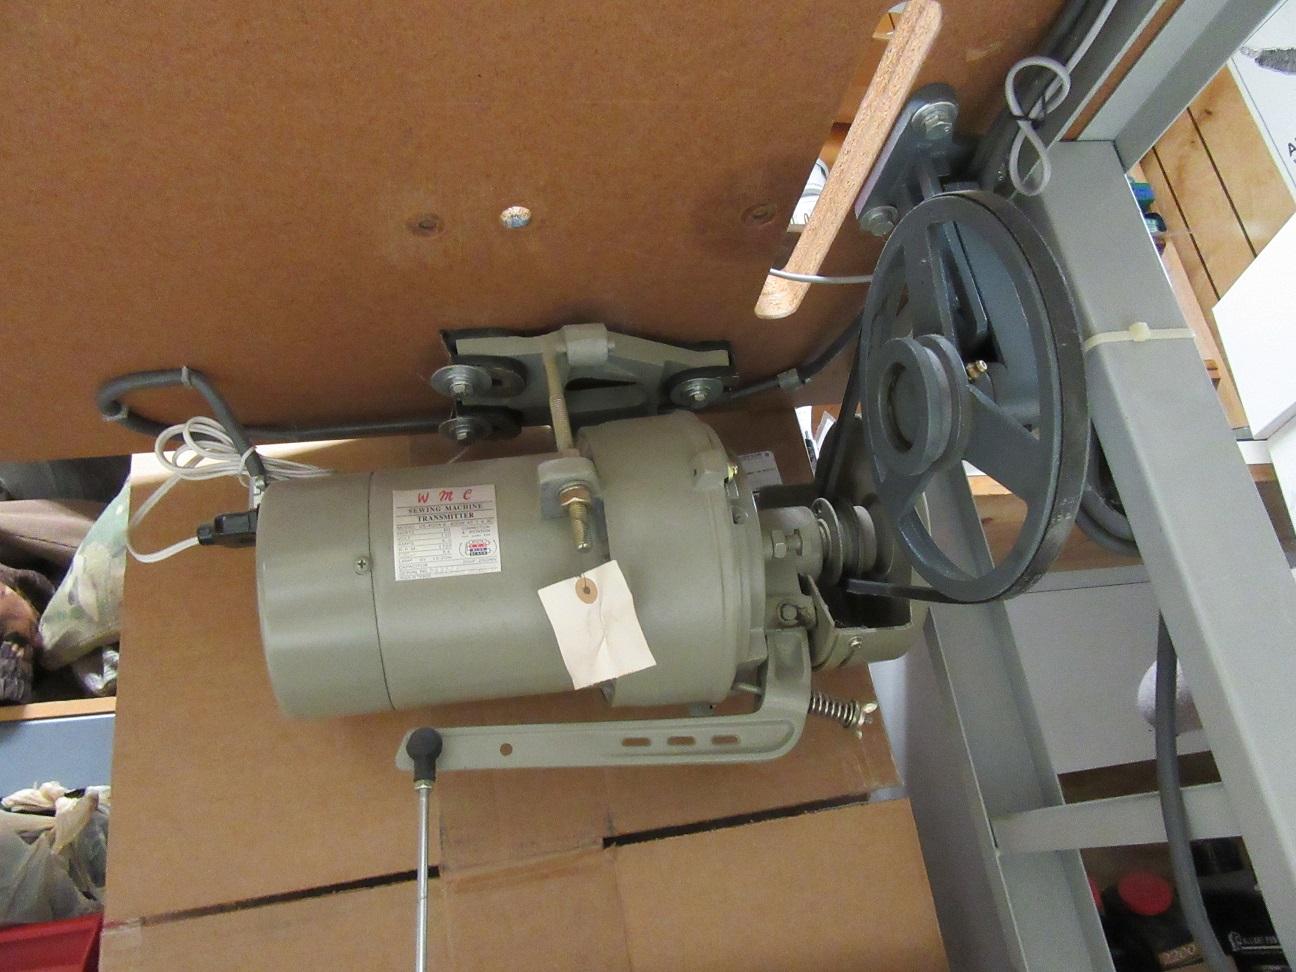
What wizcrafts say's . & That machine head one of the easier to assemble with the table . very common setup used world-wide , It just bolt down with 4-drilled holes, and you line the cut belt-slot for centering the belt to the motor pulley . There Nothing wrong with what you bought, it just you have to do a little wrenching to set it all up . You bypassed brick and mortar store and you not going to hell for it . But if this your 1st machine then that means you biting off a lot for your a learning curve . If this is your very 1st machine ? . it is pretty straight forward on the assembly nothing special . but If need help, and you don't have anyone who is mobile repair or has a shop, Try to find/search someone who works with industrial sew background by asking someone in you area who they use/call to come out when they get a kink in there machines . The head is probably 100% properly assembled and it will stitch . BUT.. You do want to start a machines life out with running the right wear patterns . When I buy any new machine, I always put a couple hours of run on it to feel it out good, Then I always have a professional come out and go over it . Throw him your materials you want that machine to handle and let him tweak and put his ego-eye on the timing and look it over . It the best investment and well worth flipping him an hour or two of labor he will charge you . . Here a quick pic. of similar old table I got sitting in back room without smaller cylinder head bolt on it . edit add: .. This old table has a 'speed reduce pulley set-up' , so just disregard that part your seeing coming off the pulley motor . Your table top, I hope has already been pre-drilled and has a belt-slot cut in it ? . but if not it still pretty easy and fast job . - -


-
The Nylons are just bad when you get down to the last 20% on the cones . but I don't know what else can be done ? , Big thread cord is not to bad, but small #69 nylon can get pretty Pig-tail in the bottom end of the rolls .I am sure the Thread manufactoring have done studies and even hold propritary knowledge on the science of making and twist and rolling miles of thread to Cones . Nylon is strong and high abrasion resisteance but bad part is it holds a ' thread Memory ' , it holds on to in the tail-end of the Rolls . It something that is still usable and you (live with) sew with it . But it is definitely Not as sweet on the bobbin and needle as when you throw on a brand new spool . Also.. all Threads are not created equal . 2 identicle thread may be the same as far as maunufactured same #size and material . But I find a big difference in the smoothness/difference of some, and you can feel the differences when pulling threw the tension disks . You can feel a tiny subtle grittyness with one, but another color and manufactures cone of same #size, will be smooth as butter . .
-
Thanks for taking the time to make that video . It gave me a lot to think about, will watch a couple more times to properly digest . Use threads #69 to 346, I use primarily 16oz. spools or larger bonded nylon . Always the 69 nylon can get pretty unruly when getting down to the last 1/4" on the cones . -
-
Double Row Hook and Awl Post Stitching Machine for Shoes
nylonRigging replied to JJN's topic in Leather Sewing Machines
- I am in this area just west of this machine for sale . I would love to just drive over there and pick it up . It is a cool piece of sew mechanics . but.. I just cant justify losing more space that it would take up . and don't know what Job I would use/need it for . Never seen or sewn on a Puritan . ( I think ? ) . it is a chain stitch on the bottom stitching ? , not Lockstitch machine . . -
Sewing Machine for Sewing Custom Sneakers
nylonRigging replied to JohnG305's topic in Leather Sewing Machines
- This Thread reminds me of something someone said to me about 30 years ago on my sewing . I was pretty green, My work and design was mechanically sound, but the 'aesthetics' of my stitching was lacking ..LOL . So, I was pretty proud of the 1st item I sewn, and i took it someone who was well schooled in making the same type item that I just designed and sewn up . She looked at me and said, ..." Well.. I have seen worse work, out of better people ". . -
Forward great , Reverse always sloppy .
nylonRigging replied to nylonRigging's topic in Leather Sewing Machines
update for future reference, anyone with similar ( top-thread tension problems with 'only running Reverse' ) . It does look much better now running in reverse . removing and replacing the thread guide pin, with one with a small tension spring/disks . Then taking out the heavy coil spring out the main tension assembly and putting in a little softer coil tension spring . I don't know why ? , but Spreading out the tension to both a Pin-guide and main tension assembly , rather than giving the entire burden to the main tension spring/disk assembly . Seems to tighten all of the loose stitching problem up when running in Reverse . . -
Forward great , Reverse always sloppy .
nylonRigging replied to nylonRigging's topic in Leather Sewing Machines
I using #20 on the x17 . with bonded nylon . I do change needles regularly also . I don't sew a lot fast long runs most days so I usually keep the RPM's down on my machines . but I did try slow and fast with the speed and also I tried some thinner lighter denier fabric with using Reverse . This got to be some kind of weird tension problem on the top needle thread . Got to be something easy fix, but just hard for me to see . I ordered a new tension assembly yesterday . And when get a few minutes tomorrow . I am going to pull the thread tension assembly off and pull apart and go threw it . Going to replace the Thread Guide Pip on top the machine with one that also has a small tension disks on it . Maybe spreading/smoothing out the tension , then use a lighter Coil Spring reduce some off the main Tension assembly . -- -- I not had this Head but about 6 months . And it a project almost done . This Tension sewing Reverse problem is one of the last bugs to work out . Normally I would not own this model of machine . But it was one of those 'oddities ' you run across once in while looking around, so I picked it up .The Head is older , probably 80's production . but is pretty nice clean shape . It set-up on new table and new motor, and made a new drip pan . Added a Press-foot lift lever on backside for table foot pedal . added feed Dogs, throat plate and presser foot . OK this is 'the thing' . It is a Mitsubishi head, ( DB170 ) with factory cast stamp underside of machine . But It NOT the normal model everyone familiar with . That is why it a project . Was is a custom run ordered and branded 'Nustyle' , and was ordered from Mitsubishi cast to a 16" long-arm, with 7" of table clearance . That why it caught my eye and bought it . ( Nustyle ) It was marketed as a 'Quilting machine ' , and had a frame setup screwed to the Head for 'free motion' . . BUT now .. Wham Bam.. it sitting on a flat table looking like a real sew machine . Hopefully It will turn this thing into a good daily stitch workhorse . Just got to smooth this thing out and make the switch to punching nylons . . -
I been playing Inspector Clouseau off and on for past few days, and I am finally stumped . It Sunday and I got few minutes, so I will throw this out there . I have a machine that sews great in forward stitch . Timing looks GTG . tore into and checked timing twice . Is a simple design, drop-feed . Mitsubishi DB170 . using E-69 nylon , and 135x17 needle . ( sewing Forward ) . Sews and looks great threw 2 to 5 pieces 1000 Den. cordura . Stitching always Looks good top and bottom of material sewn . When I turn stitch length select knob to 'zero' . The needle in in a stationary position on the plunge . Using stitch length select knob, it sews great threw all stitch lengths . Turning the stitch select knob , All stitch move narrow to wide with sewing . So that all looks/checks out great . sews great all day ....But pushing the Reverse handle down .. ( sewing Reverse ) . OK.. Bottom of material, the ' bobbin thread side always looks great ' . But ( top of material ) , the top stitch is always loose and never tensions right . I used different bobbin tension . I put on a fresh set of Dogs . changed thread . It not catching/tearing thread . It is just sloppy loose and I cant get the top thread' to tension in Reverse . Anyone have an Idea what I am missing ? . I got to be something stupid simple that I am just not seeing ? ...thanks .
-
What is the 'Blue' ??? .. did someone put silicon adhesive to that case spring ? Most times I will just run without on 'pop-out' Vert. bobbins . but I pretty religious about using them under the bobbins for flat Horizontal . They a PIA once in while on pop-in bobbin cases . also popping out once while if you drop your bobbin case on hard floor . hate crawling around and trying to locate when in hell it ended-up landing ...LOL .
-
SEIKO - What kind of sewing machine is this?
nylonRigging replied to Seom's topic in Leather Sewing Machines
Good eye, on some blurry Pic's . . Ya, if Needle feed, It will be good Head to get . Needs to bolt it down and roll some stitches with hand wheel to see it sews good . Find out why? It Not table mounted and laying around solo . Then offer Low-Ball price and take it home ...LOL . -
SEIKO - What kind of sewing machine is this?
nylonRigging replied to Seom's topic in Leather Sewing Machines
Is it just a Drop Feed ? ( bottom feed-dog only ) ? . with just stitch length/reverse lever on the R-side . It does look like there was a model/plate missing there under the stitch length knob . looks like some discolor where it was till removed, or knocked off . It should have had another small plate riveted on saying where made ? . 'made japan' or 'made china' . but I think that Seiko is Jap. machine. But , If can't find any model plate or anything ??? it might have a factory 'cast stamp' or something more under bottom side of the head if you look . If just Drop feed . I would not choose it to sew Leather with as my 1st choice . ( bottom feed ) , it actually sewed really good for heavy Webbing/fabric . It sewed #277 thread great, and up to #346 only satisfactory . About 1/2" high material is the limit for Needle . It only takes 15 minutes to take down the bobbin assembly and look at the race, Hook, Bobbin ...etc . and put back together. If were me looking to buy .. I would Sew on it and bring a some webbing and throw under the foot and see how the Hook and assembly treating the stitching . -- Looks just like a old ( China made ) 'Mercury' branded Head I had years ago that was just a bottom feed . And they made that Machine Head copied/branded under a mountain Pile of different cover names . The "made in China" heads were just disposables . 'china made' , Run them till sloppy and get rid of . .