Search the Community
Showing results for tags 'hand made'.
-
My wife has a very nice Husqvarna sewing machine. It is in the attic and I have recently become handicapped and the attic is another one of those challenging places for me. Does anyone know if the better sewing machines by this manufacturer would have capabilities to work with light leather? I assume I would need special leather needles at the most minimal of standards and, of course, it may not even be possible. If I wanted to proceed by hand, what would be a good starter basic list of items to experiment? Any tips would be most appreciated. Regards, R. Craig
-
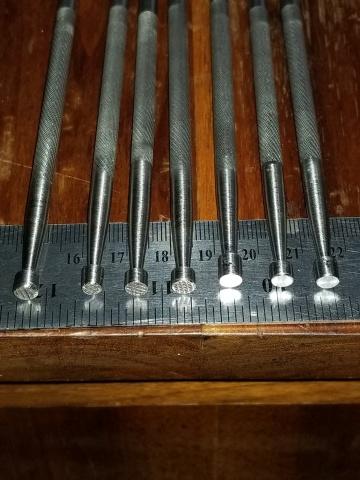
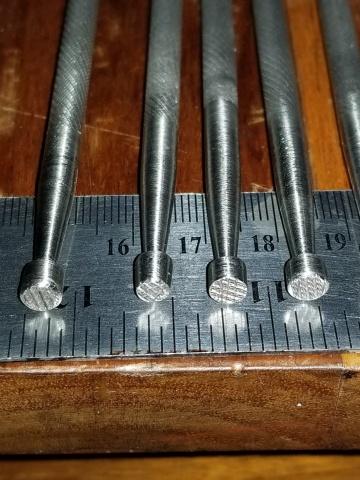
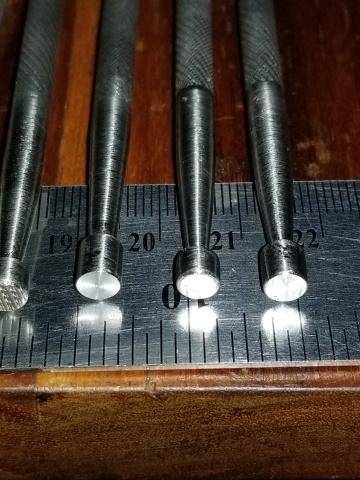
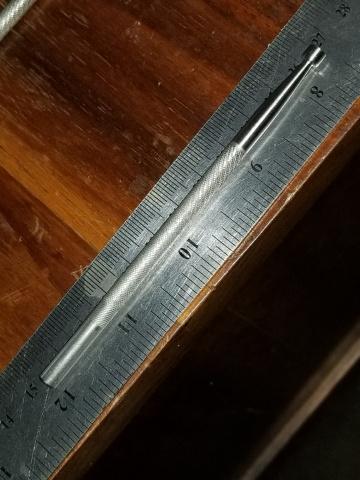
Ok so I'm hard headed and know what I need for my style of carving after looking around and asking here I decided to make some mini stamps these will be modeled after some that I've seen but they will suit my needs plus I made them so no one to blame but me if they don't come out right. Here they are feel free to ask any questions. Here's some details 1. They are 3/16 inch diameter 304 SS rod. 2. The knurling was a little bit of a PITA. So I had some help. 4. The checkered backgrounders were done on a file, all me. 5. I plan on shaping all on a powered diamond hone. The 3 with no checking will be 1 beveler possibly 2 pear shaders. They are all the same length relatively +/- 1/8 inch.
-
Hi all, I will start this topic cause almost all the links in my old post here got broken. Sorry for that, I probably do have some fault in that but still don't know how that happened. Also I want to say I am sorry I just had no time to post here more often. Had some big orders this year and still I am trying to catch up with it all. I am also expanding my workshop and opening additional arts and crafts studio. It should have been done at March but the workshop is constantly busy so I am forced to delay the whole thing couple more weeks. Will post some pics as soon as I do move... Ok, and here are some pics of my work... Btw. all of you that have seen them do not hate me please, I just want to have a topic here with no broken links and 8 pages of nothing... Thanx for understanding Big size side bags - based on WW2 side bags from some old BMW motorcycle, or so I have been told... I did promise to make more videos and I will, as soon as get my workshop in shape... Here is a short one you have already seen... https://www.youtube.com/watch?v=SuWgs5ud4Mk&feature=youtu.be
- 34 replies
-
- silkfatblues
- croatia
-
(and 5 more)
Tagged with:
-
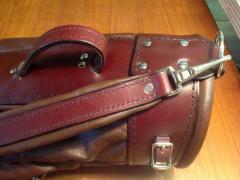
This is a leather golf bag I recently finished making. The majority of the bag is made from Connolly leather with foam and cotton duck lining. Those panels were all sewn together using an able 290 patcher hand cranked sewing machine. The shoulder strap, handle and some of the other parts were hand sewn using two needles. The top and bottom collars were hand sewn with a speedy stitcher due to having to sew through thick leather with the padded panels inside. The golf bag took about a month all up including planning and making it. It would have taken a lot less time if it had been made on a singer k6 or similar. The base was wet formed over the base of a saucepan. The Zips were standard jacket zips. The strap and handle were made using the techniques detailed in the book The art of making leather cases volume 3.
- 9 replies
-
- leather golf bag
- hand made
-
(and 1 more)
Tagged with:
-
Hello! Let me present to you my third work. My first work were these boots http://leatherworker...showtopic=45616, design Merrell Chameleon Wrap, and the second, running shoes, design Garmont Escape PRO 9.81, on photo bellow. And here shoes numbered 3, with my own design and own logo, which will be discussed here and manufacturing technology, which I would like to share with you. The first thing I began with - design, available materials and furniture. Despite all this, you can correct design subsequently as I did. I began the design with a clean sheet of paper. Sketched a few pictures I settled on this design, considering the design features and attachment parts sequence - this is important , otherwise it will be impossible to attach it properly. It is also important to think about where and how will shape the bend. To improve inflection, I used an extra pair of belt loops on the shoe vamp. Here demonstrated only one of many possible designs of shoes, the rest depends on your imagination. http://i-fotki.info/...031277.jpg.html "By approving the project" could begin. Put all materials on shoe last (except upper material) in the right amount and manner as they would be in the finished shoe. It is necessary to put a thickness of insole and middle sole. For further winding of shoe last, use masking tape 20-25mm wide, wider is not recommended. Masking tape should stick well, but not to be wax outside, otherwise it will be bad stick and when removing the shell it can lose shape. http://i-fotki.info/...031431.jpg.html http://i-fotki.info/...031468.jpg.html http://i-fotki.info/...031491.jpg.html Glue tape needs with a little overlap, preferably without wrinkling. After sticking enough thickness of tape, insert shoe last in the outer sole and outlines the level to the visible part, below which all will hide. http://i-fotki.info/...031619.jpg.html http://i-fotki.info/...031648.jpg.html We should also mark the axial lines, front and rear. Now we can begin to design. Draw is best with conventional ballpoint pen, using gentle pressure and instead of the eraser, use pieces of masking tape. Underway, you can change the design somewhat, if in dimension will not like something. Since the right and left side is not quite the same, move all lines using vellum, for example, you will not succeed. Help you centerlines and tailor measuring tape. After completion, you must draw harder all the necessary lines, to avoid confusion. http://i-fotki.info/...031709.jpg.html http://i-fotki.info/...031815.jpg.html http://i-fotki.info/...031845.jpg.html Using sharp knife, making slit at axial lines and lower edge, to divide into two parts. By dividing, cut along the contour, including the toe cup as the most convex part. Parts became more flat, but they still can not be cut, they must be glued on thick paperboard, while leveling and cropping. More detailed process describes here http://www.youtube.c... for shoes&sm=3 http://i-fotki.info/...032008.jpg.html http://i-fotki.info/...032046.jpg.html Now is necessary to make slits on lines for creating patterns. http://i-fotki.info/...032207.jpg.html http://i-fotki.info/...032235.jpg.html Creating patterns is most responsible for connection all parts. Using the main patterns make all external parts. It is necessary to consider all overlaps, overmeasure and mark centerlines. You should also specify the right and left sides, as well as the front to each side. http://i-fotki.info/...032285.jpg.html http://i-fotki.info/...032313.jpg.html http://i-fotki.info/...032340.jpg.html After making all patterns, you can begin to cut material. Also note, if were made some amendments to the upper, it is necessarily to make them on patterns. http://i-fotki.info/...032387.jpg.html I have a regular sewing machine (Singer copy), therefore the manufacturing technology reminds classic shoes, where is no need of a post sewing machine. I made some improvements for greater sewing accuracy and larger thickness. I replaced original hand driven mechanism and attached own lever directly on the wheel. Instead of three stitches per one revolution, now it makes one (used for hand sewing of large thickness). Undergone revision and presser foot, making it narrower and shorter, increased downforce, improved visibility and accuracy. Needle used conventional 110, although it is better to use reinforced for leather, thread polyester 40. http://i-fotki.info/...032557.jpg.html http://i-fotki.info/...032583.jpg.html http://i-fotki.info/...032604.jpg.html Before sewing, machine needs to be adjusted for a specific material thickness and test on a separate piece. My primary material is haberdashery suede 1-1.2 mm thick. http://i-fotki.info/...032654.jpg.html Should start with the basic parts, on which is necessary to mark those details, which will be sewn first. Because of the sliding effect and high downforce of the presser foot, one material slides relative to another, I found a simple solution for this problem, parts before sewing, I gluing together after what, concentrating on precision stitching. http://i-fotki.info/...032713.jpg.html Since suede is not for footwear, however, it is strong enough, to provide proper rigidity of some parts I’m using 1mm thick cotton fabric. http://i-fotki.info/...032779.jpg.html http://i-fotki.info/...032806.jpg.html Having measured braid using patterns, glue and sew them, then you can sew the side part. Do the same with the second half and then sew together both parts. Stitch on these parts is 2.5-3mm. http://i-fotki.info/...032978.jpg.html http://i-fotki.info/...033039.jpg.html After receiving a single piece (upper), it’s ready to make a heel cap. Since I did not have a proper shoe last (proper shoe last on pictured below), I made a separate billet for forming the heel, but with a normal shoe last is done directly on it. Cut two pieces of cotton fabric, stretching and gluing together with SAR 306. When dried, transfer lines with pattern and cut. http://i-fotki.info/...033091.jpg.html http://i-fotki.info/...033129.jpg.html http://i-fotki.info/...033381.jpg.html http://i-fotki.info/...033431.jpg.html http://i-fotki.info/...033457.jpg.html http://i-fotki.info/...033479.jpg.html Then glue it on heel in folded position on shoe last and sew it with stitch 2.5-3mm. http://i-fotki.info/...033535.jpg.html http://i-fotki.info/...033559.jpg.html http://i-fotki.info/...033593.jpg.html http://i-fotki.info/...033616.jpg.html Now you can begin with layer over the heel of polyurethane foam and lining. There are no patterns for these parts, so lay out on the shoe last, blank sheet of paper, draw around the top and cut. There no corrections for polyurethane foam, but lining must be recalculated - 1mm suede + 3mm polyurethane foam + 3mm wool interlayer + 4mm lining allowance = minimum 11mm total must be added to the upper contour, on which will be sewn lining. This is necessary to ensure that all will twist neat. http://i-fotki.info/...033673.jpg.html http://i-fotki.info/...033705.jpg.html http://i-fotki.info/...033735.jpg.html Sew need right by the polyurethane foam, for smooth edge, stitch 1.8-2mm. For insulation using natural wool, material thickness about 3 mm, the same material used on the first boots. Gluing with SAR 446, applying thin layer on wool and suede. The photo shows masking tape, 5-8 mm to the edge, where wool layer will be needed to cut. http://i-fotki.info/...033796.jpg.html http://i-fotki.info/...033827.jpg.html Then gluing lining with SAR 446, also applying thin layer. http://i-fotki.info/...033883.jpg.html http://i-fotki.info/...033921.jpg.html All excess need to be cut and sewn, on that edge, where the masking tape was. At this stage, the shoe begins to appear. As can be seen on the photo, it keeps form well, but the final forming will be at the very end. http://i-fotki.info/...033977.jpg.html When the upper is ready, next part you need to continue - tongue. There also no patterns, but you can estimate the length using upper, the width of the tongue I took from my sport shoes - 100mm. Gap width in the shoe vamp is 40mm, respectively adding 6mm allowance, will be enough for sewing. On a sheet of paper draw everything and make pattern, cut the mesh and lining without any overmeasure. Put some polyurethane foam (about 3mm) on the tongues top (for thickness and strength) and sew together mesh with lining face to face. Then glue mesh with wool layer and extroversion. http://i-fotki.info/...034032.jpg.html http://i-fotki.info/...034054.jpg.html http://i-fotki.info/...034191.jpg.html http://i-fotki.info/...034218.jpg.html http://i-fotki.info/...034262.jpg.html http://i-fotki.info/...034286.jpg.html Cut a piece of suede, glue and sew. Mark the braid and sew. http://i-fotki.info/...034383.jpg.html http://i-fotki.info/...034406.jpg.html http://i-fotki.info/...034426.jpg.html Connect together tongue and upper with clearance 40mm using SAR 446 and then sew together stitch to stitch. Mark border of the toe cap on upper and glue with SAR 446 along the edge, as well as toe cap, connect and sew, stitch is 2.5-3mm. http://i-fotki.info/...034718.jpg.html http://i-fotki.info/...034749.jpg.html http://i-fotki.info/...034859.jpg.html http://i-fotki.info/...034891.jpg.html http://i-fotki.info/...034918.jpg.html http://i-fotki.info/...034939.jpg.html Now put the upper on the shoe last, I leave allowance in 20mm for bend under the shoe last, only for upper, side parts, heel and toe cup should be in the slice with the bottom. After toke the upper, cut out the toe reinforcement from cotton fabric, glue with SAR 306, tighten in place. Once again, make sure that upper is in the right position, remove the staples and glue. Cut off all suede relief and glue suede center part. When it's all ready, it's time to form the shoe. We need to warm all shoe parts, that has inside cotton fabric and tap with a hammer, to complete forming. After that, shoe will keep the shape for a along time. http://i-fotki.info/...035595.jpg.html http://i-fotki.info/...035647.jpg.html http://i-fotki.info/...035683.jpg.html http://i-fotki.info/...035713.jpg.html http://i-fotki.info/...035741.jpg.html http://i-fotki.info/...035767.jpg.html Basically shoe are ready for gluing outer sole, but I would like to stamp on it own logo. To do this, take a picture of the shoe from the side, where logo will be, open the vector program Corel Draw, import photo, create a logo in scale and print on plain paper. Take sticky film Oracal, and cut out the logo with sharp knife, slot only to the film substrate. Unstick from the film unnecessary parts and glue masking tape over all parts. Cut and stick the logo in its place. Carefully remove the masking tape, leaving all separate pieces in place. Glue around with masking tape to avoid smudge of shoe. Preparation is completed and we are ready for rubber coating. As rubber coating I’m using SAR 306 and 30-40% of aluminum powder (for metallic effect). Using brush, apply thin layer and let it dry for a couple of hours. With precision knife cut glue on film edges for smoothness of the logo edges without rips. Due to a thin layer of coating it obtained fairly resistant to damage. http://i-fotki.info/...035832.jpg.html http://i-fotki.info/...035873.jpg.html http://i-fotki.info/...035901.jpg.html http://i-fotki.info/...035924.jpg.html http://i-fotki.info/...035950.jpg.html http://i-fotki.info/...035974.jpg.html http://i-fotki.info/...035995.jpg.html http://i-fotki.info/...036020.jpg.html http://i-fotki.info/...036039.jpg.html http://i-fotki.info/...036068.jpg.html http://i-fotki.info/...036089.jpg.html Finishing stage, gluing the outer sole. Left the upper on shoe last and insert it in outer sole, outline with pen about 1mm below the level of the outer sole. Apply SAR 306 on surface, coat over line and let it dry. The outer sole is made from thermoplastic and I need degrease it with special composition Satreat and only then glue it. When the glue dries, it does not stick at all, conversely it's slides. Insert shoe in the outer sole, heat bottom side with hairdryer and press for a few seconds. Then you can easy heat side parts and tap with hammer. By this way it’s easy to make clean connection between upper and outer sole. http://i-fotki.info/...036284.jpg.html http://i-fotki.info/...036312.jpg.html After a few hours, you can remove shoe from the shoe last. It remains only to make insole. For insole I am using - 2mm thick polyurethane foam, 3mm wool interlayer and 3mm lining. http://i-fotki.info/...036371.jpg.html Glue the insole on its place and do all the same with the second shoe and enjoy your work. When placing this article on other sites link to this forum is required. Sorry for not exact terminology and not perfect english. Good luck!
- 15 replies
-
From the album: My Work
© 2014 The Old Rock House Sewing Co.
-
Hi. My name is Samuel and i am a Leather smith going on 20 years. i have been working leather as an apprentice since the age of 8 and as i grew so did my love for leather work. i have started my own leather crafting buisness and need help. i figured i would run a kickstater and try and get crowd funded. i have made a kickstyarter and took it live yesterday the 8th of august. i figured i woudl turn to the leather community to help spread the word... please copy and paste this link into your facebook, just that little shout out could be the diffrence between not getting funded and making it. if you have some time and wanna check it out please do there is a small 2 minute video of me making a wallet. thnak you for all the help and comemts that will come https://www.kickstarter.com/projects/529482776/slims-wallets-light-sleek-and-functional thats the ling. -Sam <iframe width="480" height="360" src="https://www.kickstarter.com/projects/529482776/slims-wallets-light-sleek-and-functional/widget/video.html" frameborder="0" scrolling="no"> </iframe> <iframe frameborder="0" height="420" scrolling="no" src="https://www.kickstarter.com/projects/529482776/slims-wallets-light-sleek-and-functional/widget/card.html?v=2" width="220"></iframe>
- 17 replies
-
- kickstarter
- small buisness
-
(and 4 more)
Tagged with:
-
hey guys and gals, so im just about ready to buy some leather from tandy leather but i've one problem ..... im a beginner ! and i've really not much knowledge about which leather to buy ! im thinking 3 oz .. would that be right ? and what type of leather ? i guess tanned cow hide ? PLEASE HELP !
-
Greetings to everybody! Here i want to show some little expirience about creating boots. This is my first shoes i ever made. I very much like older version of Merrell shoes like chameleon series, which in production no more and i thought why not to make them by myself. It was interesting job that i done. Everybody are welcome to watch result on youtube.If you have some questions, i will answer with pleasure. to be continuum......
-
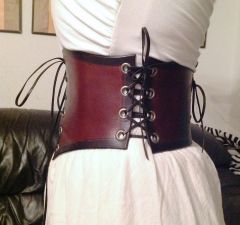
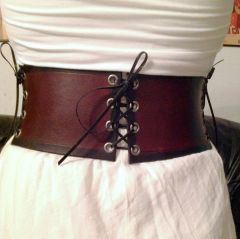
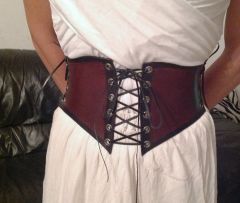
This waist cincher is my first official leather project! The stock is 5/6 ounce single shoulder from Springfield Leather. Dye is two tone black and mahogany Fiebing's oil-based dye, and finished with Fiebing's Acrylic Resolene. Edges slicked down with a bit of gum tragacanth and water. Back slicked down by Fiebing's tan kote. 1/4 inch antique nickel plate eyelets from Tandy, and black kangaroo lace from Springfield Leather.
-
From the album: Waist Cincher
My beautiful girlfriend Jenny poses with the waist cincher. 5/6 oz. single shoulder from Springfield Leather Company. Oil-based Fiebing's dye two tone in black and mahogany. 1/4 in. antique nickel eyelets and black kangaroo lace.© Made by Jonathan Doan
-
-
From the album: Waist Cincher
Back view of the waist cincher. Two identical panels.© Made by Jonathan Doan
-
From the album: Waist Cincher
Front view of the waist cincher. Two mirrored panels with compound curves.© Made by Jonathan Doan
-

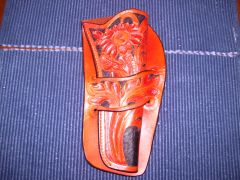
Hand carved Mexican Loop holster For Ruger Single Six
prc77ro posted a gallery image in Gallery- Our Leatherwork
From the album: Carved Mexican Loop Holster
-
- mexican loop
- hand carved
-
(and 5 more)
Tagged with:
-
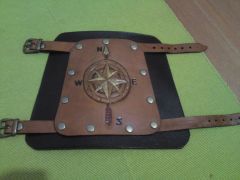
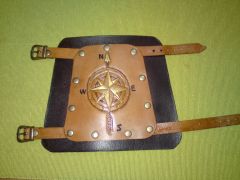
From the album: archery arm guards
-
From the album: archery arm guards
-
Greetings to everybody! Here i want to show some little expirience about creating boots. This is my first shoes i ever made. I very much like older version of Merrell shoes like chameleon series, which in production no more and i thought why not to make them by myself. It was interesting job that i done. Everybody are welcome to watch result on youtube.If you have some questions, i will answer with pleasure.


