All Activity
- Past hour
-
 Comes with c-60m cnc servo controller
 - Today
-
 Thanks a million for all the suggestions. It seems I have a lot of work to do in the dye dept.
 -

New Way to Measure and Visualize Hook Timing
AlZilla replied to friquant's topic in Leather Sewing Machines
Where is that "Like" button? Thinking about it, a person could do this on any machine they work on regularly, just set an easily seen mark on the bed of the machine. Thank you for that. -

New Way to Measure and Visualize Hook Timing
CowboyBob replied to friquant's topic in Leather Sewing Machines
The easiest way to check the hook timing on this type of machine is if you drew an imaginary line from the center of the bobbncase to the center of the front needleplate screw the point of the hook should be directly under it when the needlebar is all the way down. -
Grab theneedlebar & push it front to back to check for play,make sure the hook tip is good & that the bobbincase isn't too loose.Then some samples of what you want to sew along with some thread ( in case they don't have any) & see if it will sew your material ok.These are great machines just keep it oiled good & all the parts are still available.
-
I’ve been reading a great deal of posts here and gathered a lot of information from you all. I have a singer 16-188 that I have been using and I am going to look at a 111w155 on Saturday. Do you have any pointers I should examine while checking out the machine? I am pretty technical but never had my hands on one of these. thanks
-

Adler 205-370 - help an old man who screwed up
councilman24 replied to councilman24's topic in Leather Sewing Machines
I just figured out the trick to get the inner race in. I couldn't get it in with the springs in place. But you can with the springs out. Then you can turn the race to match the half circle cut outs in the surrounding structure with the half cir le cutouts on the race. Insert the spring. A needle helps with line up. Then turn handwheel to allow race to turn and line up another spring. Got all four in, lined up race cutouts for for door assembly bolt, and then pressed in and locked ba k with ser screw. In photo you an see one spring in and hole lined up for another. This is the kind of trick that can save hours. And obviously was intended with half cutaways in stationary out side rim. I was trying to figure out why those cutout were tpmhere. That's what led to figuring out how to do it.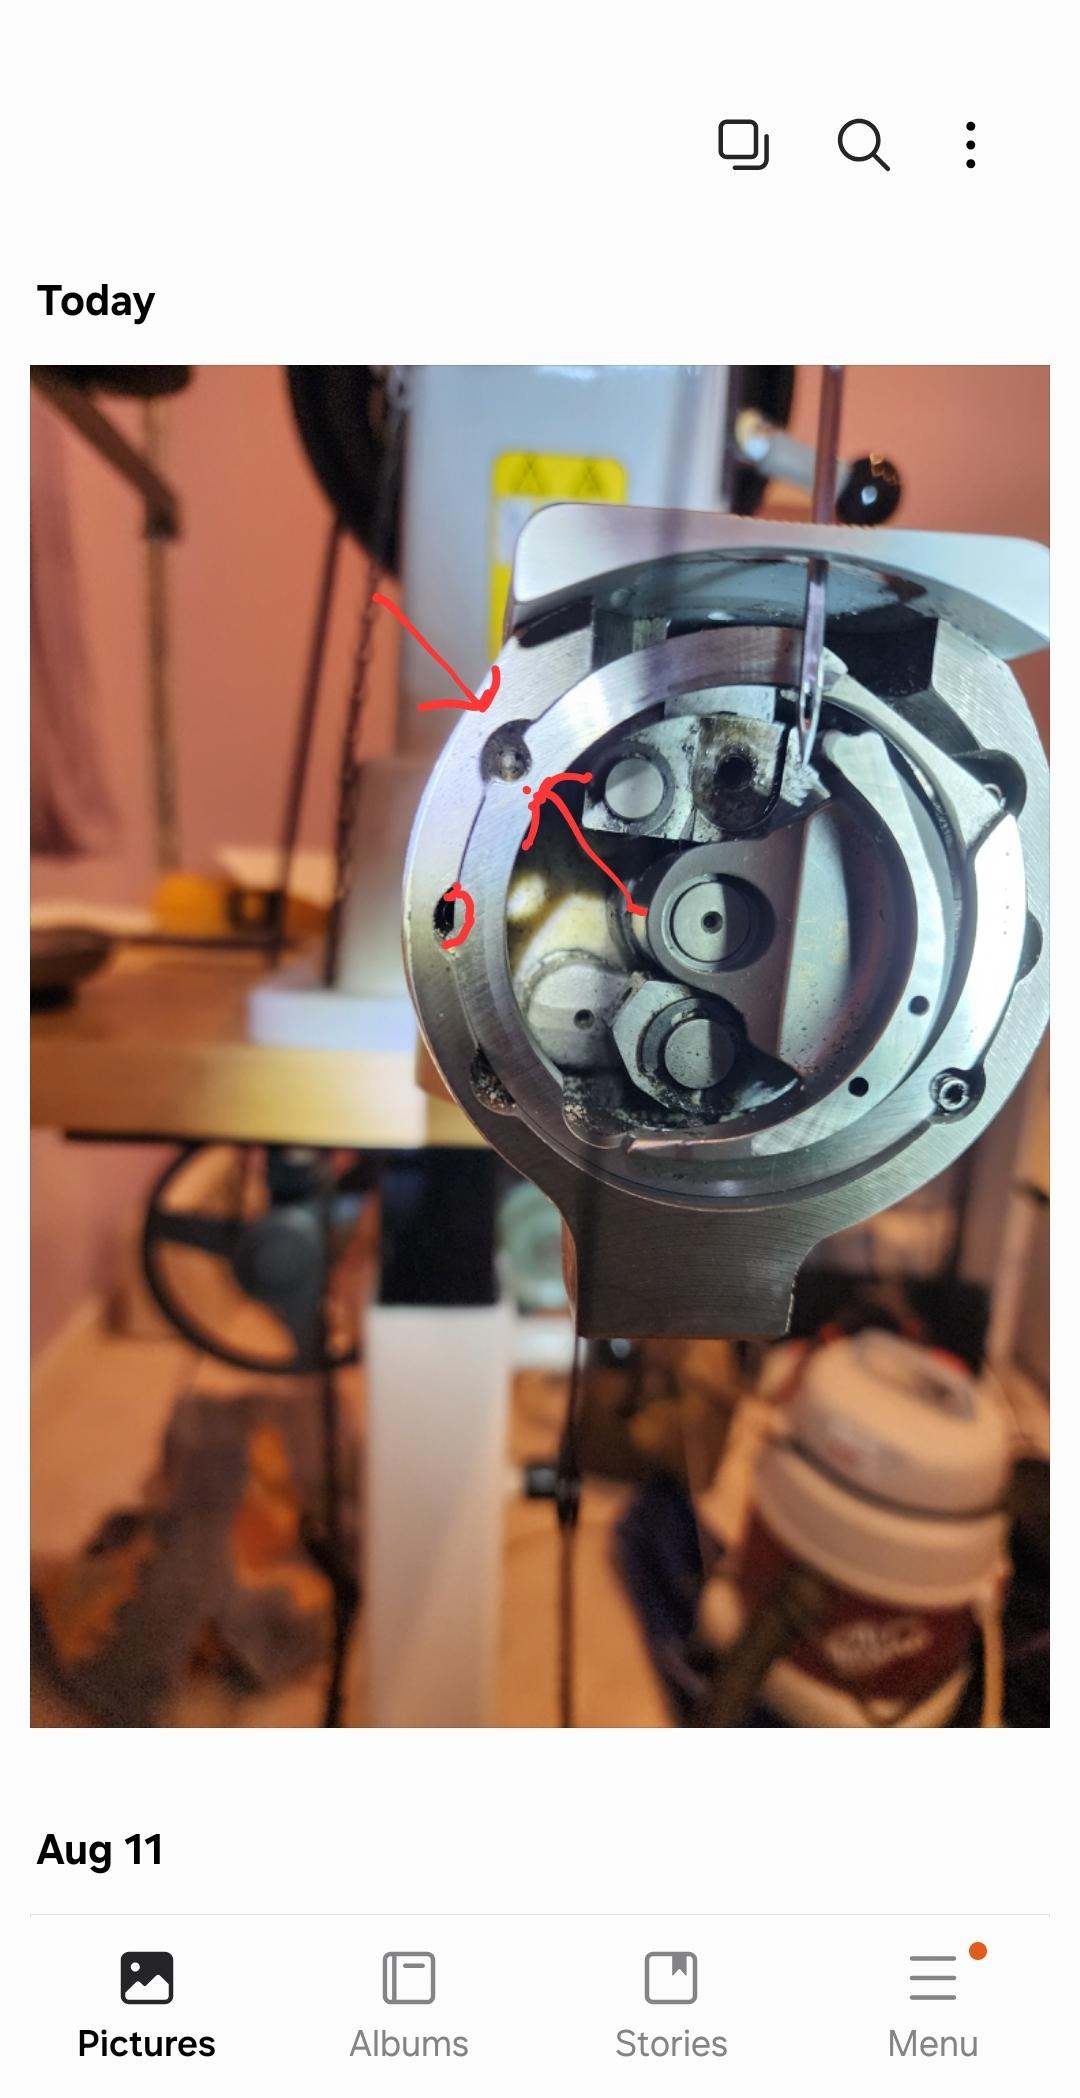
-
Taking last first I've had aluminium corrosion being blue away from any contact with leather. When #1 son was younger he shaved his head. At one medieval history event he wore an aluminium chainmaille coif. (coif = head covering) It was a very hot day. He perspired a lot. When he took the coif off his head was covered in a pattern of blue circles. He told others that he was an ancient Briton! (who used to paint blue patterns on their bodies) I used brass washers as I didn't want to use steel. For that will give an electrolytic reaction*. And I didn't have aluminium The leather straps were un-dyed veg tan As far as I can remember the rivets diameter was less that 1/4 inch. Maybe 3/16" or 5/32" If I can find them I could measure. I was given about 2000 of them. Gave loads away for model steam engine building and used about 50 * in motor vehicle building we put a layer of sponge rubber between the steel frame and the aluminium body work otherwise if both were in contact during corrosion the aluminium acts as a sacrificial metal corroding away quickly PS; when setting the rivets and peening, I drilled a counter-sunk hole in a large steel plate and used that to support the round dome head
-
Nice. They're deceptive in that they're simple, but the devil is in the details. Larry
-
 Thanks for the info you all.
 -

Looking for a nice, affordable wallet/journal/bag veg tan.
DieselTech replied to CelbridgeLeather's topic in Getting Started
Look into Conceria Walpier veg tan. It is some of my favorite leather. -
What size rivets were you using? Based on yours and TomE’s usages they should be plenty strong. It is interesting that they caused a blue stain on the leather, in my experiences aluminum stains black and oxidizes white it must have something to do with a reaction with the tannins in the leather. Were you using chrome or veg tan on your shields? Maybe the tannin makes a difference? As to moisture causing problems… the only moisture problems we have in far west Texas is there is none. Was there any reason for using brass washers with the rivets instead of aluminum washers? Maybe that could’ve caused the blue staining was a metallurgic reaction from dissimilar metals? Thank you for the help and sorry for the random rambling questions and thoughts.
-
I was trying to get a parachute harness job done last night. I went to rethread the machine and like the forgetful old man I am I forgot to thread through the hidden take up lever. Yes I know, but I haven't had it long, it was 3 am and I'm forgetful. I actually teach new riggers how to sew so yes I no better. So, or course a bunch of thread got bound up around the hook and bobbin. I cut the work loose, opened up the cover, pulled out the loose thread. Hand wheeled around and the needle was hitting part of the hook. I was confused and pulled door assembly off and pulled hook out. Of COURSE, I forgot to tighten the inner race spring lock. By the time I remembered about the lock I had managed to pull the inner race out from behind the hmm, hook driver? What ever that part is called. And now I can't get it back behind to lock it back in place. I did manage to find the one spring that fell out. Any help on how to get the inner race back there without complete disassembly? I got it out but I've tried an hour to get it back. Also it seems like the timing is off a lot, like 180 degrees. Do the two halves of the drive shaft under the clamping rings slip around one inside the other? The timing instructions in English are poorly translated and confusing. Given that I have to retime the bottom anyway maybe releasing the clamp rings and what ever I have to do to get the driver out won't be much more. Any videos on timing hook? Couldn't fine any from Uwe or anyone else. Help? Photos in a few minutes. Terry
-

Maintanence Question on Juki 1508 NH
friquant replied to MarineBozo's topic in Leather Sewing Machines
On my pfaff 545 the knee lift was very hard to engage until I greased the area on the back of the machine where the plate slides against the body (and pushes on the rod to release the tension). I had already oiled everything, or so I thought. But when I finally removed that little piece and greased behind it, the knee lift became easy to use. Perhaps it is that there are parts underneath that oil doesn't get to easily. Or maybe the grease is just better at lubricating things that move slowly like a knee lift. Anyway, that's the first place I would look. To go along with that, I would remove the thread tension assembly from the front of the machine, pull out the actuating rod that goes from the back to the front of the machine, and make sure the back end of that is greased. -
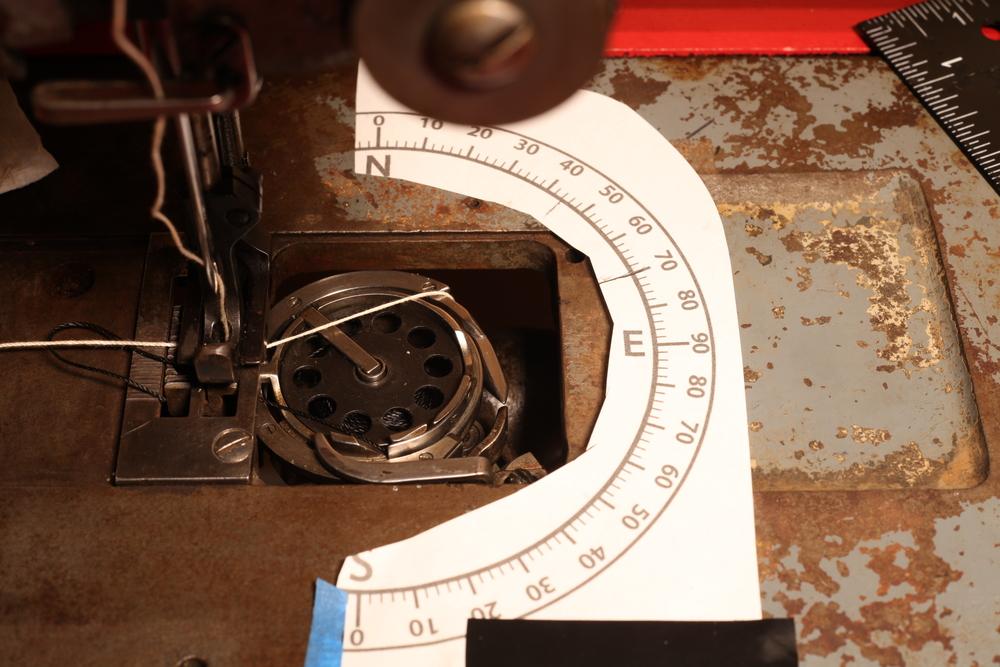
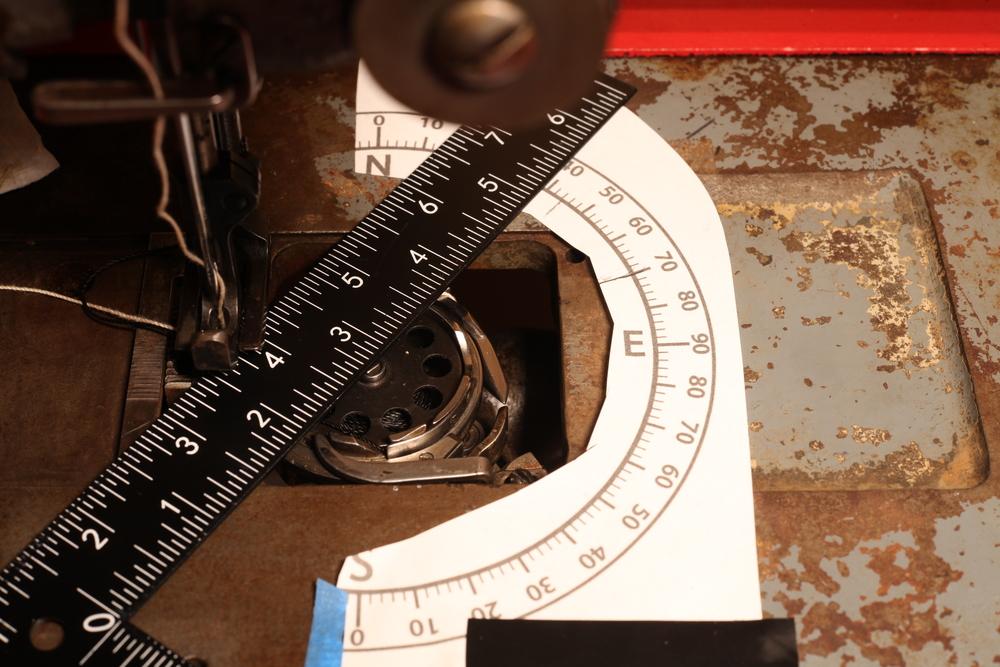
Hook timing...what a drag! You remove some parts, insert a brand new needle, then get out the calipers and measure a tiny rise of the needle bar past bottom dead center. Afterwards, if the machine does not sew well, you repeat the process and hope for better results. That's why I'm going to start measuring hook timing another way---at least on my vertical hook-shaft machines. I'm going to start measuring degrees of hook rotation. Protractor I'll set up my axes like this: 0 degrees: when the hook shoulder is farthest from the user 90 degrees: when the hook shoulder reaches the apex of the hook's journey around the bobbin I'll print this protractor and tape it to the machine bed. Note the origin/center of the protractor is at the center of the hook/bobbin. Note in the photo above, the white top thread is stretched between the throat plate hole and what I've been calling the hook "shoulder". I'll rotate the hand wheel to where the take-up lever is at is lowest point. Then I'll take a measurement of the hook angle from the center of the hook to the hook shoulder. (I chose the hook shoulder because it is the part that actually drags the thread around the bobbin, and it is easy to see from the top.) If you click into this image you can see that the edge of the ruler/square crosses the center of the hook and crosses the hook shoulder where the bit of white thread is peeking out. Note this photo shows a 39 degree measurement. What This Measurement Style Provides: Easy to measure hook timing without removing anything but the bobbin cover plate Easy to visualize where the hook is in its cycle in relation to where the thread take-up lever is in its cycle Easy to make generalizations (I hope) about certain hook timing angles producing certain behavior/symptoms across lots of different machines The timing angle is the same regardless of what stitch length is selected The larger the timing angle, the more advanced the hook timing. (Note with the old/conventional measurement system, larger numbers mean the hook timing is less advanced.) Background / Theory: The hook's job is to grab the top thread and drag it around the bobbin. As the hook shoulder rounds the apex of its path (goes around the right-most edge of the bobbin), that is the farthest that the thread gets dragged through the needle before the thread take-up lever pulls the thread back the other way. The hook shoulder going around the right-most edge of the bobbin must coincide roughly with the thread take-up lever being at its lowest point, otherwise the thread will be tight and the hand wheel hard to turn as the hook drags the thread round the bobbin. Some Data Points and Corresponding Behavior I was working on dialing in the timing on an old Singer, and to learn the machine better (and develop my skills) I was purposefully doing it without referring to a manual. Here are the timing angles on the left, and a description of the corresponding behavior on the right. 2° Top thread tight and grabby as it rounds bobbin 13° Top thread tight and grabby as it rounds bobbin 20° Top thread tight and grabby as it rounds bobbin 44° Most of rounding bobbin is easy...but snags just a bit on the hump by the bobbin tension spring 46° Easy to round bobbin. Good clearance between nearly-formed loop and hook 51° Easy to round bobbin. Minimal clearance between nearly-formed loop and hook 70° Very easy to round bobbin. Negative clearance between nearly-formed loop and hook. (The hook stabs into the nearly-formed loop and jams the machine.) In this round of measurements, the 46 degree setting was my favorite. (I did not get more measurements between 30 degrees and 44 degrees because I was having trouble getting the worm gear slid into position.) Making Generalizations By trying out various timing angles, I was able to observe certain behaviors and put them on my mental map of what causes those behaviors. (And can hopefully fix some of the tendencies from the "70°" row that I've been having on a different machine!) Hope this is useful to someone wanting to understand not just how to set hook timing by the book, but how to react to certain (mis)behaviours, and possibly how to design a sewing machine 😀

-
I thin my pro dye 50/50 with denatured alcohol. I do this because of cost & as well to lighten the pro dye. I think pro dye is too dark using it straight from the bottle. I also lay my dyed projects flat on cardboard & put a fan on it for at least 24 hours.
-
 Gufnstuf joined the community
 -
 Yes. Each action is so economical and efficient. @Northmount Thank you. I will check at that site.
 - Yesterday
-
I'm going over a pair of United Carr M245 motorized snap setting machines. Doing the usual, cleaning, adjusting, etc and thought to replace the drive belts. My usual cheat method is to just remove a flat belt when I come to one and replace it with a heavy cogged v belt and changing the pulley on the motor to a V type while leaving the larger driven one flat. This time around I may have hit a bump in the road. Best I can tell, the driven pulley doesn't have any way around it for a standard belt. I can't really get a good look in there, but best I can tell I'd have to disassemble the machines to get a v belt in? Anyone replace a belt in a M245 type before? Any tricks or advice before I take everything apart? They currently have flat belts w/lacing.
-
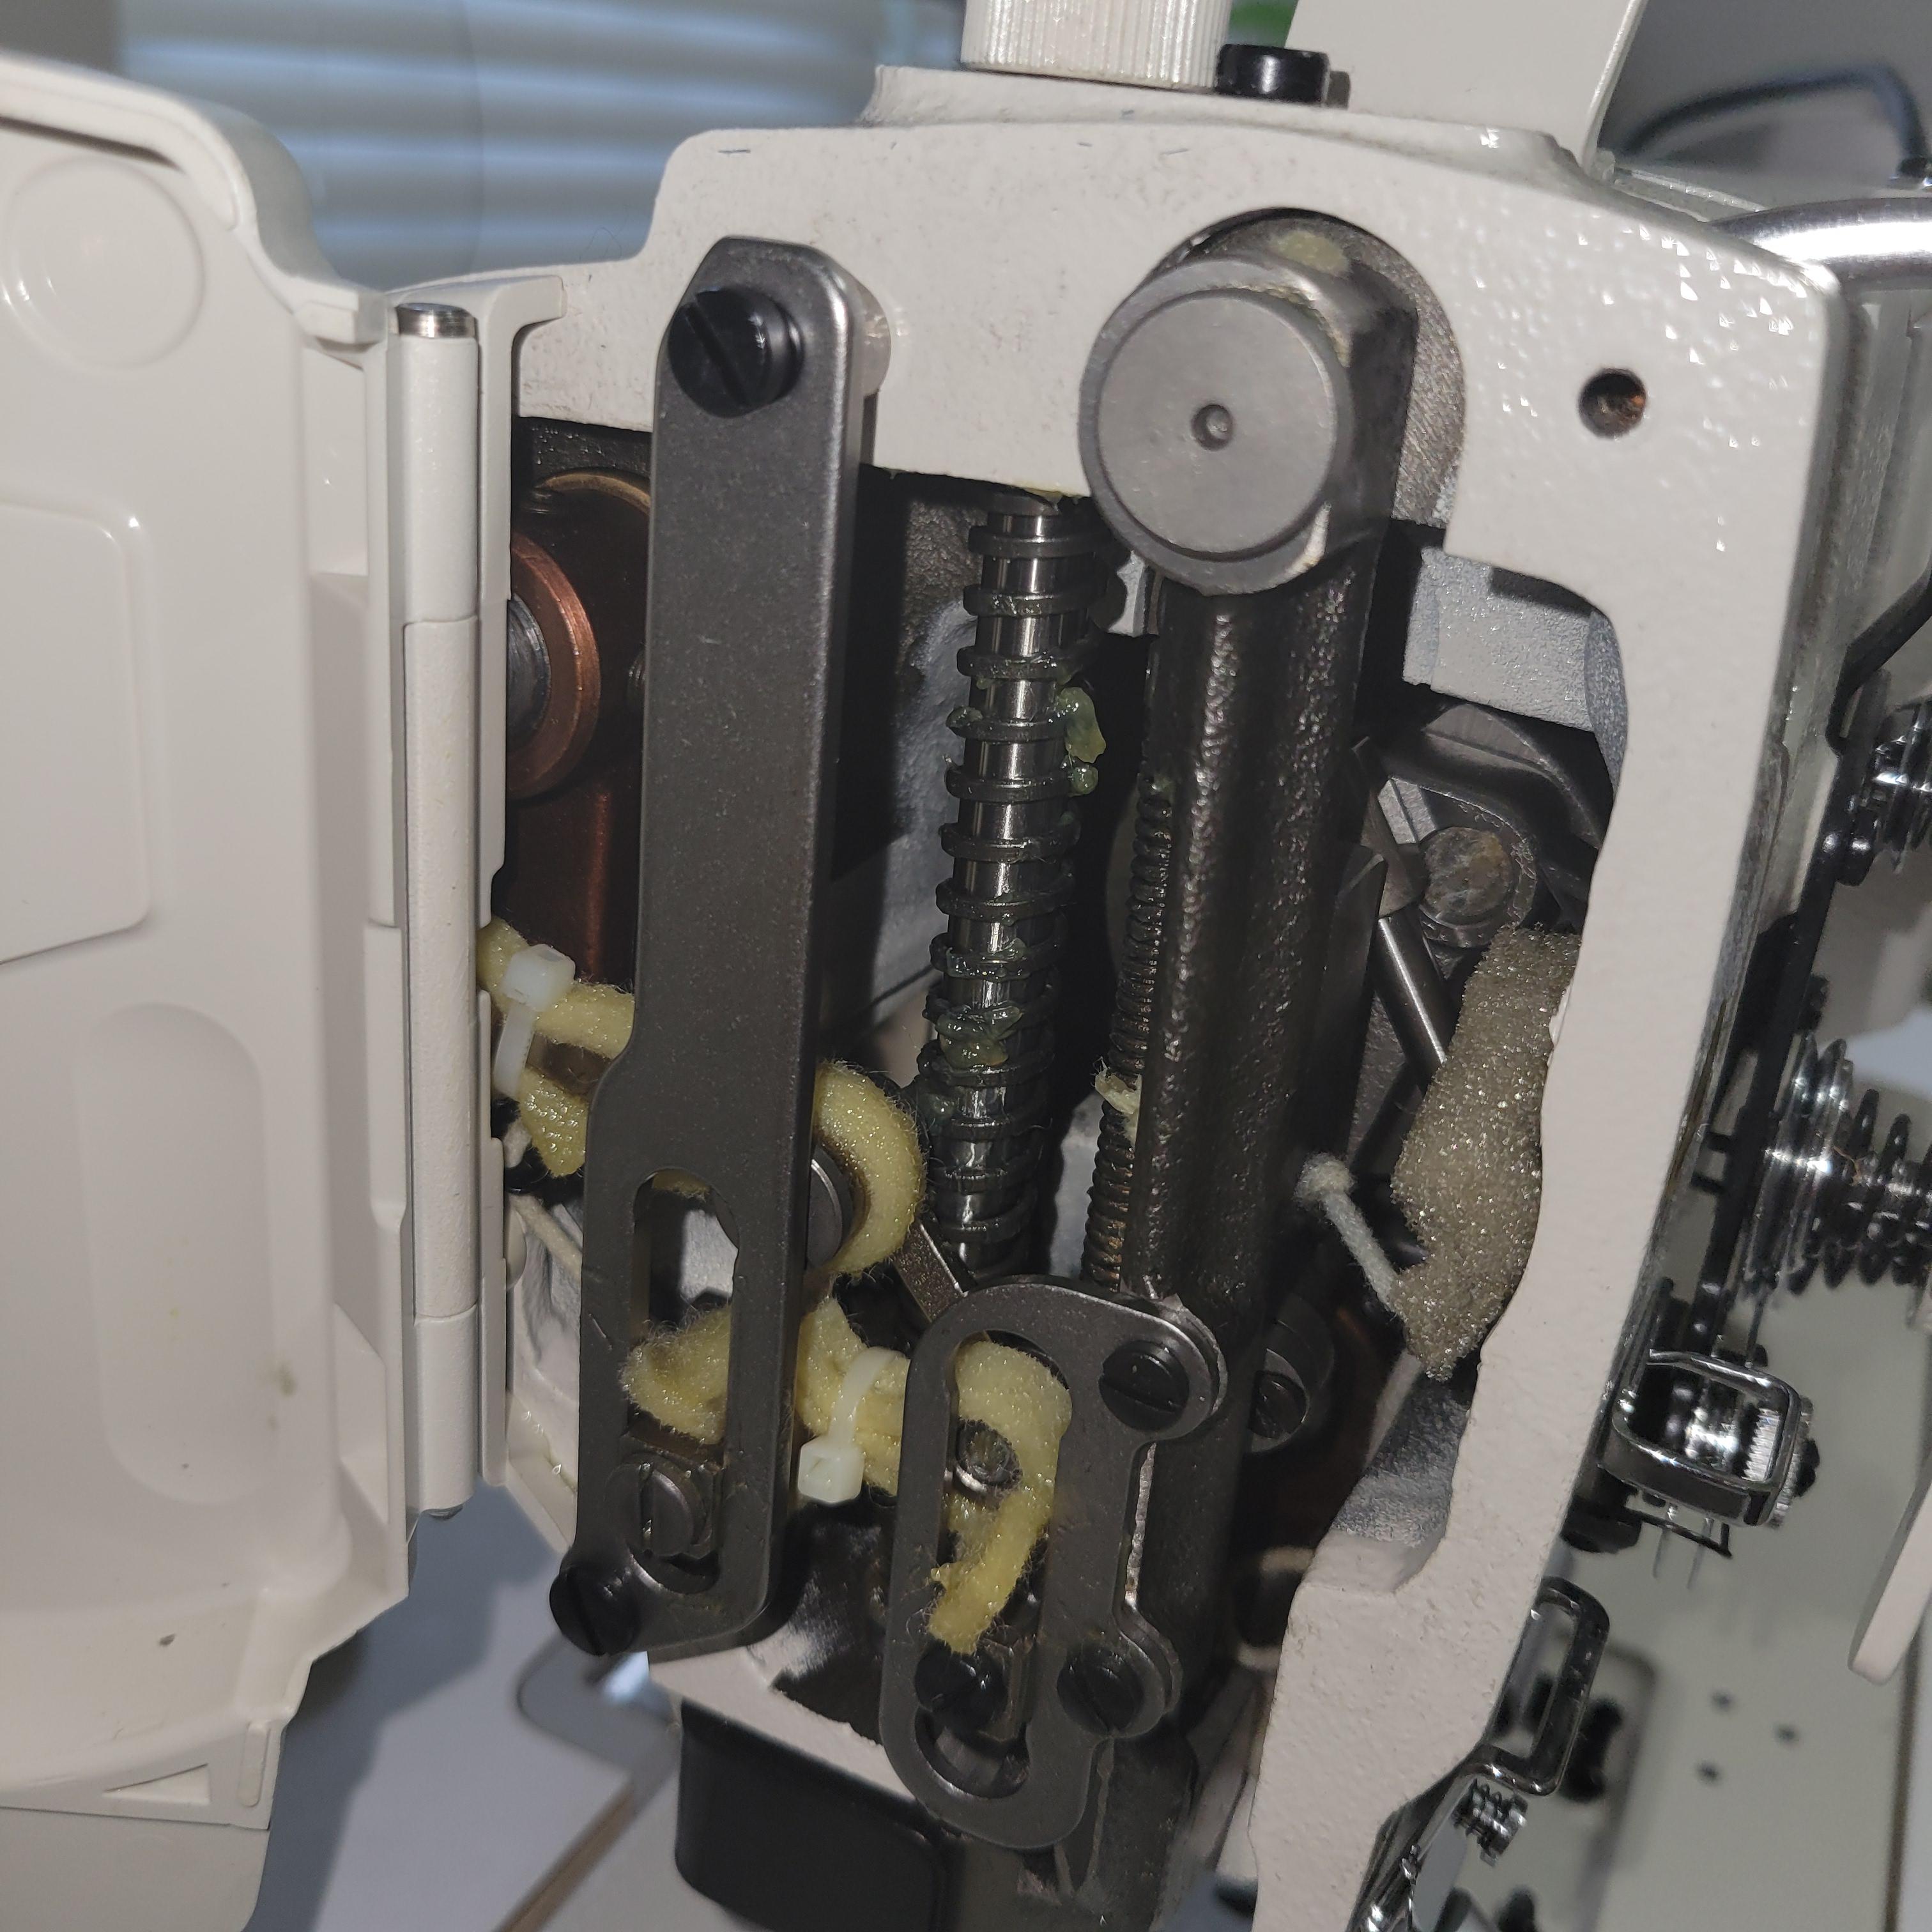
Hey all, I recently purchased a Juki 1508 NH (my first industrial machine!) and have been making some minor repairs and upgrades over the last couple of weeks before I put this workhorse to work. There is really only one last issue I am dealing with. That is whenever I use the knee lift, there is a low pitch squeak that comes from somewhere in the head unit (I'm thinking it's maybe the triangular link in front or possibly from the bushing/rod/spring on the presser foot rod, though not positive). If I use the back lift there is no sound (it's very smooth) and if I leave the back lift up and engage the knee lift there is no sound (ruling out the arm itself). It's only when it has the additional tension of being completely engaged using the knee lift that it makes the sound. I also noticed that if I put a little lateral pressure on the knee lift when engaging it the squeak is louder making me think something may be slightly out of alignment. I know it maybe impossible to know exactly what the issue maybe just from a description, but I'm basically looking for advice on first steps to diagnose where exactly it's coming from. Should I just break down the entire head assembly while testing each time I take off a component. Then clean with alcohol, relube, and reassemble? How would y'all go about it? Another related question is that the previous owner seemed to put a thick grease around the springs of the presser foot rod. I've never really seen grease used for these areas and thought this might be a no no. Should I remove that? (You can see it in the photo) Thanks!
-
 You don't really need thinner for the pro dye. I've dip dyed browns for years in 5gal buckets....And had the same problem at the begining. The first thing to address is having your dye at room temperature or above. If it's 20degrees where you dye, it's not going to absorb well and you'll get those results. I realize it's August and I see you're in GA, so that's probably not your issue. the other thing to address is working the dye into the leather. the Browns/tans are the worst colors to get a good even tone with. You are probably oversaturating the leather (I feel like your 3-4 seconds is probably more like 6-8) AND not working the surface excess into it. After you pull it out of your dye you need to "work" the dye into the leather for a few seconds until it vanishes. if you pull it out of the bucket dripping with dye and it stays that way very long you'll get lots of dark/black/streaks/blotches, etc. Thinners make it absorb more quickly (Alchohol) but you'll generally get a lighter shade that takes more dips to darken to the desired one. Browns usually take 2 dips. 2 seconds in, wipe excess, dry completely then repeat In hot GA sun I'd say an hour or 2 would be enough drying time. Makes sure your dye is well blended. It seems to separate a little with time. Last bit of advice is to use a QUALITY leather for the browns. Mexican/Argentinian/Turk import sides don't absorb or dry as evenly with browns as Herman Oak or even W&C. By the way are you sure you have the right color of dye? Any chance you dumped the wrong jug into the blend? I once did that and made a whole batch of holsters that were supposed to be brown. I had dumped a gallon of black by mistake, forgetting what I was working on. The results were actually a charcoal color. Much to my surprise they were the first ones to sell.....!
 -
.thumb.jpg.6e903dd66163ad5672f00f144058c571.jpg) Leather Tape https://www.wawak.com/bag-making/double-sided-basting-tapes/wawak-hyperstik-super-strong-double-sided-basting-tape-clear/#sku=tpe29
Leather Tape https://www.wawak.com/bag-making/double-sided-basting-tapes/wawak-hyperstik-super-strong-double-sided-basting-tape-clear/#sku=tpe29 -
I used aluminium rivets on a few 'Viking' shields. They mainly held the boss on but also a hand-hold strap and also a carrying strap known as a guige. In use they were strong enuf for the shields to be flung about. In wet conditions the rivets corroded and left a blue stain on the leather. I changed to galvanized iron rivets. The aluminium rivets never failed despite the abuse the shields got The rivets were easy-peasy to set. I just peened them over using a ball-head hammer. I used ordinary brass washers on them
-

Accurately cutting "stretchy" leather.
dikman replied to Shadders's topic in Leatherwork Conversation
Yep, I've found one of those rotary cutters much better on softer material because there's no drag like you get pulling a blade. -

Accurately cutting "stretchy" leather.
JDFred replied to Shadders's topic in Leatherwork Conversation
What Fred said. -
Yes they would be hand set. It is a good point that the post might buckle with a glancing blow with aluminum being soft. If you have used them to hold billets onto a tree it the would probably be strong enough to attach buckles to a head stall. One day I will remember to modify my pattern before I cut it out to accommodate sewing in buckles. I usually remember about the time it is time to attach the buckle. However if I could remember the strength question is voided and I could use them as a solely decorative application. Thanks for the help.