All Activity
- Today
-
What do I want to make? No idea yet. I've watched many videos on how the die steel is shaped using bending tools/machines so figured I needed one. Me being me means I have to make one. The concept is simple enough it just needs three things - a means of applying sufficient force to bend it, (force applied to the end of the sliding tube by a lever/handle), a means of keeping everything square/vertical while bending it (hence the square tube to prevent any twisting of the die) and the right shaped dies to get the bends (right angles, curves etc). The shapes needed can be determined by watching the videos. Bear with me, hopefully at the end you will be able to appreciate the full extent of my genius - or realise that I just confirmed I'm an idjit with no idea!
-

Sewing machine stitches slanted-CB4500
Wizcrafts replied to Crest's topic in Leather Sewing Machines
Please look at the package that the needle came from and let us know the designation on the needle. For instance, a System 794 or 7x4 in Schmetz S Point, or a 4-sided Diamond, or 3-sided Tri point, or an LR or LL twisted wedge point. The first 3 give a straight stitch line, but with a different visual front to back length on top. The last two are made with a left or right twist on the tip of the needle. While the needles can lay the thread differently based on their geometry, the only ones that might try to push the leather sideways are the LL and LR slanted wedges. Personally, I avoid slanted needles. My preferred needles either have a diamond or tri point, or an S point, which is an inline slicing wedge. If you sew a stitch line with each of these two types, using the same stitch length and tensions, The S point stitches will appear closer together and submerged, compared to the diamond shape needles. Then, there's always System 7x3 round point needles that poke a round hole and are made to sew fabric and synthetics, and create a straight stitch line with good visual appearance between the ends of the stitches. Now that the needle geometry has been discussed, there is something mechanical that could cause the strip to move sideways as your sew. That is a misaligned or loose needle bar and inside foot mounting frame. Normally, this frame is installed with a minimum of sideways clearance to keep it sewing straight. If some impact knocks the frame alignment out, it may sew off the center line. Look to see if your machine has an L shaped bracket screwed on at the bottom of the moving frame that contains the needle and inside foot bars. If present, make sure it hasn't loosened or moved to the left and giving too much clearance to the moving frame, which might be called the "rock frame," or such. -
 Very interesting... love it!
 -
I can't see your vision dikman. What is it that you want to make with your dies? I used to buy a pattern, precisely cut out the wooden core and using the pattern and the core Id bend it around the nails until it fitted.
-
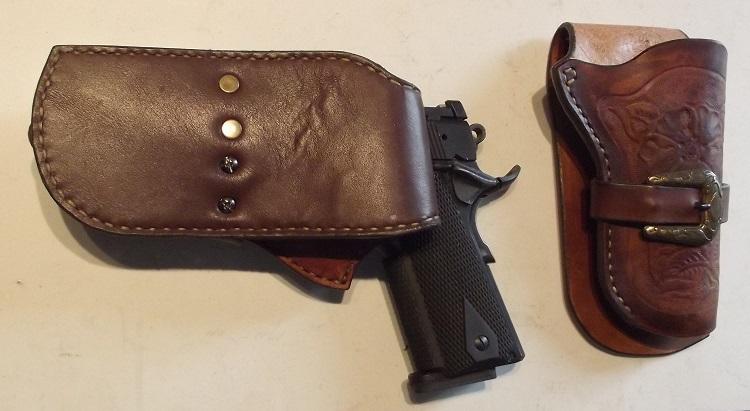
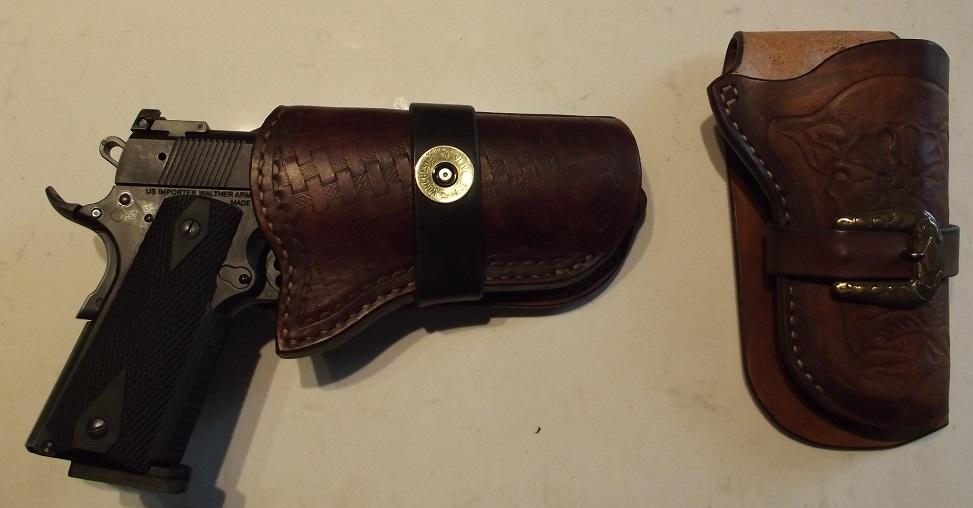
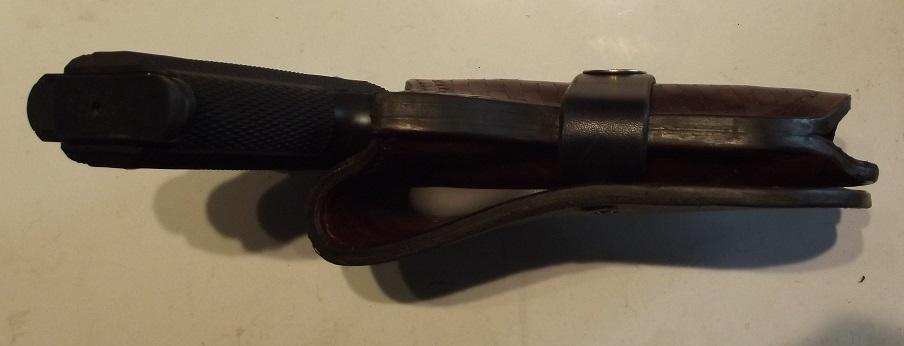
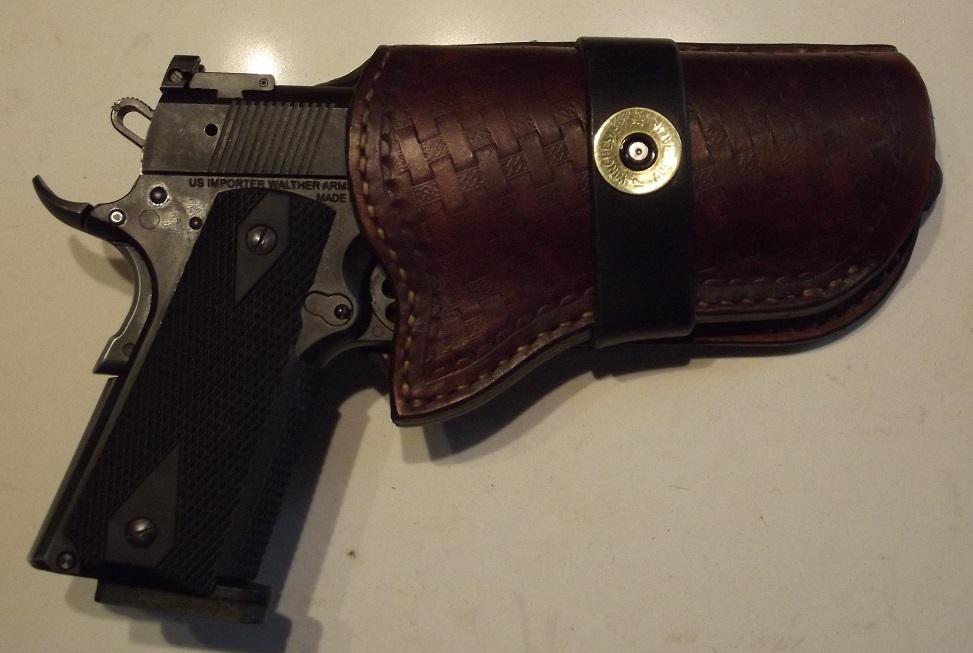
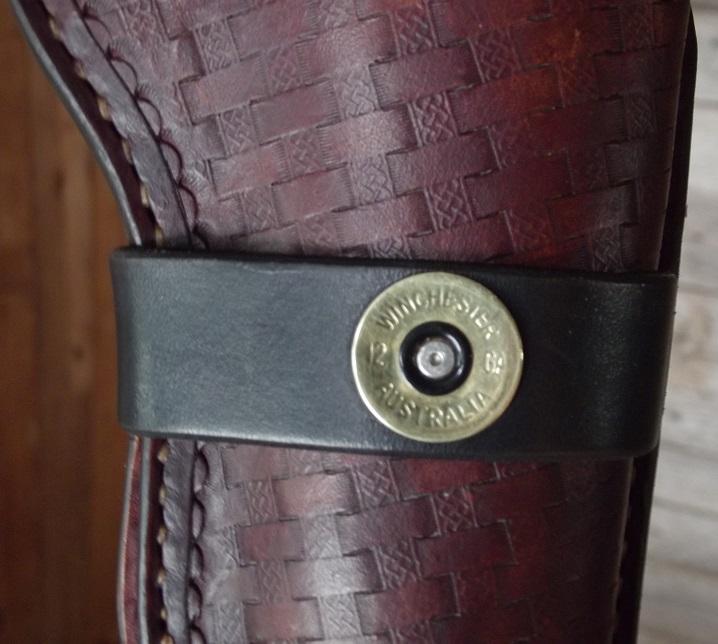
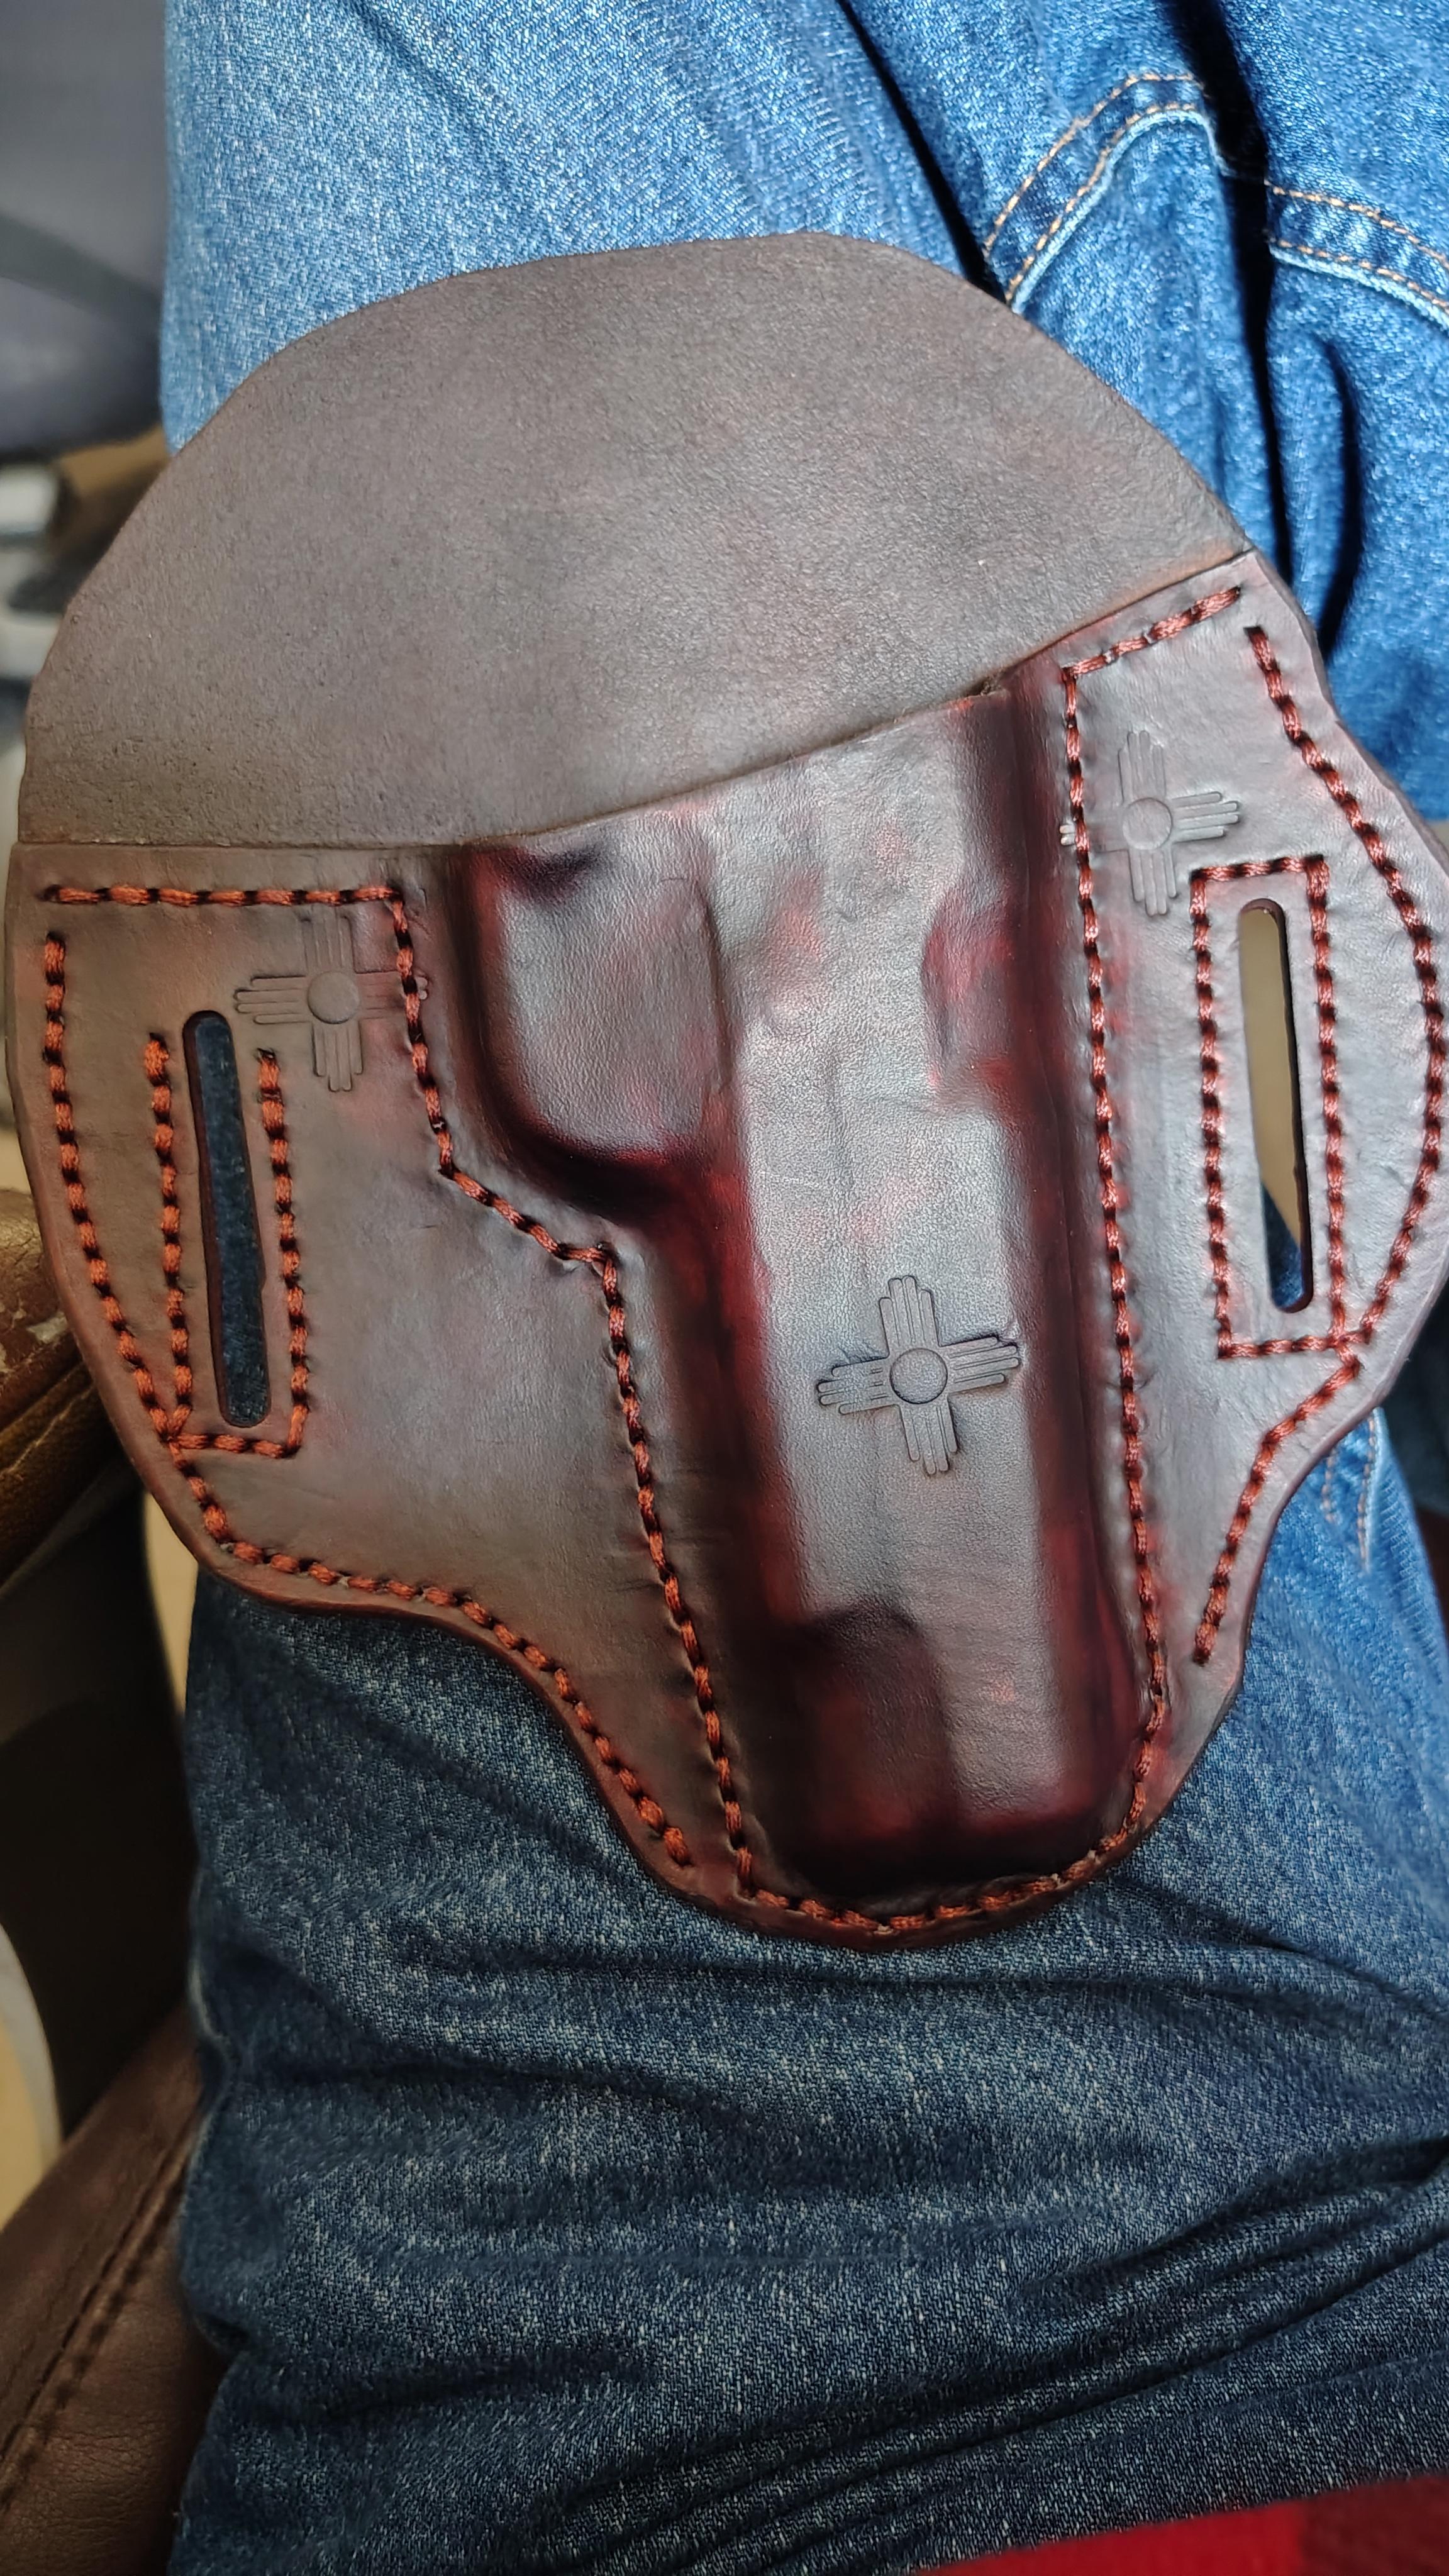
This is my second 1911 holster.....lined / double leather, black strap to match gun, 12ga shell because this is a three gun match...12ga shotgun, 1911 45ACP, and 40 cal + lever gun. Roger
-
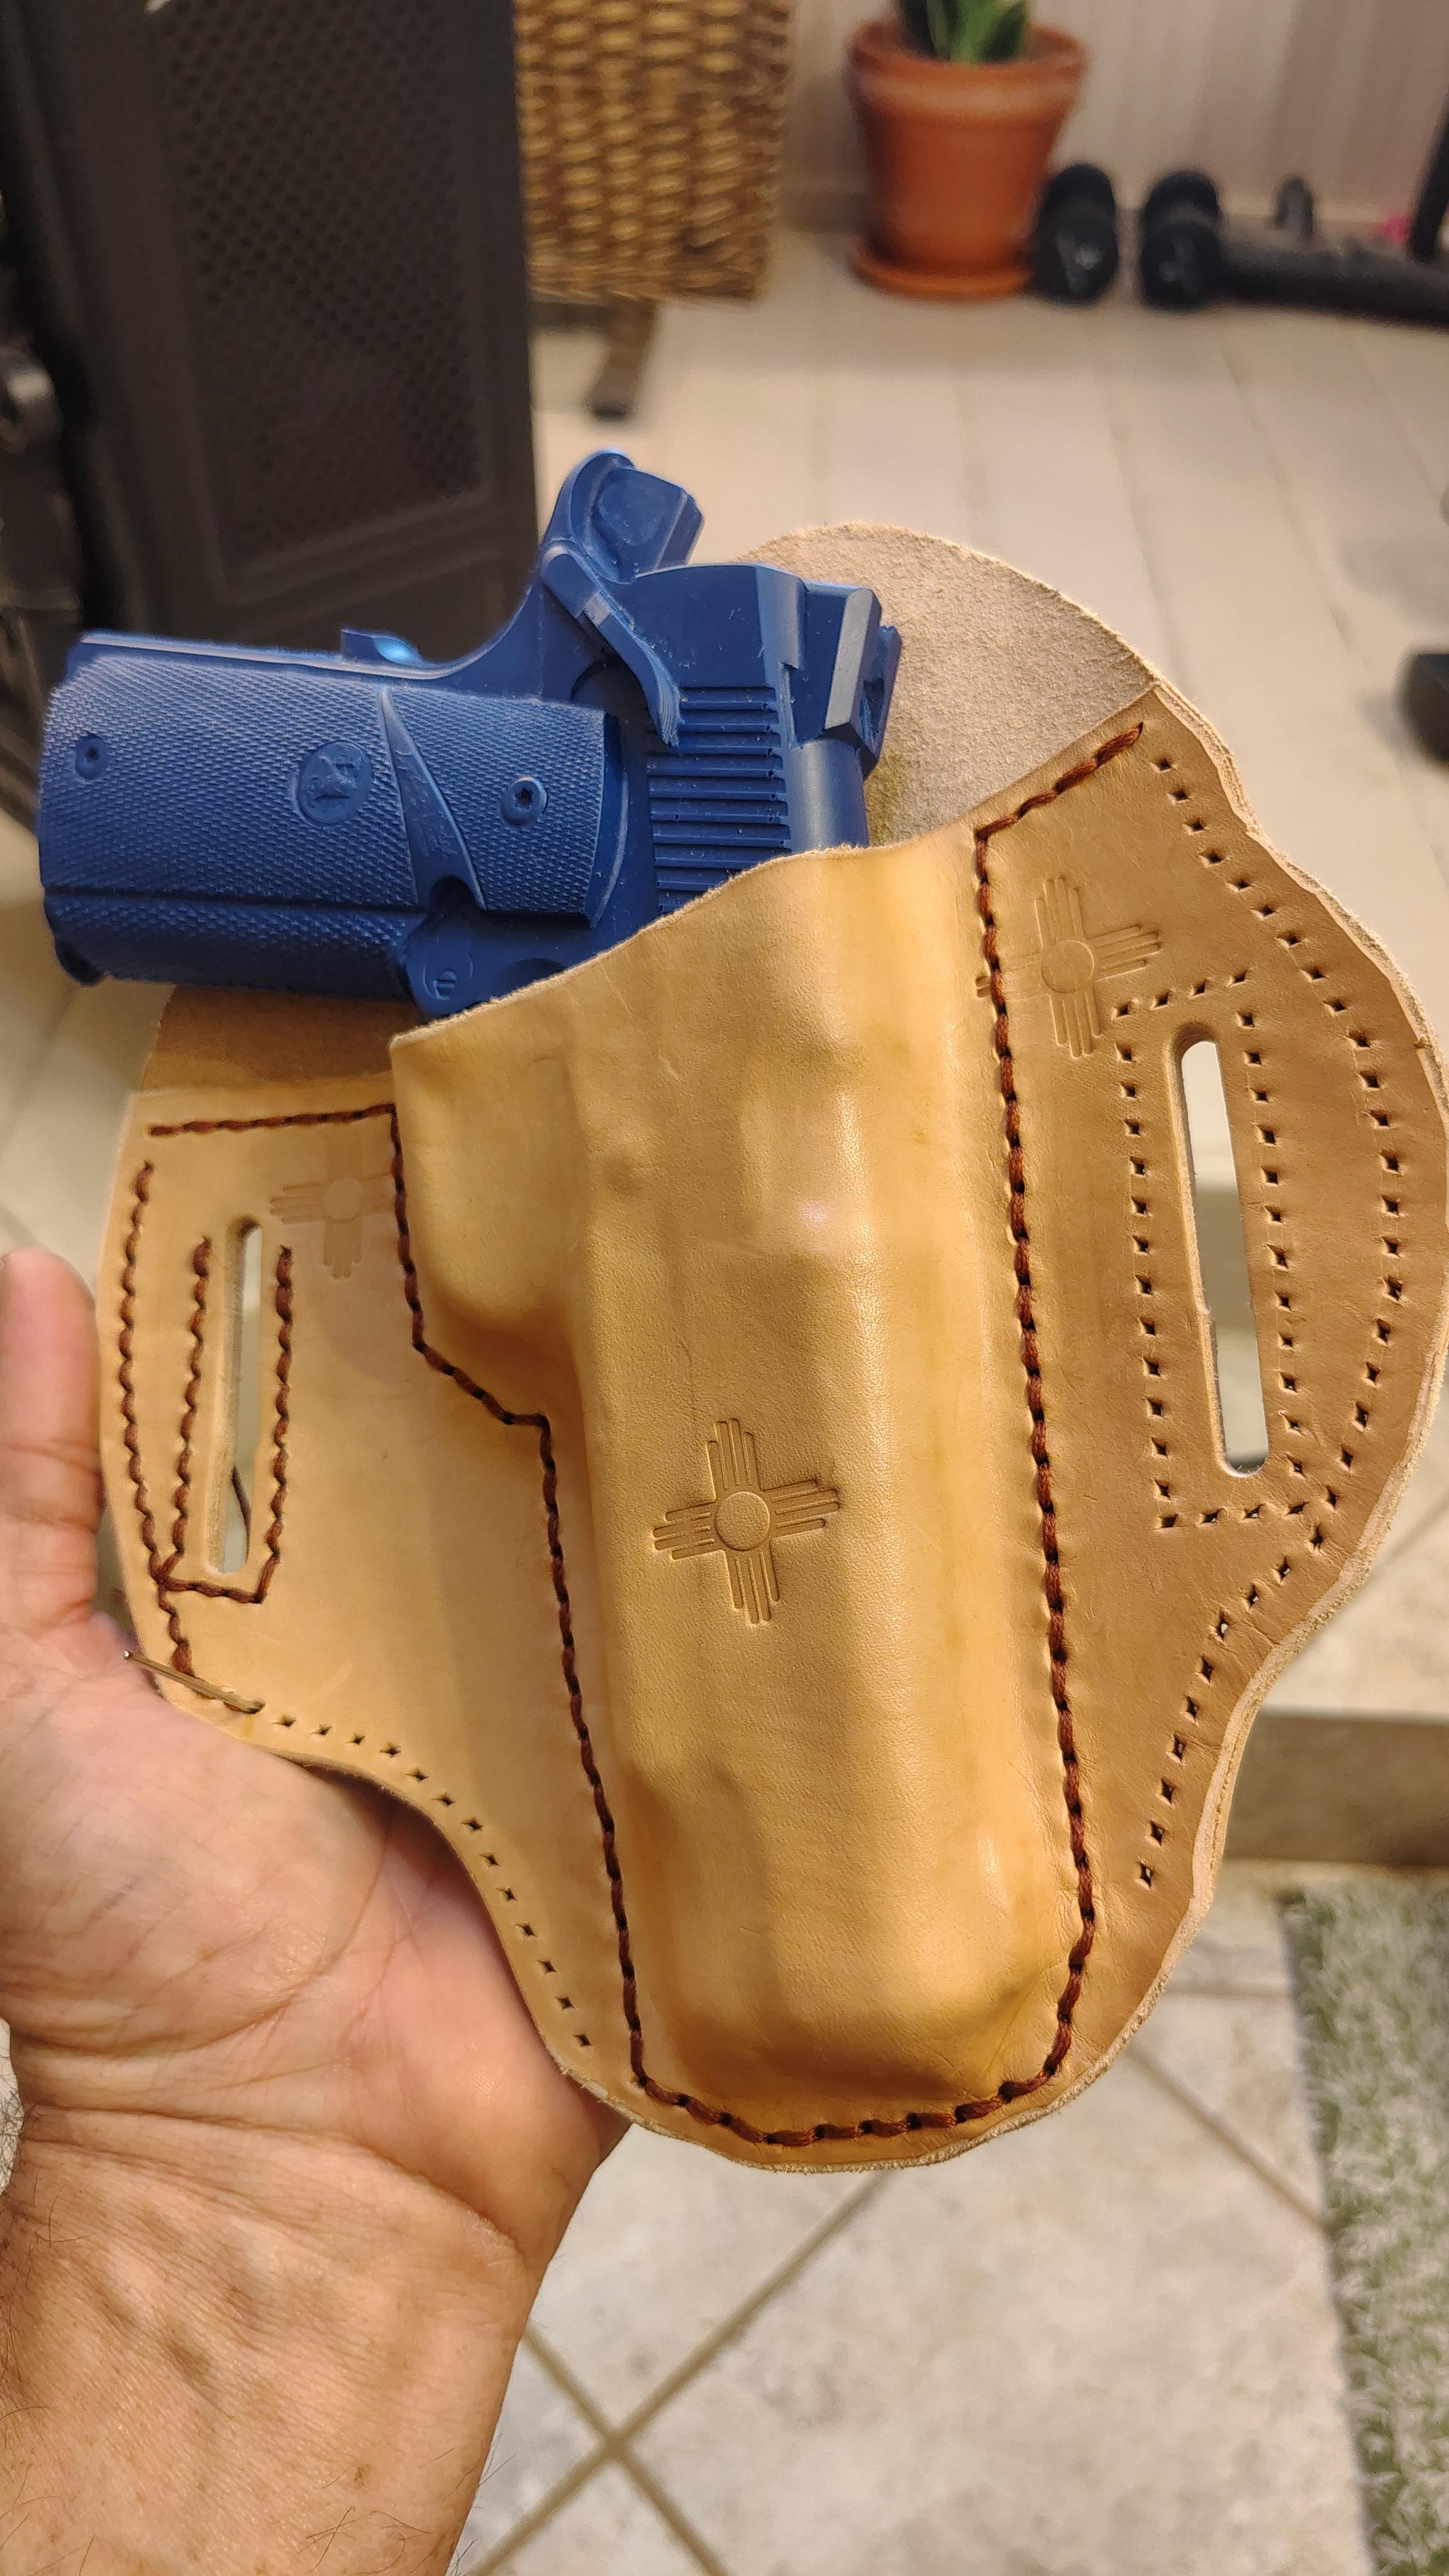
If I may make a couple of suggestions? I would suggest that after you have glued-up your holster, you use some sandpaper on a small sanding block to gracefully level the irregularities on the edges of your holster. Use sandpaper wrapped around a dowel for tight curves. I use a paint stirring stick to do inside the belt slots. Then, use a #2 edge beveler to knock the edges off of all outside edges and the long side of the belt slots and sand them again to round them off. Don't try to go around the tiny curve in the belt slots. It is not needed and often does not come out looking good because the beveler gouges into the leather on the corner. Also, it appears that you may be using only a 4-tine stitching chisel to make the holes. I would recommend getting a 1 and 2-tine chisel to enable making more graceful curves in the stitch line. Use 4-tines, only if it is truly for a straight line. You can use a stitching wheel to mark the spacing for stitches on a curve for the 1 & 2 tine irons. Make sure that the TPI (threads per inch) of the wheel, matches the TPI of your chisels, e.g. if you irons are 6 TPI, the teeth on the stitching wheel should also be 6 TPI. So, look for that. After your holster is glued together and the edges are trued-up, set a pair of dividers for 3/16". Place one point to ride on the outside edge of the holster with the other point scribing a line in the leather, to follow for stitching. Do it just firm enough to be able to see it when stitching. This will keep your stitches equal distance from the edge all the way around. If you are using a strong contact cement, like Weldwood or Barge, you may not need to stitch around the belt slots at all, unless you just want to do it for style. I never do and have never had any separation of the layers, even after 5 years of use. Example...
-
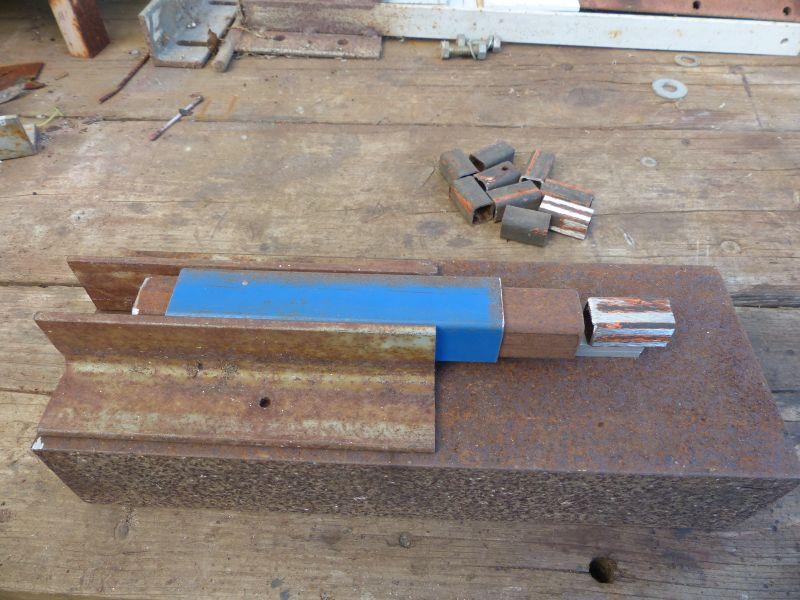
Scratching around and this is what's coming along. the base is a lump of heavy channel iron, the blue piece will be welded to the angles which will give it some bottom clearance, the rusty square tube will slide inside with a handle on the left. I'm not sure whether I will need to make a compound linkage for the handle. The little square piece on the right will hold one part of the die and will slide into the other piece with a locking pin to hold it. This way I can make interchangeable dies. The other half of the die will be attached to round stock and will fit into a hole in the channel base. At least, that's the theory. Worst part of the job next, removing all the rust before welding, wire wheels and sandblasting I guess.
-

Sewing machine stitches slanted-CB4500
RockyAussie replied to Crest's topic in Leather Sewing Machines
As @AlZilla mentioned above the needle tip shape type can give an angled stitch such as an LR which gives a saddle stitch look. A TRI point needle will give a straight stitch if that is what you want. If you are having to hold the job inward as you go you overcome this fairly well with a guide that is angled slightly closer at the back behind where the needle is. This video I ade some time back shows how you can pretty much set up a guide that does not require you to hold it at all. -
As Fred said Keith. This one is stuck down on the mat. This one is just a ruler. Just move the piece so it reads the same both sides and mark the center.


-
I've been using a metric centre-finder ruler for several years I don't really bother with the actual measurement; I just get the ruler onto the line, get the same distance number on each side and voila, the centre be found
-
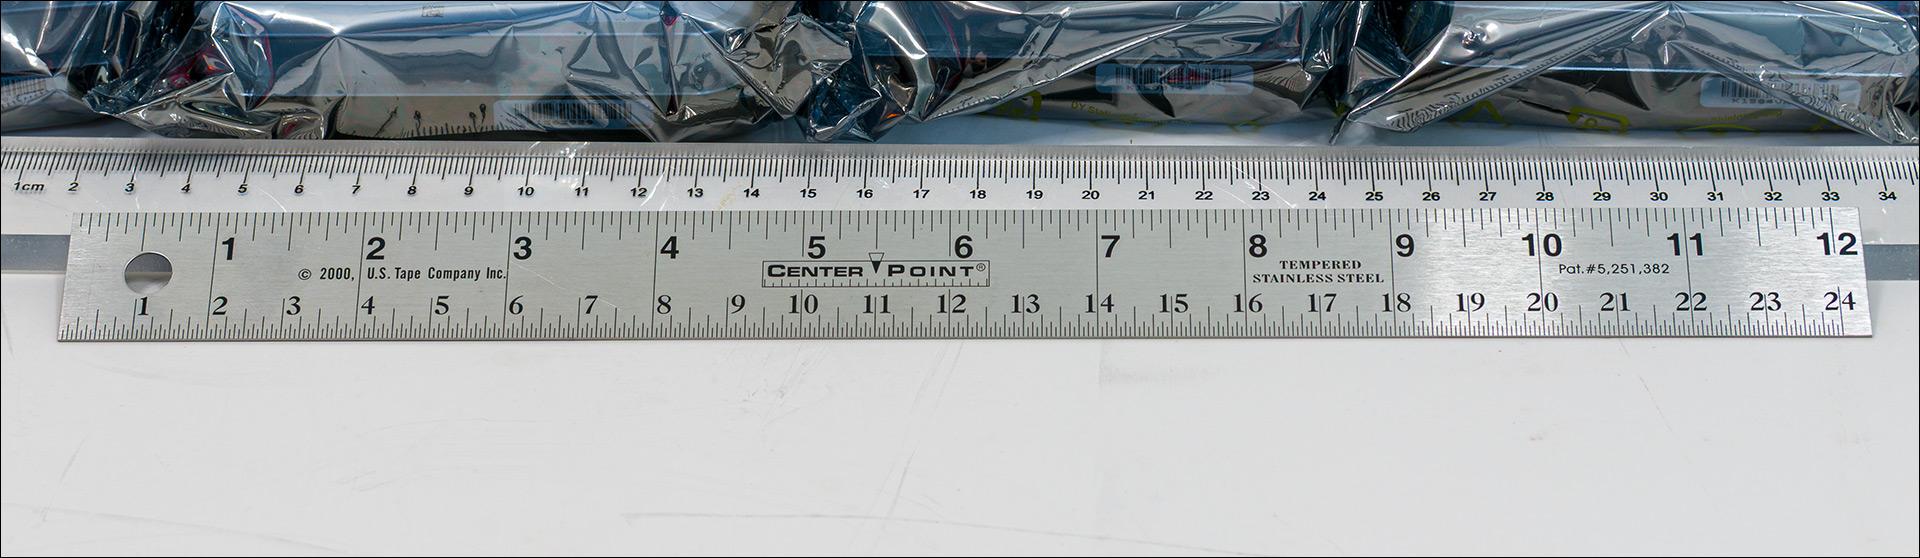
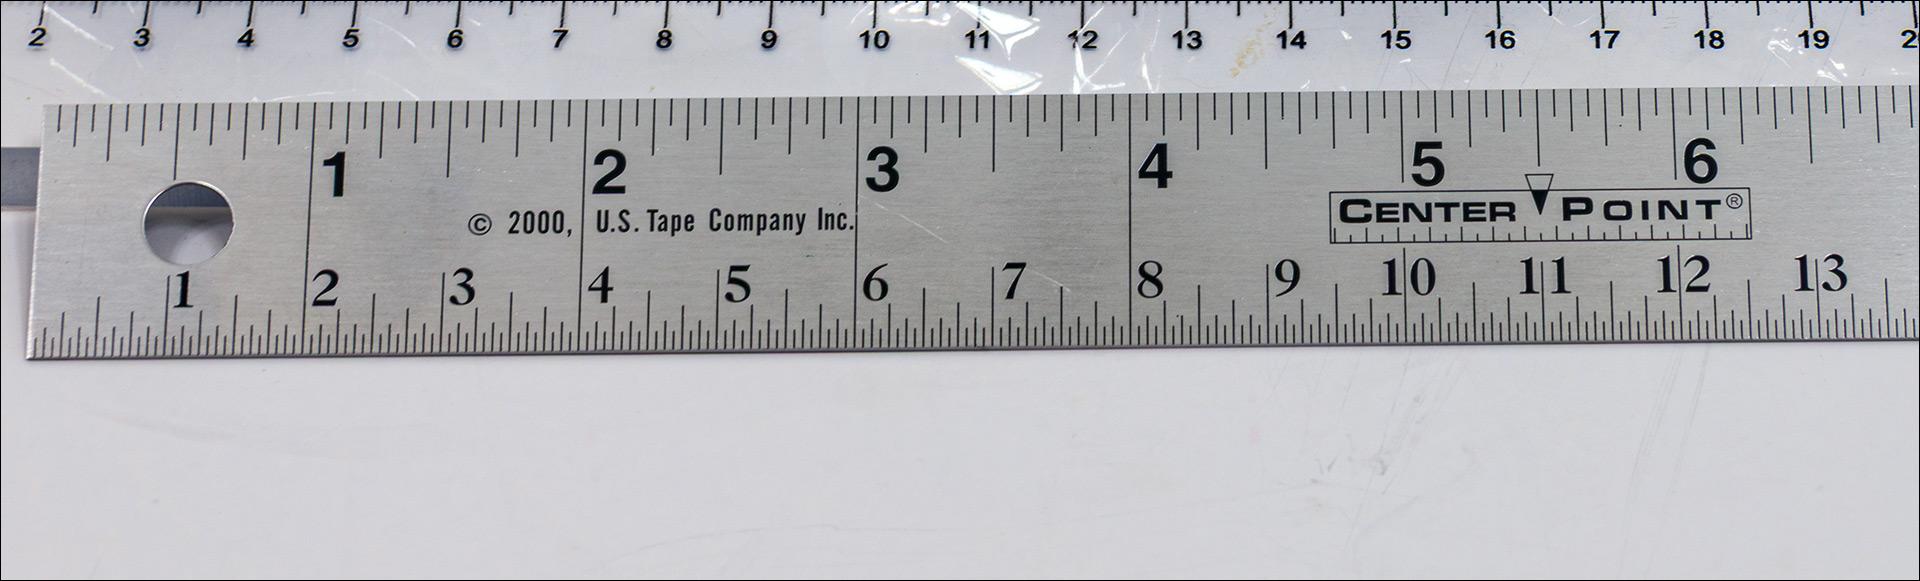
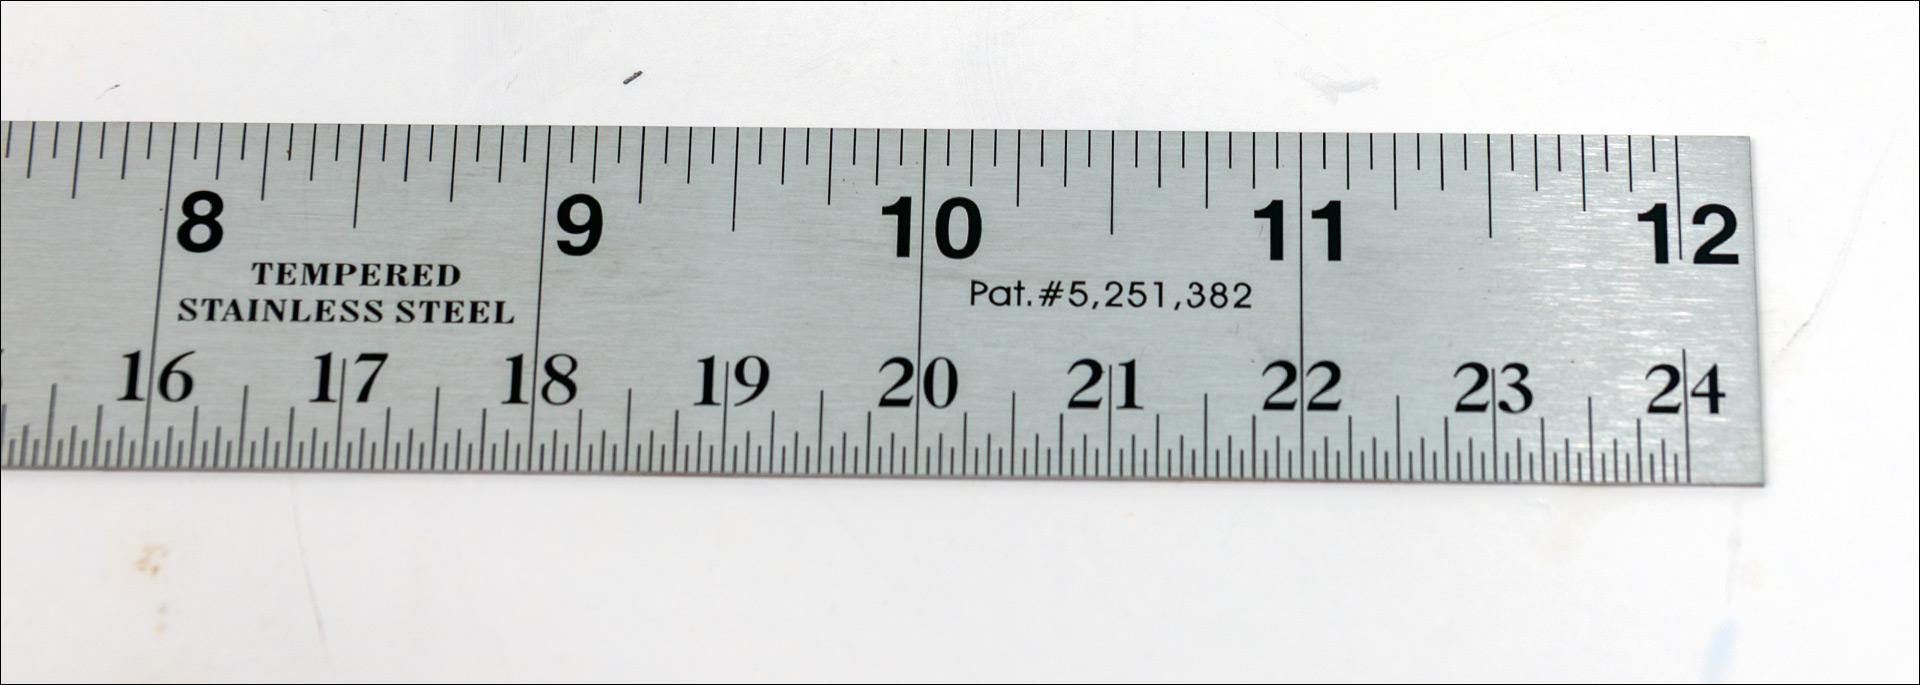
I finally got tired of doing calculations in my head when trying to find the centre of something. Since I was taught, trained and worked in the Imperial and US systems until Canada converted supposedly to the Metric system. Normally the Imperial system is my go to for everyday type measurements. So I finally broke down and bought a 12" centre finding ruler sometimes called a doubling ruler. The ruler: i) Imperial measurements up to 12" or a you can get a larger 24" version ii) Two scales. A measuring scale and a centre point scale iii) Material: Tempered Stainless Steel iv) Sold by US Tape Company (https://www.ustape.com/product/centerpoint-straight-edge-rulers/) v) Made in China vi) patent number: 5,251,382 which is for a tape measure not a ruler???? vii) Status: Expired - Lifetime viii) Cost: I paid $18.90 CAD plus tax for total of $21.35 CAD ( $15.35 ) from Lee Valley This is a very simple design. You just measure the item say 8 1/4" and find 8 1/4" on the bottom scale and that is the centerpoint location. Anyone with a laser or 3d printer could easily make one. To bad they don't have a metric version for better accuracy. kgg
-
@Crestare you saying it feeds the material through at an angle? Or does it feed a straight line and the stitches are at a slant to the line? The latter is just a needle choice.
-
I've been watching some old Gunsmoke shows . . . and two things came to mind. One . . . just about all of us teen guys were in love with Miss Kitty . . . and I really doubt if any of us knew her age. She turned 30 . . . same year I turned 15 . . . and I never had a clue until just a couple years ago. But # 2 . . . I really got a chance to take a good look at that "Marshall Dillon" gun rig . . . and was surprised at the number of bullets he had on that rig. I'm not sure I could keep my pants up with that weight trying to pull me down. The more I've seen it . . . the more I'm probably just gonna make me one. I'll wear it in a parade or two . . . then put it on Ebay . . . and get a reasonable price for a "used" rig. May God bless, Dwight
-
Ive missed this place. Just felt the need to say that. Life changes alot and it changes you.
-
Good job . . . and that will be comfortable as well. May God bless, Dwight
- Yesterday
-
I honestly did start out with a big vise and a couple of six inch nails and I got reasonably good at it, only because I was fitting around a solid wooden core and lots of screws around the outside helped to get it into shape. And of course I was using 3pt R/Steel at the time so your stuff should be easier.
-
Harry Rogers used one of those but I didn't know what it was called, apparently designed for jewellery work. It looks like it's for material about 25mm high(?) but my stuff is about 32mm. They're also very expensive here, maybe $600 or so. Temu have a version for $35 but it looks like it's even smaller. It wouldn't be hard to make something that operates on the same principle but it depends on what I've got in the scrap bin.
-

DIY servo motor with wide speed range
friquant replied to Gymnast's topic in Leather Sewing Machines
I like it! I saw this video a few months ago on youtube, and had not figured out who you were on leatherworker. Using a variable frequency drive (VFD) and an AC gearmotor I have been able to get super low speed like you demonstrate. It would be convenient if the VFD had an option to add some parabola effect (or "exponential" as the radio control pilots call it) at the slow end. As it is I get the best low-end resolution when the max speed is on the slow side. Here's a link to a video in that thread: https://leatherworker.net/forum/topic/131403-my-first-vfd-w-3-phase-ac-gearmotor/#findComment-783471 As you built this system (or from your general knowledge) did you learn why it is that commercially available servo motors start at such a high speed? I'm still looking for a satisfactory answer to that. Or a way to adapt a commercially available servo to start at whatever speed I choose.. -
 This Wikipedia article on museum level leather conservation may be of interest. If I recall correctly, current thinking in museum circles is to not use any oils, balms, conditioners of any kind because they found that in the long term, they did more harm than good. https://en.m.wikipedia.org/wiki/Conservation_and_restoration_of_leather_objects I've tried neatsfoot oil a couple of times and it made the leather soft. I see plenty of people here who use it regularly and love it.
 -
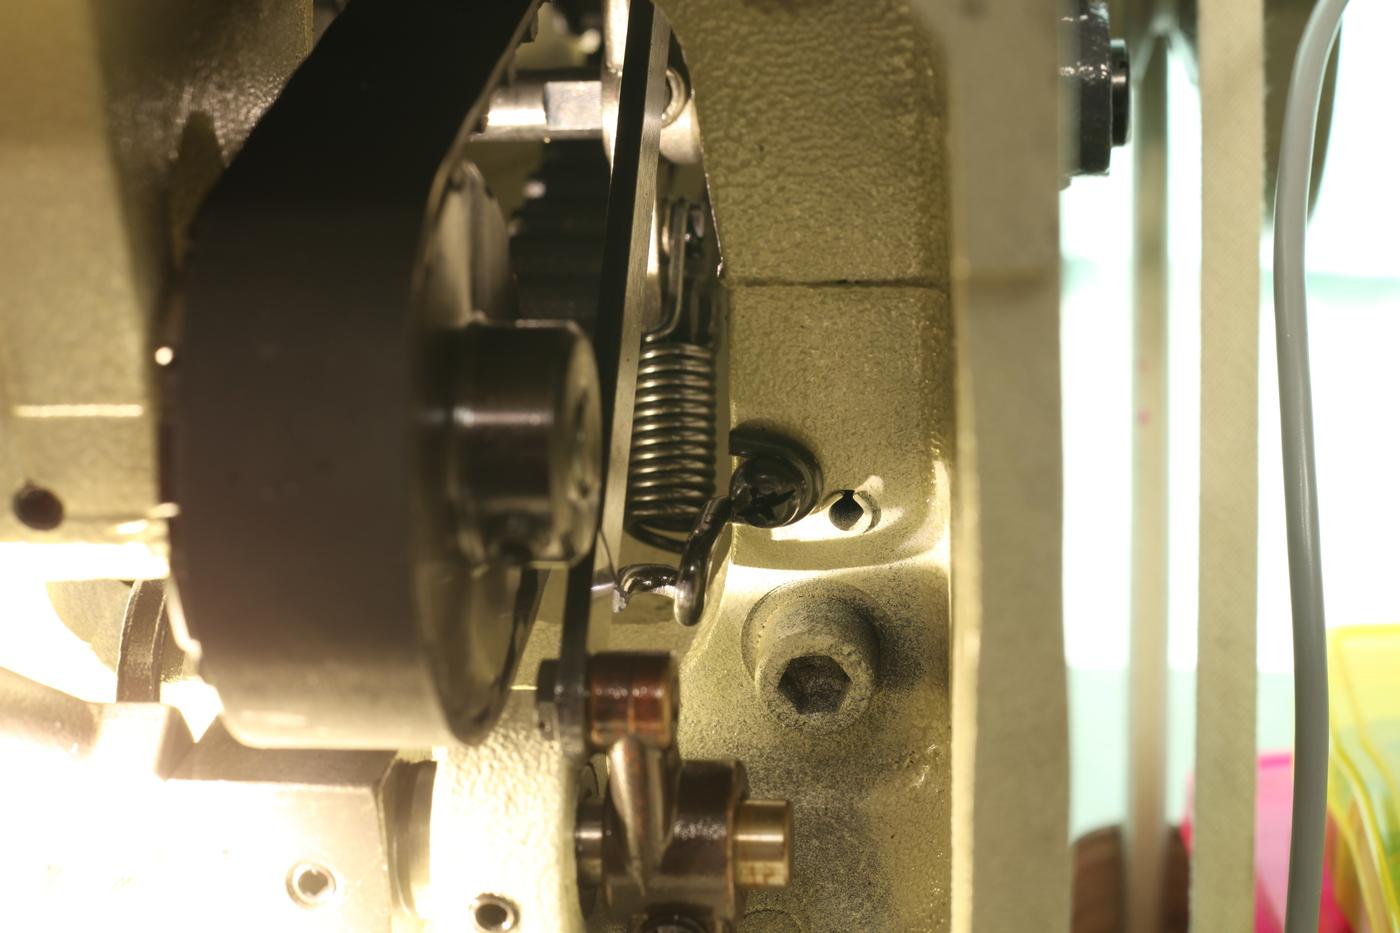
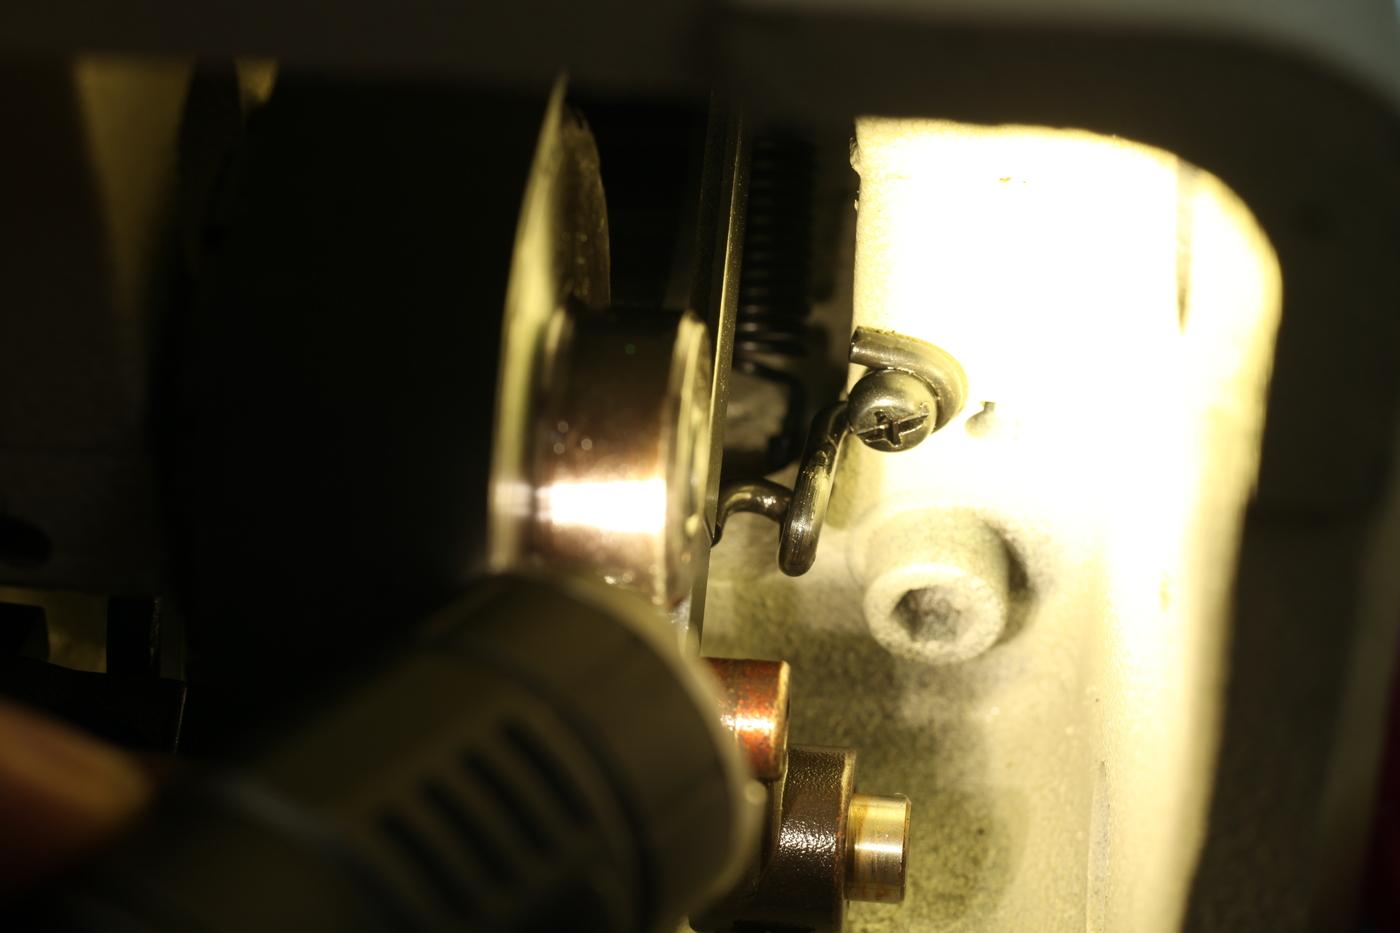
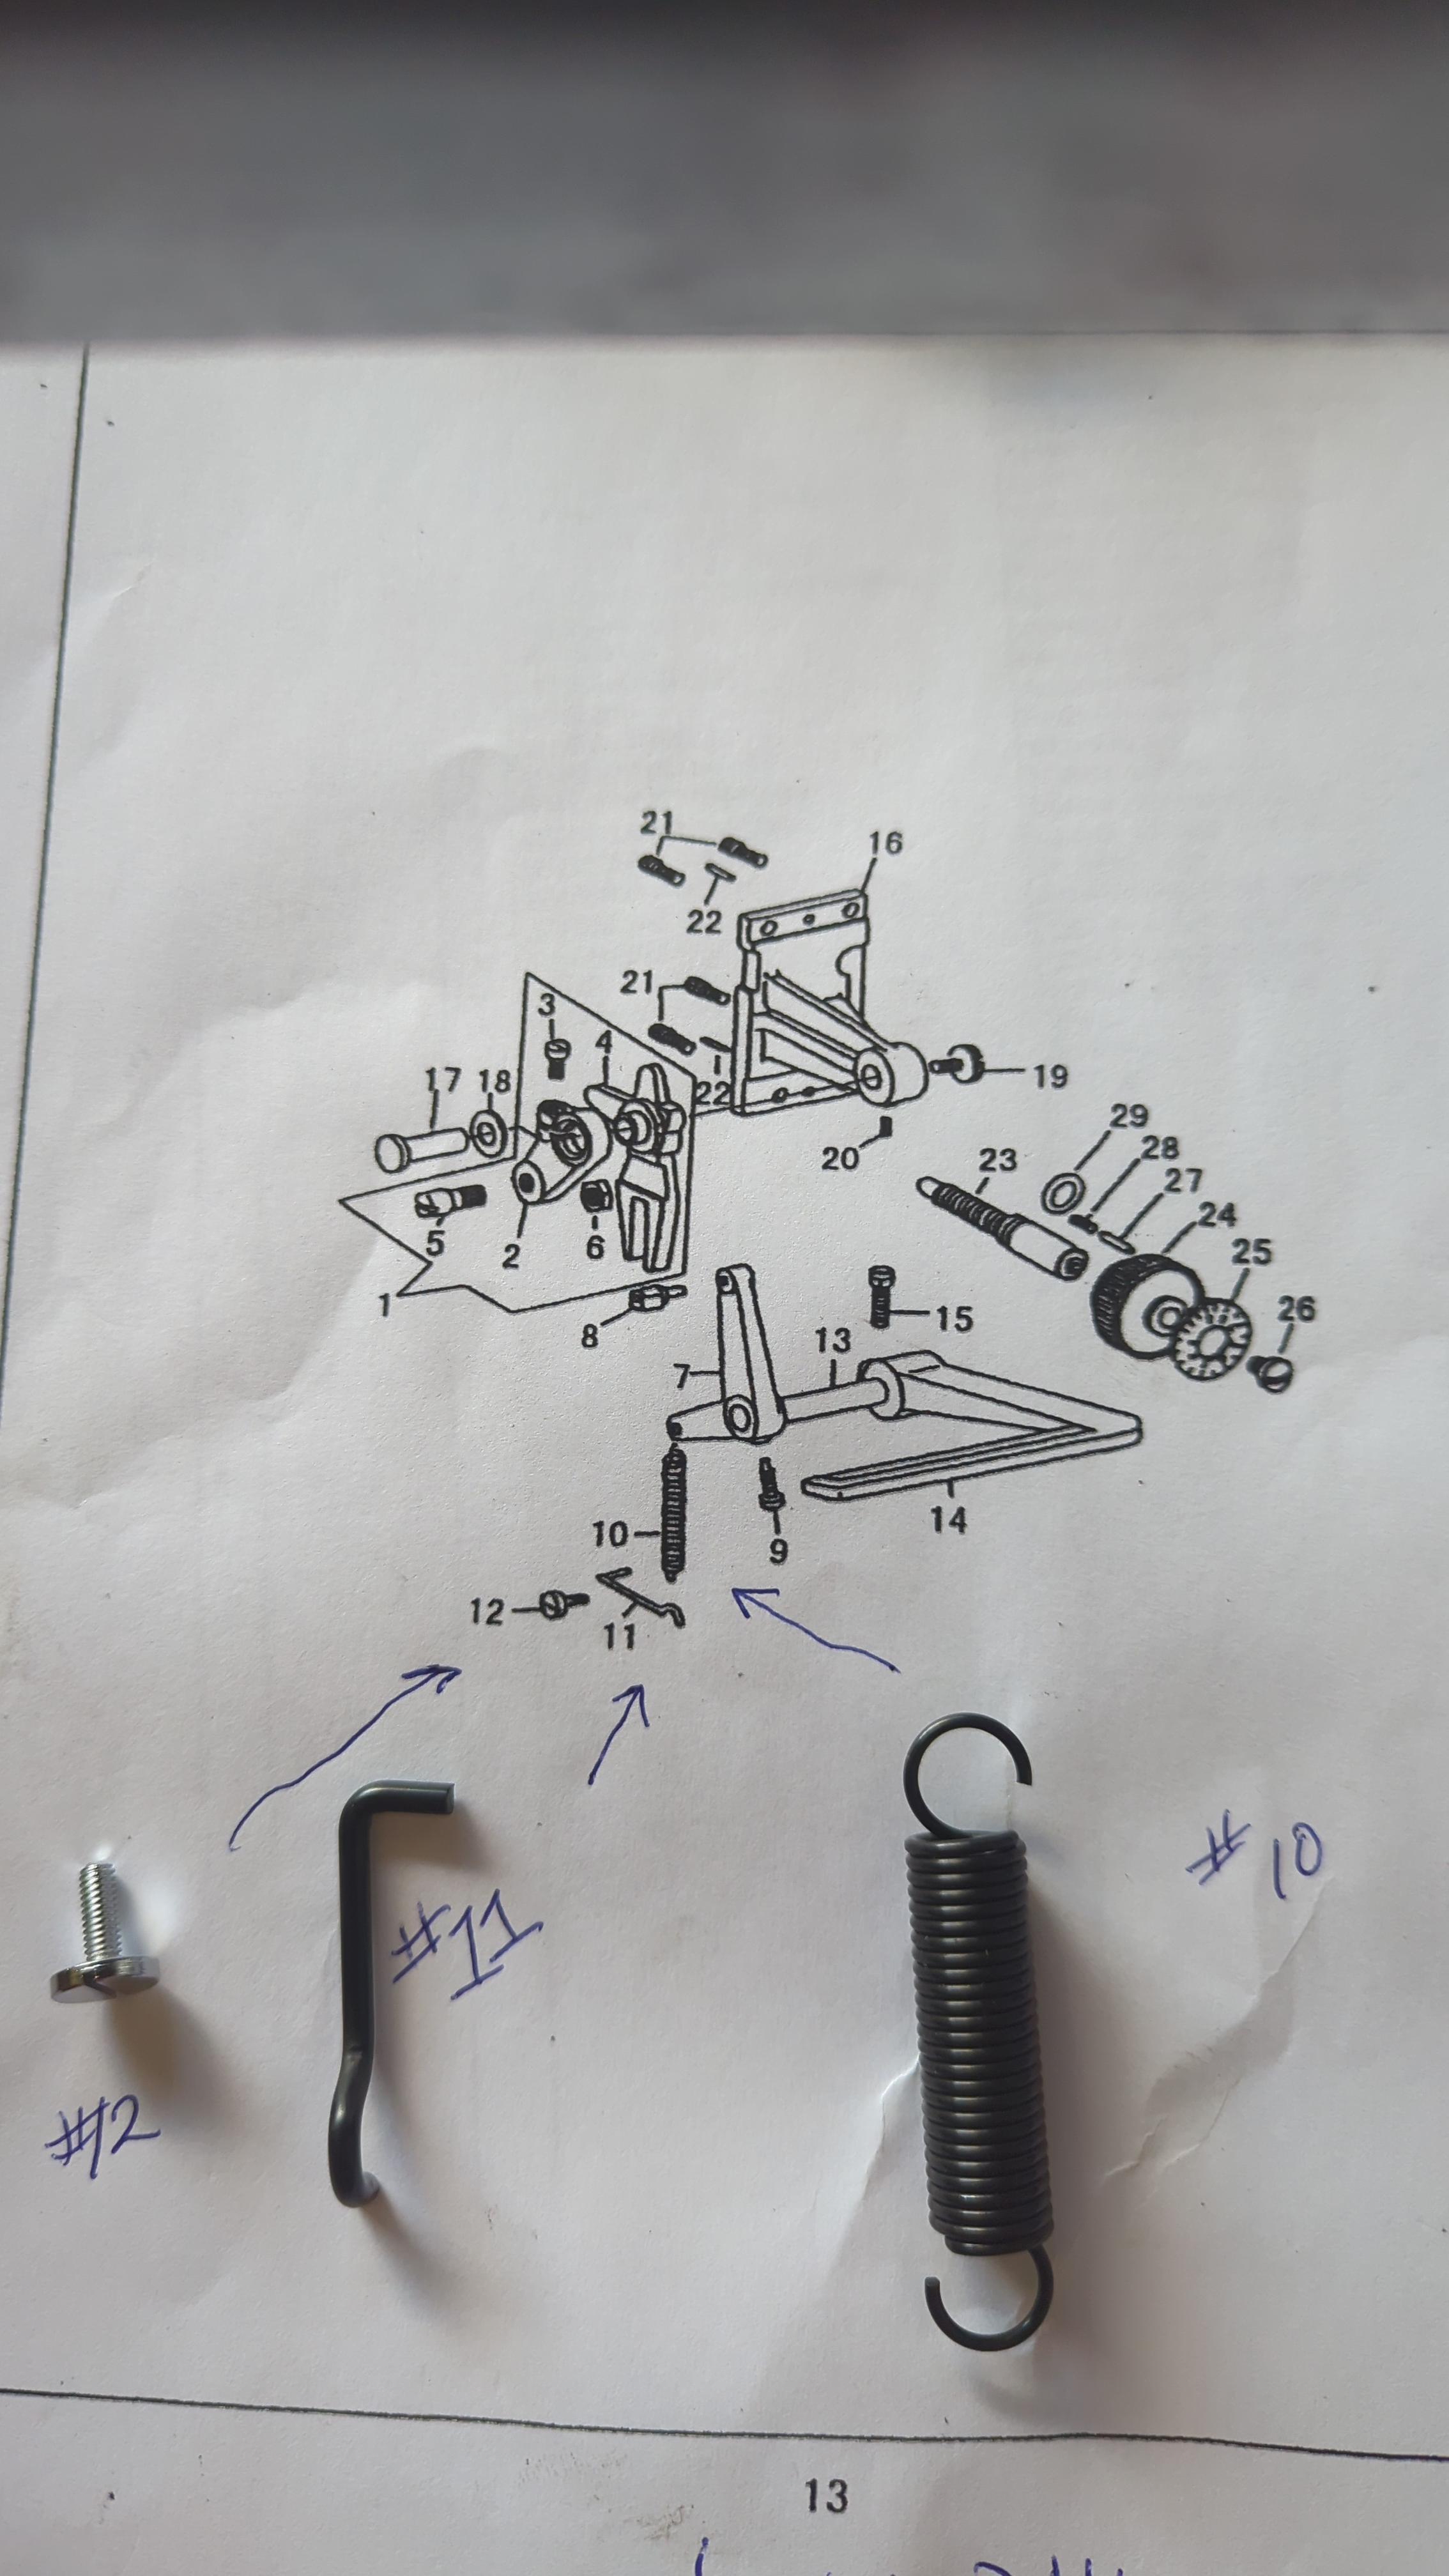
Here are some photos from underside of a different machine that may give you an idea where to look. You may notice that my spring is disconnected (too stiff for me!) But that's the hanger that it was on. Yes that's how I'm interpreting the diagram. Notice the screw has a very wide head---that will allow it to hold the U-shaped wire (#11) in place.
-
.thumb.jpg.6e903dd66163ad5672f00f144058c571.jpg)
Sewing machine stitches slanted-CB4500
Northmount replied to Crest's topic in Leather Sewing Machines
This is a machine type question so I moved your post to Leather Sewing Machines. Perhaps you could add some more information. What needle type and size are you using? What thread size and type? A picture would help visualize what you are describing. The machine guys crystal balls haven't been working for several years, so they really need your help by providing adequate information. -
-
Thank you very much I'm going to check it out
-
Good afternoon .I'm stuck with my consew 206 RBL 25 ..on the feed regulator I trying to install the reverse lever spring and the spring retainer. I can't seem to figure out where it goes . I think i know where the spring hangs from but can't find where retainer goes. Also is the screw #12 for the retainer ..the diagram for this is not to helpful for me .. I'm trying to do all this myself so I can learn and hopefully one day I I'll be the one who's answering the questions..and plus the closest repair shop is 4 hours away...so I'm sorry but you guys are are my only source of help...thank you for always being so willing to help . Here's a pic of what I've got.
-
 If you want to remove the dirt and grime you can use warm water, saddle soap, and a sponge. Then wipe off the soap with warm water, let it dry thoroughly, then wipe some neatsfoot oil on all of it. If you add wax after the oil soaks in it will deepen the color and add a little protection. Leather, like your skin, needs to breathe to stay healthy so I don't recommend keeping it in a tote. If you do store it in a tote make sure it's completely dry because wet leather will mold. Most tack stays in a barn or tack room its entire life and as long as it's taken care of it can last decades. Your tack is 100 years old, it's seen heavy use and it's still around. If you're going to keep it on display in the house or tack room just wipe it down every year to remove dust and condition it.