All Activity
- Past hour
-
Thank you so much for the explanation. All the needles are the same length except the one that doesn't hit the bobbin cover. I backed the screw all the way out, and the long needles are still too long. Unfortunately, the needle that works best doesn't have a size designation on it. The thread I'm using is 346. I should add that I bought this machine from a well known seller of leather goods. They didn't have any in stock so they sold me the demonstration model. They, rather than Tippmann, might have supplied the oversized needles.
-
According to their manual Page 13 THREAD SPECIFICATIONS: Breaking down what "794s Serv 1 230 ...... SM 53-5 " means i) the 794s Serv 1 denotes the needle has a chisel point tip made for leather sewing ii) the 230 denotes the size of needle. Here is a good reference chart for the thread size vs the needle size needed ( https://www.tolindsewmach.com/thread-chart.html ) iii) the SM 53-5 is the Tippmann Boss part number for the needle. You can order these directly from Tippmann using their part number or from other vendors just by specing the needle system, needle size and shape of the tip of the needle. The needle system (794) denotes the length of the needle. All 794 will be the same length. Are all the needles the same length when you put them side by side?? It maybe as simple as you don't have the screw holding the needle backed off far enough. Otherwise I would call Tippmann. kgg
-
It does cuir bouilli, literally Boiled Leather, sometimes using a hot wax bath
- Today
-
I'll endorse Fred's answer. From experience, the hotter the water, the harder the end product will be. If you have plenty of leather, it might be worth experimenting with a range between hot tap water and boiling water. I think the hot water trick played/plays a role in making leather armor.
-
Only hot water from the tap, and not too hot at that Boiling hot water will really harden the leather but will make it shrink by as much as 20%, in uncontrolled directions
-
Lovely and so much detail on that paint job. Good to know that's an option. Thank you for all of your suggestions!
-
What kind of leather do you use for concho belts ? I have use veg tan. what kind of stain , condition and sealer do you use ? what are the steps ?
-
My Tippmann Boss came with a bunch of needles, but only one does not hit the bobbin cover. All but one appear to be too long. Looking to order in more of the correct size, I could see no size marked on the one that didn't strike the cover (unlike the other ones). In the chart in the manual the needle size given for the thread I'm using is "794s Serv 1 230 ...... SM 53-5". I don't understand what all of this means. Is 230 is the size of the eye? What indicates the length? Why did Tippmann supply needles that are too long? Is this a set-up problem? The machine works fine otherwise. thanks
-
Hot water out of the tap or boiling water? Love the vacuum seal idea too. If this works as well as I hope it does, that might make it much easier to do a bunch at a time.
-
Very nice. That Landis sure does the trick.
-
 David L joined the community
 -
Unfortunately, the "W" series serial numbers aren't well documented. All we can tell is that it was made in 1943 or 1944. Meaning that it might have seen military service since everyone was pretty well focused on war time production. https://ismacs.net/singer_sewing_machine_company/serial-numbers/singer-w-series-serial-numbers.html
-
 Southernemma joined the community
 -
 Good thoughts!! I'm gonna throw you folks a bone, suppressor cases !!!!! Be the first on your block and you're in.... there is a lot of good money in custom work and you can make a decent living but beginners arent gonna get it, plain and simple it takes much longer than a week to learn to make a decent "custom" holster for every gun out there in every style imaginable. A good many folks like to put thier multiple-thousand-dollar weapons in quality leather, but most of them that buy high-dollar guns know quality and they know leather holsters and they know beginners just cant cut it. I'll also add the best selling guns right now are really cheap and no one will pay 300 for a holster for a 250 dollar gun and why you sell 10 x more. So like you have shown its a bit more complicated issue than just waking up one day and saying "ima be a holster maker". Here in my town, the local gun store has a big box full of used leather they get on trade-ins for 5 bucks a pop. po folks buy them instead of anything new so another rock in the road to riches from holster making.
 -
 stampdycom joined the community
 -

spring flowers and good food
Sheilajeanne replied to chuck123wapati's topic in All About Us and Off Topic
Good one, Northmount! -

Adler 205-370 - help an old man who screwed up
Constabulary replied to councilman24's topic in Leather Sewing Machines
Looks like the shuttle race is not installed correctly, -
 hmm.
hmm. - Yesterday
-
Being a moderator on a forum is a selfless task, often having to deal with all sorts of numpties! If that's indicative of Redhorses's attitude then I wish him bon voyage and good luck on whatever forum he goes to. Unfortunately for him this is the forum he really needs.
-
Dilute either the Future or Resolene 1:1 with water. Use several thinned coats, maybe 3. I prefer to use a version of 'Future' which I can get The paint won't help stiffen the leather Thin the paint and apply thin coats to build up the colour This knife scabbard was made in 2007, painted with acrylic model paints with no varnish to protect it. It was used regularly at events, tossed into a kit bag, generally neglected. It came back to me for repainting late 2016. After 10 years;

-
Something else that might work is shellac. It's used to stiffen felt hats, dissolved in alcohol (I used methylated spirits) and sprayed on the hat. I haven't tried it on leather but it might work on floppy leather.
-
Look great. Are those snaps, or dome-headed binding screws? I like that smooth look. I also like the little 'mind changer'. Larry
-
 zsteve joined the community
 -
Thank you and everyone else for teaching me and answering my questions! My family tended to never throw out cleaners, so I do have some of the old Johnson wax Future acrylic floor polish. Not sure though if I should quickly put it up on Ebay. lol. Someone else suggested avoiding chrome tan for my beaks - but it sounds like it's easily recognizable. Yay that. And it also sounds like I could keep using scraps then - even better! Since I do have some of the old-school Future, would you suggest using that or the Resolene? Would you recommend diluting either one with 50/50 water? If I used paint (I have that cheapo acrylic craft paint) would that help with the stiffening or eliminate the need for the floor polish or Resolene? Should I water it down or use it straight out of the bottle? Sorry for so many questions. I tend to stick to dry materials for my projects. I've learned the hard way that when chemicals are introduced to a project, i.e. glue, finishes, clay, paint, etc; they can look great for a long time, but can eventually fail big time. I had something randomly fail 30 months after I had boxed up the items - some were fine, some were not so fine. I've tried acrylic medium that the manufacturer insists always dries rock hard - mine is rubbery with only one coat.
-
One thing that may be of help ... I've found soaking veg tan in hot water and letting it dry makes a stiffer dry piece than room temp water. This was about 10 ounce leather but might be worth a shot. Vacuum sealing the pieces for about a half hour seemed to make them even stiffer. Just a seal-a-meal. The bags have a textured inside, which showed up on the leather.
-
When moulding it; give it a good soaking and a little bit of stretching. Clamp it up and let it dry. Resolene will work if can soak in, so usually not chrome tan Floor wax ? do you men 'Mop & Glo'? despite what it says that is not a wax but an acrylic varnish You can use acrylic paints on leather. Any paints. Don't go buying expensive ones. I use paints meant for plastic models. They're cheap. They'll only crack off if you put the paint on really thick, which you won't have to do
-
Basically you have veg tan and chrome tan. Chrome tan is used on furniture are rarely can it be wet moulded to hold a shape. Chrome usually shows a blue line in centre when its cut. I see from your photos your leather is not showing this blue Veg tan can usually be wet moulded and when dry will hold its shape
-
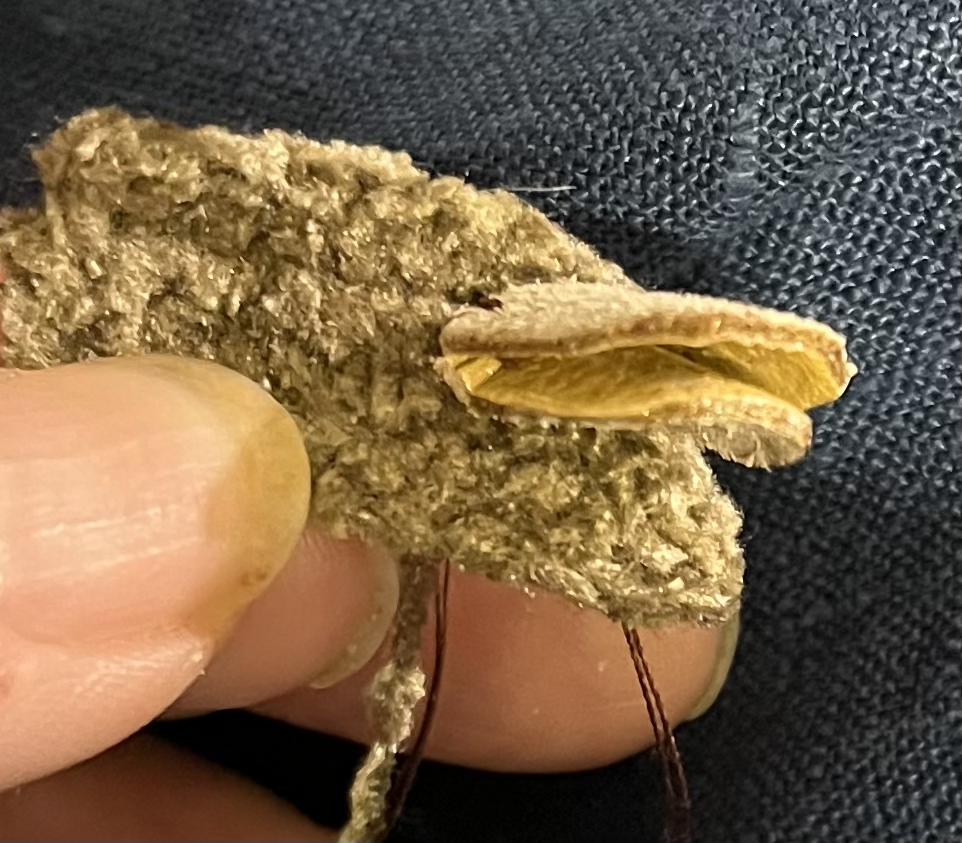
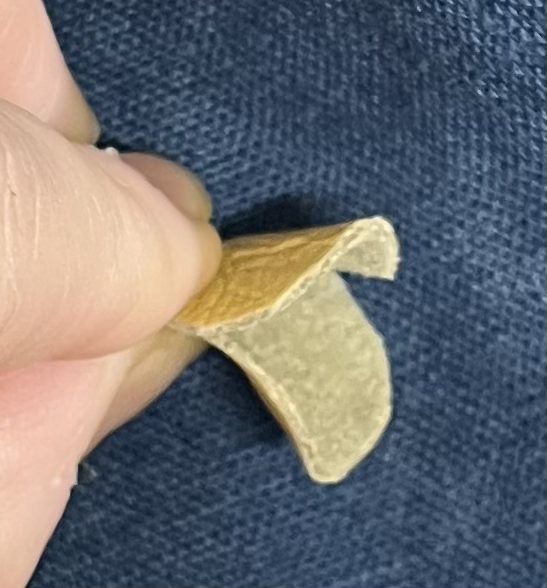
Here's a photo of one of the more curved ones.
-
Here's a rough photo of one of my experiment beaks. That's my thumbnail in the photo to show how small it needs to be. That's the one where I put a little Elmer's on the edges. I wrapped it around a skewer overnight, after cutting it. With the same leather, I've gotten a better curve by squishing and hopefully stretching it a bit more. Not sure if it should be stretched or just wrapping it around is enough or if I should wait to cut it out until after I stretch it. If I use the Resolene or floor wax, would that allow this to work with random scraps or should I use veg tanned only? I can use acrylic paints on leather? It won't crack or scratch off?