ClayB
-
Posts
2,063 -
Joined
-
Last visited
Content Type
Profiles
Forums
Events
Blogs
Gallery
Everything posted by ClayB
-
Thanks for sharing the pictures Holly. The really neat thing about a show like this is the variety of different things people make. I am not much into fish or bright colors, but that is an awesome picture! And that picture of the two trees and the moon looks like it was really cool too. Looks like it might be a little bit blurry, glad I am not the only one that does that ) I'd like to get a better look at how they colored that one and the cat. I always like to see what kind of designs other people come up with to put on saddles. Glad you took the pictures that you did and shared with us. I hope we get to see more from others that were there soon. Clay
-

Items stolen from Boot & Saddle show in Wichita Falls, TX
ClayB replied to Johanna's topic in Leatherwork Conversation
In addition to what was stolen from Robert Beard, the American Saddle M akers Association also got hit. Here is a message from Verlane on what was taken there. Bob's tools were not the only thing stolen at the Wichita Falls show: ASMA (American Saddle Maker's Assoc) was also ripped off. They got 18 of our Green Books, our banner, and our hair-on hide table display. It's very unfortunate that this kind of thing has to occur at shows where you consider everyone there your friend. If someone tries to sell or give you a Green Book, it was not authorized by ASMA. If that happens perhaps you'll be kind enough to report the name to me off-list. Verlane -
Interactive demonstrations via chat technology?
ClayB replied to Brigid's Forge's topic in Feedback and Suggestions
I went to that site and those are kind of neat. If something like that could be done here, I would be happy to make up a few lessons on things that I know how to do. Clay -
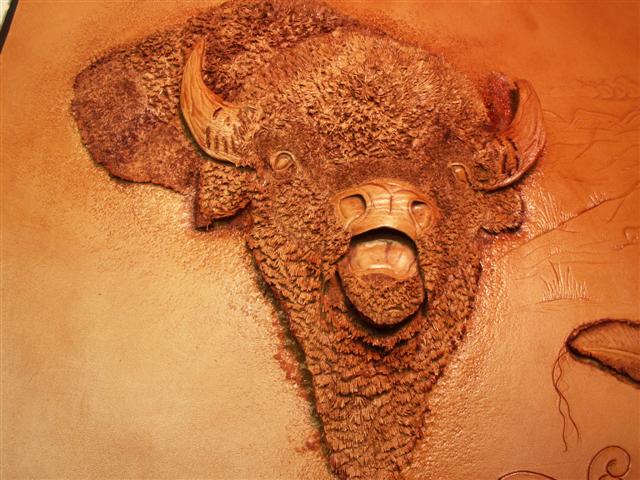
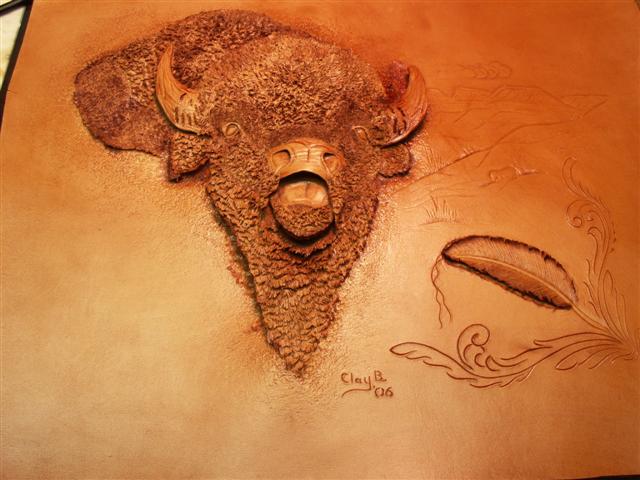
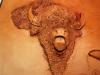
I told some of you that I would put together some in-progress pictures of an extreme embossed project. I took a lot of photos of the buffalo I finished up this past weekend. I am not sure what the best way to put them up on this site is yet, so for now I have them on my own photo site with brief descriptions of what is going on. You can see them at http://clayb.dotphoto.com/CPViewAlbum.asp?AID=3953699 This is my free photo storage site and some people have troubles getting into it, so if you have problems, let me know and I will help. Clay
-
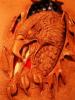
Decided to color it like Robb did in the video. It is really hard to get a decent photo of. The white is dry brushed really lightly on top of the hairs. It is kind of weird, depending on the direction you look at it, it can be almost all brown to almost all white. Not sure if I like it yet, but it was fun to do. If I do another one, I will color it like a normal buffalo. Clay

-
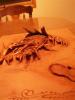
I just finished up the carving, embossing, hairing on the buffalo from Robb Barr's video. Still have to figure out how I want to try and color this one. On the video, he made a white buffalo. Lots of different hair lengths and textures on the buffalo so I learned some new techniques again. I took a bunch of photos while I was doing this one. I hope they will show some of the things that you can learn from Robb in his videos. He really came up with some neat ways to create realistic looking animals. I am not sure the best way to share the photos on this forum, but as soon as I figure that out, I will get it done. Clay

-
Hi Kate, I don't sew alot, but when I do, I do the same thing. I will punch the holes before I start sewing. I have tried doing it the right way many times, but either I am just not coordinated enough or I just need more practice. On small items, I use an awl. On larger items. I sometime use my Boss sewing machine without any thread in it. It would be nice to just sew with the Boss, but I haven't figured out how to get it set right to sew and I get frustrated so for now it is an expensive hole punch. Makes nice even holes ) Someday maybe I will learn to do it the right way. Clay
-
This reminded me of something Bob Beard brought up in a class making a checkbook cover. Bob said that he doesn't gouge a stitch groove when he sews. Why? Because if the grain side is where all the strength is, and you gouge that away, didn't you just remove the strength of the leather? Bob said that he will use a modeling tool to press in a stitch line without cutting into or removing the grain side. Goes against most instructions on sewing leather, but it does bring up a valid point. Clay
-
if your neatsfoot oil is moving around in the leather, I would have to wonder how it was applied, and how much you put on? I use 100% Neatsfoot oil on different items. I rub it into the leather well with a piece of sheepskin. Let it soak in and then add more if I think it needs more. Too much is worse than not enough. If your leather is greasy, you used way to much. I also like to use neatlac over neatsfoot oil. I have heard lots of people say not to do that but it works for me. Once the neatsfoot oil has evened out, I apply Neatlac with another piece of sheepskin. I work the Neatlac in really well too. One thing I heard a few years ago(I think from Peter Main) was to not apply another coat of Neatlac once the first coat has dried. You can apply a second coat to insure coverage, but do it before the first coat dries. I haven't had any problems with the Neatlac cracking when I do it this way. You can still use spirit dye or oil dye after applying oil to the leather, but not after the neatlac. You can mix spirit dye in neatlac to give it color. You can also use antique after the Neatlac. That was how I was told to get the Sheridan style finish. When I have done that, I then used Tankote as the final finish. One reason people give for not using Neatlac is that it seals the leather and then you cant go back and oil it later. I talked to a local saddle maker about that. He told me that the oil will still go in, it will just take longer. I tried it after he told me that and found he was right. But after sitting overnight, the oil did soak in. It also darkened the item quite a bit. I am not trying to start an argument here. I just think that when it comes to working with leather, there aren't a whole lot of absolute do's or dont's. What works for me might not give the results you want. Always practice on scrap before taking the chance of ruining a project you have worked hard on. Clay
-
Look what Clay sent me
ClayB replied to Johanna's topic in Purses, Wallets, Belts and Miscellaneous Pocket Items
Aw shucks, Johanna, it really wasn't that big a deal Just a small token of my gratitude for all you have done with this forum, and the other stuff you have done for me. I hope the judges at the show next week will like my entries half as much as you liked your shoulder pad. Clay -
I will try and be on about 8 Central time Clay
-
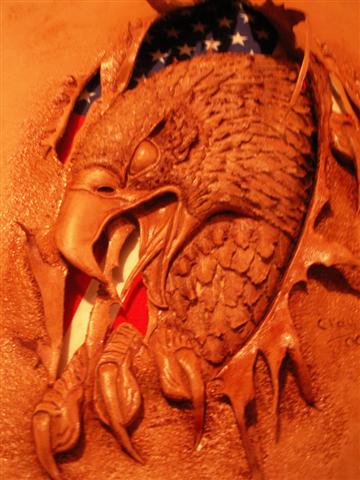
Hi Al, I really like doing the 3-D animals. I started another one yesterday and am taking pictures as I go. I will post pictures and descriptions of what is being done in each. This will give an idea of what it takes to do one of these kinds of projects but probably wont be complete enough instructions to do one yourself. The videos from Robb Barr are pretty good and if anyone has any questions after watching them, I would be happy to try and help. I emailed a friend that works at Hidecrafter and she confirmed that they do carry the videos in both formats. She said you just need to make sure you tell them which format you need when you order. I have quite a few videos on many different leather carving techniques and have learned a lot from them. I probably wont get back to the latest project until the weekend and will try to post some "in progress" pictures then. Thanks all of you for the nice comments on the eagle. Clay
-
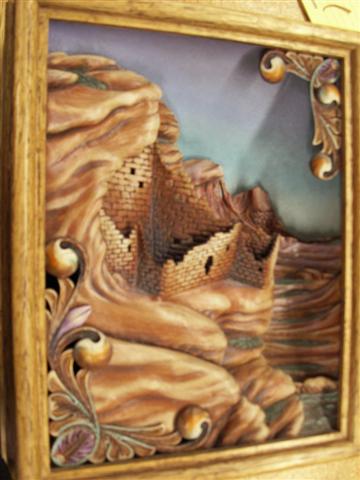
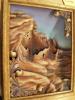
I had the opportunity to take a class from Robert Beard a couple months ago. The subject for the class was a cliff dwelling ruin. We didn't have time in class to color our projects, but Bob told us a little about how he colored his original. I would never have thought to use different colors in the sky but Bob did and it is very effective. Like Dale did, Bob went from white to blue. Bob took it one step farther and went from blue to violet. The different colors give the sky depth. Nice job on your deer Dale. I am sure it looks even better in person. Clay
-
I think part of the problem might be that at the bottom of the screen where it tells who is in the live chat room doesn't seem to work very well. Even if it doesn't say anyone is in the room, go and check and there might be some people in there. Johanna showed up this week. Slowly, this might catch on. Clay
-
I'll try and be there too. Clay
-
I agree 100% with Bruce on the awl blades by Bob Douglas. I broke the Tandy awl blade that I was trying to sew a cantle binding on a saddle with. Since our local leather store had closed down, I went to a local saddle shop hoping I might be able to buy an awl blade from him. He told me to get one from Bob and that was all he would use. I couldn't believe the differnce they made over the Tandy awls that I hade been using. Bob's blade slide right through all the layers of leather on the cantle binding with very little effort. I know it's sometimes hard to justify the cost of really good tools, but once you use some of them, you realize they are worth it. I don't hand sew like Al Stohlman teaches in his books. I still set the awl down a lot. I know that sometime I should just practice until I get it figured out, but I don't sew all that much and haven't taken the time to learn to do it properly. Clay
-
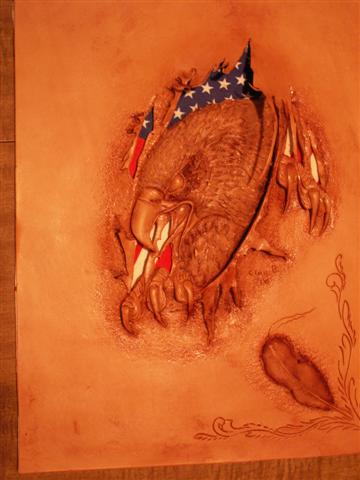
I started this project last weekend. It is another of Robb Barr's video lessons. I have never been all that interested in doing an eagle, but several of my family members really liked this pattern so I decided to give it a try. All those tiny feathers really intimidated me but the instructions were really good, as usual on Robb's videos. Once I got going, I found I REALLY like making feathers. I have to look around and see if I have the right color paints to finish this up. Each time I do one of these projects, I have to wonder how Robb thought all this stuff up. He really did have an amazing talent!! This project is really different and was a lot of fun to work on. Clay
-
something came up and i had to leave but will be back around 8:30-9 pm mountain time.
-
I like the idea of a regular scheduled time. For me, Saturday or Sunday evening would probably be best. To get people from the east and west coasts on at the same time might be difficult. My suggestion would be to try 9 PM eastern time. That makes it pretty early on the west coast, but otherwise it gets pretty late on the east coast. What's everyone else think?
-
Cowboy cuffs to match existing rig
ClayB replied to pepin1948's topic in Saddle and Tack Accessory Items
Holly, I know a lot of people say not to do this but you might try just oiling the leather with pure neatsfoot oil. Rub it in really good, let it soak in to even out and then apply neatlac. Rub the netlac in also really well with a piece of sheepskin. I use that on quite a few projects and it comes out about the color in your picture. I haven't had any problems with it cracking or anything else. Clay -
Hi Karl, I have been watching all your posts and look at your pictures over and over. I really like what you are doing. I agree with Johanna that carving portraits would have to be about the hardest thing to do. Profiles are hard enough, but you have done some straight on views and done them very well. You really did capture the likenesses of both Custers. On your picture of Tom, there are a couple things that just don't look quite right. His lower jaw looks like it has a lump between the chin and the ear. The photo shows a weird lump there too, so I am not really sure why the carving looks wrong to me. I think if it was mine, I would try to shade it a little more to make this lump not so prominent. The other thing is that the ear kind of stands out. It sort of looks like you might have beveled all the way around the ear, making it look like it is floating beside his head. It could be the stain/ antique you used that just makes it look like that in the picture too. Both of these are small things. I think you did a really nice job on the mouth, eyes, the hair, the jacket. I hope you take this critique in the spirit it is given, and not in a bad way. I really hesitate to give comments on other peoples work because I do NOT want to offend anyone. I will be looking forward to seeing more of you work. Thanks for sharing. Clay
-
I was thinking I would try and be in the chat room Saturday evening around 6PM mountain time. If anyone wants to join me they would be more than welcome. No topic or anything, just hang out and get to know each other. Clay
-
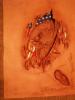
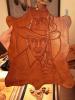
Johanna That would be Bob Brown The artist who drew the pattern. Here is a picture of a piece of Bob Brown's work. This is a picture he did of Billy the Kid. It was given to Robb Barr. I saw it at Robb's sister's house when I was visiting there. I think it said on the back that it was done in 1938. Robb also had carved leather pictures done by Ken Griffin and Bill Gomer and other leather items by people from around the world. It was neat to see who's work he admired. Clay
-
Tips on holster-making?
ClayB replied to Tom Katzke's topic in Gun Holsters, Rifle Slings and Knife Sheathes
-
Thanks Tom and Holly, As for the hairing Tom, I tried to do it the way that Robb did in the video. I got side tracked a little though. Robb used a pointed figure beveler to give texture to the body before he used the hairing knife. I never really liked the Craftool pointed figure beveler I had. The end was blunt and it really didn't work like I thought it should. The first tool I ever bought from Bob Beard was a fine lined pointed figure beveler. It has a very sharp point and the fine lines make it nice to use on figures with hair. I used this on the body of the deer and found that it gave it a really nice hair effect without even using the multi-blade knife. I think the pictures of the deer without color were taken after just using that tool. I thought about just leaving it like that, but then before coloring it, I did use the multi-blade knife and a scalpel to seperate the hair. I tend to be a lot more reserved with the hairing than either Robb or Jan. I think the longest I ever make any hair is about 1/4 inch and usually shorter than that. On some of the projects that Jan has done in classes, when he lifts the hair with the scalpel, it can end up looking sort of like scales. I think it is probably because of the time limitations in a class situation. I am sure that when he does a project at home, he takes a lot more time seperating the individual hairs. I try really hard to make sure mine dont end up looking like that. Usually when I compare my projects to his, mine always had a lot finer looking hair. I dont know if that is good or bad, just the way I do it. In a class with Bob Beard, when I compared my carving to his, I noticed that he bevels a lot deeper than I do. I asked him about it, and if I should try and do mine differently and he said that a persons personality shows in their work. He said that he could see that I was quiet and easy going and it showed in my carving and tooling. I guess if he is right, it shows in the way I do hairing too. Not sure if I mentioned the differences between Robb's technique and Jan's before or not. While they both get pretty close to the same results, they do things a little different. Jan cuts, bevels, hairs with the multi-blade knife and then the scalpel, then embosses. So far from the videos that I have watched, Robb cuts, bevels, embosses, then re-bevels, then does the hairing. I discussed this with Jan and he has some good reasoning for doing it his way. He does the hairing when the leather is still pretty flat. When you emboss, the hairs lift and seperate when you are pushing the leather from the back. The down side is you cant really go back and re-bevel after you emboss because the hair would be mashed down. The way Robb does it, you can get more definition in the muscle by going back and re-beveling, but it is a lot harder to do the hairing once the embossing is done. The muscle stucture created by the embossing leaves high and low spots that are hard to get into with the multi-blade knife and the scalpel. As with most things you do with leather, there isn't just one right way to do things. In talking with Jan, it sounds like they were both experimenting with this technique at the same time. Jan saw some of Robb's work and started asking him how he did some things. Robb told Jan to take one of his classes so he did. When Jan started, he was cutting each individual hair with a swivel knife. If I remember right, he was using a mixture of sawdust and glue to fill the cavity from the embossing. From Robb's class, he learned about the multi-blade knife and the leather dust. Jan did a wolf that was featured in a doodle page in 1996 using his original techniques. After that, they began competing with each other to see who could get thier animals the farthest out from the leather. The result of thier friendly competition was Jan's grizzley bear that was almost 6 inches off the leather. I really wonder what kinds of things Robb would be doing today if he hadn't died so early. Well, that got really long winded! I really admire the work these guys have done (could you tell?) Clay