JLSleather
-
Posts
7,383 -
Joined
Content Type
Profiles
Forums
Events
Blogs
Gallery
Store
Everything posted by JLSleather
-
Yes, there IS a reason. Rather like the emperor's new clothes.... find a bunch of people (market) who are ignorant enough (don't know any better) to buy something BECAUSE SOMEBODY ELSE SAID SO, regardless of quality (many of these are bought site unseen) because somebody will be impressed that you have it (insecure). I understand Elvis' used underwear sold at an insane amount at auction. That doesn't make me want one, and I was NOT bidding
-
I don't do formulas, nor do I recommend anybody else use them, nor do I pay anyone according to them. Don't take this any kind of personal, but I'm going to be a bit silly to make a point here. Your work is worth what it is worth - simple as that. And it's not worth what it's not worth. The TIME you took to make it, the EXPENSES you had where you make it, what the "average wage" is, what you think is a "fair" profit ... NONE OF THAT has anything to do with what your item is WORTH. Let's assume you made a belt. It works - holds my pants up just fine, so it qualifies as a belt. But its not really very nice looking - the ones at the box store look much nicer and cleaner. Some examples of how ridiculous it is to use these "formulas" to price it: Well, yeah, it doesn't look like much, but it took me 6 hours to make, so that's $150. And I have lease fees and electricity about $100/day, so 1/4 of that is another $25, and I drove here to sell it, so that's $10. Add that to the $20 it cost me to make it, and this belt is now $205. Oh, and I need to make a profit, so the ugly belt is $250. Now, you MIGHT find one here and there who will buy that. Mom will probably take TWO But as a rule, you'll be done making those shortly. Did you spend a few hours making videos to "promote" (pronounced BS) your work? You can add that to the price if you want, but I will NOT be paying more for something because there is a video about it. And I'm not buying the video, either... if I came to buy a holster, I want a HOLSTER, not a SHOW ABOUT a holster. Your video did not increase the VALUE of that holster one bit. MOST of "pricing formulas" is just more BS. You can probably quickly find 100 people to SELL you a formula (probably comes with some videos) for a price. When I'm BUYING something, I COMPARE THE GOODS. I want to know what I'm getting and what I'm paying -- the rest is just noise. Not silly enough? What if I buy a new truck? Isn't that an expense? So, my not-very-well-done belt is now "worth" $500/month more than it was? What if I move to a bigger, nicer building? Does that make my belt "better"? Obviously, that's ridiculous. Also ridiculous to suggest that someone get $25/hour (or 50, or whatever) based on something OTHER than the quality of what they're selling. A few years back (or maybe 15) I had a buddy who was doing some renovation work. Started to make a few $, and bought a new truck - and he was a bit proud of his first ever "brand new" truck. Fair enough, he can afford it and it's what he wanted. Course, his "expenses" went up, so his prices went up. Showed up at the house one day, basically wanting to show off his new truck. It was nice. I said so. And he launched into the "speech" about how customers need to see you in a nice vehicle when they think about hiring work on their home - it shows (according to Richard) "professional" and "responsible". I told him I'd rather see the truck that looks like the guy in it has done some work, maybe shows some tools with some wear on them (seriously, anybody can go buy a shiny ladder and mount it on a shiny truck). When I see a shiny truck pull in my drive to discuss the new driveway I'm ordering, I don't see "professional and responsible" - I see a guy who likes shiny trucks and thinks I SHOULD PAY for it But, now I'm running behind for this morning.... so maybe somebody will get something out of these old blog posts .... go read em (I think they're both informative and entertaining, but - regardless - there's no charge). Git lookin'... they'll be moved in the menu by Monday https://www.jlsleather.com/compare-items/ https://www.jlsleather.com/hand-made-well-made/
-

What the heck is going on here!!!?!?!?Help???
JLSleather replied to YinTx's topic in How Do I Do That?
if the width is consistent, don't worry about it. -
When can you call yourself a craftsman?
JLSleather replied to Handstitched's topic in Leatherwork Conversation
Yup, gonna go with that. Even then, I try to keep in mind that I decide what I call ME. Next guy's tag or title is on him -
When can you call yourself a craftsman?
JLSleather replied to Handstitched's topic in Leatherwork Conversation
Yup. Not very popular to say these days, but.... yeah. I don't think that's the case any more. Do a search on ebay and you'll find folks making $39 holsters... and selling THOUSANDS of them. Hideous, poorly designed, and badly executed. Still, $25 profit... 10,000 times... pretty good chunk of easy money. I would NOT call him / them / whatever a "craftsman", and yet .... they still there. It seems that many these days are more interested in FAST and CHEAP than about quality or beauty. Each his own, I suppose. -
When can you call yourself a craftsman?
JLSleather replied to Handstitched's topic in Leatherwork Conversation
Tuesdays. I think you should call yourself a "craftsman" on TUESDAYS. And sometimes on Saturday. Point being... you'd have to DEFINE "craftsman". According to one dictionary, a "craftsman" is "a person who is skilled in a particular craft". So, who or what is "skilled"? Art is too subjective to rigidly define. I admit it... I see things for sale EVERY DAY that you couldn't PAY me to carry to the landfill for you. It's THAT badly done. I have personally THROWN AWAY items I did BETTER than that, but tossed them out as unacceptable work. BUT somebody BUYS those things I'm talking about. By DEFINITION, a "professional" is someone who gets paid for what he does. So, can you be a "professional" WITHOUT being a "craftsman"? I've always had a problem with the idea that the length of time you've been doing a thing has anything to do with how good you are at it. I personally have met a lot of people who have done one thing for 20 years and STILL SUCK at it. AND I know people who are brand new to something they decided to like and showed a genuine talent at it - far surpassing some with "20 years in" . One guy in the tool and die "trade" had nearly 30 years on the job. Turns out, he was there because he was one of the first in the department there. He knew how to get through a day THERE, but wouldn't pass a proficiency test ANYWHERE else, and after 30 years of learning nothing new, basically kept his job simply because the union said you can't fire him unless he goes on a shooting spree through the building. End result, he was one of the highest paid, but the least skilled. And I don't personally think it's about the number - or range - of skills a person has. You don't need to know everything there is to know about belts to be a skilled belt maker. Nor do you need to know how to design sundry types of wallets to be a very good belt maker. So having thought for a minute, I'm gonna say you are a craftsman when that craft is what you do the majority of the time. If you install or fix roofs, you are a "roofer". If you work on plumbing, you are a "plumber". ANd if you craft.... -
Computer Drawing Software For Making Leather Patterns
JLSleather replied to Blackey Cole's topic in Computer Help
8 years ago. You'd think with all the people touting their videos these days, surely SOMEBODY has a video out of how this is done ?#@! That would be THE video I'd be willing to endure watch. I have blue guns (and others). And i have a flat bed scanner. Still haven't figured out how to make those into an accurate "pattern". -
Yup, we use PayPal card readers.
-
Paypal is painless. There are other 'versions' now that didn't exist before, but Paypal has always treated me well (and still do). As for money, I recommend billing up front for anybody you don't know. I HAVE done work prior to payment, but only if it's something I would normally make and sell anyway. AS A RULE (and I do break them); Basket stamped belts - I probably have some on hand most of the time. Holster for a model I make frequently - no bill up front most of the time. Tooled belts with patterns I already have - pay a deposit, amount depending on a few things. "Normal" work flow items, but requires additional materials not usually in the shop (such as exotic leathers or unusual hardware) - pay for the "extras" up front, but not the whole item. Tooled and/or stamped with names, initials, or custom (and off the path) colors or shapes -- payment in full before I start that.
-
 That will pass
 -
-
hydes purdy good
-
EVEN THAT is a preference question. What is the 'best bang' for my buck is to get 7/8 oz AND 3/4 oz. Together, they make a great belt -- and I mean TOOLED belts, "jeans" (casual wear) belts, and "carry" belts - all in the 11/12 oz range. This IS how I make them. The 7/8 also makes great leather holsters and the 3/4 also makes a solid leather wallet. So... it "saves" to get both of these on hand. I "could" get JUST 8 oz, and split the 3/4 when I need it, but I use enough 3/4 that that would actually be CREATING work for me. And the 8 oz lets me tool relatively deeply. The "best bang' for the guy who only wants to do a "few" (or a dozen) belts might be different. Maybe you don't want to stock multiple thicknesses, and maybe don't want to have to buy (and /or sharpen) a splitter (I don't blame you). In that case, maybe a guy gets some 6/7 oz. Narrow belts can be made from a single thickness and survive just fine for "normal" wear. I've made a number of belts this way . But it's also thin enough that you can line it with the same leather, making it 2 layers of the same hide, and not have so much bulk it's ridiculous. You can play with it a bit, won't take long to get the feel for what YOU and your customers like. Certainly, you would make one for yourself. Then when you talk with people considering getting a belt from you - and they often won't know what they want - you can show them one they can see and feel and decide if they want one lighter or heavier.
-
I like wood personally -- absorbs moisture/ humidity, which should keep the dies from rusting longer. But I suppose id S.A. you don't have so much of that.
-
Well, yah, basically cosmetic... but smoother is easier to take on and off, too.
-
Yeah, you could. Got a 9 oz belt, line it with some 2/3 or 3/4 and you're fine. Some will line up to tell you about their belts 1/4" thick... but I only make 'em that heavy by specific request, and not too many want them that thick. Whatever yer using, just be sure to use a piece that's clean and free of wrinkles.
-
Conceal carry holster for middle of back
JLSleather replied to Pappys Leather's topic in How Do I Do That?
I was gonna just by-pass that. Changed my mind. I looked that up, seriously. If you read the definition of "asinine", it sounds like they're talking about a guy who gives psuedo-morality lectures under the guise of "just a piece of info" ... without even touching anything resembling a legit response to the guy's question (by way of reminder, the question was "Does anyone have a pattern they could share?") as·i·nine /ˈasəˌnīn/ Learn to pronounce adjective extremely stupid or foolish. "Lydia ignored his asinine remark" synonyms: stupid, foolish, pointless, brainless, mindless, senseless, doltish, idiotic, imbecilic, imbecile, insane, lunatic, ridiculous, ludicrous, absurd, preposterous, nonsensical, fatuous, silly, childish, infantile, puerile, immature, juvenile, inane, witless, half-baked, empty-headed, unintelligent, halfwitted, slow-witted, weak-minded; informalcrazy, dumb, cretinous, moronic, gormless, damfool; informaldivvy, daft; informalglaikit; informaldumb-ass, chowderheaded; informaldof; informaldotish "another asinine bit of advertising" -
Conceal carry holster for middle of back
JLSleather replied to Pappys Leather's topic in How Do I Do That?
The "could happen" is WAY over blown these days. I should maybe stop making holsters, I guess? If someone fell on their hip, they could get hurt badly. WAIT.. if somebody fell on the OTHER side, they could cause a discharge at them or someone else. I shouldn't sell my car when I get a new one, since somebody could get in an accident with it. AT SOME POINT, people have to be responsible for what they do. The store sells me Snickers bars. I eat them like a junkie. But if my neighbor is allergic to peanuts, this does not warrant the store NOT selling SNickers bars. But for THIS rig, sounds like you bout got it whooped - you alrady have a "close" pattern, and you already know how you want to build it... so... just a matter of making one, see how you like the look and feel of it. -
I'm in stitches !~
JLSleather replied to SShepherd's topic in Gun Holsters, Rifle Slings and Knife Sheathes
That sheath absolutely is NOT awful. At this point, I'd personally go for the oil only. I don't like ant-streak AT ALL, but I certainly would never put it over well done stitching! -
I think you'll NOT like the flat needles. But honestly, it might be good to go on and try them, so even if you DON"T like 'em at least you'll KNOW for yourself.
-
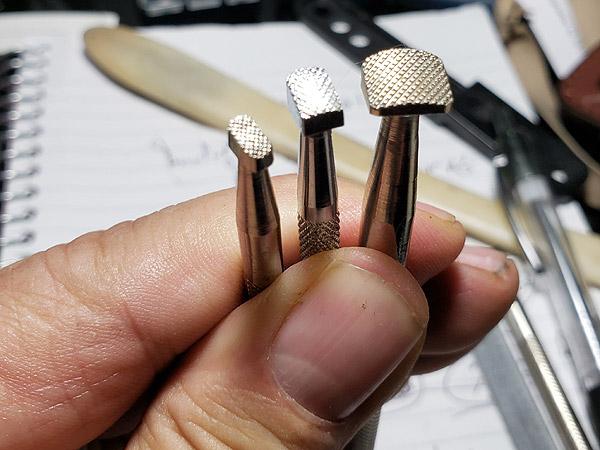
The 936 is HALF the size of the 701. I wouldn't be without the small bevelers -- you can hit it twice where you need to to fill the size of the 701, but you can't hit the 701 in the space of the 936. And the 803 is easily twice as wide as the 701, so on those long, less curvy sections you can move faster. Here's the tools involved here.... 936, 701, 803. And ABHandmade is correct... a smooth tool or two doesn't hurt a thing BTW: I used to have a set of undercut bevelers - long time ago - and also those "lifter" tools with wooden handles. Gave them all away to somebody else who THOUGHT they were needed
-
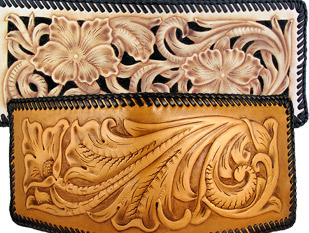
I lace with these, even with flat lace (those wallets were done with this). Size 'regular' works with 3/32" or 1/8" lace. https://www.tandyleather.com/en/product/perma-lok-needle I HATE those "2-prong" needles.
-
Those are good basic tools. I would recommend getting a B936 and B803 also. The wider beveler is going to let you move down those broad lines more quickly and smoothly, and the smaller one is going to let you turn the corners easier. If I remember rightly (?) the B60 is an undercut beveler, which I wouldn't care to use personally. IF you ask me, I'd get the 936, the 701, and the 803.
-
Hardly worth a subscription to ANYTHING just for that. As a rule, you have to make the pocket for something the size of the item plus the thickness of the leather. General guideline. But with a card, really just a matter of putting your material over the card, crease the ends/sides down, and measure the creases. Add 1/4" each side and you're fine (1/8" to the stitch and 1/8" to the edge). I swear -- ask what day it is and you get somebody wanting to sell you a calendar
-
Guess I'm the "other guy" (again). I much prefer the ANGLED slots... both for strength and for the look of the finished goods.