

robs456
-
Posts
301 -
Joined
-
Last visited
Content Type
Profiles
Forums
Events
Blogs
Gallery
Store
Everything posted by robs456
-
4am can't sleep
robs456 replied to Joseph1836's topic in Purses, Wallets, Belts and Miscellaneous Pocket Items
STOP!!! It's hammer time! Soooooorrrrry...... -
Leroy dropping wisdom about that.
-
I'm not an expert by any means, and tend to stamp too wet at times myself so I recognize the certain 'mushiness' to the look at certain places. And the basketweave look a bit flat which happens for me if the leather is to wet from the beginning or is remoistened. Then there are the 'white lines' around the cross which could happen because of to deep cuts, too hard beveling, too wet leather or all of the above. As for casing, there's a lot of info on here but the best way to learn is by trial and error. One of the best ways for using the quick way by spray bottle or sponge is the wet the leather thoroughly on the grain side, go and have a refreshing beverage, come back to see the original color almost returned, feel that it's dry but cool to the touch, grab a beveler and make a test imprint. If you get a sweet friction burn you're good to go. Otherwise back to your beverage/forums/etc... If I manage to plan my carving ahead of time I do it in a better way that works for me, but it takes some getting used to: Put the leather under the tap for about 10 seconds so that it's wet on the grain side, but do NOT get the flesh side wet (so no submerging it). Then put the piece in a plastic bag and seal it so it's air tight. Wait until the next day, about 12-24 hours. The piece will have moisture all the way through meaning the fibers in the middle will be formed as well which gives much better impressions when stamping. If the piece is still a bit too moist to the touch on the grain side, start the beverage routine above...
-
Was the leather a bit wet when you stamped?
-
Just for fun - croc bracelet
robs456 replied to motocouture's topic in Purses, Wallets, Belts and Miscellaneous Pocket Items
Hermès make their own hardware, or has it made. But you could probably find something like it from some Italian hardware company. -
Heating the edge to 350++ F 2-3 times? Seems to me you're cooking the leather making it brittle and even the beeswax won't stop it from basically falling apart after some use. For me, if I can't burnish just by water and elbow grease I use Giardini or Fenice.
-
I have a problem I need help solving with finish work
robs456 replied to WoodysWorkshop's topic in Leatherwork Conversation
Acetone. Then: -
Try sanding the edge to below gum trag penetration, then proceed according to the above. It still may not work though, then try acrylics.
-
You can't run the soldering iron on full effect, you need a temp or voltage regulator attached somehow unless it's already built in to the iron.
-
Thanks, Edges are just Giardini semi-dense with some wax and elbow grease.
-
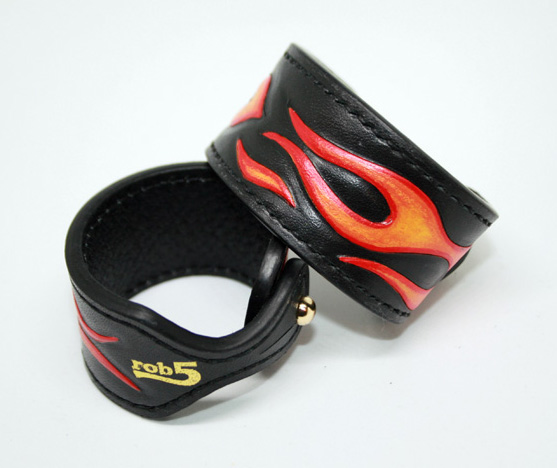
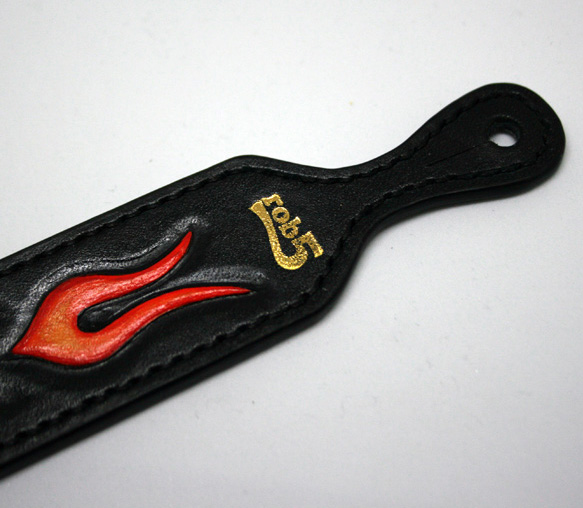
Watched too many pinstriping vids on Youtube, then made some bracelets...
-
This. I strive for perfection. But what is perfection? That every piece I make looks exactly the same like it was made by a machine? I used to think so, but not any more. Perfection for me nowadays is when everything looks professionally Handmade by a skilled artisan. If something is off, like the stitch on the leftmost piece I posted above (easy to see) I still sell it at full price as it is on the inside of the bracelet and not visible. If it was on the front and visible 'to the world' I might toss the piece, and if it was on the front but more to the lock and thus not very visible anyway I reduce the price, make the customer very aware that I have reduced the price and exactly why so that they don't 1. tell their friends I sell stuff real inexpensive and 2. show/complain to their friends about 'what shoddy work I do'. It seems to work but I read here that marking 2nd rate pieces as such might be a good idea also, may try that later.
-
Thanks. And yeah, keeping it clean is always a good way to go. Please post some pics when you get your process down pat. I quite like your artwork, especially on the hairpin.
-
Hi, I'm just starting up a leather jewelry business, and have looked into this quite a bit. The best way to go is to use lining leather on the inside of the product, or even doubling the leather to have to grain sides, which I do with thinner leathers. This will of course affect your cost and effort and thus the price as well (I hope...) and if you're not going for the higher end of the market you may not want to do that. In that case my advice is to use quality leather with a smooth flesh side or sand/split it down so that it is suede like. Then use an edge paint like the Fenice mentioned for example, making sure the back stays spotless. Using dye on the edge only could work but it's easy to have it bleed into the back or otherwise make a mess. In my experiments coloring or dyeing the flesh side I have always managed to get color transfer some way, but there are ways to minimize it. The best way I found on some cheap(ish) leather was: Dye the flesh side, Rub out as much as possible after an hour or so, Dye it again, Rub after an hour or so, Apply Gum Trag, Burnish the entire back, Dye again, Let dry 24 hours, Rub, Gum Trag if necessary, 3 coats of Resolene/water 50/50 -let dry between coats. This still transferred when rubbing vigorously with a white T-shirt, maybe because of friction, but wearing it on my wrist for a week in the summer produced no transfer. Things I think about when designing are climate, where the product is worn, will it have contact with clothes, what kind of clothes (jeans, dress etc) and how it will be used. Attaching a pic of a few bracelets, these all have pigskin lining and Giardini edge paint, leather is Tärnsjö veg tan. Hope I could help some.

-
Latest bits and pieces
robs456 replied to Spindrift57's topic in Gun Holsters, Rifle Slings and Knife Sheathes
I vote knapsack and knife -
This. I'm setting up my website now, so please come up with lots of classy, cool and witty replies to the OP....
-
I also used to think/worry about putting acrylic paint on leather and that it took away the 'characteristics of leather' from the piece. But then I came to the conclusions that: 1. I choose to work with leather because of the great possibilities of the material; shaping, carving, fabrication, dyeing, painting and so on. So even if a finished piece can look and feel plastic, it isn't plastic. 2. The strengths of leather are still there, toughness, heat resistance, flexibility etc. 3. The customers who are buying the piece as 'art' cares about mainly two things: It's pretty, and it's handmade. (And some of course don't care about the handmade part.) 4. The people who want, need, the pure leather look and feel won't buy it anyway, and I sure can make things in saddle tan for them if they wish... (Anyone else who's noticed that people tend to think brown or tan is leather's natural color?) So for me that strap is just pure, good leather work. Very nice.
-
I think you need to tighten up your bevelling, overlap and 'walk the tool'. And I got really excited about the Castle of Chocha, but googling 'College of Wizardry' it didn't quite turn out to be anything like what was in my mind. But I'm sure it's a great place anyway.
-
The bracelet in the photo looks 'funny' as the leather is distressed/"vintage" and the concho and snaps are pristine.... Anyways, first paint the piece using acrylics as billybopp said (dunno about the antique tho) then distress the piece by putting it on the ground and stomping it, running it over with a car, hitting it with a bike chain, sanding it etc etc until you're happy with the look. Then put finish on it, unless you want the piece to further 'develop' during use.
-
http://www.giardinigroup.it/
-
That's my bet. It was neutralised but probably not washed good enough making the black solution bleed later. My point though is that however it happens people need to realise 'roon isn't a 'fire and forget' kinda thing, and need to handle it correctly.
-
Sure man, in a perfect world that's how it works. And I admit that I and the others that have posted here in the past about 'roon rub off have made some errors along the way, but the truth is that you can get color transfer after using 'roon. After the fact I think I know what I did wrong and how the roon came to rub off, may have been my fault and I'm posting it here so that others don't make the same mistake: Made belt-dipped belt in 'roon-dipped belt in baking soda solution-rinsed belt in water-let dry-buffed with white cloth until no color transfer-sealed belt with 50/50 Resolene and water-wore belt during summer-found black spots on jeans-yes, they came from the belt... So yes, while it's a chemical reaction to the leather it doesn't mean that 'other stuff' can't make the leather 'bleed'.
-
Roon rubs off.
-
My Blue Daily Bag
robs456 replied to olenawills's topic in Purses, Wallets, Belts and Miscellaneous Pocket Items
Thanks, I appreciate the tips and I guess some of them were learned the hard way... -
My Blue Daily Bag
robs456 replied to olenawills's topic in Purses, Wallets, Belts and Miscellaneous Pocket Items
Thanks for the reply, and yes, with the edges it takes a bunch of layers to get it done good. Regarding the stitching I think it looks awesome with the distances but as you can see in your first pic in the OP it's a bit uneven between the handles, did you use any kind of marking of the stitchline before pre-punching? In the few Hermès vids I've seen on youtube they use a creaser to mark the line before sewing, did you do something similar? I'm about to make a small handbag just for 'training purposes' so trying to figure out how to make things the best way before I ruin quite a lot of expensive leather...