


Bob Blea
-
Posts
1,771 -
Joined
-
Last visited
Content Type
Profiles
Forums
Events
Blogs
Gallery
Store
Everything posted by Bob Blea
-
 I reall like the light on black background effect. I can see why it would be popular. Bob
 -
Nice looking pack! Is the Austin leather water resistant like Latigo? I've never used it before and don't know anything about it. Bob
-
Thank you for sharing this Chit! Bob
-
Very nice looking! One question from someone who has never made a watch strap: How to you finish the edges in a situation like this? Are you able to burnish the edge with the Ostrich or do you need to do something else to finish or seal the edge? Bob
-
Leather Froze While Casing
Bob Blea replied to Mechanical Cowgirl's topic in Leatherwork Conversation
You're right, I never thought about it but I'll bet some saddle and tack does freeze when used in winter. It must take some amount of freezing because I can't tell the difference where it has happened on the notebooks, and they don't appear to take dye / antique any differently when finishing. Bob -
I second Cyberthrasher's 3M packing tape. I use it to tape the back of most everything. Recently I've started using clear shelf liners from the dollar store. It comes in big rolls, is clear (but any color will do) with a peel away backing, and it is cheap. I use Con-Tact brand, and it doesn't seem to leave any residue on the leather either. I think the 3M tape actually works a little better but it sure is a lot easier to cut the shelf lining to the size of my project and put it on all at once, versus putting multiple strips of the tape across the back of a notebook.
-
Leather Froze While Casing
Bob Blea replied to Mechanical Cowgirl's topic in Leatherwork Conversation
Hello, I've had this same thing happen in my home fridge. I make notebooks and I've had occasions where a corner of the cover freezes. In my case, it didn't seem to degrade the leather at all. I've even been told by a couple of people making saddles that they have stored cased pieces in the freezer when they couldn't work on them for long periods of time. But, I've also been told by other saddle makers that this isn't good for the fibers in the leather, and I can certainly see how it could weaken the leather some. In my case it just wasn't noticable. In your case, I still don't think it will make a big difference and I think you will be fine. But, if this was your safety harness I would make another piece. Just my opinion, Bob -
I don't think you will have much problems with the Resolene since it is acrylic based as well, but I am told the solvents in Neat Lac / Clear Lac / Wyosheen will disolve acrylics, so if you are using one of those you can have problems. On another post here Spinner recommended using Acrylic Matte Medium as an over coat on acrylic paints to protect them prior applying the lacquer based finishes like Clear Lac. Bob
-
Dying Tooled Leather, How Do I Get It To Stand Out?
Bob Blea replied to RDCreations's topic in How Do I Do That?
Hello and welcome to the forum! The technique shown in the photo is antiqing. Once you are finished with your carving and stamping, you apply an antique paste or gel that is darker than your leather and then wipe it back off. The dark antique stays down in the stamps and carving, giving the effect in your picture. If you are in Missouri and are anywhere near Springfield, you can go to Springfield Leather. They have a variety of products that will do this and can probably give you lots of tips based on whatever kind of product you want to do. Hope this helps, Bob -
I agree with Silverwingit, making sure you have good visibility of how the legs are lining up is critical. I usually prefer to be able to see the long side of the basket and the short one, so I'm usually have one corner pointed right at me. That lets me see both sides and I can make sure the stamp is lining up. Make sure you have good lighting, so you can clearly see where the legs of the stamp are really going. Also, these are a great time to use magnification. I don't normally wear glasses (though my vision isn't what it used to be, it's still very good) but I did buy some reading glasses to help with hand sewing and making sure some of these stamps are lined up correctly. Personally, I wouldn't recommend starting off with the angled basketweave that Sturme shows in his link, though it isn't that hard to do. I would recommend starting off by drawing a line across your project and then stamping straight down that line, running the basket weave on either side. Take your time making sure you get the legs of the stamp falling on that line each time. Extra care with that first row of stamps will make the job easier for the rest of the project. When doing this first line I usually view the stamp from the short end and make sure the stamp is running parallel to my reference line. Once that first row is complete, I turn the project 90 degrees so I am looking more at the long side of the stamp. Now I align the stamp in the legs of the previous row of stamps, and because you have that good row of baskets (that you took your time doing well) to guide where the next row goes, things go much quicker. Finally, make sure your basket stamp itself is actually symmetrical. Poorer quality stamps might not be the same dimensions all around and this can throw off your stamping. Try this test: Stamp it into leather then rotate the tool 180 degrees and try stamping it into the same impression again. A good tool that is symmetrical will fit in the first impression. If one of the legs is off a bit, you will see the difference in the leather. A tool like this isn't the end of the world, just mark one corner so you can always hold it the same way. Hope this helps, Bob
-
Those look great. I especially like the campfire scene.
-
Very nice! The saddle looks great. Were you able to match the existing conchos enough to reuse them or is that all new conchos and spots? Also, did you have to replace any of the leather on the saddle? Bob
-
Nice job on both of these. Your notebooks look great and I like your design. The Bible covers look outstanding, he should be proud of them. Bob
-
I've always wanted to build a saddle, but just can't justify the real thing. One of these days I'm going to build a miniature saddle. Thanks for sharing this. Bob
-
Yes, I think it leaves sweat stains
-
I live in the high plains desert and have this problem all the time. I keep all my projects in bags and try to only bring out what I'm currently working on. Also, I've started using plastic wrap to cover areas I'm not working on while they are out of the bag. Also, something I've found that really seems to help is adding glycerine to my casing water. It supposedly helps keep the moisture in the leather. I just finished carving a legal sized notebook that was full floral on the front and basket stamped on the back. It took almost two weeks to complete and other than using a sponge to add moisture along the edges and corners where it was drying out, I only once added moisture to the rest of the carving. It seems to make a big difference adding the glycerine, at least from my experience. Bob
-
Now that's an office I could live with! Bob
-
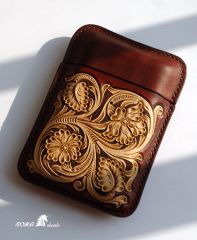 Wow! Really nice case!!
 -
Dragon Flask, Tree Frog Wallet
Bob Blea replied to 5avan10's topic in Purses, Wallets, Belts and Miscellaneous Pocket Items
Really great work. I especially love the artwork on that purse, but they are both great! Bob -
Armor Project, Sewing, And A Big Buy; Could Use Suggestions!
Bob Blea replied to evaengineer's topic in How Do I Do That?
I don't think the repost would be a problem, and I think they would be the best people here to talk to. Bob -
Armor Project, Sewing, And A Big Buy; Could Use Suggestions!
Bob Blea replied to evaengineer's topic in How Do I Do That?
I've never made armor but if you are molding or carving this leather, you will need Veg Tan leather. I don't know how much leather you will need, but I would guess you will need more than a side of leather to cover this much area. Plus, you will probably need some extra leather to work out your process, bugs and techniques before you can make finished products. As far as a good source, Springfield Leather (a sponsor here) would be a good source to work with for any of your needs. Hope this helps, bob -
Hello Robert, You are right that I am suggesting to not strike the next tool impression right up against the center bar of the previous one. Because we are human and can't space them perfectly each time, you need a little wiggle room between stamps to allow for variation. If you tried to stamp them right next to each other as close as possible, you would come to a point where you make a slight mistake and stamp one impression a bit off. That forces the next stamp to cut into the center bar of another basket weave because the one before it is slightly off. The problem will compound itself on each row that follows. Since we're all human and can't be perfect, it's better to give yourself some leeway and stamp the next stamp a slight bit over. The key is to make that distance consistent on every stamp, which is easier said than done. Once you do, your basket stamps will line up in neat rows in any direction. I haven't reached that Nirvana yet, so I still have a lot to learn! Bob
-
Something New
Bob Blea replied to immiketoo's topic in Gun Holsters, Rifle Slings and Knife Sheathes
Really nice Mike, the eagle came out great and love how the numbers stand out. That's some good control with the dye. Bob -
Custom Clutch Purse
Bob Blea replied to Bob Blea's topic in Purses, Wallets, Belts and Miscellaneous Pocket Items
Thanks all, the customer was thrilled with it too. -
A Serious Question For Leather Carvers.
Bob Blea replied to KnotHead's topic in Leatherwork Conversation
Yes, a coaster is about the right size. You want something you can easily tool in one sitting and that gets you practice at the basics: cutting, beveling, shading, etc.