bruce johnson
-
Posts
4,408 -
Joined
-
Last visited
Content Type
Profiles
Forums
Events
Blogs
Gallery
Store
Everything posted by bruce johnson
-
Bill, I had one for a short while I got with some other stuff in a trade. I can think of things that are worth more than $450 in my shop than the Weaver slicker if I was buying it new. The biggest problem I had was I don't like the horizontal axis. On large pieces it was hard to hold them and keep a constant pressure and movement without them flopping all over or the table/motor interefering with keeping them in contact. For straps, it is alright. I like the spindle type slickers in a drill press. I checked and the pulley chart tells me I run it at 1100 rpm. One thing that is emerging in this whole thread is there are a lot of ways to skin this cat. It looks like once a guy gets the speed, roller material, burnishing medium, and pressure figured out for him, then good results can come from a lot of different setups.
-
Art, Actually on my wish list is a postbed. I am looking at one to sew turned seams inside bags. That is on down the road though. Thanks for the numbers,
-
Richard, I use the same set from Bob Douglas as Go2Tex. We probably saw it used first at the same place. I was using a homemade deal before that to dome with, made out of a bolt. It is a 3 piece set - burr setter, shank domer, and head domer. I have "predomed" the heads on some, but usually dome them once set. To predome, I punch a hole in some scrap skirting and stick the rivet in, set it over the pritchel hole on my anvil and dome it. Somebody or another told me to do that because they had the head domer slide off and cut through the grain of the surrounding leather. After using it a while, I haven't done that yet. The shank hole on the burr setter is almost 1-1/2" deep. An advantage over the Osborne I had with a shallower hole. You don't bottom out and bend the shank setting longer rivets. I also use it as a handle, stick the rivet in and polish the head on a wheel. Worthwhile to wear eye protection, I have had them fly out of vice grips and the setter.
-
Thanks Jerry, That is pretty much what I found too. Seems like the bootmakers are high on the 31 for doing decorative stitching, especially fitted with a roller foot. They also mention chiseling a needle and setting the feed short and using it to cut inlays and overlays. I really didn't need another machine, but am getting an appreciation for the oldies as time goes on. Set up for light stuff, I can probably justify getting this one up and going.
-
Jim, Thanks for posting this. Very nice and easy to follow. I learned a little skiving tip here with the peeler. Thanks,
-
Pete, Yes it is. Mine is off the shelf from Staples, the basket/geo is from Office Depot. I use the "$10 off any $50 purchase" coupons they send me every month or so. I don't like the $29 ones, too thin. There isn't a lot of difference between the $59 and the $99 ones. The $150 ones have better quality insides. I use what the customer wants. I have also done this on the aluminum shell ones as well. I just cover the front, and the little conchos hold them on.
-
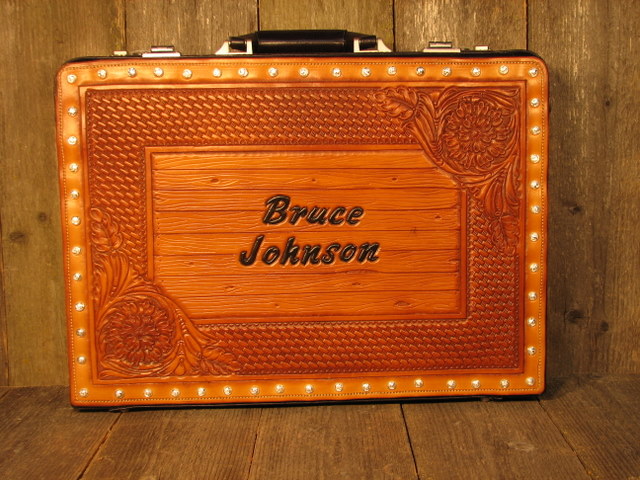
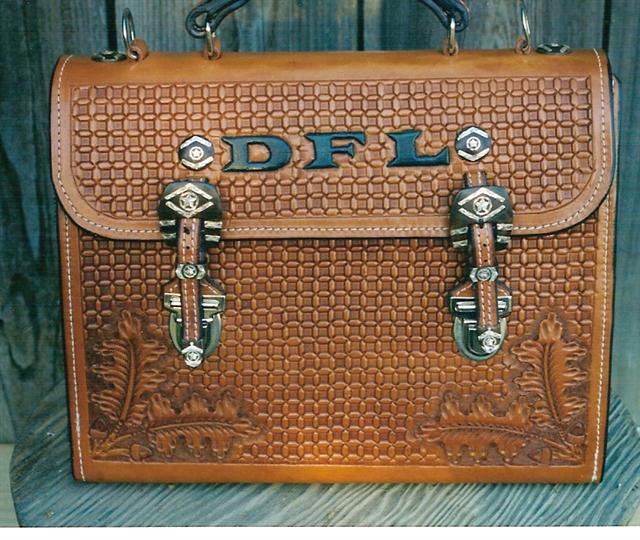
I make a fair amount of briefcases sized to carry laptops. My personal favorite is a hardside briefcase. I pack my laptop back and forth everyday. On the latest ones I did, the briefcase came with a padded sleeve for the laptop. Otherwise you can buy those sleeves sized to fit about every laptop at most electronics stores. I buy my briefcases at whatever office supply store has the best deal going at the time. I put my computer in the sleeve, and have enough room for the power cord, cellular modem, and mouse. Room enough for some paperwork too. I am attaching some examples of these. One is mine, the old one I carried for several years, and was just getting bored with it. The basket stamp/block stamped border one was a customer order. I attach them with 3/8" high dome engraved conchos. I drill through the front and screw them on. I also do flap over the top brief cases. Some customers like these a lot. I have varied the width depending on laptop size for a close fit. Some like to use a sleeve now. I also put a pad on the bottom. It is a scrap of chap leather over two layers of saddle seat foam scrap, edge sewn like a pillow. Some have a divider and two sections, some people only want one section. They have heavy chap leather or hair on hide gussets on the sides. Hope this helps.

-
I use them on the bigger letters and on the 3Ds. Especially nice for taking to things where we had kids pounding stuff. They don't bounce and fly nearly as much or as far. One thing you will see on some of the larger letters with the regular handles. I try to stamp letters on leather a little to the dry side. I have to tilt to get even impressions all the way around sometimes. The handle that fits down into the socket can flare out the top of the socket. I have had a few split.
-
You will need veiners, bevelers, pearshaders/thumbrpints, an under cutter or two (or Propetal type lifter), and a seeder or two for most oakleaves. Whether you want them plain, lined vertically or horizontally or checkered depends on the look you are after. I'd recommend picking a leaf size and getting a set of tools to do that size first. See what effects you like and then go with that for other sizes. Until you know what you like and what effect you want, low end tools will let you see that. Trade up later when you get comfortable and decide you really like to do leaves in the first place.
-
The seat profile looks great. Looks like it ought to ride. The scroll cuts in the seat look excellent too. Don't worry, you are not the first one to come up with short skirts either. I do have a couple questions. How is the front rigging layered in there? From one picture it looks like two layers of skirting on top of the rigging. Also how are the skirts pulled up to the tree. In back I am not seeing lugs or pockets, but might be the picture angle. Finally, cool front cinch, who made it?
-
Thanks Art, I found it yesterday in an antique store. The on-line parts list combines the 15 and the 20 in the same book, so I figured there can't be much difference, I just wasn't seeing it. You find a lot of the 66s, featherweights, and stuff around in the antique stores. I play with them, but have never jumped. I hadn't run across a 31 before. This 31-20 is as tight as they come and cosmetically new. There is no freeplay anywhere, looks like minimal or no use. I got the head, bobbin winder, knee lift and brackets for a song - no table or motor. It looks to be the standard cutout, so a table shouldn't be hard to come up with. Threaded and handrolled it and it stitches tight, so I am feeling good. Should make a nice light to light/medium machine. Once in a while a blind sow will find an acorn....
-
Does anybody know the differences between a Singer 31-15 and the 31-20?
-
Harvey, I heard last night it was so-so, probably better if you use a color in your work. It would should be OK to have, considering the changes in the chemicals recently and more to come. I'd like to hear from someone that has one to see if it is worth the bucks, or something Feibings should have put out for downloads. The impression I got was kind of like being held hostage. "We have new stuff, and for $15 or whatever, here's how to use them".
-
Looks like an air-assisted presser foot lift. Great machine and a smoking hot deal on it.
-
I want it. PM me and we'll work out a trade.
-
The issue is not what you do with material on someone else's website. I can assure you there is also a discussion starting about posting it as a direct referral on the forum page, but no dispute. The issue as I see it is making it an official referral from this forum by listing it on the home page, rather than a referral from an individual member as it is now. This material was not exclusively given to anyone as I understand it, IILG has it, DeeAnna hosted it for Verlane, and I am sure Verlane shared the master files with others as well. She sure sent me a bunch if not all of it. There was talk and speculation at one point on other forums about this material being published and the proceeds used to fund scholarships or charities. It may or may not ever come to be. There is a lot of speculation and no real clear answers, we know Verlane shared it freely, but things may have changed or will change in the meantime. The potential copyright implications to a group who runs on donations, sometimes in the red, and has no reserves is something that we need to consider before going with something that might be construed as "official". I don't see that same issue with a a member referring to it and sure don't want to discourage anyone from visiting this site based on the individual referral. It has only been 4 hours since this suggestion was brought up, and not everyone has had much of a chance to weigh in yet. In the meantime it is on the open internet, great info, and I would encourage anyone to utilize it.
-
Hilly, No need to apologize, natural questions and good discussion points. The strings are to tie things on with. To further cloud the issue, they also can be drilled through the saddle tree and looped through the skirts to help hold the skirts up tight to the tree and the parts they go through on top of the tree cinched down into place. It is more secure to have the strings looped through the tree, than through just the leather on top. An even less secure way is to loop them through the leather conchos and nail or screw them onto top leathers. To drill a tree or not for strings on saddles will divide saddlemakers into two camps.
-
 Marlon, Everybody kind of has developed their own way of cleaning stuff, here's what works for me. I'd clean it first. A lot of times these ones that have just sat around are covered with dust and petrified birdcrap. Physically knocking it off and brushing the dust with a soft bristle brush may be all that is required. If they have been greased up and are oozing that sticky spew, then a little soap of choice would be in order. I like Murphy's soap in lukewarm water about the best. Apply and work it with a soft brush, rinse and hit it again until the water runs clear. I use Dr Jackson's some, especially on new stuff or stuff that is going to be used and exposed. It will leave a sort of greasy feel on top sometimes, and can rub off on clothes. I apply it to some pretty oiled up skirting and then melt in some Dr Jackson's for straps, tugs, and waterloops for rein ends especially. Makes for a nice looking and feeling harness type leather. I use it doctoring and saddle bags too. My favorite is Williams saddle dressing for older leather though. To me it just gives me a nicer feel when all is said and done, and especially for display kind of pieces. It leaves a light waxy topcoat that polishes up well.
 -
Rick, Tippmann makes a bench much like a stitching horse to mount the Boss on. It looks too high to me. Keep reaching up and you will fatigue faster in your shoulder. I mounted mine on the end of a table at the left corner. That made it so the cylinder arm hung over and I could stitch deeper things easier. I got a low counter stool (higher than a chair/lower than a bar stool) to sit on. It made my stitching more comfortable reaching across rather than up. I could still get my legs under the corner and get closer too. As far as the stroke, you will get a rhythm going eventually. The key is a full stroke forward and back. You don't need or want to slam it into the stops at the end of the stroke though. Another key is not to grab the handle too hard. I kind of kept my hand relaxed and pushed with my palm forward, and then "caught" the handle with my fingers and hooked it for the pull stroke. After enough time you will get that muscle memory and it will be second nature. I taught two wives and a son to run mine, they all got onto it pretty quick.
-
Hilly, What you saw your friend cinching up was using a latigo tie on a ring cinch. It makes a little larger (2-3 layers of latigo) lump at the rigging ring. It is kind of old-fashioned but a lot still do it. Most cinches have a tongue buckle and the buckle is the fastener. The excess tail length is just looped through the slot on the carrier and hangs there. The bumps on either side of the horn are called bucking rolls. They are fastened to the forks of slick fork saddles (without swells) to add some width and prevent you from slding forward. Most are stuffed with some sort of padding - hair, synthetic fiber. clipped wool, or dense foam. They are softer than hitting the hard swells of a swell fork saddle. Some guys will make them from chap or veg tan leather. Some use exotics, some match the seat, some are tooled, some have fancy stitch patterns. Some have different profiles, higher, rounder, tear-dropped. They kind of take on a life of their own.
-
Pella, I think I know what you are thinking, this guy rides horses that trip and fall down. Actually this is a rodeo event that is also called single steer roping. Fastest to do all this wins. Basically the rider has his rope tied to the saddle horn. He ropes the running steer around the horns (the only legal catch) from the steer's left side (other than Trevor's dad, he's a lefty but that's another story) and then flips the excess rope over the steer's back to hang on the right side of the steer. You ride off to the left and the rope basically pulls up from behind takes his legs out, and lays the steer down. The horse continues to drag the steer as the rider steps off and ties the steer's legs together, and signals for time. Remounts then, gives slack in the rope, and if the steer stays tied, it is an official time. I think it takes one of the better trained timed event horses for this event. They have to run, have some handle, take the jerks, and then pull until the steer is tied, and then stop. This event is hard on saddles because there is one jerk on the horn when the steer hits the end of the rope, another when he hits the ground, and then a steady pull back on the horn when they log or pull the steer. It is a little hard on cattle. As time has gone on, they are roping smaller steers now, less horn on them, and in pretty good ground. I was at the last steer roping national finals they had in Laramie, and it was a cool time and great watching. It was kind of during the change from the old time guys to the new young cowboy athletes, and interesting to compare styles. Who was "safe"and who was "wolfy", add paramutuel betting and it was a stellar weekend. This is not a universal rodeo event. Some states don't allow it. Some states have no regulations, and some have big time steer ropings. Off the top of my head, Texas, New Mexico, Oklahoma, Kansas, Oregon, Wyoming, and Washington have it. It doesn't happen in California, but we have a few guys who compete in the Timed Event Championship in Oklahoma. They practice here and do it there.
-
Brian, Very cool one again. Is the stirrup leather stitched down to the fender or stitched for effect? Neat idea to run the string throught the carrier.
-
Tim, As far as is the extra cost worth it? That extra expense will be the cheapest part of that saddle. Your time to take out and stick a new tree in to replace one that is broken is way more. If you and the tree maker do eveything he wants, then if it breaks - it just plain broke from use and no excuses. Some tree makers used to put a steel "skid plate" in the gullet and bolt the horns on rather than screws too. I am not sure if anyone does that anymore. Regarding what size to order, I'd talk with the treemaker and see how much they think the extra will take in. They should have a pretty good idea. It sure could be 3/4-1" figuring doubling up on the back of the swells and depending on if you measure the cantle at the peak or the front of the face.
-
It seems like these books kind of sell more on their collectible value most of the time than the actual information in them. Another one that tends to sell high but has pretty good info is the one by John Beck. I bought my Cowboys Complete a few years ago for about $90 or so on Ebay, probably worth that to me. Sometimes they'll sell around that, and other times way more. Just depends on how many dogs in the fight. I've seen them in some used book stores for $50 and $500. I don't know how many were ever printed and sold. The saddlemaking section is alright, but the section on making other things in the back is pretty good.
-
I got hurt one winter and didn't have much going. I started doing a little more leatherwork than the hobby and make for myself stuff. I got some award orders from local rodeo and equine groups which is sort of like wholesale. They want it as inexpensive as they can get it. I made all the rookie mistakes - price based on comparison instead of time and materials, beat any price to get an order, spend time in your shop instead of making money on fewer orders. That did lead to some resellers wanting to do some consignment, which I didn't do. I wholesaled to them. I did the old halve the retail price the other guys were charging, which also lead to some negative pricing deals. Don't do this. A few years later it did lead to some inquiries from better resellers though through word of mouth. People that would pay me what my time and ability was generally worth then. I got orders for 30 belts, 20 spur straps, 10 planners at a whack deals. I got hooked up with an interior decorater. Orders for 30 leather covered toilet lids, 40 double lightswitch covers, stuff like that. I got better at pricing and eventually paid off some pretty hefty medical bills. The upside was I could buy some nice tools and equipment, they paid back in time savings, and could start paying me back. The downside was I still have/had a day job, was a single parent at that stage and never missed an event, and spent a lot of long nights and weekends in the shop. The scenery never changed. When you have 30 toilet lids to do exactly or pretty much the same - it wears on you. I would batch them all and do each step on all of them before going on to the next step. It sometimes took two weeks before you could look and see the first one finished. I got the advice to only do a batch I could finish in 5 days so I could "see" the progress and the end in sight. Do 12 a week and three of something else just to mix it up. Break the mindset of assembly line work. I got to do a lot of different things, that was good. The issue with wholesale and awards are that you can make a steady check. You can burn out if you don't keep it mixed up. Try not to neglect a higher paying single order to do three smaller things at wholesale rate that take more time. Allow time for higher paying stuff, and allow for time off. There are other guys here who do a lot more of this than I did, and higher end. Hope they will chime in too.