bruce johnson
-
Posts
4,401 -
Joined
-
Last visited
Content Type
Profiles
Forums
Events
Blogs
Gallery
Store
Everything posted by bruce johnson
-
Jack, Just to kind of put this into perspective from my viewpoint. It did get kind of nitpicky when you posted before. I think you asked or the thread changed into "who is the best carver" and I recall names came up like Jim Jackson, Don King, Chester Hape, Don Butler, Lloyd Davis, Stanley Dias, and others. In the meantime we have picked up people here on this forum (in no particular order) like Jim Redding, Troy West, Keith Seidel, Andy Stevens, Shelly Liggett, Brian Hochstrat, Greg Gomersall, Ryan Cope, Steve Mason, and apologies to others I unintentionally omitted who have posted or linked to their sites with really high end work. Some of these do contract carving, and they all do fabulous work. It might be helpful to gauge the work by knowing a general price range of what you pay for contract work to give some perspective. One of the functions of this board is to link leatherworkers with customers, and this really might work out for everyone's benefit or reinforce who is doing your work currently.
-
Russell, I oil mine up with my dye/NF oil mix. I use Leathersheen for a finish. I have tried others, and at the end of a year, the Leathersheen bags and can covers have held up the best. I put on a decent coat, let it get almost dry and add another. If I want a more subtle finish, while it is still fairly dampish, I'll take and old bathtowel scrap and buff it, rub pretty firmly. If I want a glossier finish, I wait until it is dry to touch and then buff it, with the the same sort of towel. We might be through there again in a few weeks. I am flying back to Indiana and getting a truck from my folks and driving it back here. We are going to be leaving my uncle's in Windom MN the 22nd and headed to Cody WY to catch a dance on the 24th on the way back. Time frame depends on when we get away and if it isn't the middle of the night, I'll give you a call.
-

Organizing and Storing Chap Leather
bruce johnson replied to bruce johnson's topic in Leatherwork Conversation
Brad, I got two full sides of 10/12 latigo, plus a remnant in one. I got 4 chap sides in another. The lining tube has about 8 goats, 5 pig, and one side of 2/3 veg. I have two sides of 4/5 and part of a 7/8 in one. They make these tubes in 6", 8". and 12". I bought an assortment, but took back the others when I saw how well the 8" size worked. They have a waxy coating inside, and I rolled them flesh out. Greg tells me even with the heat in his shop, he hasn't had a ruboff problem with the wax. I hit it with a little heat from the paint stripping gun to try it, and it took pretty good heat to soften it. I am not worried about it. My shop has been a little tight on space, and I am trying to do without one rack in there. I was able to get on one rack what would have been on one and a half, plus being comfortable having the latigo there too, so I probably almost doubled up on my usage. I put the other rack in a storage shed, and the excess is out there on two shelves. -
affordable Leather sewing machines
bruce johnson replied to shockme2's topic in Leather Sewing Machines
I am going to step out of my box here. My wife got the vaccuum fixed the other day, and said they had a machine that sews leather there. Yesterday i checked it out. It is one of the Singer CG 500/550 models. I figured motor on the machine portable. Maybe some pigskin garment, they'll all do that. He pulls out a piece of petrified unoiled 13 oz veg and a piece of old chap and it doesn't even choke on the first stitch. I could run it slow or fast and it did a nice enough stitch for what it was sewing through, and no handwheeling. It wouldn't ever replace my 1245, but seems to be a dandy little machine. I could see using it for small projects and set up for lighter thread. Being portable it wouldn't take up much space. It isn't industrial and I wouldn't trust it for dailky heavy use on a lot of vegtan, but for little chrome tan projects, it might be the ticket. -
Organizing and Storing Chap Leather
bruce johnson replied to bruce johnson's topic in Leatherwork Conversation
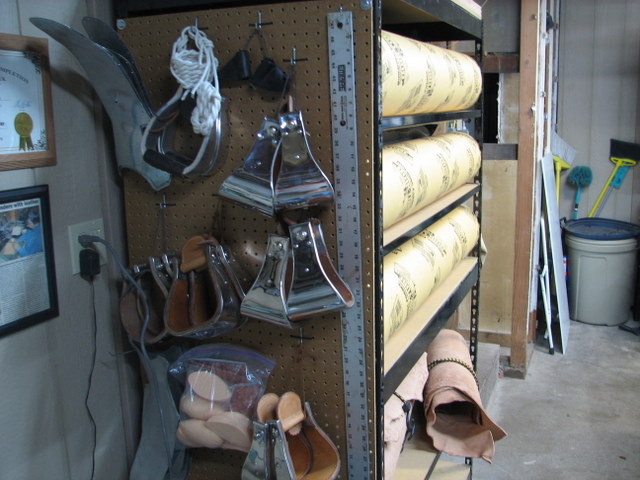
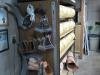
Had a couple of questions about what I decided to do about leather storage. The old way was leather pushed into the rack and sticking out from the front, chap on top (which then slid off behind), and latigo under a bench away from the rest to avoid ruboff. I just have to say thanks to Greg Gomersall for his suggestions. I priced out PVC pipe is various sizes that would hold leather - not economical for me. The concrete form tubes he suggested are the ticket at $6-7 each. They just happen to come in 4 ft lengths - the length of my storage racks. The tubes will fit within the vertical brackets and not roll out, and three 8" tubes will fill the 24" shelves. I sorted my latigo into one, the light chap into a couple, dark chap into one, linings into one and some of the tooling leather in some. There are still some nooks and crannies to slide a roll into that I am cutting as I go on. I like this setup. I added a pegboard at the end to hang some of the stirrups, strainers, and stuff on. Pretty compact little system. Not real crazy about having to stack the trees on top, but with the better insulation and blackout film on the windows, it is a bunch cooler in there anyway. I have the bottom shelf open for a couple scrap tubs. As evident in some of the views, the electrician is still not totally done in my baliwick yet. Thanks for the tip Greg.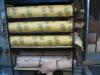

-
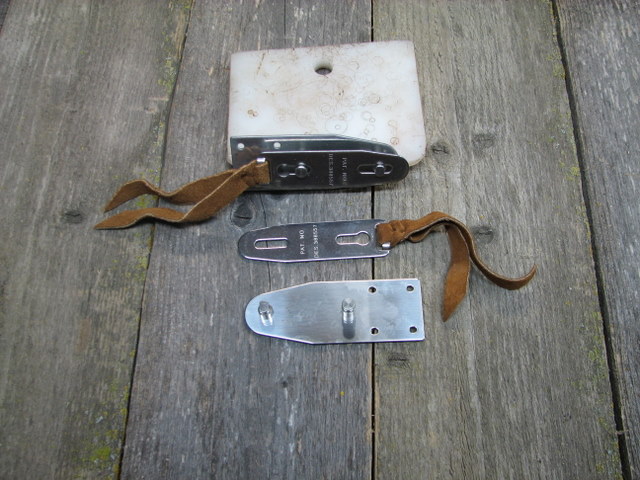
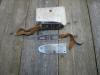
Art asked about these stirrup leather buckles in the thread about Steve Brewer's saddle. Here is a picture of a set. They make them in two post sizes for thick or thinner leathers. I kind of like them, nothing to rub and wear out, and they stay in place.
-
JW, Another great looking saddle. You really run that stamp well. It was an endless source of frustration for Harvey Lutske and I, and mine got a new owner before I learned your trick for running it. Congrats on a good one.
-
Half Leathers vs Full Leathers
bruce johnson replied to bruce johnson's topic in Saddle Construction
Steve, So is Smokey getting half leathers again? LOL. For those who are not semi-local, he is a pretty good sized guy, and trains cutters and snafflebit>bridle horses. Cutting may be pretty balanced in the stirrups for the most part. The cowhorse deal is not the same. No hand on the horn to keep you centered. Working a single cow, going down the fence and turning them, and then circling up tight on one will get you loaded from one stirrup to another. That stresses those fenders and leathers a bunch with a bigger rider, and a lot of these people are training and showing in cutting saddles. I think a good quality leather, heavy enough and treated right, and left full is a way safer deal for this kind of use. Secondcrk is right. Helpful if the rider takes a look under there once in awhile too - kind of check the stitching and rivets. Some of these production copper rivets cut close and pounded flat are just looking for an excuse to pop off and land you on your melon. At least with full leathers two straps have to break down low to put you there. Rickybobby, A little trick I learned several years ago to prevent some of the pull on fender legs. When you replace full leathers, fold the leather and fender leg like you would to match up the top of the fender to the stirrup leather and mark it. Slide it down about 3/4 inch below the mark and attaching it there. If you put your leathers on like most of us probably were taught, the billet end in the butt and the fender/buckle end is getting up toward the shoulder - a stretchier area. As that leather is weighted and stretches, it will match up with the fender leg and both will bear weight and it will sling some of the weight off the fender leg. If you were to match it to the original position, it would stretch just enough to not bear much weight, and the fender leg would again being carrying the load. I have to laugh at your description of the dude ranch saddles and their economic constraints. I wonder if their liability insurance would be happy. I had a guy leave me 3 towsacks of saddle parts to make as many kid saddles up as I could. He had a poor attitude when he picked up 3 sacks of saddle parts a week later. A personal side note to everyone - Thanks to all of you for posting questions and replies. We are all coming here with regional, use, and event-specific backgrounds, and sharing it and learning from each other. I appreciate it. As most of you know, this forum is run on donations and it has some fixed costs every month to keep it going and maintained. Most months is it pretty close to break even, but some months short. For what it is worth, there has never been a surplus that has lasted past the next dry spell. If you ever feel flush and can help out, the moderaters and especially Johanna would appreciate it. No money is taken out of this forum. I think there is a link on the home page to donate, and somewhere Johanna has her address. This forum was started with some seed money from a guy who said "do something to help out the leatherworkers" and I think we are meeting that. It has grown way beyond anyone's wildest expectations, and I don't think there is another group sharing like this. Glad to have all of you here and your participation. -
To throw another maker of good mauls into the mix - Wayne Jueschke. I have Barry's in 12 oz and 16 oz for tooling and a heavier one for punches, rivets, and end cutters. They are pretty neutral weighted. Good for rocking motion repetitive stamps like bevelers and backgrounders and small foot print stamps. Wayne's mauls have different head material, and are more heavy at the head end for more of a deadfall effect. Good for basket and geometrics for me. Wayne's handles also are a little more tapered than Barry's under my little finger. I have had it kicked out of place a few times, and it is less fatigueing for me to grab the shape of Wayne's handle and hit with. On Barry's I use more of a rocking wrist action, ring the handle between my thumb and first two fingers, relax the 3rd and 4th fingers, and let the heel kind of flop, and that works well with Barry's handle shape. It is kind of a luxury to match the maul to the stamp type, but worth it for me.
-
Question Re: Landis Model 30 Crank Splitter
bruce johnson replied to beltman08's topic in Leather Tools
Wally, I'm thinking like Greg here now. If the feedwheel isn't slipping, then the gap or pressure isn't right. You can tweak the pressure on the springs and gap with the adjusting screws and checknuts shown in the online manual. I would dang sure try it. The manual ShopTalk sells may well be the one that is on the bootmaker site. I have found that most of the old manuals are mainly a parts list and basic adjusting instructions. These machines and manuals were intended for use by people in the trade, and lot of assumptions regarding familiarity with using one in some manuals. . A fair amount of the blades on these are broken out at the corners, just set the blade back where it should be, set the retaining screws to hold it and cinch it down. If you want to know what the manual ShopTalk is selling has, give him a call. He likes to talk about that kind of stuff. The Landis 3 is a stitcher and would have a manual that is bigger. -
FWIW. I took apart a pretty moldy saddle in my old shop. I can trace it back to that, and had a mold problem on about everything after that. It was a pain - new bags everytime, refrigerate, some stuff still molded in the fridge, leather and scraps stored out of the shop. When ProCarve got popular, that stopped it. When I moved, I have kind of got away from the antifungals, and haven't had a mold problem. For what it is going to cost to clean this, and the time involved, I'd toss the walletback and bag away without opening and make another.
-
Question Re: Landis Model 30 Crank Splitter
bruce johnson replied to beltman08's topic in Leather Tools
Wally, I am not sure I am following your question. I had an American and the basic difference was it fed from the back and the Landis feeds from the front. All other things being equal, it should feed anything and split to any weiight within its specs. I used mine to level 16 oz, just taking a high edge off. I used it on 3oz to make cigarette paper thinknesses for lining. It should feed 8 oz and split it to whatever thickness you set it for. Your question is making me think it is feed roller issue and not a blade. And now I am going to show one of my stupid things I did with the American. There is a set screw on the roller that binds it to the shaft turned by the crank. Dumb ol' me. I thought it was just a set screw and tightened against the shaft. When my blade started to get dull, it would slip and not feed. I would sharpen the blade to skin gnats, and it would feed just right, for a while. Then start slipping again. It was the serrated feed roller slipping on the shaft. I couldn't crank that set screw any tighter. I had asked this question on the Crispin group (boot and shoemakers) and thought about scuffing the tip of the set screw to get a bite on the shaft or putting a rubber disc in there to bind to the shaft more, and a kind hearted soul let me know about the set screw hole in the shaft. There is actually a drilled spot in that shaft for the set screw to seat into. When I tightened it and seated the set screw into the shaft, it couldn't slip and fed anything I could crank the handle on. I used a flashlight in the set screw hole, spun the roller until I found the seat hole on the shaft, lined it up and set the screw. Came up that someone else had one that had done the same thing for years, spin and not feed when the blade got a little dull. They couldn't find the seat hole in the shaft. Ends up theirs had been taken apart for remilling the serrated wheel and re-assembled end for end. The set screw hole was at the opposite end of the set screw in the feed roller, and he was trying to bind against shaft like I was. Might be the issue either way. -
I just got my newest issue of Western Horseman magazine. They are running a little deal on the TCAA scholarship program, and have story on our own Alan Bell learning from Nate Wald. Congrats Alan.
-
Question Re: Landis Model 30 Crank Splitter
bruce johnson replied to beltman08's topic in Leather Tools
Wally, Two suggestions. First off, the guy at Pilgrim Shoe Machine is trove of info on these old bench machines. A weblink that has a manual of sorts is landis splitter too. Not to sound smart, but it may be something as simple as a blade being upside down. I have seen that on one my buddy bought off ebay a few years back. Previous owner got disgusted because it wouldn't split and had it listed for parts. Also a dull blade or odd bevel can be a problem. These really need to be sharp, and maintained. Herb French has a great little book on sharpening. Sherdian Leather Outfitters sell it. -
Matt, I am no expert on this, and didn't stay at Holiday Inn Express last night. I done exactly one thing with an exposed edge of stingray. It is sharp enough to cut you easily. I sanded the edges down with a dremel going to the fine sanding drum until it felt good. Then I used a paint-on edge coat. Not sure if it was DYO or Feibings. I talked to Jerry VanAmburg later. He uses a lot of it on bracelets, and was doing essentially the same thing then. I usually try to just inlay it. I did see a sheath done with it, and that guy had sewn a binding strip over that raw edge. It didn't look out of place to me.
-
I use an Osborne push beveler some, especially outside beadlines to break that edge over. Got it in a trade, but probably wouldn't run out to replace it right away after a loss. I like Barry's bevelers also, and wish Bob Douglas was still making his bisonettes so I could fill the set (lesson learned). I also like the round bottom and vizzard style that Jeremiah Watt sells. The big key I think for any of the edgers is not how well they cut out of the box, but how easy they are to sharpen and maintain. These guys all fit that criteria. I traded off my Ron's edgers several years ago, and they were good too. I like Barry's mauls and have a 12 oz and 16 oz straight for tooling. I like my Wayne Jueschke tapered mauls (1 and 2 pound) for baskets and geometrics. They are more head heavy, Barry's are more neutral weighted. I use a heavier maul from Barry for punches.
-
Skirt Lacing
bruce johnson replied to CollinsMS's topic in Saddle Identification, Restoration & Repair
Collins, The skirts should be butted together. No gaps, no space between them. Do they have a gap? -
The other way to cut sole bend is with the cutting wheel on the end of a 2 in 1, 3 in 1, or 5 in 1 machine. It is some seriously dense stuff to cut with a knife.
-
Skirt Lacing
bruce johnson replied to CollinsMS's topic in Saddle Identification, Restoration & Repair
Collins, A pic might help here. There are a few patterns that different makers use to join skirts. Anything from simple "X" patterns to weaves. If the holes are there, you can use about whatever you like. If you want to duplicate a pattern, make notes as you take it apart (under how many/over how many, back so many holes, etc). If the question is "how did they lace these together in the first place?", they did it with the skirts off the saddle. You have to drop the skirts, which is probably a good idea anyway to get some more perspective on how the maker did things anyway. -
Saddle restoration
bruce johnson replied to CollinsMS's topic in Saddle Identification, Restoration & Repair
Since we are on a saddle restoration thread, I am curious what everyone prefers to condition with after the cleaning. To kick it off, personally I keep going back to Williams. I have tried several of the others - Hide Rejuvenater, Feibing's Aussie, Leather N Rich, Saddle Butter, Pecards, and the various animal fats and oils at one time or another. I haven't tried Skidmores yet. I think the others do have their place, but it just seems to me that the Williams just gives me a better feel on these older leathers. Anybody else got a favorite for old reconditioning? -
Elton, Looks good. I like the stitch pattern on back billets. A little more interest than the regular ol' sine wave lines. I really like the way you used that trinity/propeller/whatevertheycallit stamp for the border. I had to look pretty close to see exactly what stamp that was. Neat effect.
-
Need some Help about a leather splitter/skiver
bruce johnson replied to Tina's topic in Leather Tools
Tina, I had one of the TLF "professional" splitters. It was just OK, and after I sold it the guy who bought it did the maching work to get it right. Right now Campbell-Randall is selling probably the best new one. I am with Greg and Bob though, you can find a good used older one that you will be happy with for the same or less money. The few dollars you spend buying from one of the guys with a good rep will pay back. The one on ebay right now is one of the better ones to come along in a while. -
recent saddles, what do ya think?
bruce johnson replied to Fpotter's topic in Saddle & Tack Maker Gallery
A pretty minor thing but what I find a bit distracting is the back billet. The stamp pattern is angling opposite of the swells, fender, and back jockey. The seat profile looks good. The execution of the stamping pattern is excellent. -
Half Leathers vs Full Leathers
bruce johnson replied to bruce johnson's topic in Saddle Construction
JW, Thanks for the insight. I too usually let the customer decide, and you are right - most folks have a strong preference. I see some binder twine/wire repairs and weak spots that would make your head shake on saddles ridden by people that ought to know enough to check more often. I like the 2-1/2 leathers too. I don't think I have ever seen a leather break because it was just too narrow as the only reason. The narrower leathers give me more clearance over buckles and twist in a shorter length. Probably the only place I don't offer to go to 2-1/2" would be calf roping saddles. I have some 2" Blevins style buckles, and they are dandy on kids saddles. I have some all day guys who like the 3" and that is their call. I like the safety factor of the full leathers a little more. My brother-in-law had some rivets let go on halves on a pretty new reputation shop saddle. Ended up on his head when he went to circling a cow. Within about 5 minutes probably every saddle on the grounds had the seat jockeys lifted to check theirs. They both have been successful in the ranch horse versatility deal, and my SIL shows snaffle bitters to finished bridle horses. On any of the releathers I do for them, full is what they want. Seems like the barrel racers are split evenly, probably depending on whether they have seen one let go yet. LOL. The cutters are mostly half leathers, but tend to change out leathers and fenders more often. On the half leathers I do 2 horizontal rivets and 3 vertical stitch lines. I handsew them just because. Another factor I think that figures in is the leathers themselves. I oil mine, sit a day, apply Williams, and let them sit a few a days. I have already wet and stretched them which makes them a little boardy. After the Williams has had a chance to soak, I work them back and forth against themselves to soften them. I put the final set on them with a stirrup stretcher. Most everybody has commented that the new leathers feel broken in right off the bat. Especially with full leathers, I could tell a difference on my own saddles. -
Good little discussion going on over on JW's Buster Welch ropers regarding full and half stirrup leathers. Good enough I think it could be its own topic for future searchability. I am curious what different people think regarding full and half leathers. If you use fulls for all day saddles, halves for performance arena saddles, let the customer tell you what they want, one or the other exclusively, etc. Another part could be if you use half leathers, how do you attach them at the top - what stitching pattern and/or rivet pattern.