bruce johnson
-
Posts
4,401 -
Joined
-
Last visited
Content Type
Profiles
Forums
Events
Blogs
Gallery
Store
Everything posted by bruce johnson
-
Ed, Most good sized towns will have a plastics shop. There are some mail order places too. If they don't stock it, they can usually order cutting board overnight. They will cut to size, and may have remnants sitting around. I got two five gallon buckets of scraps that I make my cell phone molds, and stuff like that out of for free. I like HDPE to cut on, and LDPE to pound/punch against. The HDPE can crack if you hit it enough. Bruce Johnson
-
Ron, I have not personally used the Al Stohlman knife. If it is like most of the reviews of the other Stohlman cutting tools, probably not the best. I started off with an Osborne, it was pretty good, but required more frequent sharpening not just stropping. I now have an older Osborne, but my favorites are two Clyde round knives. Osbornes are notorious for being the makings of a tool, but you have to put the final edge on yourself. The lore is that in the old days, everybody liked a slightly different bevel to the edge. They could put the final edge on themselves when they got them. The good old new days is that most people are picking up one for the first time and have no idea what the edge should be like. The good old knives Darcy mentioned are your best bet to start off I think - price, ease of sharpening, and learning curve wise. There are some good modern makers of knives - Bill Buchmann, J Cook, Wayne Jueschke, Danny Marlin, I am missing more I know. You are going to pay more from these guys, but once you know what you want, they might be the ticket down the road. Once you get one, I would send it to someone who professionally sharpens leather tools, not the local guy with the scissors, saw blade, and knife shop. They are a little different than doing meat cutting knives. Herb French in Sheridan WY does a good job, and also has a little book out on sharpening leather tools. You can call him for it, Sheridan Leather Outfitters sells it too. The book costs $10 or so, and worth the dough. Once you have it sharpened by someone who knows how a round knife should cut, you will have a feel for it when you get it back. Once you know, and can try to keep it that way. Keeping it sharp is key. Stropping often prevents a lot of going back to the stones or whatever. Stropping surface, stropping rouges, stones, wet/dry paper, crocus cloth, paper wheels, felt wheels, Cratex wheels, cutting surfaces - maintaining blades takes on a life of it's own. Bruce Johnson
-

average treadle machine is a garment machine
bruce johnson replied to Art's topic in Leather Sewing Machines
Art, Thanks for the feedback. Actually my wife and I both like the antique stores. I collect books, and have found some great deals on old bits and a couple saddles. She likes old pottery and jewelry. You are right about the 31s sometimes being worn out. On many I have been able to shake the needle bar with nothing else moving. I am thinking that is not necessarily a good thing. Now that I know what the 66 can handle, I am thinking it might be OK for linings and inlays, although I think a good treadle stand might make it more leather friendly. Has a bit of zip the way it is. I will play with this one, and then keep an eye out for a good treadle model. I have all the feet with my wife's 66 - hemming, piping, some that look like you could scale and fillet fish with them in one pass. I don't care what the cabinet looks like, and like you say, that is the price separater for the antique stores. I have Ferdco's version of the 1245 and really like it for lighter strap goods and chaps. It is just an inconvenience to change the tensions and settings for running the light thread, normally I run 207 or 138 in it. I still haven't got the tension changes down pat like I do with my 2000. With that I know a quarter turn up or down for each thread size, and I really don't even need to check when changing threads. Thanks. Bruce Johnson -
building a Western saddle for a female vs. a male
bruce johnson replied to Blake's topic in Saddle Construction
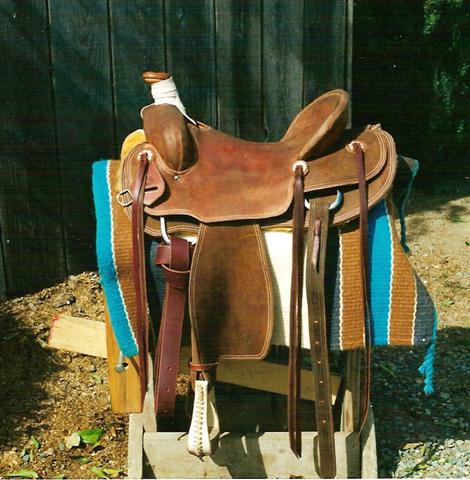
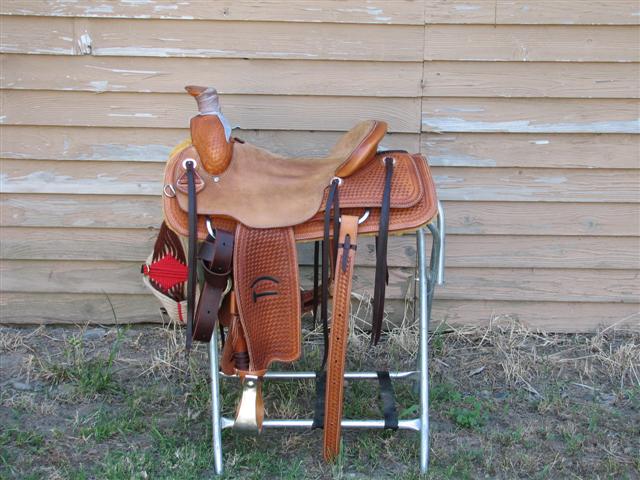
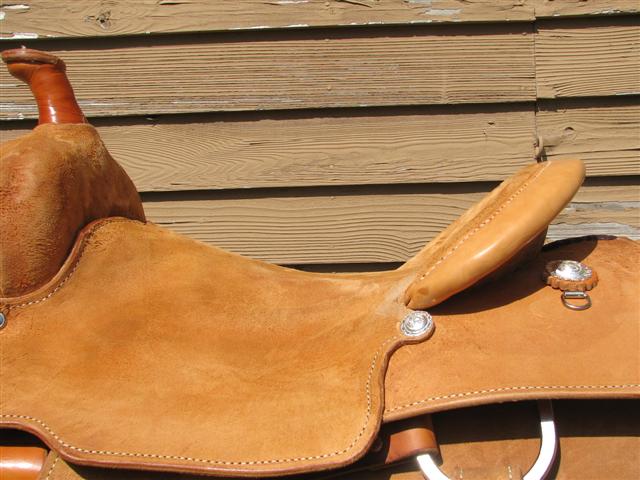
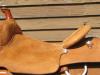
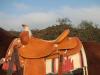
Blake, In short, I consider what they do or don't like about what they are riding now. I have sat in with Pete Gorrell on this topic a couple of times. Pete has the anatomy drawings of the female pelvis and hip structure, as well as the more muscle and leg mass on the inside of the femur (thighbone) vs men. The general recommendation is a narrower seat, scooped out for the thighs, with a higher "ridge" for women. That said I have had more guys order that type seat, and two woman want a wider lower front. I think a lot of this also depends on the purpose of the saddle though. To stand up and rope, some people prefer a wider seat in the front to "get a squeeze" on, but it is too wide to ride 10 minutes down the road. Personally I like a narrower seat with a slight buildup. When I was cutting, I liked a little more rise to the front than the average "board". Roping, wider to stand up and not have to be knock-kneed to be stable. I am attaching some pictures of a few variations of seats I do. The dark roughout is a cowboying saddle and moderately narrow through the waist and a little more rise to it. The Weatherly has a longer low spot, is quite narrow throught the waist and has a very narrow moderate to higher rise. This guy cowboys a lot, and that was the complaint with his previous saddles being too wide and/or low in the front. The saddle with the branded fenders could go roping, cutting, or a pretty good dayride. Fairly narrow and moderate rise - my personal favorite. The light roughout is a cutter/colt saddle. Narrow waist and moderate rise, but would be considered too narrow and high by most cutters. All of these saddles are used by men, and they like the seats. The block stamped saddle with the florals has a fairly low seat, not real narrow, and not a lot of"pinch" to the front. Fits my wife just right. I am already seeing where this thread is going. Dennis Lane's sytem for the top of the saddle too. LOL. Bruce Johnson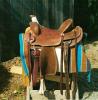


-
average treadle machine is a garment machine
bruce johnson replied to Art's topic in Leather Sewing Machines
Art, I am sitting here looking at my wife's Singer 66-16 electric model bought new by her mother. The serial number matches up with 1951, she bought it in '52. The original manual lists that it will take a needle up to #21 to sewing with thread size "40 to 60 Linen or very Coarse Cotton". I am not sure how these thread sizes compare to what I am using now. First off, I have started paying attention, and see a ton of these machines in the antique stores in treadle and electric versions. Prices all over the scale. Apparently they were made from the 20s to the 50s. Think they might do the job for wallet linings, or inlays with chrome tans? Second question, some of the bootmaker guys seem to like the 31-15 with the roller foot for inlays and sewing neatly close to an edge. How close is the 31 series to the 66? Can the 66 be fit with a roller foot? Not sure I want to just jump in solo and face the wrath if something should happen to the 66, but if I say "Art said it was OK", I have an out. Thanks, Bruce Johnson -
standard heel-bar buckles alternatives?
bruce johnson replied to abn's topic in Hardware and Accessories
Alex, I have to agree with Greg. Even the "upscale stuff" sold by most of the craft outlets is very mediocre and high priced for what it is. If you compare the Montana Silver to anything else, it is shallow and PLAIN. Hansen's silver is available at several outlets, one being Weaver, although not cataloged as being from Hansens. Hidecrafters used to carry some of Hansens as well, not sure if they still do. By the time it has gone through a reseller and then a retailer, the price has gone way up. Two options. It is not all that hard to get a resale number in most states. That will open up many more supplier sources to you. If you don't want to do that, get with someone who does have a resale number and order through them. In the case of Hansen's, they are on the other side of town from me, and we are there on average at least once a week. I would be glad to pick up whatever you need and deal with you on it, I have done it for others. They have plate which is tons better than Montana, overlay, and solid sterling - depending on purpose and economics. When you get past the commercial sellers like Hansens and B-C (which are also local) and the like, then you get into custom hand silvermakers, and they charge a rate commensurate with what we charge for custom handmade leatherwork. Bruce Johnson -
attaching the stirrup leathers to the fender
bruce johnson replied to barra's topic in Saddle Construction
Steve, Are you glassing just the grain side or both sides? I have heard the twist and wrap called Nevada twist most commonly. I have also heard it called the Oregon twist, The Northwest twist, and just plain old "twist and wrap". Good luck with the guiding and fishing this summer. I look forward to seeing more of your work in the fall. Bruce J -
attaching the stirrup leathers to the fender
bruce johnson replied to barra's topic in Saddle Construction
Barra, I also have always put the flesh side to the tree bars. This allows the natural abrasion of the the grit that gets in around the stirrup pin to wear the flesh side away rather than the grain side where there is more strength per unit. I would like to expand the answers in this section without taking away from your question. I am curious how many makers prestretch the leathers (and how) before construction. I have been shown to get them sloppy wet, nail one end to a board and lever the stretch out with spikes and tack the other end and let dry. I have been shown to case the leathers and roll them back upon themselves in both directions to take stretch out. Then there is the dampen and turn the bottoms only on either the tree or a stirrup stretcher. Bruce Johnson -
cowboy gear I have made this week
bruce johnson replied to steve mason's topic in Saddle and Tack Accessory Items
Steve, Very nice work. As Roger said, I like that stitching also. Your tooling on the oakleaves and flowers is interesting. You have done your silverman proud. Bruce Johnson -
Wayne, First place I would try is Jeremiah Watt. His website is www.ranch2arena.com. He has English point punches. Another source might be Weavers Master series tools. I use the Osbornes, but like you say, they do vary in degree of point and occasionally width. Sorted through to get what I wanted. Last option would be to have die maker make some up for you in exactly the shape you want, and have them put a handle on it. Texas Custom Dies would be a good place to start. Kirk and Heather do very nice dies there. Bruce
-
My daytime job is a veterinarian. I started out in an equine practice. I had grown up showing horses, and have done most things you can do with a western saddle at some point. I switched to small animal practice after I realized I was treating everyone else's horses, and my family and my horses were suffering. I started seriously doing leatherwork after a pelvic fracture laid me up one winter. Similar fracture to what happened to Don Butler a few years ago - broke my pelvis still in the saddle, and then had to try to get free of that wreck. I had hung out in a saddle shop quite a bit before, and learned a lot there. I was doing my own repairs and making up a few things. After I got hurt, I did a lot more to pass the time, and it kind of evolved. I was doing everything but building new saddles. I had done a lot of repairs, and was making all the little stuff - planners, clocks, checkbooks, etc. that customers buy. Basically a part-time thing that has evolved from there. Ten years ago, I rebuilt a saddle for a buddy. It worked, word got around, and I started doing more. I have done about 35 or so now. Everything up to this point has been on order. I am looking to get a little stock built up, and have a couple saddles done on spec to sell as well.
-
Denise and Rod, This system sounds like a pretty simple idea. It doesn't involve a large investment for the average guy to be able to communicate with a tree maker, which has been the drawback of most previous systems. It also appears to have a starting place for reference, which seems to be the biggest drawback of the bent wire models. I was also interested to read in Jeremiah's blog that David Morris was traveling with Dennis Lane. I got to meet David and spent some time with him last year at Sheridan. David is one sharp cat, you come away smarter just by osmosis spending time around him. Bruce Johnson
-
Ashley, Count one vote for the tunnel with removable plugs now, especially on strainer seats. I first learned however to cut them afterward, but learned on all leather ground seats. I was taught to use a string bleeder turned up so the backside rode on the bars to start the cut, and the connecting cut was made with a french edger. It really makes you say bad words to run a good french edger into a strainer. It also makes you say bad words to use a crappy french edger to even try to cut at all. No winners for me using a french edger with a strainer in the layers. Bruce Johnson
-
Savage, Unless these are HF Osborne (and not CS Osborne) end punches, I think the collectibility factor other than as users is not much. I am not sure that I have ever seen them sold as anything but singles. If you bought a set, the seller probably put together the set themselves. I would keep what you need and sell the rest. Bruce J
-
Art? ArtS? Is that you? Glad you made it, welcome my friend. Personally, I haven't seen the doughnuts yet either, but my favorites are plain ol' cinnamin sugared cake doughnuts when Clay makes another run (Clay, I ususally eat at least two). Coffee is good, but you occasionally have to make it yourself. Bruce Johnson
-
Coasters and key fobs!! I bought my wife some coaster clicker dies. Anything that I don't use for conchos or carriers is used for that. The decent pieces are pressed with embossing plates with different rodeo silhouettes I have. Off grain or softer pieces are glued onto hair-on hide scraps and clicked. Sew around the edges, slick edges, and they are good to go. She bundles them in sets of 4 for $16 a set. I did the math once and by batching, she was making $25-30/hr. She has made key fobs using a spur strap buckle end clicker die. To separate from the pack, she edge dyes a smaller leather concho, center punches through both, and adds a spare silver concho. She prices them according to the value of the concho. Larger pieces I make into yokes for soft purses. I run the edges around the skiver, so they don't look clunky. I still have the meat in the middle to dig deep and lift up with my tooling. Since they are sewn down and normally a concho or two plus the handle hardware through them, they can be a little stretchier and get by. I use up chap scraps for the bodies this way too. I mostly do custom and awards orders, but it is kind of nice to take a day and make up some of this stuff to have "off-the-rack". Bruce Johnson
-
best and worst critics of our own work
bruce johnson replied to SmilinJim's topic in Leatherwork Conversation
Clay, I got the deal about self-critiquing your work from the Honorable Cordwainer's Colloquy, a boot and shoemakers group. They have a web forum (www.thehcc.org). Some of the machinery, tools, and techniques are universal for leather. They are also a philosophical group, really into tradition, function, fit, form, beauty, and craftmanship. Although I am not planning to make boots in the near future, I get smarter just hanging out there. Basically to paraphrase one of the things I took away from them about self criticism. Look at your product and find three things you can improve upon. If you find less than that, you are only kidding yourself. Find more than three, and you are too self-deprecating. Bruce Johnson -
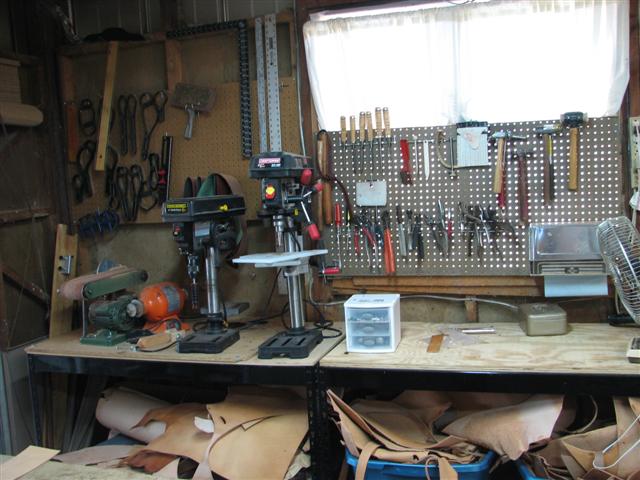
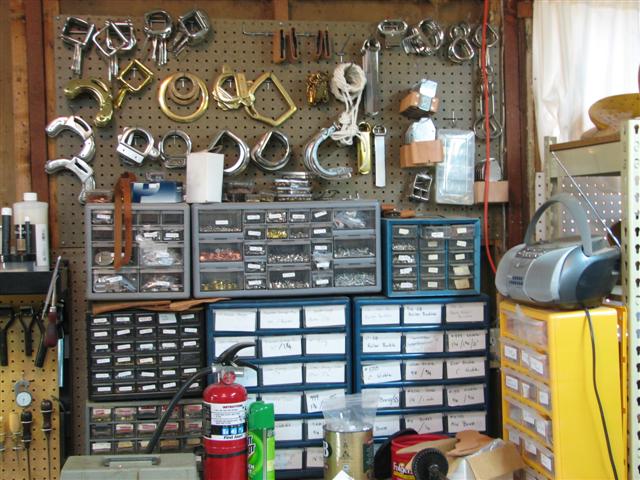
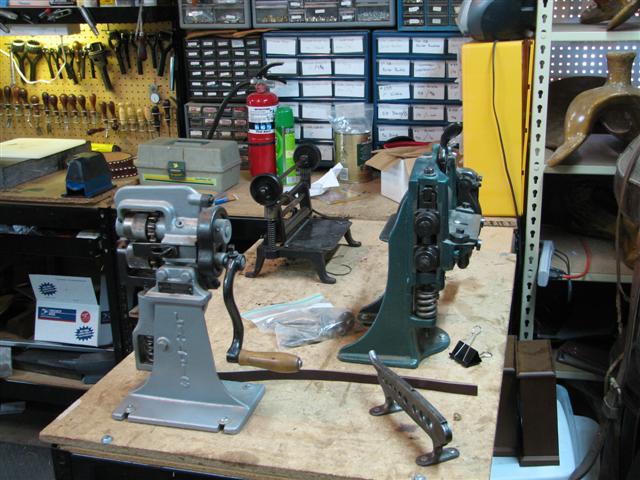
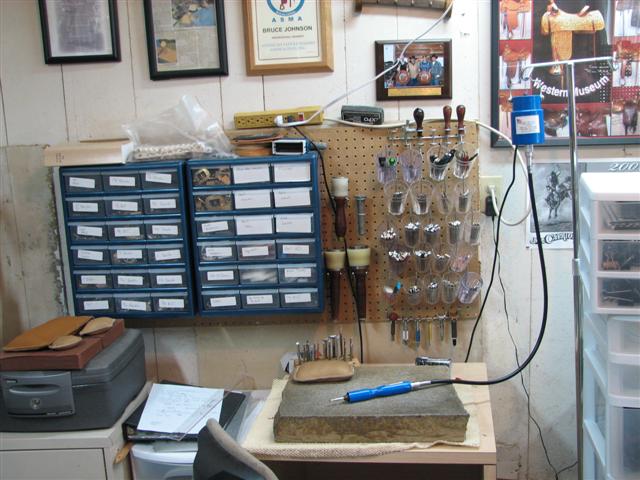
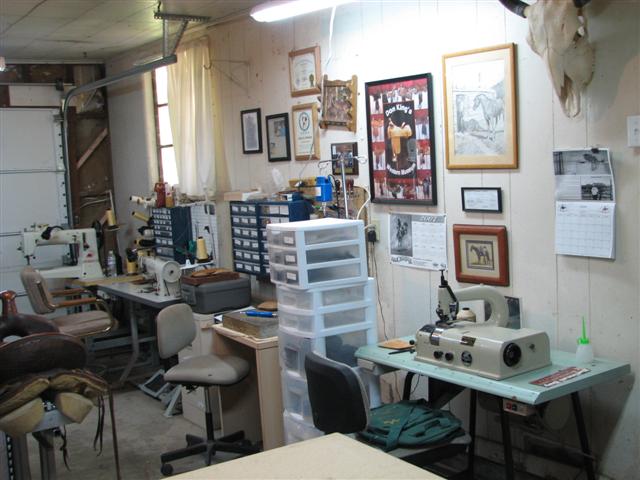
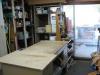
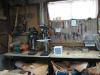
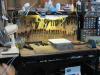
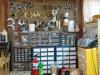
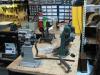
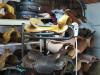
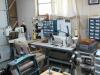
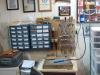
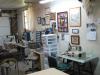
A view from around my shop. I have reconfigured it a couple times, but this layout seems to be working the best. The first picture is the cutting table. It is a large metal desk (had a "free" sign on it along a driveway). I put pipe over the legs to raise it up, and use particle board for the roooler knife, and plastic for the round or straight knives, To the right of that all the cutting tools hang on a pegboard rack. Second pic is the bench top tools - the sannder for trueing up edges, one drill press has one of Norm Lynds's burnishing wheels. The other drill press has a punch chucked into it for holes in leather, or drill for removing rivets. The scrap bins live below. It is handy to have them right by the cutting table, and closer than the rolled sides. I am more inclined to look in the scrap bins first that way. The pliers and hammers live above this bench. An open area is there to put cased leather under the fan to speed dry it when needed. Third pic is pretty basic - hand tools on the back, using chemicals above. There is not a buckstitched belt on the bench. It is a figment of your imagination, I don't buckstitch belts, unless I quote a ridiculous price and they say "yes" because nobody else will even do them. Fourth pic shows the hardware. Saddle riggings and large buckles above. The parts drawers hold rivets, nails, screws, and buckles and rings under 1-1/2". The bench to the right ahs the handmachines. The two splitters, the handcrank skiver, and the rein rounder. The are set so none interfers with use of the others. The three tiered rack holds works in progress ort repairs. The shelving behind that holds trees and things like ropecans, and bins below hold stirrups. The sides are sorted and rolled up on the shelf next to that. The opposite wall has the two sewing machines. I keep the different feet, guides, and throat plates in the drawers, the thread is sorted on the pegboard. Bobbons are sorted by thread size, color is obvious. The stamping bench is covered with a 4" headstone fragment. Like Steve, mine has a name (and a picture) on the bottom. Stamps are kept in plastic cups on the pegboard above. The parts drawers to the left have silver. The drawers directly by the stamping bench have tapoffs. There is a roll around drawer thing for miscellaneous stuff, and then the skiving machine to the right of that. Bruce Johnson
-
tlowrey, Frank died a little over a year ago. As far as experience with the different lace cutters and trimmers, I am not much of a braider. Hopefully someone in the braiding section might have more experience. Bruce Johnson
-
Busy in the saddleshop
bruce johnson replied to Cowboy Crafts Online's topic in Saddle & Tack Maker Gallery
Ashley, Good looking work. I am glad you had my idea first (a polite way of saying I am stealing your idea) on a couple things. I like how your ear concho cut at the cantle corner lays parallel with the bottom line of the rear jockey. I like that, have probably seen it on others I liked, and never recognized before. If it has happened on mine, it was accidental. Also I have not been a rear billet stitcher except on bronc saddle repair billets. I like your pattern and will give you credit on my next one. THAT is why I like these forums. I can steal from people besides those that David Stoecklein and Bill Reynolds photograph. Bruce Johnson -
Thanks to all for the great birthday wishes on the forum and offlist as well. Just an update. I was supposed to be at 7500 feet elevation flattening my butt on the boat seat pursuing large rainbow trout surrounded by pine trees and granite. Unfortunately the boss got a new grandchild, so that is off for a week. I am at 150 feet elevation, it is approxmately 104 degrees, and the only fishing has been pulling a dead roping calf out of the irrigation ditch where he chose to give it up. If I was a rawhider, I could sell him to the leather business and not take a total loss. Such is the livestock business. I received two custom Barry King basket stamps from a list member. with my initials on one and those of my wife on another. The kind of gift that those on this list could appreciate. The day is now looking up, and I thank everyone for their wishes. It is always great to have a birthday, Thanks also for all of the comraderie and info shared with the group. Bless you all! Bruce Johnson
-
Barra, I think the Stohlman books are the most complete, and Lord knows, hundreds of saddles have been made using them as the only guide. That said, I like your line "differing opinions are what makes the world go round". That is the gist of why we are here. I have the Stohlman books and do find them a good resource. My "go to" book now and for the last several years is Harry Adams' book "Saddle Makers Shop Manual". Harry is deceased and his daughter was still selling it last I heard. I am sorry I don't have the contact info handy, but someone can come up with it I am sure. This book goes through making a Wade saddle in the first section. The second section covers variations - swell forks, different seats, riggings, horn covering techniques, etc. My favorite part is that he shows you how to make patterns "on the fly". It is a notebook binder style book. I finally at the suggestion of a friend put each page in a pocket page protector to preserve the pages. I agree with you on the Yates' books. Some good tips, techniques not really showed all that well in other sources, but a little sparse. They are an OK value for the money. I think about $30-40 gets them both from ShopTalk. Johns Hopper's book Cowboy Complete Saddlemaking is almost a cult classic. Snapped up on ebay for prices more than the value of the info to me. There is a section on accessory items in the back (bucking rolls, saddlebags, hobbles, halters, etc) that is pretty good. Hard to find and pricey when you do. If I had to only have a couple - they would be Harry Adams first and Stohlmans second if I had done some saddles before. If I hadn't built many, the order would be reversed. Either way I guess, a person would want both. The others are OK, mostly out of print, and the info is either sparse or "dated". Bruce Johnson
-
Well, we might as well not leave the writers out here. Let's start a thread on saddlemaking books too- Stohlman, Harry Adams, John Hopper, John Beck, Bob Likewise, etc. Bruce
-
OK, now that we have some starts, I will share my views of what I have. Dusty Johnson - very basic. You will learn to put leather on a tree. As Greg said, not accepted techniques for many of the good handmakers, but it is a start. Probably the lowest price. His chap making and holster videos I think are better. Bruce Cheaney - I have the cutting saddle and roping saddle tapes. Bruce builds with a minimal amount of tools. I think you could turn him loose at Ace Hardware with $100 and he would have all he needs. His drawdown is made from plumbing pipe sections and fittings. Most of the cutting is done with a pocket knife, and he uses a smooth faced hammer. A guy probably only needs one of his three different types of saddles. Lots of overlap in building techniques, other than seats. Some pretty good ideas, but a few things that have me wondering why he did "that", without explanation. Priced about $200 per set. Bill Gomer - A fair amount of information. Pretty good production, and he tells enough stories to keep it light. Quite a few things that I learned from, and have done on everything since (pattern material for instance). Priced under $100. Worth having, especially for early on building. Jeremiah Watt - My favorite as of now. Lots of techniques from a handmaker. Lots of "this is why I do it this way". Some of the Jeremiah philsophy along the way, and commercials! I didn't see many of the advertised items in Jeremiah's shop but what the heck. Lots of the little finese things that separate the good guy from the average. He also has a tape set on floral carving and layout. I like that set also. Priced about $400 for the saddlemaking, and about $180 for the carving set. You probably have some of his tools, buy his tapes (now all on DVD I think). Bruce
-
This is probably a good time to start its own section with the discussion on the Harwood DVDs soon to come out. I think a section of reviews and impressions on the current videos ands DVDs would be good. There are some that are geared to be pretty basic, and others are pretty involved. I realize that probably everyone will have different opinions, expectations, and from other lists, I know price points, as to whether a particular set is worthwhile. One's I have seen or have are a couple of Bruce Cheaney's (cutting saddle and roping saddle), Bill Gomer's, Dusty Johnson's, Jeremiah Watt's on floral layout and saddlemaking off the top of my head. Each of these have merit, and are geared for different levels of experience. I would like for anyone who has thoughts on these resources to share. Thanks, Bruce