bruce johnson
-
Posts
4,401 -
Joined
-
Last visited
Content Type
Profiles
Forums
Events
Blogs
Gallery
Store
Everything posted by bruce johnson
-
I am with Luke. I had a Boss and liked it a lot. The throat clearance was an issue with some things and you needed to plan out the attack for sure. I went to an Adler 205-64 and it was 11-1/2" maybe. Still had some problems on some things like saddle blanket wear strips and inlays on rope cans and bags. Not a big problem but sometimes it took some engineering. I have a Pro 2000 with 16" and a lot less problem.
-
Yep, they are saw sets. They are about always tagged as a "leather tool" or "unique clamp" in antique shops. The average price is $25. I bought a really cool looking tool a while back with a nice 2 line rosewood handle (ala CS Osborne). It has a sliding blade on the square shank with a hook on the end. I had never seen one and thought it looked cool but couldn't quite figure it out. At the next shop who had a lot of kitchen things, There were several there tagged "vintage can opener".
-
 The belly on the pelican horn will keep a rope low on the horn neck.
 -
Sara, I use one like the second from the left, but in the old days they made one for glove snaps and one for belt snaps. As far as the caps staying on, I use an anvil with the concave dish on one end and the hole to set the stud on the other. There is kind of a magic thickness of leather that lets the female part of the snap collapse into the cap and the scallops on the cap will crimp on the mushroomed socket end. Too thin and the socket collapses too much and the stud won't seat. Too thick and the cap won't grab. Like Ashley mentioned, the other suppliers snaps do better sometimes too.
-
Sara, This thread is from 2009 and I still do snaps the same. I am not home to give setter numbers. I meant that I use the setter that goes into the socket to set them. My setters are pretty old, but don't look like a pencil. They are kind of rod with a tip surrounded by a concave rim. My belt snap setter has some number and the letter "B". My glove snap setter has a smaller post on the end and has the suffix "G". I use the "G" setter for the belt snaps (should be using "B" setter ) and the caps seat better and the snaps stay closed better, at least for me.
-
Lois, No offense at all. In fact I find that interesting. I had a running email conversation with a guy in Europe a while back, and he wrote he finds beveling on the inside (toward the fence) works better for him. The blade will tend to push out if anything and not narrow the strap. . All the plough gauge knives I have run across so far have the bevel on both sides of the blade. I have had some old draw gauges that are only beveled on the inside though. They worked good like that and not as well with a double bevel. I think that the angle the blade sits was the difference there. This reminds me of a skiver blade I had a few years ago. I had an American crank skiver and an American 3-in-1. I used them both about equally at the time. I confess to being a little slow on the uptake. Every so often I would take them off and give them a stropping or touch on the stone. They both worked well. I'd probably had both off 3 or 4 times, but never at the same time. It wasn't until I had both blades off at the same time I noticed something. The blade on the 3-in-1 was a flat single bevel like a splitter blade.. The crank skiver was double beveled like every other crank skiver blade I have had since. I could never tell a nickle's worth of difference using them though.
-
Ann, I am thinking you have a Dixon and the fence does flare out some in front on most of them. I watch where the leather is in contact with the flatter part of the fence and usually I am keying in about the area over the beam which may be about 1/2" or so in front of where the blade meets the leather. If they don't feed right into the leather I definitely strop. I usually strop my blades at least every other day in use, and if it has been a couple days, I strop before I start. That keeps me from having to use a stone on them much if at all. If it has been since you got it that it hasn't been stropped, it might need a little really fine stone work again.
-
I had the same trouble when I first started using a draw gauge. An old man showed me how he did it ("and old men are generally wise"). The tendency is to want to look at the blade since that is where the cutting action is. He told me to just look at the fence or guide as you work. Keep the edge lined up on that and the blade will take care of itself. When I went to plough gauges I mucked up the first strap, by watching the blade. Once I looked at the fence, no more problems. HOWEVER, one thing to be aware of. The blade angle needs to be pretty right on alignment wise with the guide in a draw gauge or a plough gauge. If the angle is off enough the blade might want to track in or out and that can really mess you up and that torque deal gets big in a hurry. The draw gauge blade slots are not 100% precise, and so even taking a blade out and putting it back in can be a slightly different angle from just bit of change of positioning in that slot. Usually a few strokes on a fine stone and stropping on the offending side of the blade will make a big difference. The same thing can happen with plough gauges, although a bit less of problem. There is a longer slot for the blade and they are generally more precision made so the blades tend to go back the same. Once the blade angle is set, then equal stropping on both sides will maintain it. The other thing that can happen with either one is that the fence and guide may not be exactly at the right 90 degree angle with the beam. The blade may be eqaully sharpened but isn't being presented squarely into the leather. The older draw gauge and plough gauges made with matching numbers on the frame and beam were individally made and matched to be precise. Some are dead on and some are probably off some. The new ones are supposed to be precise and are mass prdocued and not "matched". They can be off just as much or more. Again, fixing the blade angle on side to the other is an easier fix than file or grind to fix the frame. I use the wooden strap cutters some too. I had a couple of the old "Original" strap cutters and not a problem. A few years there was sale on them (proved to be knock-offs) and I figured I would get a few and just leave them set at some common widths for strings and lacing. A couple were alright but others had the blade slot cut that you could see by eyeballing it was off. I use razor blades in those and there was no fixing the blade angle there. For the $12 or whatever they cost, it wasn't worth my time to try sanding of fixing the handle/bar alignment.
-
I like plough gauges too for straps of any width. The blade is in line with your hand and you push them. There is no torque as the strap gets wider like on draw gauges. I use draw gauges for 3/4 inch or under and plough gauges for anything else. I have a wide one that will do 8" widths and I do use it that wide for cutting wide strips out for doubled reins. I use ones with a shorter beam for general use. The roller in front of the blade keeps the leather from climbing up the blade and off the guide like can happen with draw gauges too. Plough gauges are used on the table top, you don't need to be off the table or over the edge like a draw gauge either.
-
Opinions On This Saddle
bruce johnson replied to The Farmers Daughter's topic in Saddle Identification, Restoration & Repair
If you like it, I'd check out to the riggings and leathers to make sure the attachments are solid and leather is good underneath. Check for nails in the wool, stuff like that. With no makers stamp, not much else to say I guess. It is a kind of retro style with that horn, cantle, and seat jockey shape. If you like how it rides and your horse gets along under it - great. -
Any kind of identifying mark on the Eberly? I have some of the McMillens you do. One of the guys I bought some stamps from remarked on one "you know, I think this one might be an Eberly". It just sort of went over my head at the time and I never have pursued it since. You kind of raised my curiosotu level again here.
-
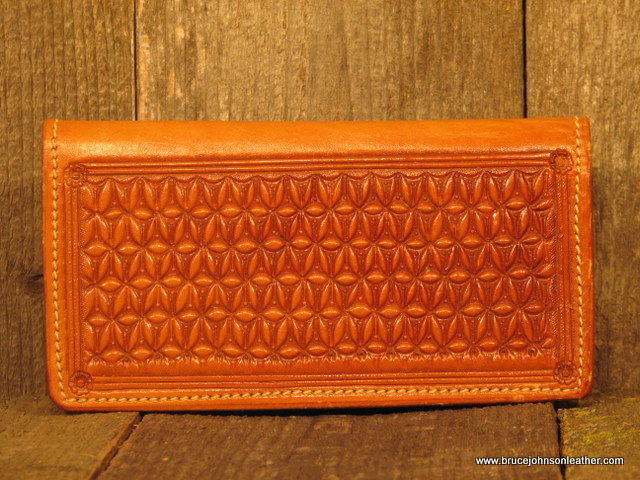
I've got a couple of those McMillen meander stamps. My wife didn't know it was supposed to be a border and started playing with it a few years ago. She came up with a geometric pattern that is pretty cool. It is one of our most requested patterns for ladies leather stuff - purses, checkbooks, etc. I have attached a picture of an early checkbook with it.
-
The whole thing is cut in a banana shape for me. As a generality, I allow about 1-1/4 inches at the bottom for the fold-out and then it depends on on the binding style for my top allowance. For a straight binding I allow about 1-1/2" around the top edge of the cantle. If it is a Cheyenne roll I allow about 3/4-1" plus the width of the roll. If the roll is level at the top I use one pattern. If the roll is to snap down more across the top, then I use a pattern with more curve to it.
-
Ross, I got this link from another post here a couple years ago, but can't find that post at the moment. Here is the link - Slack Belt sharpening . This method ends up with a slightly curved edge on the blade. Some people call it a Moran edge. It is sort of like a secondary bevel to back up the edge, only an infinite bevel instead of a fixed angle. This has made a the most durable edge for me. I was doing a light secondary bevel (Herb French's book) but if I got a really thin edge two things happened. Either I chipped out some edges when I was cutting curves bcause the blade was to thin or I rolled an edge. That was the "forgiving" part of the Clyde knives because I could fix it pretty easily. Once I tried this slack belt deal, It hasn't been the issue. I have a Harbor Freight 1x30 vertical belt sander and the belt grits they mention in the forum from Lee Valley. I also found another place to do the slack belt effect at a steeper angle. On my 4x30 benchtop belt sander there is a small gap between the roller on the end and the flat top that supports the belt. If I back off the tensioning lever slightly, it releases enough tension on the belt to be slack. It is good place to do things like the new Osborne strap punches and make a sharper edge that will punch way easier but won't roll. I do some of my clicker dies there too if they have a flat edge. I have some pretty wore out 300something grit belts I save for that. Some of the new edges are dull enough I go through a few grits to finally raise the foil edge. I think they said in that forum link that if you don't raise an edge in a couple passes you need to be using a coarser grit. Pretty much what I do. The only real fooler I have is sometimes I get a short foil edge pretty straight out from stropping but not wearing it off. It looks and feels good, but when I go to cutting hard leather it rolls. Stropping with a more agressive compound (I use gray for that) and then going to the green takes care of it.
-
Like Art, I prefer a 4 to 5 inch knife overall. For some cuts I use one down to 3-1/2". I roll a round knife to cut fringe, and will go to a big knife then. I like to skive with a wider knife too, and about a 5-1/2 feels right to me. I'd agree with Art's makers listing also and add a couple. I think the Rose knives are the top of the scale - they are hard. That makes them take longer to sharpen, but once they are right, they go a long time with just stropping. Then I'd give a slight edge to older Gomphs followed closely by the Newark marked CS Osbornes and older Harrison CS Osbornes. I have a couple Harringtons and they are about like the Gomph or Newark CSOs. I have had several Clyde and Shapleigh knives that I liked too. They are maybe a bit softer than the others, but not so soft you spend half your time resetting the edge. They make a real nice knife, pretty forgiving, and you can learn a lot about the mechanics of putting a good edge on one and not be taking all day to do it. For modern makers, I have had recent CS Osbornes and they are a notch to a step lower than the Clyde/Shapleighs to me. I've got a Dozier I like a lot, but he has had a really long wait time. I have had some Bill Buchmann and Linneman knives and they have some real fans too. I know one person on the forum here bought a Knipscheild (sp?) knife at Sheridan and likes it. There are some other newer makers putting out leather knives, but I haven't got to use any others. These good modern handmade knives have a fair price on them, so there is some sticker shock comparing them to a new Osborne or Stohlman. Another consideration when you shop for knives is a good cutting surface and sharpening system. I like high density poly with a smooth finish to cut on and glass to skive on. I like the diamond stones or wet-dry abrasive paper to profile. I set my final edge with a slack belt sytem with a superfine grit. I follow that up with green compound. I also strop with green compound to maintain.
-
Knut, Thanks for the compliment. I think the hardest saddles to make look mechanically good are the plain ones. The sweet spot is probably called different things by different people. I guess I call it the place where you settle into when you are relaxed and seated. On a normal saddle I would have made a tad more "slide" in the cantle dish maybe although this tree has a good transition already. I also would have started the rise about 1-2" more forward of this one. I had the advantage on this order of seeing his other saddle and the seat geometry. I could see what I needed to do with this one to make it work better for him. If this works out like we anticipate, we can do some some tweaking on his other saddle.
-
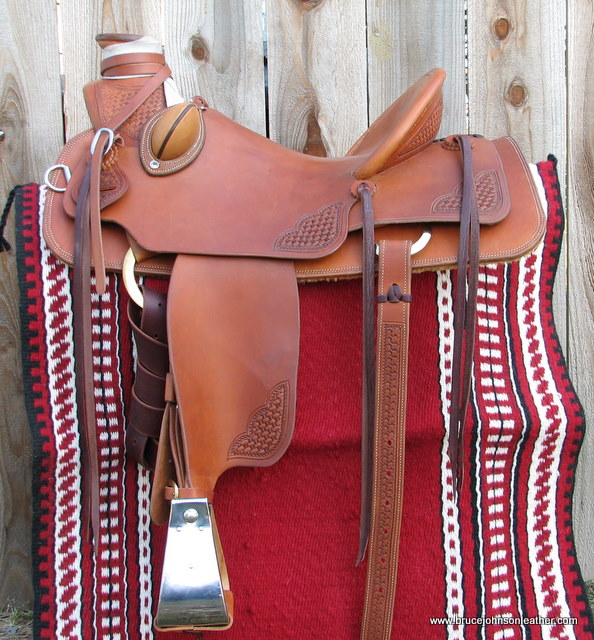
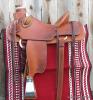
This is a cowboying saddle I just finished up. It is built on a 16" tree. The guy is pretty stocky but short legged. It was nice to take an order from a guy who came in knowing what he needed for the most part. He doesn't do well with Nevada twist leathers and the dropped ring rigging, so we went with 2-1/2" leathers and regular Blevins configuration. I cut the fender leg a little shorter to accomodate that also. He wanted a shorter sweet spot in the seat and quicker rise than what he was riding, so I got that benefit of that before working the ground seat too. Pretty minimal stamping with the swells and then small corners.
-
Another Rope Can
bruce johnson replied to Double U Leather's topic in Saddle and Tack Accessory Items
That is one cool can. Great job, I like it a bunch. -
I use electrician's tape. You have to be careful on some conchos. The real thin cheap conchos will collapse if you grip them very hard.
-
I predrill pilot holes for my screws about with a smaller bit than the shank of the screw. That way I still end up with some bind on the shank. I set the depth so the last 1/4" of screw is not drilled for more bind. That is just the way a coupole guys have shared with me. When I go to seat one, I use a pair of channel-lock pliers with taped jaws. I have a pro-concho turner and it works alright if the hole is fairly loose (like on a repair). I can't get it to really seat one though. It works a lot better for me to back out old conchos. One thing to be aware of is that if the hole is not at 90 degrees to the surface. As you get close you will end up with a bit of a problem. A rawhide mallet will ususally bend over that edge of the concho to make it flush. Also some conchos don't have the screw soldered on at 90 degrees and you need to be aware of that and compensate with the mallet, so I have been told.
-
Shave Kit Bag
bruce johnson replied to wood's topic in Purses, Wallets, Belts and Miscellaneous Pocket Items
RW, I do quite a few in that type. I use chap leather for the gussets. For the bottom I sandwich some 1/8" masonite between the lining and the tooling leather to stiffen it. I started putting feet on mine after the first couple to keep them up off a wet counter. For the feet I use round 3/4" punchings and run chicago screws through them and the bottom with the screwhead inside the bag. -
Sewing Machine For Someone With Limited Use Of Legs/feet
bruce johnson replied to LilRay's topic in Leather Sewing Machines
Ray, I have sewn some miles on one of the early Boss stitchers and sometimes still wish I had it. They are pretty simple to operate. The downside is that it takes one hand to run them so you have one hand to hold the piece. You learn to use binder clips and things like that to hold pieces in place instead of two hands. There wasn't much I couldn't get sewn with some improvised clamp or support one way or the other. There are some bigger stitchers that have a large hand wheel on the front to run them also. I am sure someone has adapted a powered machine to run by hand control for people with limited foot control too. If so, you still would only have one hand running the piece anyway.You can run most powered machines by hand turning the flywheel. Some of them have been adapted for a crank handle on the flywheel too. The servo motors can be set to sew pretty slow on a powered machine, but it still takes some foot control to stop and start. The biggest problem I had starting out with a clutch motor was I drove it like a gas pedal. I used the ball of my foot and pushed to go and let up to slow. When someone showed me to use my whole foot on the pedal - "Toe to go and heel to slow" it gave me way more control. When I switched to servo motors it was even more precise. -
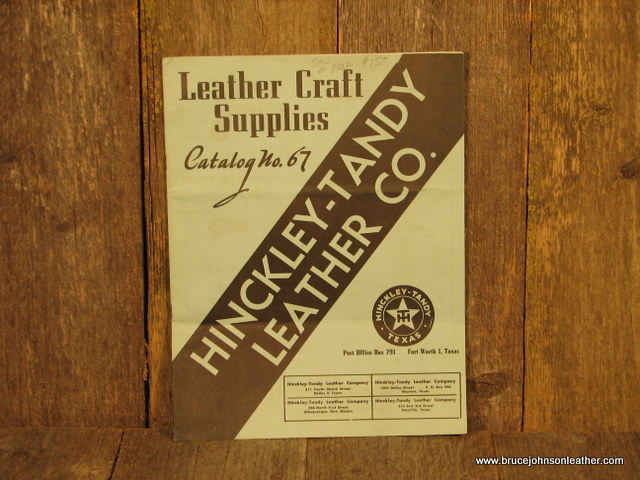
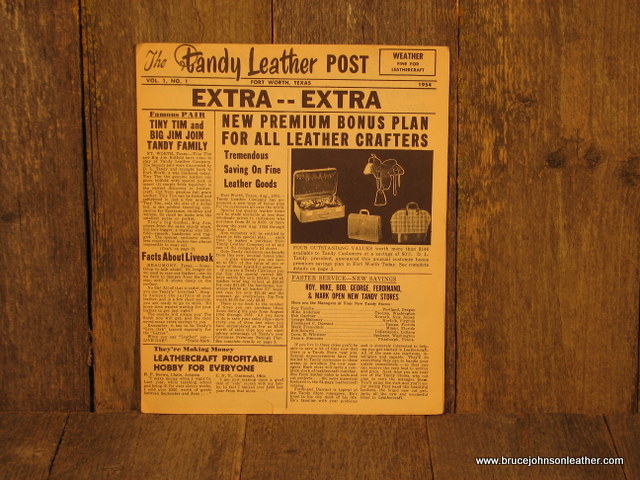
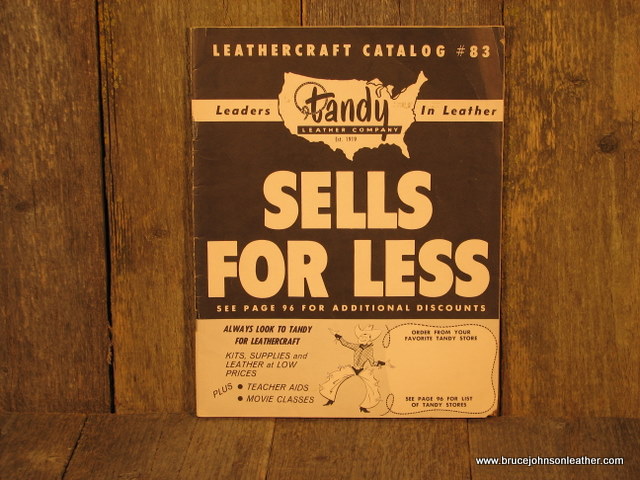
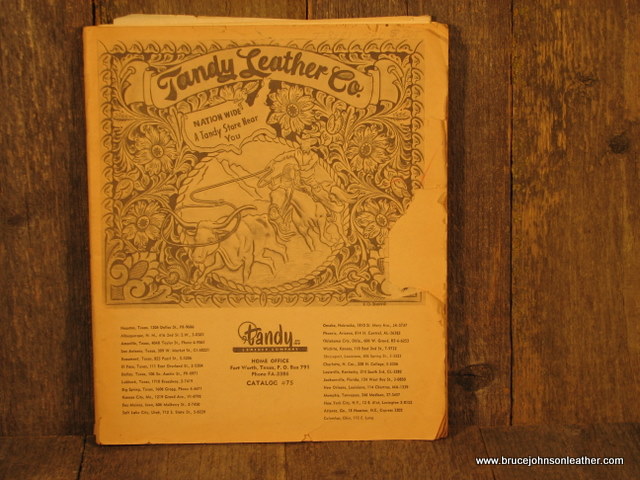
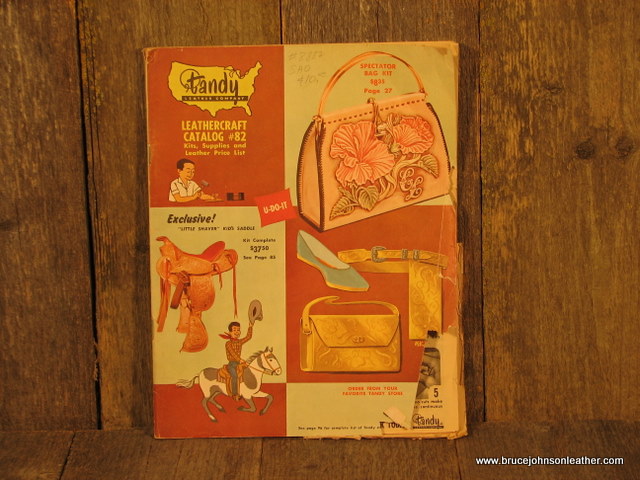
I have some old Tandy catalogs, a flyer and some ad inserts for sale. The forst is a Hinckley-Tandy Leather Co catalog #67. I have been told it is from the 1940s. I have Tandy catalog #75 with a mailing date of 9-29-53. The flier is "The Tandy Leather Post" from 1954. Kid's size saddle kits were #34.50, ostrich legs big enough for two wallets were $1.50, goat skins were 50 cents, and Cape (buffalo?) was 33 cents a foot. Catalogs #82 and #83 don't have dates, but catalog #84 is Spring-Summer 1959. What might have some more appeal is that all of these catalogs were mailed to the Duhamel Trading Post in Rapid City, South Dakota. My great-grandfather rode a Duhamel saddle in the 30s and it raised a couple more generations until I retired it to my living room. I am open to offers on these, and they can all mail in a flat rate envelope.

-
Frank, You pretty well hit it. The round bottom edgers will cut a rounded profile. The blade edge is thin with a low bevel, and they do almost a "quarter round" profile. Sharpened up well, they run the easiest of any edge bevelers except for maybe a really good sharp bisonette. Most of the other lower priced edgers will make a square cut profile edge. The blades are flat top and/or bottom and the profile of the cut matches the profile of the blade edge. Also the ones with the edge in a slot, sacrifice one to see the cutting angle is 30-40 degrees inside on some of them. That is why they get pushy and chatter more. Also hard to work the inside to sharpen like some will tell you. Those slotted ones are easier to work off the bottom and just strop the slot. The round bottoms are the easiest to sharpen and maintain. You can take a round object like a nail or screwdriver shank depending on the radius you need and wrap it with wet/dry sandpaper, then work it on that. I strop the bottoms of mine on a leather edge with compound and the top with a felt wheel on my dremel on slow, Just a touch will do it. The round bottoms have the longest life also. As long as you maintain that profile, you can sharpen most of them back for 2" or a little more. Roundbottoms work great for trimming excess and leaving a nice rounded profile, like on a cantle binding or the sewn in lining reinforcements. If you keep the toes ground back as you sharpen them, they will do a tight radius in a slot also.
-
Because of more tools for sale,I have increased the number of pages of leather working tools for sale on my website. I added a few tools yesterday includung a great little Gomph knife, and I have quite a few other tools I will be listing in the coming days and weeks. Coming up I have several Gomph, HF Osborne, and CS Osborne hand tools, as well as a splitter or two and rein rounder. I also will be listing some more recent good solid using tools as well. Several have asked me to be notified when more tools are listed and so I am starting an email notification group list. If you would like to be on that list, please contact me at this address - bruce(AT)brucejohnsonleather.com - *substitute the @ symbol for (AT)* Please title the message "Tool List". Eventually we will get a software program for automatic subscriptions, but for now I am doing this manually. Thanks,