bruce johnson
-
Posts
4,401 -
Joined
-
Last visited
Content Type
Profiles
Forums
Events
Blogs
Gallery
Store
Everything posted by bruce johnson
-

Looking For Help On Mule Hide Horn Wraps
bruce johnson replied to Nathan Horn's topic in Saddle Construction
I skive the edges of mine down to about 3 oz at the edge and back about 1/2". I soak them in warm water for about 20 minutes before I wrap. I wring it out and then cut a slot just long enough to go over the horn. I go down through the handhole, then under and up the front. For right handed I wrap clockwise. I pull on the tail hard as I walk it around and lay the wrap in place. I make sure everything is where I want it and looks alright. Then I unwrap and really crank it on the second time. I wrap the tail around a stick for leverage and wrap again. I lay the stick against the horn and walk it around. I slip the tail and I need to and it really goes on tight. I finish off by pulling the tail through the slit exposed at the back of the horn and the excess lays off to the left. Mine are tight enough I have to work a needle nose pliers under to get the tail. I tap all around with a small hammer and then go over it with a choke strap. Edit - I found some pictures of a couple I have done. I try to make the slot just long enough to go over the horn and so the tail will fill the slot. I think that makes a cleaner look to fill the slot and not have a big gap. On some big caps and small necks you can't though. Also If I hang the rope strap off a dee on the swells, I screw down throgh the mulehide and then wrap as normal and tuck the tail under the first wrap. The Wade shows that method.
-
I cut on HDPE and like a bigger board. I have a 2x4 sheet of 3/8. I stand it up against a wall when I am not cutting. I get less knife drag on HDPE. If you punch on HDPE, it can crack. For punches I like LDPE and have a few 12x12 pieces I can toss on a granite on the working bench and some smaller ones I can slip in a pocket or on the drill press to punch a hole against.
-
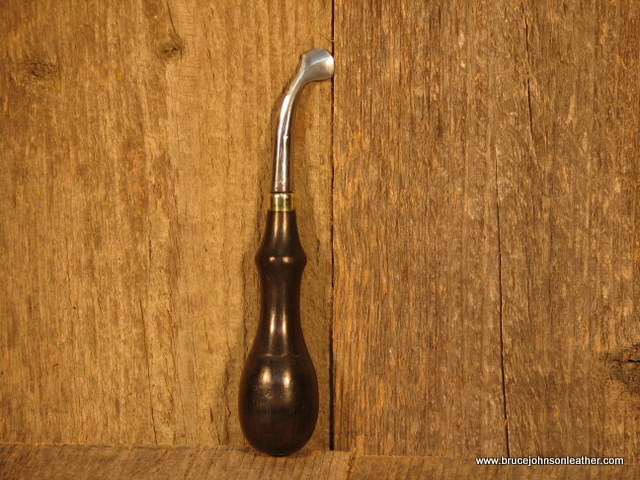
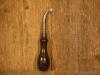
Good call, Bill. It is part of a McPherson equine dental speculum. Here's one in action - McPherson dental speculum . You can also see the downside of them in that picture. They are like a deer-basher bumper if the horse decides to sling his head.
-
The round knives that are the most comfortable for me are 4-5" across the tips. It gives me good control. Four inches is a good starting size. I like a wider knife for push skiving down an edge. I also use wider knives for when I am making a rolling cut and not a slicing or puch cut. I do rolling cuts to "chop" straps to length and to cut softer leathers, especially for fringe. when you roll the knife you never want to roll over past center of the front of the knife. You lose any leverage advantage. Friend of mine did that several years ago. The underneath point kicked up into his wrist.
-
Source For Horween's Shell Cordovan And Chromexcel
bruce johnson replied to itsben's topic in Suppliers
Here's a source too - Maverick Leather -
Art, You are dead on with your assessment of the Rose knives and I think the reasons for the soft spots on some. I use a belt for some work and keep a finger on the opposite side of the contact area when I am on a belt or wheel to monitor heat. I have gone back to mostly using wet-dry on the Gomph and Rose knives for one reason. It is a heck of a lot cheaper to buy sheets of wet-dry than belts, especially the finer grits that aren't sold at every hardware store. Roses will eat the grit right down to the nub on belts in short order. Keep using that belt and all you make is heat. The only time I use a belt much is a slack belt for the final edge. I have used diamond stones and like them for a lot of things, but laying a full sheet of wet-dry on an inspection plate gives me bigger strokes and more surface area and gets the job done faster and more evenly.
-
Bradley, Here is my anecdotal experience. Rose knives have the hardest steel I come across. An older guy that is pretty colorful described a Rose knife as "harder than a whore's heart and will stay sharper than a mother-in-law's tongue". Pretty much sums it up. To work on a Rose, you have to be of the right mindset that day because it takes some time. On my scale, Gomph is next in line - a little more forgiving to sharpen than a Rose but harder than an old Osborne. For me they hold an edge well. One small step below that are the older CS Osbornes - the Newark made ones for sure and the older Harrison marked ones. They are a nice combination of sharpening up fairly easily but still holding an edge for a while. I'd put the Shapleigh/Clyde knives with them. One bigger step below that are the more recent Osbornes. I don't know 100% the reason, but it seems like I see more Shapleighs and Clydes out here than maybe they do in other parts of the country. I am not sure if one of the bigger distributors back in the heyday pushed them or what. I'll see a nice set of older Osbornes and Gomphs in a shop, and there will be a couple Clydes or Shaps there. Even some of the old yard sale sets used to have a bunch of Craftools, but a Clyde knife with them.
-
Thanks for the nod Luke. I appreciate it. I do have round knives, draw gauges, English points, and slot punches on my site. I have some more I got in the last few weeks I haven't got to yet also.
-
Bradley, I don't know who might have made the edgers. I've had several round knives from Shapleigh and the word has been they were made by Clyde Cutlery in Clyde OH for Shapleigh. I seen no difference between the two in design or handle shape, so no reason to doubt it. Both have lightly etched logos too. Shapleigh went out of buisness in 1960 as I recall, so that will giuve some dating.
-
Aleta, I do put the conchos through the lid. I do a few every year where someone has a can already and I normally have them just send me the lid. If they can't spare it I do send just the leather for someone locally to glue it on for them. I have one going to Canada tomorrow that it was too expensive to mail the lid both ways. I made up an instruction sheet a while back for these customers, and will cut and paste it here - Gluing Rope Can Lids This is the way I attach the leather to the lids of rope cans. I have not had any come loose following this technique. I have reglued some for other guys, and had a few loosen early on. This way now has worked out to be the best for me. First off the ropecan, leather and contact cement should be room temperature. For glue I have been using Renia the last couple years. Before that I was using Masters and Barge original AP and they both were alright, but not the quick strong bond that I get with Renia. I have had poor luck with Duall 88. I first lay the leather on the lid of the rope can and line everything up. The holes for the silver conchos are already punched. I use them to mark the holes for the machine screws on the back to go through the lid. I mark and drill holes through the lid with a bit just large enough for the size of the screw shank. I rough up the lid of the rope can for better glue adhesion. I usually use a welder’s wire brush and then wipe all the dust off. I put a thin coat of glue on the leather and let it dry thoroughly to make a base. Usually it takes about an hour or so. Then I put another even layer of glue on the lid and another on the leather. I wait until the glue is mostly dry but still a little tacky. If it seems a little too dry I hit the leather side with a heat gun to tack things up a little more. Then I put wax paper on the lid to separate the lid and leather until I am ready for it to stick. I use saddle spikes in the punched concho holes to line things up. I go through the wax paper and into the holes in the lid. When things are close I pull the wax paper a piece at time and lightly press that section in place. Once I have all of the paper out, I make sure things are definitely lined up and then press pretty well with my hand all around. I work it over a few times to get a good bond. I leave it about 24 hours for the bond to cure. I normally weight them overnight. I lay the lid face down on a clean thin towel like a Motel 6 towel, and then put a weight on the inside of the lid. 20-30 pounds is fine. The last thing is to attach the conchos with the machine screws. I put a few sizes in, so that should get it done.
-
Saddle Fell In The Water Trough
bruce johnson replied to The Farmers Daughter's topic in General Saddlery Discussion
At least in some cases it was true. Some of the old saddles didn't have the leathers turned or the skirts blocked to the bars. They wet it and rode it to set the stirrup leathers and try to sink the bars into the skirts and set them a little too. Not unlike the way some guys break in Whites boots. BTW, I like your quote at the end of your posts. I collect cowboy poetry among other old books and "Songs of Horses" is one of my favorite collective books. I haven't seen that particular poem in any other book. I wish someone could attribute an author to it because I think it is a great piece of writing. I have heard Randy Rieman recite it at a show, and it is on one of his CDs. He does a wonderful job on it. -
Some New Spur Straps
bruce johnson replied to bruce johnson's topic in Saddle and Tack Accessory Items
Thanks. Yes, this is a pattern I came up with. I kind of like the rounded up leaves a little more than point and scallop oakleaves for this kind of thing. They fill a little more space and have a different look. -
Need To Build A Work Platform For A Cylinder Head Machine
bruce johnson replied to Crystal's topic in How Do I Do That?
Crystal, for mine I used a piece of 3x4 plywood and bought the folding banquet table leg sets from Ace. I screwed the legs on and it sits about 2" below the level of the bottom of the arm. I traced the outline of the arm from above from aboove and cut with jig saw. Being below the level is good for sewing gussets into bags and things like that. The table supports the weight and the piece sits up enough to run under the foot. When I need to raise the table to sew flat, I slide pieces of PVC pipe over the bottom of the legs and they are cut at the length to raise the table to be level with the top of the arm. The nice thing about the folding legs is I can take it down and it stores easily. Edit - I made the cut out so it is in 10 inches from the front edge of the table. I had seen one that was in further and it was a little hard to get your feet in to run the pedals and still be over your work to keep it feeding right. -
Kim, I am not sure if you got my last email. Here is the only I have like that. Thanks, Bruce
-
Ray, The wooden strap cutter is your best bet. The majority use them as a pull trap cutter but some guys turn the blade around and push. I used them for a long time and still do some. I use the disposable single edge razor blades in mine. They stick up a little and I just take a pliers and break them off flush once they are in there. I never could get a good enough grip on the little blades that came with them to feel safe or effective sharpening them. With a new razor blade I can do some good strips with some pretty soft leather. I cut a lot of stirrup leathers with razor blades too, so they have some strength too. For a lefty I have never seen a left handed plough gauge. I have seen a picture of one left handed Osborne draw gauge that was probably a special order from back in the day. I have not seen them as a catalog option.
-
I have been putting a bunch of tools for sale on my website in the last few days. Some people have already found it and things are sold. To keep things organized, every picture is tagged with an inventory number. There are some really sweet plough gauges and draw gauges I put up today. There is a bunch of hand tools, punches, a few hammers, some punches too. Here's the link - Leather Tools for Sale. The best way to contact me is to email through my website "contact me" link. Thanks,
-
Kate, I have had guys tell me the rollers can be remilled or trued by a machinist. The first time you take one apart it takes a good part of the day (or having a manual) to figure out how everything comes apart. After that it takes about an hour.
-
I have put dividers in some flat tops. I have made some round bags with two compartments each with their own zipper. I still have a couple of those plastic rope can divders left and they work alright for the round bags and rope cans too.
-
Charlene, The quick and dirty rsponse is this. Most of the rope cans I do are just covered on the top. I tool up the circle patch, finish it, and glue it down. I also use conchos to keep things together. I haven't had to reglue any of mine yet, but have some others. I have done a few that we covered the sides too and they were a pain to fit up, but came out alright. A lot more time involved with those. The ropes inside are treated with powder, so any leather inside is going to get covered in powder pretty fast. The biggest reason they are only covered in the front is most rope cans are thrown down in the dirt. Here's a an example of that - http://fineartamerica.com/featured/rope-cans-carol-miller.html . At least two of the cans in that picture are mine and maybe a third. I need to order it for my wall. Rope bags are a whole other deal. I mkae them from 18" to 22" diameter. Usually I put a gusste in that finishes out to be 6" and a heavy zipper. Some guys like a flap over bag and I make some of those too. If I inlay on them they are lined, otherwise not. Some like shoulder straps, some like handles in shirt medium or long. They defintitey aren't a one-size-fits all project. If you want to give me a call we can go over any details you need help with.
-
I have never been wealthy enough to get more than one Landis 30 and then somebody with more money bought it pretty quick. That put me back to looking for and buying another American. I have been thinking about it for a day and my bulb is still pretty dim. It has to be a tension, blade, or feedroller issue. One side or the other feeding and I'd think that tension is the problem, but if the blade is not square with the roller that could do it too. The blade being too far back from the rollers and softer leather can cause some funny feeding too, but I suspect the Landis has stops too to set the front position of the blade to be right. I'd be curious what it does with some firmer and heavier leather too. Now not feeding in the middle. That sort of makes me think a blade sharpening deal with drag maybe or a feed roller problem. Are both wheels true and not worn in the middle? Some of them get worn down in the middle because it is most common to stick a strap in the middle and crank away. Eventually that could lead to less feeding pressure and wadding up.
-
Saddle Screw At Horn Bar Connection?
bruce johnson replied to GrampaJoel's topic in Saddle Construction
On some I put a 1/2" concho there. Depends on what the customer wants. It is sure easier to put a screw and washer in there and get it tighter more easily than some conchos. -
The leather is softer when I am done. If I want to make something that needs the leather stiffer, I use warm water.
-
I use the mix for molding too.
-
Us Leather Shows - Which One Do You Think Is Best?
bruce johnson replied to UKRay's topic in Leatherwork Conversation
Art's list is about as good as it gets. There are also some regional shows that are not as big. There are smaller shows in Elko NV and Pendleton OR too. These are smaller, fewer venders, limited class numbers, and most attendees haven't traveled as far to get there. Still they sure serve a purpose and although they may not appeal to someone looking for the biggest bang for the buck for a one time experience, they are a chance for some people to make a weekend trip if the timing is more convenient than other shows. Social aspects aside, all of these shows are a great chance to meet suppliers, see and compare what they all make, and put faces to names. I would make one other suggestion based on some conversations with some venders. BUY from them at the shows. With a few exceptions most of them have a website, and they all take phone orders. Yeah, you can take a flier and buy from home later. They will be glad to ship. They would be happier though to swipe your card or take your cash at the show. This shows them that you appreciate them being AT the show. They have time and money tied up in travel, booth displays, and lost production from not being at their shops. It shows some appreciation for their efforts. -
Josh, Thanks for posting. One of our favorite singers, as evident by my signature line.