Squilchuck
-
Posts
210 -
Joined
-
Last visited
Content Type
Profiles
Forums
Events
Blogs
Gallery
Store
Everything posted by Squilchuck
-
In addition to an online school, some sort of mentoring program might be of interest for some new makers. I have made a couple saddles self taught w books and videos, but also have mentoring from a local journeyman saddle maker to advise me when I run into problems or have questions. This forum is great for some problem solving, but interaction time is slow (days) and limited. A person could setup an appointment via an online video app like Skype to discuss issues, show what they have done, etc. Not sure how you'd work out payment, but maybe people could subscribe for a set amount of sessions or total time. That could prove a valuable service for new makers without local mentoring options. --John
-
Check out the Stohlman case making books. Invaluable books for making all kinds cases. Vol 1 shows how to make a rod case and round cases to adapt for a fly reel. You can buy them from Tandy. Get the whole set - they are worth the small cost. --John
-

Fork Covering on an Association Tree
Squilchuck replied to pharescustomleatherworks's topic in How Do I Do That?
Get the Stohlman saddle-making books. I think Tandy sells them in one volume now. A great investment for a novice saddle maker. They often go on sale for $70. They will show you in clearly explained detail with text and diagrams how to make laced and welted swell covers, and everything else too. I'm a novice maker who has made two saddles using the Stohlman and Adams books. One saddle had a laced swell and the other a welted swell. Not sure which was easier - maybe lacing. I found Stohlman's instructions easier to follow. I think it would be difficult to explain in this forum without diagrams or pictures. --John -
Looking someone to make me a custom saddle
Squilchuck replied to BarrelPony's topic in Saddle & Tack Maker Gallery
Thor says it well. You'd need to double your price range to get even a startup saddle maker interested, I'd guess. There are some threads on this forum discussing prices for custom saddles. I'm recalling $3000-3500 was about the average rate for a plain custom saddle from a well-established maker, and higher for top makers. There were some makers that would make such saddle for $2000-$2500, though. --John -
Replacing Breast Collar Dee
Squilchuck replied to rktaylor's topic in Saddle Identification, Restoration & Repair
Thanks, I'll try that method. -- John -
Replacing Breast Collar Dee
Squilchuck replied to rktaylor's topic in Saddle Identification, Restoration & Repair
Randy, how did you end up replacing the dees? I have the same issue. Fleece on the saddle I am repairing is synthetic, so has mesh fabric backing. I am curious to know if your method went well before I choose. Replacing dees by screwing to tree is not viable with owner I think -- John -
Thanks for the responses! Guess I'll order right and left sides for the best cutting options. I'll have to ruminate over the rumen stretch theory. Interesting! --John
-
Yes, I meant ordering a right and left vs. two rights or two lefts or potluck - not from the same cow Jeremiah Watt says in his saddle-making video that he orders 5 right and 5 left sides from HO then pairs them for color and size for a saddle. I have heard or read of ordering right-left sides elsewhere too. Yes, positioning your pattern on the hide to optimize stiffness or stretch etc. is critical for quality work, but I could lay out my right and left skirt patterns side by side in.a single side of leather (as JW does in the video) and get nearly similar pieces in terms of thickness and stiffness etc. Still a puzzle!
-
I've made two saddles but have not figured out the reason for ordering both right and left skirting leather sides vs. two sides from the same side of the cow. Enlighten me, please! --John
-
help removing cemented swell cover
Squilchuck replied to Squilchuck's topic in Saddle Identification, Restoration & Repair
Thanks for the advice - I greatly appreciate it. It is a steer wrestler's saddle, so a horn wrap won't work. I took Bruce's advice and the swell cover came off without too much work. I found the horn not wrapped in bull hide with the rest of the tree, and I had to rebuild the wood horn cap. Learn something new all the time! --John -
Someone asked me to recover the horn on a saddle. I have made two saddles and recovered the horn on a used saddle, so know the process for replacing the cover. The swell cover came off easily on the first saddle I repaired, but the swell cover on the one I am currently working on is firmly cemented with contact cement. I have tussled with it a bit on the edges, but before I get too far into muscling it off I wonder if there is an alternative to simple muscle power and tools to separate the pieces? Can I use a heat gun on low heat directed at the interface between cover and tree, or something else, to soften and loosen the bond between swell cover and tree? Thanks. --John
-
Both of my saddles were made from HO bought from Montana Leather. They have the best price I have found for #1 grade. if you can get #1 grade for that price why gamble on TR selection. I buy most other leather from Hide House - great selection, service, and fast shipping to WA. I've bought from Weaver too but prices for small quantities and shipping to WA have been higher than H House.
-
I cut my own stirrup leathers from the same 11/13 oz. side. If you want heavier 13/15 oz. leather, then the blanks would be a good option, unless you're building the saddle from 13/15 oz. then cut your own. To help cut this long stuff I bought a 6 ft. metal rule from the hardware section of Lowes (they are surprisingly cheap - maybe less than $20) and use a regular utility knife/box cutter with expendable blades. (Jeremiah Watt cuts his freehand with a round knife on the video - wish I had the confidence/skill to get a straight line freehand for that length!) With a plain saddle be careful with scratches and other marks because they are not hidden by tooling/stamping. Trim your fingernails! Use some denatured alcohol to clean off oils and smudges before oiling. One thing I found is not to rush. Sometimes you get to a point when you just want to finish a piece and sort of rush, then make a mistake. I learned the hard way it is better to stop and come back when you are fresh. Good luck!
-
Thanks, Big Sioux. I forgot to mention that this forum also is a great resource for learning and troubleshooting! --John
-
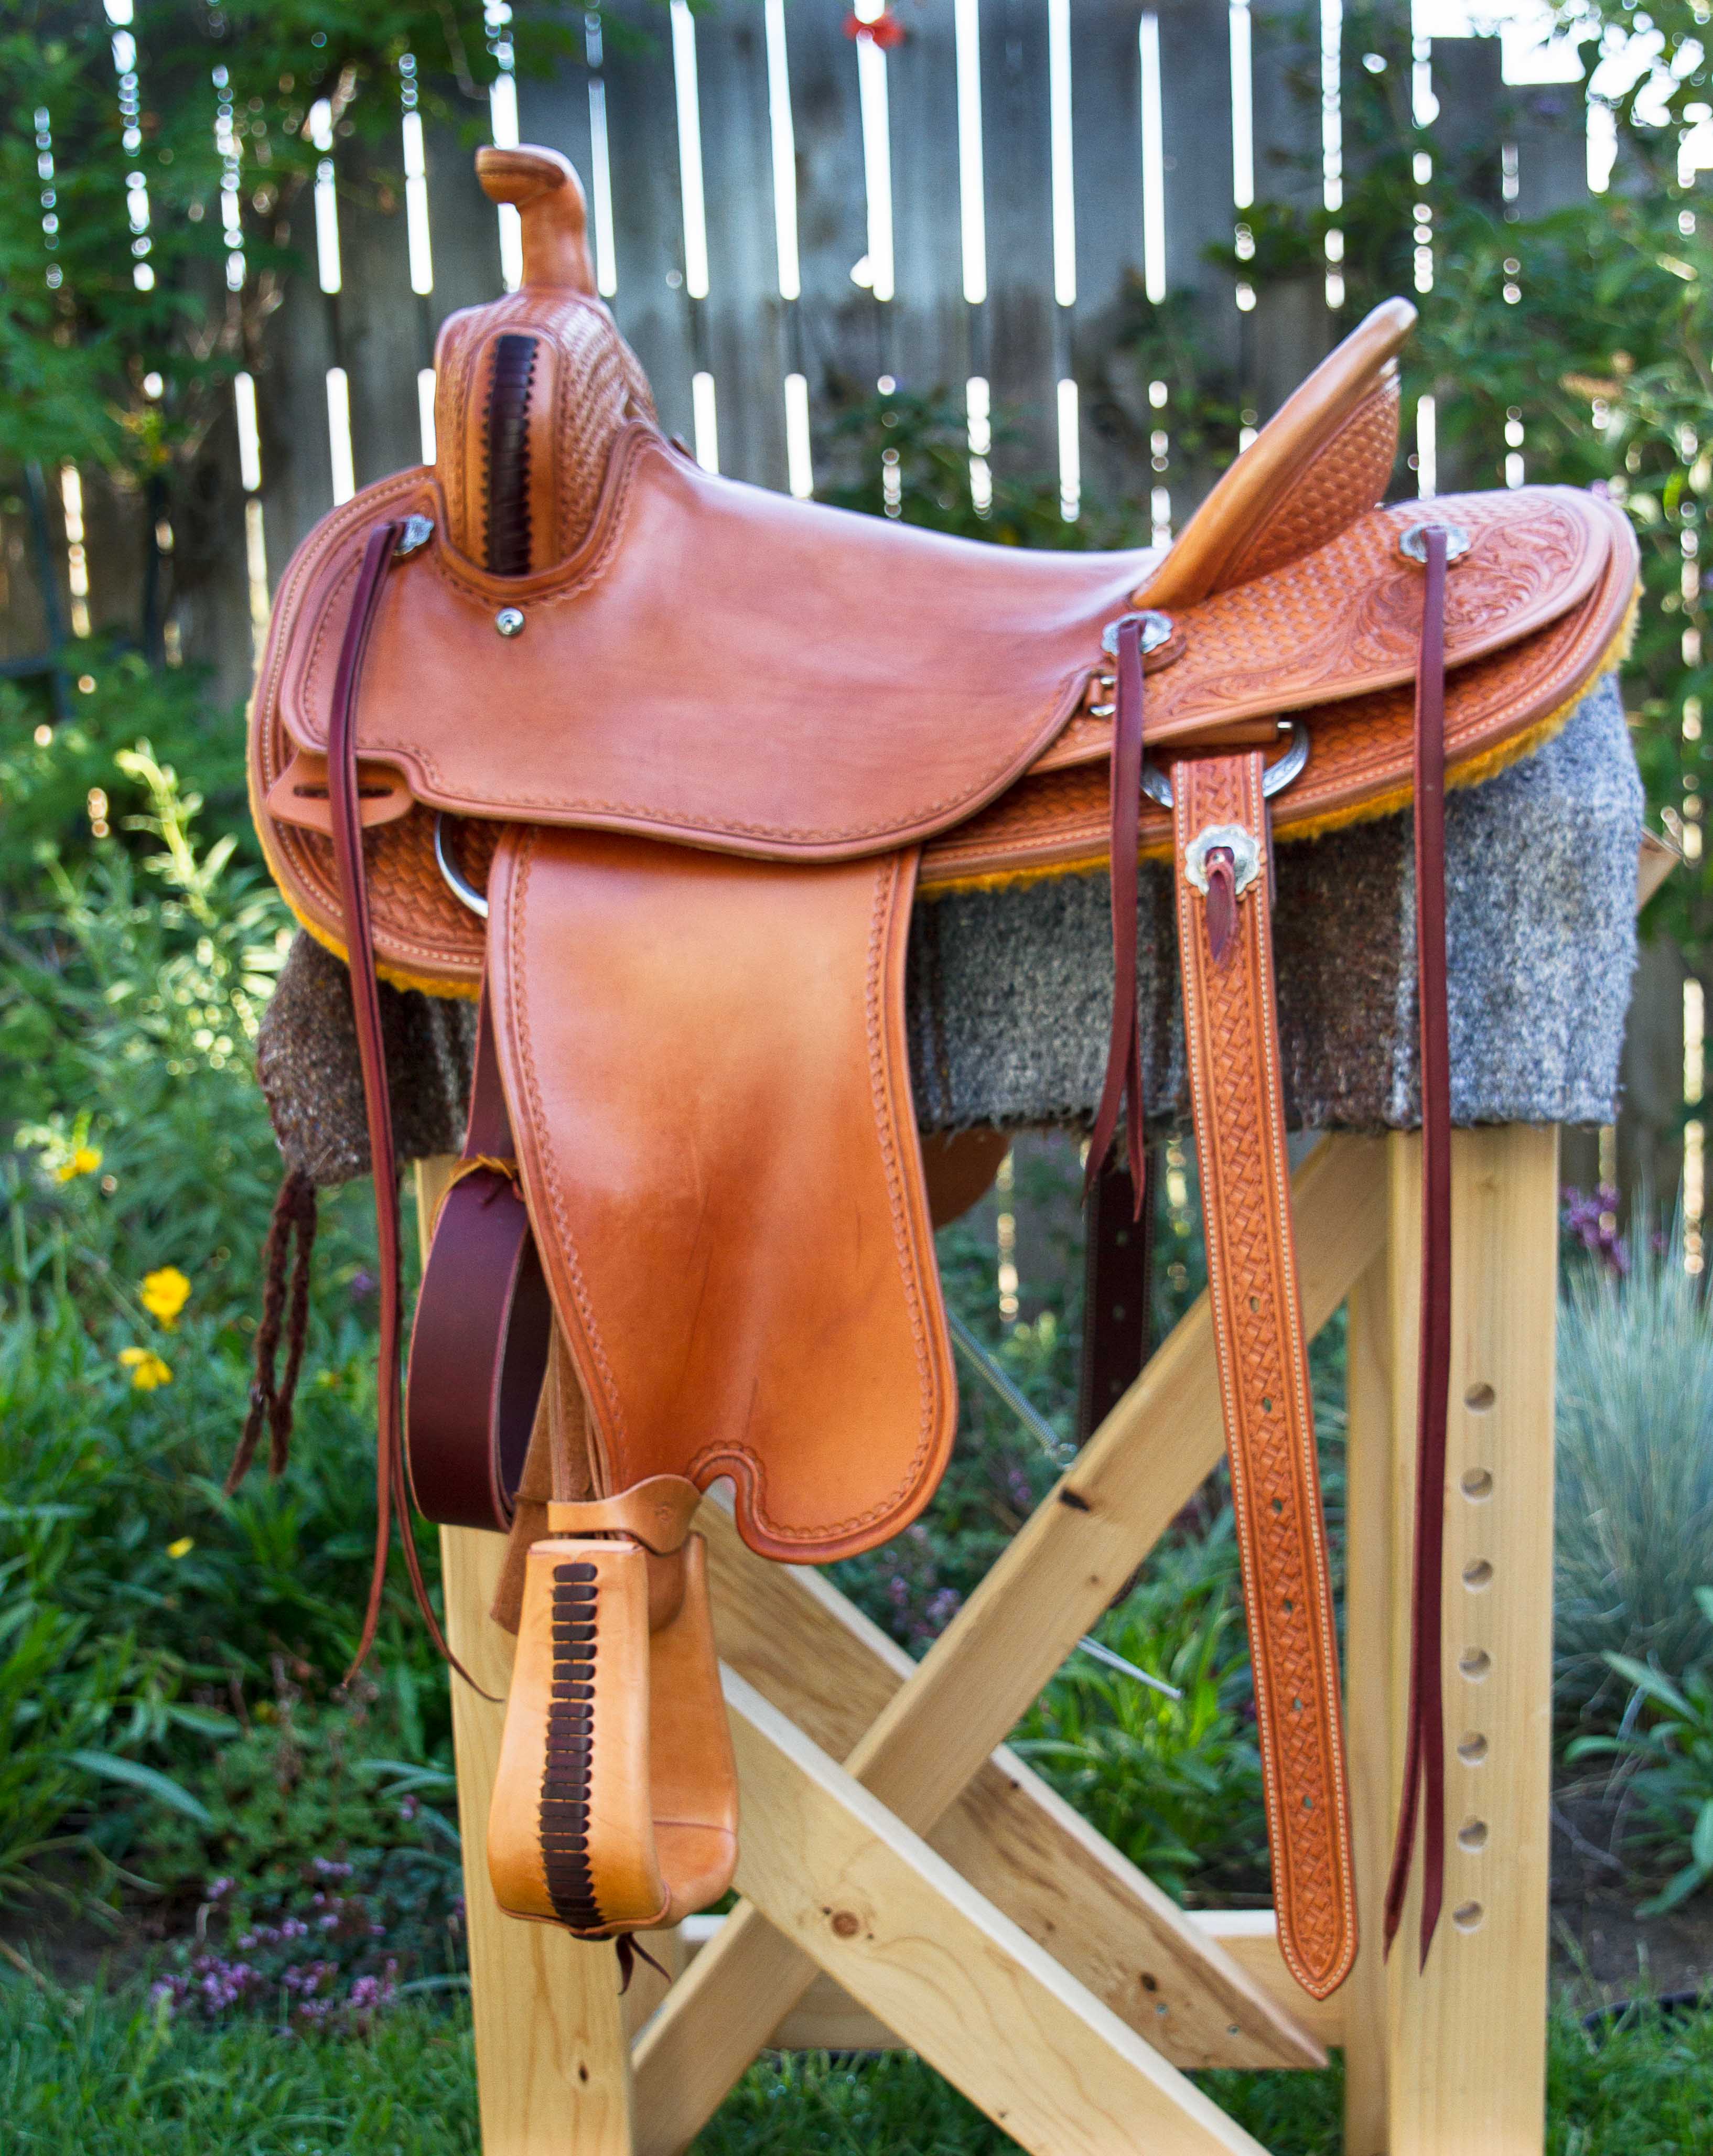
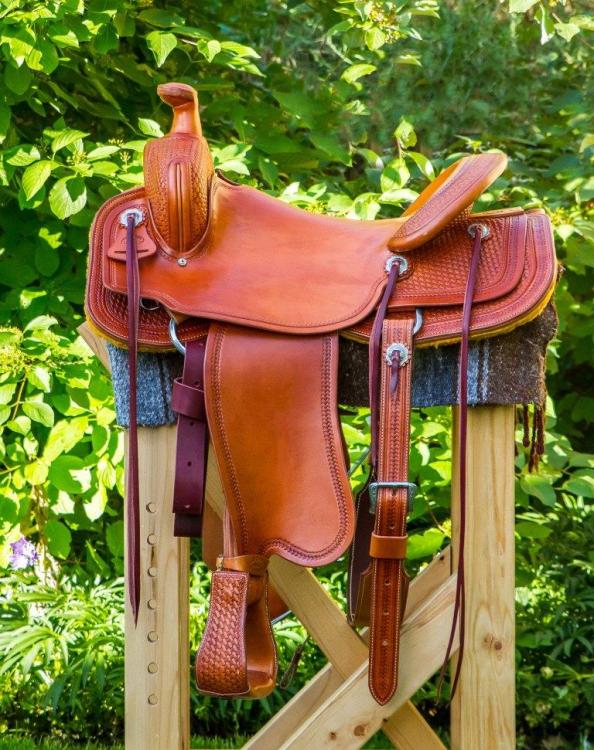
I just reread your original note. I did a leather ground seat in the first saddle, then used a strainer plate in the second. Can't say which is better, but I likely will use a strainer in my next saddle. Good to try both methods. If you make a Wade then the swell cover should be easier than Stohlman's saddle #1. Stohlman shows how to cover round swells in volume 3 of his series. I have done both laced and welted swells, and found neither not too difficult using his instructions. I used standard ring rigging because that is what I am used to, and thought it would be lighter and easier to make. I am going to put flat-plate rigging in a Wade saddle this winter. If you will be trail riding, I'd wrap and lace cover your stirrups; the edges of my stirrups with tooled covers sewn on the edges took a beating from brush while trail riding this summer. The end of my brain dump.... Here are photos of my saddles 1 and 2. Lots to improve on, but on the whole not bad.

-
Hannah, I have made two saddles pretty much on my own using books and videos. Here are some suggestions from my experience. · Find a local mentor to whom you can ask questions and show your work from time to time. My farrier has been making saddles for 40 years, so each time he comes out for the horses he answers my questions and checks my work. · I first bought the Stohlman books and read the first two volumes well. The wealth of knowledge, discussion, and detailed instructions are invaluable. I later made the Harry Adams book one of my go-to sources, in particular for instructions for making patterns. His instructions are less detailed than Stohlman’s and harder to follow sometimes. The Jeremiah Watt DVD is great for seeing how he makes saddles and I got many tips on saddle making and other leather work. · For my first saddle, I made Stohlman’s saddle #1 to keep things simple. There are many ways to do some things, so I tried his method first like a cook book so as not to get too confused. I scanned the patterns then enlarged and printed them on my computer ( in pieces for assembly if large). Some things Stohlman does I‘ve found can be done easier, maybe better for me: didn’t use the rigging skirt or make the rigging jig, found a better way to cut the seat ears, used fewer tacks and more screws. Adam’s book of the Watt DVD were my guides. I love Stohlman’s method for cutting leather conchos with a half punch – I can make any size concho I want from the same leather and its cheaper than getting expensive rosette punches. · For my second saddle, I pretty much followed Adam’s procedures, unless I found Stohlman’s ideas easier or better. In particular, I found Stohlman’s way of fitting and cutting the ears on the seat cumbersome and inexact. I suggest you use the measurement procedures from Adams or Watt, which are similar. I made patterns the way Adams describes. · I use 11/13 oz. Hermann Oak skirting leather. Saddle leather that weight will last forever for most riders, is easier to work, and won’t make as heavy a saddle that’s made from 13/15 oz. leather. I used thinner HO strap leather for some pieces that require thinner leather, rather than trying to split or skive skirting leather. I have a nice Heritage bench skiver/splitter to thin strap-width pieces – that skiver/splitter is one of my most valuable tools for leather work. · Don’t use cheaper skirting leather like Tandys if possible – you will be investing many hours making the saddle so the extra cost for high-quality leather that stamps, forms, and takes oil/dye well is well worth it. I used to buy cheap leather when I started and wondered why my stamping, shaping and coloring was inconsistent or crappy. I only use HO leather for all my projects. I have found Wickett and Craig to be good, too, but a bit less pliable and easy to cut. The same quality and time issues apply to stamps: I used to economize with Craftool stamps, but now only use Barry King stamps, even though they cost 2-3 time more, for crisp clean imprints. · I used custom trees from Bowdens for both saddles, mainly because they make custom trees from horse measurements using the Dennis Lane template system. Both trees fit my horses like a glove, and the quality was good. · I’d keep the stamping and carving to a minimum to focus on the saddle making. Some parts like the skirts and jockey are easy to stamp, but the swells with their curve can be tricky to basket stamp straight. · I found the hardest part was cutting the seat to fit around the swells. On both saddles I made a mistake and had to buy a third hide to cut out a new seat. Go slow and be careful not to cut out too much in front of the swells. · The first cantle binding was a regular straight-up binding. I used the hidden stitch Stohlman describes and it worked well. I am sure my back stitching would have shown very uneven. The hidden stitch is easy and looks nice. I did a Cheyenne roll on the second saddle and had to do the binding over four times before I could get a wrinkle free back. Make sure you use thin stretchy leather and skive the back. One big problem was I tried to outsmart the pros and cut a piece that curved like the cantle, which put too much leather in the corners to tuck. Stohlman’s straighter pattern worked. Hope this helps. --John
-
Thanks for the advice. The museum literature was not too helpful because they use lots of chemicals I was not familiar with and, from what I read, they frown on adding oils. Here is what I did after much thinking and reading. I deglazed with two passes, used oxalic acid on spots (I was afraid to wash the whole piece after deglazing seemed to bleach it), cleaned with clear glycerin saddle soap, applied a coat of Bee Natural saddle oil, applied RTC resist and then Fiebings light brown antique stain, then another coat of RTC. All the spots and many of the old stain/finish streaks came out. The oil darkened it a bit, but probably more like the original color. I had some problem with keeping stain in the tooling and lettering where the cuts or beveling was shallow. I tried several passes with stain. It seemed like the deglazer may have done something to make the cuts shallow or left some residue that did not come out - they seemed bleached? The deglazer is harsh, so I did not want to keep whacking the leather with it. Also, deglazer shredded my nitrile gloves and deglazed my fingertips before I noticed it. I rarely use the stuff. After all, it came out nice. It is not like new and I wish the stain would have stuck better, but I am pretty satisfied. I'll post a photo when they mount it on the wall.
-
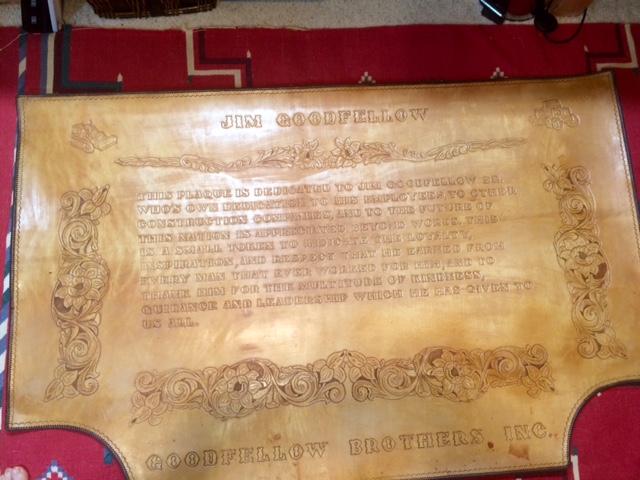
Dwight, here is a full picture. Kind of hard to get a good photo with it on the floor.
-
I need advice cleaning and restoring an old veg-tanned leather wall hanging with lettering and floral carving. It is large - 5.5' x 3.5'. It seems to be thick skirting leather. It has been hanging on a office wall for about 40 years. The leather condition is dry but not stiff or cracked. It has general dirt, probably cigarette smoke, some small stains, and places where people tried to clean it (see photos - don't mind the shadows or glare). In places it looks like it was color stained and streaked, or maybe they tried to clean it and caused the streaks, or maybe they wanted it to look "antiqued". On tack and such, I use Feibings 4 Way Care cleaner, or saddle soap and neatsfoot oil, but I am not sure how to treat this thing. Probably would use just a cleaner/conditioner and not neatsfoot oil as I don't want to darken it much. Maybe first a light wash with a weak oxalic acid solution to get out the spots and generally clean it, then use the conditioner/cleaner? Thanks for the advice. --John


-
The Pendleton leather show website shows dates of Nov 4 & 5, but the last posting was about January. Will it happen this year? I know Sheridan leather is closed, but I thought they were still putting on the show?
-
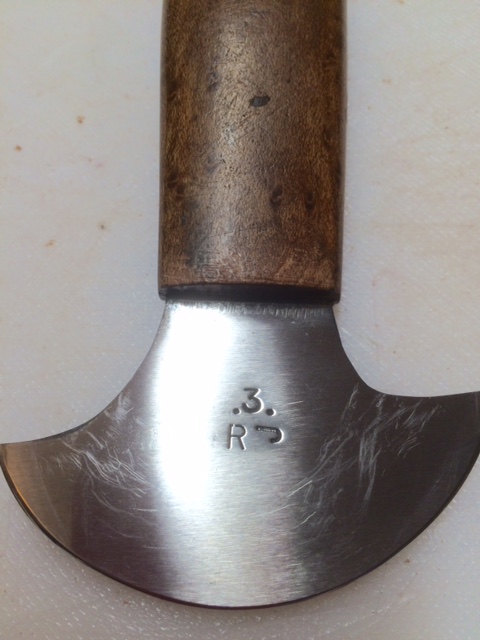
Can anyone identify the maker of this round knife that I bought at the Proleptic sale last year? I love the shape and edge on it, so am curious to know its provenance.
-
Did you ever find a US source for those attachment loops? I need just a few, and suppose I might try to make one if I can find appropriate wire.
-
Did you ever find a US source for those kilt belt attachment loops, or a good substitute? I have a request to make a kilt belt and have had the same problem. Maybe I will try to make one.
-
What do you think of the Work Sharp belt sharpeners? I was looking at the high end Ken Onion model. I have a HF 1x30 sander with Lee Valley belts but I just can't seem to get a real sharp edge. So, was considering the Work Sharp model w adjustable angle guides and variable speed motor. Should I just stick to my DMT stones?
-
Steve, great to hear you are back in action. I did no see you Friday at Pendleton show and wondered why.