TomSwede
-
Posts
2,653 -
Joined
-
Last visited
Content Type
Profiles
Forums
Events
Blogs
Gallery
Everything posted by TomSwede
-
I have the same feeling with tight corners on my bracers, practise helps and I prefer doing it when it's cased. Not soaked but not to dry either. Try stropping the edger by applying jewlers rouge to a leather string and run it through one in a while. Theese steps will at least help you along the way. Tom
-
Scotch Thistle Belt
TomSwede replied to DJ1935's topic in Purses, Wallets, Belts and Miscellaneous Pocket Items
Very good looking belt! Nice going with the stamp John!! Tom -
Ha ha I love it! There will bee some stuff with sting in that flask!!! Bzzbzzbzzbzz (bee clapping hands/wings) Tom
-
prototype & final design sheath finished
TomSwede replied to sodapop's topic in Gun Holsters, Rifle Slings and Knife Sheathes
Darryl! I think it looks fantastic!!! You sure nailed the design down better and the initial looks just great and the black colour suits it well too. I can sure understand He was grinning ear to ear over this one and once his buddies get's his eye on this one you should get some interest for more. Well done and it's been great to follow the work and design phase through!! Now you can take a well desrverved fishing trip on a sunny day, maybe tan your legs a bit Twinoaks mentioned "Scandinavian look" and I've heard it's a must to go with the "click" type sheath to compete succesfully here. Rawhide seems to be preferred and designs are put down by pushing the mass of the wet leather with a modelling spoon. Tom -
That's a fantastique piece! The leaves blow me away and animals is top notch as usual. You're not such a bad experimenter yourself!! Tom
-
Yep! Belts are in the highrisk zone to attract those microcracks. I think I will try with a beeswax product in future for belt's. I don't have a recommendation how to salvage it (if it is bad) but if it was my own and alot of them I probably try with an alcohol thinner and try on a test piece with same stain sealer and try to wipe off carefully. I did do so on one of the fishes on a rod tube because the sealer got so purplish from all the antiques I had on. Just wiped of a little with a cloth with thinner , the silver dye underneath the sealer was just a little frayed away, re-applied silver and sealer, looked as good as new. This was Fiebing leather sheen dauber on type. Tom
-
Oh yeah! Well that may prove invested hours now that they seen what you can do. The graphics is awesome on that one! Tom
-
Is it on the grain or the edge? Acrylic sealers can crack up if you "bend backwards". What I think happens is that the grainside compresses and tiny tiny folds (creases??) arises and within theese folds the sealer can show a cracked effect. I used this as a technique once to make a craqelluered (spelling) effect. I keep my belt allways rolled the right way when stored and told the customer for the other one I made to keep it stored like that. I advice my bracers customers to NEVER bend them backwards and don't let people borrow or play with them. I notice when I bring my stuff to work to show people that they think you can treat leather just in anyway and some just have to bend, stretch and "test" the stuff in unthinkable ways. Perhaps you can snap a pic to show us? Tom
-
Hello and welcome to the board! I think the stuff you mention, liners and stabilizers is a subject often discussed in threads but it seems to me that we lack a little about how to do it and such so if you need info don't be shy to ask for help. There are people here in the know how and it might just be a little delay sometimes for certain questions. Just bump the thread if so by posting a new message with the text *bump* or or to make it come up in the "view new posts" function at the topright toolbar on all pages. Pics and how to do's in this field is probably something we could use more of here. I don't recall seeing too many tutorials on sewing liners or putting in stabilizers so more info on that is highly appreciated! Tom
-
Thanks Gremlin! I do have my bar raised high when I'm into the making of something and still learning is the same as still making mistakes so naturally figured this ones a mistake from. Might have been might not. Came out one experience richer for sure and that's allways good and hopefully someone can learn from the answers to my splotch post. Thank you ArtS...it's got two pedals........................... Thanks ClayB! I'm very glad you visit and like the blog!! When/if you're shopping for a new webhotel you should investigate if they offer a finished blog solution with the Wordpress EMU blog tool. I only filled in a online form after I got my topdomain and account activated and it was ready for posting in 5 mins. It's allmost as easy as posting here. No proggies to install or html coding or anything. I think Darryl (Sodapop) mentioned having seen US hotels carry the function aswell. My host is Swedish/European only so far. The blog is partially aimed to you guys at LW since I've been asked alot (especially with the rod tubes) to post pics undergoing working process but also for customers to view progress and provide input at certain stages. Problem for you guys is that I have to keep it more simple than I would if posting here. The blog is also good to attract those webcrawlers from the search engines. My main site is just a pic gallery made with photoshop and lowlevel html coding and carry very little amount of good search terms. So the blog is a way of swatting many flies in one stroke. Splotches, the ones I hade to the sides I dont think were scars but the smaller ones might be something like that. Nowadays the hides with scars seem to have vanished. I used to like the old ones with very sharp scars going through an area to be tooled or dyed. Those really gave character, just like the pattern on an exotic hardwood. I'll keep posting problems here and ask for help, everyone can learn from it. I often use the search engine here and look through conversations to gather info on this or that and I'm very happy that my small experiments is noticed and appreciated. I have alot of input in my jobs so it's often me who instigate the designs that sometimes require an unknown solution but seldom draw up the the tooling pattern myself so I'm very happy to come up with that Kaos design on my own with a little inspiration from Schnos logo. Tom
-
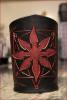
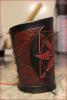
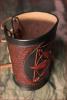
Off course I'm a nightowl 3 in the morning is about 6 pm for many members here and that's when activity seem to be high;-) Talk about addiction! To me braiding can be very much regarded as creative time. I'm thinking about the first rod tube..phew that is alot of braiding but also the Lailas purse had some nice applique to it. Whiskyflask was also designed around the braiding element. Your Dionysos cup is another fine example with both creative braiding AND striking art. The black/orange tube I did is more restrictive both in braiding and decoration but for that one I felt I had to be very creative to set the design and even had to invent a way to get the orange crayon effect I wanted. Darn I miss that tube. Theese mugs holds whisky! Tom
-
Thank you! So happens raven is my favourite animal and my animal token! That bike is good looking tricked out with those colours. You're talking 'bout the seat I commented the other day I guess. It'll be a killer. Now you got me thinking that a raven would be nice in there. Gotta set me up with something nice formyself in this combo with a raven or two I think. Coloruing a raven should be easy. That is one thing that actually would be perfect to just dye black. Hey, now you have inspired me, lol! Tom
-
A one, A two, A one, two, three, four Ja må hon leva, ja må hon leva, ja må hon leva uti hundrade år och när hon har levat, och när hon har levat, ja då ska hon skjutas... på en skottkärra fram (long may she live, long may she live, long may she live for a hundred years and when she has lived, and when she has lived well then she will be shot...on a wheelcart around. Note: skjutas, doublemeaning swedish word meaning shot or pushed) Have a great one Tina! Tom
-
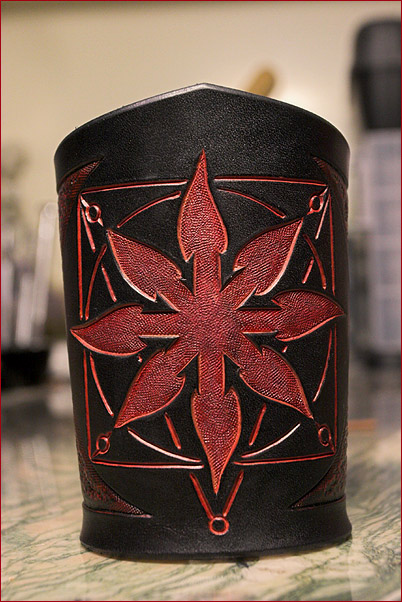
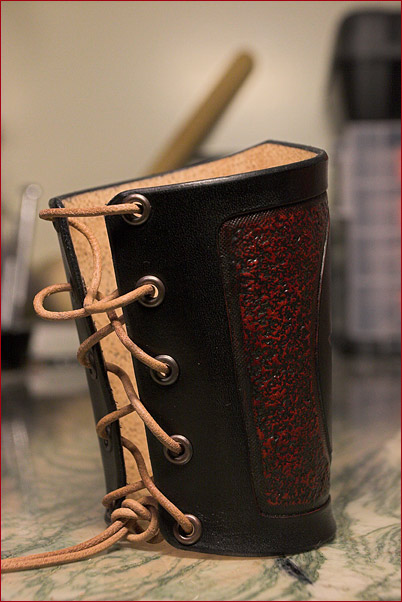
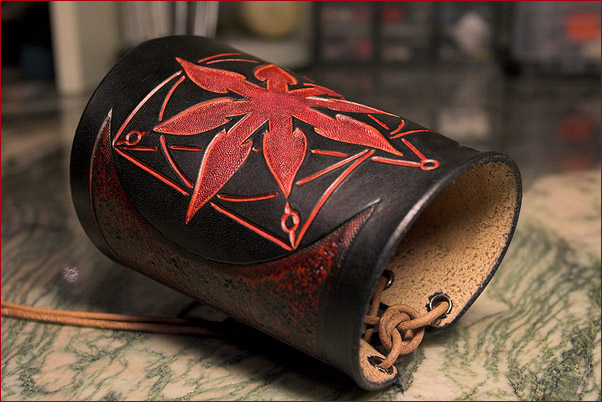
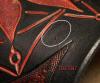
Thank you Beeza! Thank you Crystal, I get alot of interest in the black/red combos by people who wanna order. I kinda set my website up that way too wich may suggest the good looks of it however I'm a bit concerned about overexposing it. I looked over the pics I have taken and can't get a good visible on any spots anf the camera usually reveals just a bit too much so like Wildrose said. I probably overreacted a bit and I have been polisihing it up alot wich have helped. I post an enlarged area from one of the pics with a hint of visible. Thanks Darryl! I sure hope the vinegaroon test falls out well cuz it'll make things a whole lot easier. Thank you ArtS, that's a great offering but you'll regret it when you look at the enlarged pic Tom Oh BTW! got one more black n red combo undergoing tooling right now, if I just can take my eyes off of this board for more than 10 mins!!
-
The roundbraid is great because it allows me to sit back, zip some scotch and watch a good movie with one eye so I save it up for nights (I'm a nocturnal person) when I can't bang and pound the leather because of the noise. Tom
-
Gorgeous Tina!! Braiding looks great, as do the the tooling as usual and the applique braid adds a nice touch to it. Seems like you been bitten by the braiding bug aswell Tom
-
Thank you MM22! Just like I completely forgot it when I took the pics, a good sign. If it was that ovious Id see it in camera viewfinder. I slashed off edge pieces since it was made oversize and part of the probs went away there and the rest is in the eyelets are and some small spots in the design area. I polished the heck out of it two days ago. Thanks Wildrose! I totally agree, I get nervous with it and especially with this one, first time block dyeing except a small testpiece one minute before. The black can't be applied over the red, it blends and make a cool black-reddish mess wich looks cool but not for this one. So had to use brushing to stay clear off edges. It's a good thing to back off for a while. I sometimes need to be reminded of that. Tom
-
Nope!
-
So I finished up the Kaos bracer that had some splotching problem. Feel free to point it out if you can see it. Honestly, I did not even think about the splotch prob until I was editing the pics so I have done nothing with the pics to hide it. This is as you could see it in person and I won't be ashamed to let them go. I've discussed it with customer and let him know if he's not happy..I buy them back and pay for posting fees. I also experienced some probs with getting the red dye evenly on. Don't know if the colour did set in after a few hours or if I just blew it up all up in the heat of the moment but I think it looks ok now and I am very happy with the piece as a whole. Any critiques welcome, still learning! Tom
-
Those koi fishes look very fun to do except perhaps alot of tight turns around the watersplash tops. It looks really great! Colour or antique, It'll look good anyhow! Tom
-
Good looking pieces Tina, can't wait to see the rest of it! Wishing you the best with assembly! Tom
-
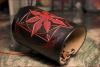
Tanner Scotch Flask
TomSwede replied to ElVaqueroMuerto's topic in Purses, Wallets, Belts and Miscellaneous Pocket Items
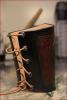
Oh yeah! Lovely flask sheath! I could empty a bottle of scotch per week if I could afford it, sadly enough I'm gonna need to cut down consumption very much for a while. It's that expensive I like the way you've been working with the borders and stuff like the thistles coming out of it. There are many elements in the design so it feels perfectly allright that they wanna come out of the framework but I know from your Firedancers bracers you have an eye for this type of things. Nice work with the thistle leafs, just the type of dyeing I dread. Sla'inte mhath Tom -
Looking good Troy, well done so far! You got it all figured out and sketched/calculated down or do you just take it as it comes. Looks like you got a plan worked out allready. I'd scratch my head for month's before getting started on such a project, lol. I't gonna be very interesting to see more of this, I'm thrilled! Tom
-
Latest items I have been working on
TomSwede replied to Jordan's topic in Books, Journals and Photo Albums
Nice stuff Jordan! I'm particularily impressed with the stamped "sphere" around the cross. Looks very nice. Tom -
That is one classy looking cuecase! Above anything I just love the colour on this one, tooling feels almost secondary but that looks great too. The floral theme feels very right on this one. Tom