TomSwede
-
Posts
2,653 -
Joined
-
Last visited
Content Type
Profiles
Forums
Events
Blogs
Gallery
Store
Everything posted by TomSwede
-
Ouch, poor guy..... Sorry, could not resist;-) Tom
-
Wow Elton, those are way nice! I like it when you play with those metallic colours. Don't know if this is very common with chaps but I don't see too much of it in other types of leatherwork. I like the way you use it to accent your designs rather than build up the designs around the "fancy bits". Hope to see more! Tom
-
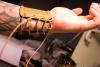
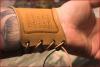
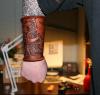
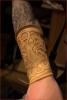
I was finally able to take a pic of how this one's stringed together at the outer side of the arm. Left arm in this case. This is the smaller female version of the previous one and that's why there's such a huge gap in the stringing area. It looks fine this way too but we've talked about the contours of this bracer to marry the joint against the hand and that's where this one fails to be put to use on my arm. A regular shaped bracer doesn't really need (for function) to be all away around the arm with just a small gap in the stringing area. That's just my personal pref and I have had customers requesting a huge gap since they love look of the crossed stringing. tom
-
Hello and welcome to the board! You'll find this place very comfortable and there's always a helping hand if you get stuck with something. Just hollar for help if needed, there's no dumb questions and people here are very inclined to help out each other and share their secrets. Very curious to see your work now, how great to have had someone to teach it to you. If someone hands you a donut, it'd be wise to say no but the coffee here is allright! Tom
-
This is a really cool piece of armour and I can't wait to see it finished! Tom
-
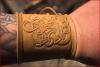
Ah now I see it! I got so taken by the nice floral that I probably forgot to look for it, well so will probably most people do. Tom
-
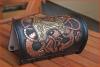
Thanks for showing us Azmal This piece is extremely cool but and so is all your armour pieces. Nice choice of colours and I love the golden border. Scales came out really good too. Tom
-
That is a gorgeous portfolio! What white thread? Antique it if you get the urge for it but I think it looks great as it is. Tom
-
Celtic knotwork belt question
TomSwede replied to happycat's topic in Purses, Wallets, Belts and Miscellaneous Pocket Items
Thanks for covering Mike! Here's a link to to a-104: http://www.tandyleatherfactory.com/product...?number=6104-00 Tom -
Thank you C79 and Clair! Are the used for any special reason in the cowboy world (like mine is really for archers) or just decorative? (I make mine mainly for good looks, 1 archer so far). I agree with you Clair but being a heavy metal man myself I just have to live with making some black. Metallics are very good to accent the tooling with since they apply on top of the black and is not streaky either. I really liked them better naked. Glad to hear people find their way into my blog. Tom
-
Welcome aboard! That's the right spirit!! Tom
-
Oh right, I put a post it note this time over my desktop to remember. I just have my *ss full so I keep forgetting it. thank you Roo and Twinoaks, yeah I have a huge "must do it sometime list" too, lol.
-
That is an outstanding introduction and good as tutorial to! I love the pics, very nice and that is one GOOD looking little purse. You're craftmanship seem to be very high, I'm just in awe with your post. Thanks for sharing and educating! Tom
-
Celtic knotwork belt question
TomSwede replied to happycat's topic in Purses, Wallets, Belts and Miscellaneous Pocket Items
I agree with Corvus but like to add that backgrounding the outside too is gonna be really tideous and for celtic designs I think they hold up pretty well if only the inside is backgrounded (of course you need to bevel the outer edges with a regular checkered bevel). I use the A-104 backgrounder for all my work when I just want to recess an area very much. Sometimes I use a tool to make structures to what is outside the general motif but have not tried this with celtic designs yet so I can't recommend that but it is an option-if you don't want to work yourself to death with the little A-104. E-294 is my favourite for creating textured surfaces like I described but basketweave tools and just about anything could be used. See to it that the leather is not too wet when backgrounding and you'll be allright. Tom -
Thank you Meleck! Go ahead and use the pattern or modify to your needs. I be thrilled to see others interpretations of it wich is one reason I put it up here. Welcome to Leatherworker! This a great place were the spirit is high! Tom
-
I sell pretty much by mouth to mouth rumourwise way. That's why I mostly get bracers orders. When I go to a concert or big party, event etc. I usually take on my show off bracers and people always start to wonder WTF I got those and sometimes they order on standing foot. I just went online with the 1eye1 site to display my work in galleries by category AND I made myself a t-shirt with my logotype and www addy to also wear at events (posted in off topic thread). I used that at a large re-union with my old punk gang and people used their cellphones to get a pic of the addy. I don't focus to much on selling right now but I do need to get stuff out for PR and to finance my further development. What I wanna do is to sharpen my skills more and more and focus on making special custom made items where all my collected skill is put in. The rod tubes I made is where I stand today and I like to comment Luke here "49 more and you'll get the hang of it" so it'll be a struggle for a long time to come I think. I don't have any plans on selling at fairs and events since I focus on custom orders but I'd like to, someday, sit at a fair in an own booth just displaying some stuff I made and sit there and work as people watch, that'd be cool. I just have to wait and see what future holds for me and continue to sharpen my skills. There's sooo much to learn that I get all dizzy in my head sometimes, lol. Tom
-
Fire Dancer Leather Bracers
TomSwede replied to ElVaqueroMuerto's topic in Collars, Cuffs, Leashes and Leads
Outstanding pieces of art!! The way you work with "living" backgrounds and sorta make 'em to blend in as natural border towards the edges is very nice. Tom -
Thank you ArtS and Calanneh! Like I said in my first post, this one's worth it in the end and if I don't have to wast ours on coming up with the design it's quite as simple and straightforward as normal bracer but I'm always nervous that it won't fit properly to customers arm but no complaints so far. I'm having a slow period with just lots of stuff to do but after my semester I'm gonna pick up pace again. Thank you for the encouraging words! Tom
-
Tom
-
Thank you Trastu! Hope it'll come to use! Tom
-
Welcome Hollerborn! You might just discover what most of experienced, it's not a freetime filler- it's totally overly alltime consuming;-)
-
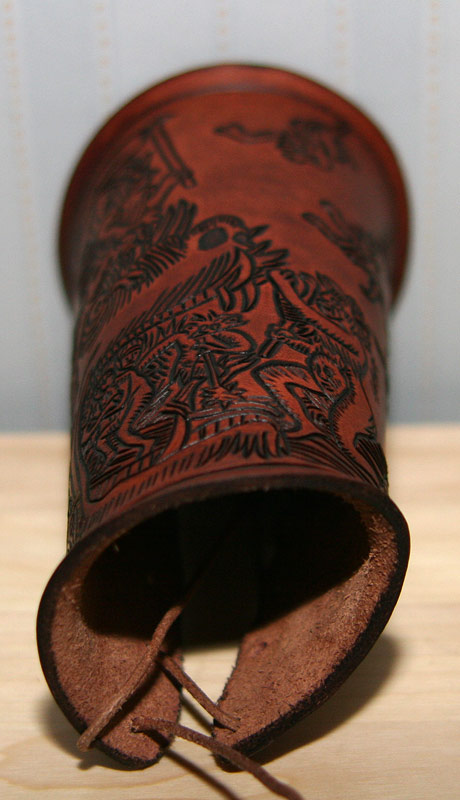
Thank you guys! The bottom line follows the contour of the arm and the bracer against the hand and that part is extended to allow you to string it tigether there. One could place the stringing holes upwards and cut down that part but my guess is the whole bracer would just ending up higher on your arm wich spoils the general idea of this one to really marry and reinforce your wrist yet provide some movement there. This bracer works just as good for the hand holding the bow aswell as the releaser hand. Tom
-
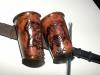
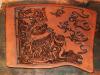
A few pics.
-
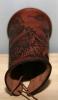
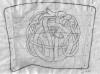
This is the pattern I use to make my archers bracers. The only fun part with this bracer is to view the final result. It is stringed together at the side of the arm. It is made as a right or left arm piece. I use tracing film to trace cutting pattern over from this sketch so remember to flip the film upsidedown if you want to make a right arm piece. THIS IS A LEFT ARM PATTERN!!! Sizing: The original to this one is to fit an arm wich is about 19cm (7,4") diameter and you can see the mark for Cris is 17,5cm (6,8") so for that bracer I just cut the marked edge off from the original to fit his arm and make sure to follow the hole lines to mark out the stringing holes accordingly. If one want's to make it smaller in diameter than Cris version it'd be wise to scale it down a bit (thus sacrificing height) Since the curled line on the inside arm may not align properly to the wrist contour. Tooling designs: I just think it's a nightmare to setup this one with the artwork since I don't draw very well thus depending on "borrowing" art. Because of the height of this one the artwork I find will most often go around to the inside of the arm and most art work is based upon centered designs so it's hard to find designs that'll display nicely once it's formed to the arm. So i always end up spending hours with just finding the right tooling artwork. Wetforming: I just think this one deserves to have that performed before shipped off to customer since it's important to make the top and bottom edges curled up. The bottom edge will not be very comfortable if not curled up and top is just to complement bottom curl. I just string it wet (cased, cool to touch and put eyelets in before stringing) onto myself and sorta pinch the edges between my thumb and index finger and curl it up. WATCH OUT FOR DIGGING YOUR NAILS INTO IT! Once I'm satisfied with the look and feel of the edge I just slide a finger in between the leather and my skin and pull it under the edge every now and then to prevent it from falling back during the drying process. I keep it on my arm for about 2-3 hours. This design with the curled edge benifit a whole lot from having a tooled border IMO. ENJOY
-
Way cool and good work brotha Too bad I missed it but I was in Sweden that day;-) Realy cool stuff and to much to pinpoint specifics but I like to mention the li'l devil wallet, it was very appealing to me! Keep it up bro! Tom