


billybopp
-
Posts
1,935 -
Joined
-
Last visited
Content Type
Profiles
Forums
Events
Blogs
Gallery
Store
Everything posted by billybopp
-
The length is the same, barrel diameter differs. Both had a height adjustable yoke. Bill
-
Thanks Tugadude! That's what I was referring to as a VB style pricking wheel. I've also seen other devices called pricking wheels that are more like a very pointy overstitch wheel - which wouldn't be of much use for me. I'd love one day to try the VB pricking wheel that has an edge guide - that looks very useful, if pricey. I find the angled marks of a pricking iron used with a broad-tipped awl to be best for me. If you hold the awl just a bit loosely when entering the slit it will settle in and give the perfect angle every time - although you still need to be closeish with the angle and that's where a flat sided awl haft as Madmax mentioned helps. It still requires attention to get the awl straight in the horizontal and vertical plane (pitch and yaw in flying terms) - but help with the "roll" angle from the angled slits is one less thing to worry about. Bill
-
I haven't tried pricking wheels, only overstitch wheels to mark spacing. Mostly because I have only found pricking wheels in pretty high SPI. Whether pricking wheel or overtitch they don't give you any guidance on angle - which is where I seem to need the most help. What I'd really like to try is the VB type pricking wheel which leaves a pricking iron like mark, but they're pretty darn expensive. Bill
-
The craftaid for these is a huge help ... But its still a bit of a challenge to keep the stamp exactly aligned. Well done!
-
The Tokonole looks more glass-like, while saddlesoap-beeswax is still shiny it's not quite as much. If I want to dye the edge with tokonole, the dye needs to go on first and can get pretty dark, but it works. And sometimes the choice comes down to what is close at hand and my mood at the time! Bill
-
Lookin' good! Those geometrics are really tough to keep aligned exactly but it looks like you've done it! It's a LOT of work! Bill
-
When I bought, clear was all that they had. It seems to do a good job, although I do sometimes use water/glycerine/beeswax still at times. The Seiwa seems to seal the edge so that it doesn't readily accept dyes - but it does do a nice job. Worth a try for sure! Bill
-

Pattern for doctoring bag
billybopp replied to T Moore Medicine Hat Saddlery's topic in Patterns and Templates
-
A clicker with a straight cutting edge, such as L'Indispensible isn't too terribly hard to sharpen with a flat stone or sandpaper and strop. The curved kind is a different story, and easiest to sharpen using a ceramic rod sharpener and a strop made of a piece of dowel rod with some leather glued on and of course some sort of polish compound. Bill
-
Ian shows the Seiwa finish in this video, about 18 or 19 minutes in. I'm pretty sure it's what is now called Tokonole. I've used it and like it! Bill
-
My round knife isn't perfectly round?
billybopp replied to myjtp's topic in Leatherwork Conversation
I only have old knives, and they are not perfectly round nor totally symmetrical .. whether they started that way or not! I've seen some old ones for sale that are practically triangular. I suppose that has something to do with the skill of those that have sharpened them over the years. It ain't easy to sharpen that much curve! Bill -
Addicts. Thanks to you folks, I can't even watch a movie, documentary or video with sewing machines in it without backing up and maybe even pausing to see what machines are being used. I don't even have an industrial machine, just a domestic. I'm not sure, but I think I'm getting addicted too! But seriously, thanks for all the info. When I take the plunge and do get a leather sewing machine I'll be able to make a much more informed selection! And I know just where to turn when things inevitably go wrong. Bill
-
Yeah. It kinda sucks. But there are reasons to use a real estate agent. Most of us are not willing to invest the time and energy into researching all of the ins and outs of buying real estate, and just pay to have that done by somebody that knows the system. There's a lot that can go wrong with a real estate purchase that can cost you your home. For example, when the owner bought the house back in the '50s, they didn't do proper title research. The house was built in the 1920s on land that the builder didn't own. Now, even 100 years later, the descendants of one of the old land owners find that the land was never properly bought. They can hire another group of parasites called lawyers to come in and take your house and land! Or maybe somebody along the line sold the oil rights and one day you wake up to find an oil rig being built in your back yard. Your best case scenario is to hire another parasite lawyer to fight these situations - at your expense. You may or may not win, but either way it will cost you. And, of course, yet another group of parasites, the bankers probably won't loan you money to buy a house unless a real estate agent is involved. If you lose your house in any one of the scenarios where you could, you're not likely to pay them so no loan for you. In most cases too, the real estate agent is bonded to cover some of the problems that can arise and responsibility goes back to them. But even that varies from place to place. Don't get me wrong - The system stinks, but that's how it is. Bill
-
Questions about awls and thread. Looking for guidance.
billybopp replied to JenGranger's topic in Leatherwork Conversation
As Mattsbagger said, the round profile of a scratch awl may not give the angled stitch that so many of us like. Additionally, they are tapered along most of their length, so like the Osborne awl, you'll need to pay attention to how deeply you push it through - and it may need some sharpening. You might try some bits of scrap leather from the project that you are working on, glued up like the edge of the project and experiment to see what works best with that and the thread that you are using. Once you find the depth / hole size that works best a mark on the blade or a bit of tape can help you get the same depth consistently. It awl just takes practice! Since I don't sew daily or even weekly at times, I usually do a small scrap piece as mentioned above as practice before I start sewing on most of my projects - Just to shake off my rusty technique. Note that Tandy leather kits all come with round holes - and much too big ones for most thread - but they work. Also, keep in mind that the holes to be in a nice straight line and the same distance from the edge all the way around. There are specialized tools around for this, but you can get by with a straight edge and your scratch awl, or a drawing / machinist compass if it's not too flimsy. You just need to get a straight even line to work along. I'm not familiar with E6000, but it might work. If it's really thick and goopy, it may be difficult to work with - glue needs to go on somewhat thin. If the leather is pretty smooth, you may need to roughen it up a bit with a little sandpaper or a fingernail file. If you have it already, try it out - you might try applying it with one of those junk credit cards that seem to come in your mail with annoying regularity. If you don't already have glue, you might look for Weldwood original contact cement in the red can / jar at a local home improvement store. Many of us swear by it. It's a meant for wood working, but works great for leather - it's pretty stinky stuff tho, so use it in a ventilated area. Bill -
That looks really great!! I couldn't help but notice some wrinkles in your leather, tho. Could Popeye have been left out in the sun for a few decades too long? Maybe some nourishment for the leather would work. I think I'd try some spinach. Seriously tho, looks awesome. Bill
-
Where the arbor press really comes into its own is for larger stamps such as 3-d stamps and letters where you need a good amount of pressure. Hammering on these stamps takes a pretty heavy his using a hammer/mallet/maul and they can bounce leading to multiple imprints. Not a problem with an arbor press! - and with some moving around and multiple presses, they can do well with BIG plate stamps. If the ram is drilled, they can be good for handled tools where you need repetitive impressions along an item - with some other additions such as a platform and guide fence. For setting rivets & snaps and such the arbor might work but a dedicated machine will work better. If I had known about the Goldstar at the time, that's probably what I would have bought, but I got the old Tandy version - and it works great, but the dies are terribly expensive. Thankfully they were on sale from time to time and I bought them that way. Bill
-
LeatherCrafting.org l Covering Every aspect of leather work.
billybopp replied to Tholek's topic in Marketing and Advertising
"however have you heard the saying those that do, do, and those that cant teach". That's only a partial quote .. "Those that can, do. Those that can't teach. Those that can't teach coach gym class." -
I've been looking at 3-D printers for awhile, and giving some thought to making my own RepRap printer: http://reprap.org/wiki/RepRap
-
What Leather type for Minnetonka Moccasins
billybopp replied to MrLentz's topic in How Do I Do That?
My Minnetonkas are very soft elk with a synthetic lining. -
Questions about awls and thread. Looking for guidance.
billybopp replied to JenGranger's topic in Leatherwork Conversation
Some good advice there from Boriqua! I've attached a picture of some different awls that I have, including the three sizes of Seiwa straight sided awls mentioned above pictured on a pretty thick piece of leather to illustrate how awl taper can give you different holes front and back on your leather. The leftmost awl is the Tandy 4-in-1, and it's pretty much useless - Soft metal that dulls quickly, and I don't like the shape, although it is close in shape to one that saddlers traditionally use. I find it hard to use, even when sharp, and it took a bit of work to get it sharp initially - it came dull as a butterknife. You have to really control the depth with these blades. I call these spear point awls. The next three are the Seiwa awls from goodsjapan, and the ones that I use most of the time - I generally use the #1 with .6mm or .8mm thread, and #2 with .8mm or 1.0mm. (Yeah.. There's a little crossover there depending on the thickness of leather and the look for a particular project). The #3 is rarely used, but would be most suitable for 1.0mm or bigger. Kyoshin-Elle makes a very similar set of three, but I have not tried them. goodsjapan carries them as well. These came sharp enough to be usable, but a little work made them better. The only problem I've had with these is that the blade eventually startsto sink into the handle - A little epoxy will take care of that problem. You can also find a similar set of awls from leathercrafttools.com for $20 for all three, but I have not tried them. I call these broadsword awls. The last one is an Osborne, and probably looks like what you have. It came almost usably sharp, but some work made it usable. As you can see, the taper isn't as drastic as the first awl, but it's still a factor and takes some depth control. I use it on occasion for really thick leather - as you can see, the blade is longer. Some have suggested snipping off the tip of these awls to give a broader tip, but that requires a lot of sharpening and re-profiling. I call these rapier awls (Like the weapons analogy?). The big advantage of a broad tip is when you are using a pricking iron the tip lays in the slit and helps guide you to the proper angle. Not so much with the rapier point. The straight sided awls give you the same size hole front and back, which I like. Notice that the Japanese awls have a flat sides on the handle? That does a couple of things for you. It keeps them from randomly rolling away when you set them down, but more importantly it allows you to feel the position in your hand without looking at the blade! I have since flattened the sides of the Osborne handle for that reason. Don't hesitate to modify tools to suite YOU! - That goes for handles, blade, and whatever else you want to change. Another little help for your awls is to cut a small piece of leather and punch through it with your awl. This will prevent the ferrule of the awl from marking your work if you slip and push it in too hard/deep. I took them off for the pictures to give a little clearer picture of the blades. Whatever awl you use, make sure it's really sharp and shiny to help penetrate the leather - and if not careful your finger. So, what's the cork about? That is a very useful multi-purpose tool, my friend. I have several - one for each awl - and use them to protect the awl from damage and keep them dry (they'll rust if wet) and safe from damaging the awl or myself, when they are not in use. They are also useful for thinner leathers when sewing. Use the cork for thinner leather to keep it from "flopping over" as you push the awl through the leather and into the cork - rather than your finger (blood is NOT a project enhancer)! They do sort of wear out after awhile and need replacement, making them most enjoyable tool in my entire kit since I get to drink a bottle of wine to get one. If you don't drink wine, ask friends that do to keep corks for you. As for stitching chisels, some old-timers and particularly saddlers do not like them for various reasons. I, and many others, find them very useful, however. You get perfect spacing and consistent holes with them. I also prefer the cheap Chinese chisels from ebay over some of the others. I have a set of Seiwa chisels that I find make a bigger hole than I want, while the Chinese chisels are more suitable for the thread that I use and as mentioned above they are much cheaper. They do all need a bit of sharpening and polishing when you get them, tho. As an added benefit they can be used much like a pricking iron to mark spacing and give you some angle guidance with an awl if you decide to use them that way and not punch deeply/through the leather. They are most useful for thinner leathers if going all the way through, since they have limited length on the prongs. Do be sure to get at least a six(or so) prong and a two prong in each size that you want and from the same maker to ensure the same prong size. Single prongs are mostly useless, and four only a bit more useful. Pricking irons are pretty useful, and reasonably cheap if you get the Chinese ones. Expensive ones are REALLY expensive! They are not meant to penetrate very deeply into the leather but more to make a shallow mark to guide your awl for spacing and angle, although a few do use them to go all the way through thin leathers. They do a better job helping you get your awl angle just right than other methods, but are not as versatile as chisels so it's a trade-off. Pricking irons from ebay sometimes look a bit crude, with machine marks along the prongs, but I don't see that as a problem as long as you're not penetrating the leather very deep. Just sharpen and polish the first 1/16" or so .. If even that. Whether stitching chisel or pricking iron, do be careful with these tools. If the metal is soft, they are easily knocked out of alignment if dropped - and you may or may not be able to get them back into alignment! If the metal is hard, prongs can break off. And lastly - +1 for Chinese thread! As Boriqua mentioned, what is sold as 1.0mm is more like 0.8mm, but still pretty nice stuff. I like that I can buy a good assortment of colors for the same price as a single spool of other threads and it works quite well. There are other, and better threads but at a great deal more $$. Sometimes that extra money is worthwhile, but mostly not. -
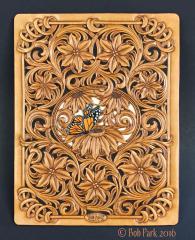 I love this, and the rope box both! I really like, too, that they break some rules - In particular spilling over the borders and adding a great touch of color with the butterfly! Just awesome. Bill
 -
One big advantage of a pricking iron over an overstitch wheel is that the pricking iron helps guide the angle of your awl so that you get a nearly perfect angled hole every time - especially if your awl has a broader tip rather than extremely pointy. (Think a broadsword tip as opposed to a rapier tip in sword terms). There is no guidance using an overstitch wheel, so your hand awl work has to be more precise and disciplined. A stitching chisel can come close to a pricking iron in that awl guidance, if you don't use it to punch all the way through.. And if you go all the way through with them, they work great as long as they don't make huge gaping holes as some do. Bill
-
A Little Luck in the Stamping Press Department
billybopp replied to bikermutt07's topic in Leather Machinery
Arbor presses are indeed handy, especially for 3D stamps and letters. There are a few modifications that you can make to them that are pretty helpful too ... First, take out the round plate and replace it with a thickish flat piece of steel to give you a good flat sturdy work surface. Second, build up a work table around the press that's at the same level as the plate so that you can lay your work out flat at least to both sides and keep them flat as you move your work around. Third, on your work table, you can add some slots for movable fences to keep things like belts straight as you move them through. You can even add markings on top of the fences to help keep spacing even. Fourth, you can add a strap and spring around the handle-shaft to raise the ram after every stroke which can make repeated patterns a little less work on your arm. I'd also consider, as mentioned above, drilling and tapping the ram to hold handled tools for things like border stamps, etc. I think you'll love using the press. It's a huge help for arthritic or otherwise hampered hands. Hope that helps! Bill -
Very cool backpack!
-
I do not care for the regular eco flo dyes at all. But when I want more muted colors, Fiebings is usually the better choice and eco flo pro dyes are great for more vibrant colors. And yes, there is a learning curve for all of them.