


billybopp
-
Posts
1,937 -
Joined
-
Last visited
Content Type
Profiles
Forums
Events
Blogs
Gallery
Store
Everything posted by billybopp
-
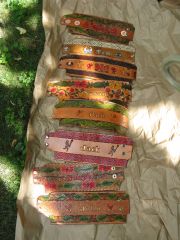
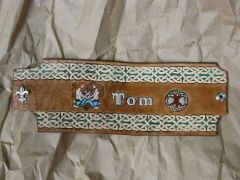
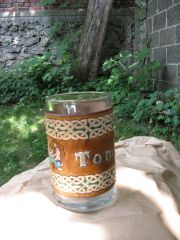
Here are some leather mug wraps that I've recently made. Edges are done with an embossing roll, and then dyed / painted using artist brushes. The center, personalized parts are a combination of stamps and tooling with dying / coloring brushed on and usually some antique paste. Various types of dyes are used for the larger areas. Finish is usually saddle-sheen or resolene, front and back. The celtic beard pullers on Tom's wrap are a traditional celtic form that he really likes, and the lettering and tree are a silver gilding. I have to give props to BDAZ for his laser printer transfer technique for the beard pullers. I could not have managed the detail there any other way. Bill
-
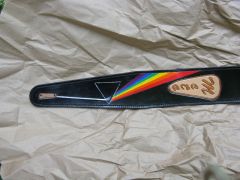
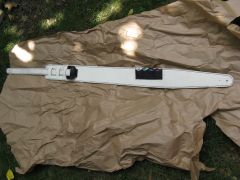
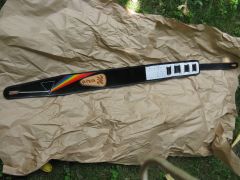
Here are a few shots of a recently completed guitar strap for a friend of mine. You probably can't guess what band he likes. It's about 4 oz veg tan with a deer lining, and a pick holder on back. I bought the deer hide on sale, and it was just crap when it arrived. The grain side was terribly wrinkly and looked like it had been dragged through a coal mine. I kept it anyway and ended up using the flesh side for this and other projects! Props for the deer idea to Colt Knight. This feels like buttah against skin!
-

From the album: Billybopps Stuff
-
From the album: Billybopps Stuff
Airbrushed rainbow, carved name -
From the album: Billybopps Stuff
Guitar strap back made of flesh-side out deer with a pick holder -
From the album: Billybopps Stuff
This is a guitar strap I made for a friend, to be shipped out soon. -
From the album: Billybopps Stuff
Here are a number of other mug wraps awaiting shipping / gifting -
From the album: Billybopps Stuff
... Without the mug -
From the album: Billybopps Stuff
latest leather wrapped mug for a friend. -

Newbie Needs Help Picking A Machine
billybopp replied to Carrieanna1172's topic in Leather Sewing Machines
Wiz: I think the above post about needle systems would be a great addition to the pinned topic in sewing machines, as I don't remember seeing most of the info there. Bill -
Good tools certainly make the job easier, and the bigger the job the more the difference as well. Bill
-
BTW .. If anybody out there HASN'T seen Game of Thrones, for us it's worth a look just for the leather work that the costumers have done for it. It's excellent work. Besides that, it's a rip-roaring good story (despite the fact that that damned neck-beard SOB writer George RR Martin kills off favorite characters faster than cattle at a meat plant ), with very good production values. Bill
-
That's awesome Raven!
-
I've only poked myself with an awl a few times, and mostly side cuts at that. Recently I watched a video of a guy using a wine bottle cork to back his awl pokes and thought it a great idea. I'm going to give it a try on my next stitching job to see if it helps to keep very thin leather nice and straight while poking at it. Bill
-
Biker Get Back Whip How To And Size Material
billybopp replied to mason HFFH's topic in How Do I Do That?
Gotcha now! What looks like shrink wrap is probably leather lace that is stretched tightly around the whip. Think wrapping the handle of a baseball bat, or maybe a golf club. Springfield leather has some lace in 5/32 silver mylar lace as well as black lace that might work for you, although that might be a little skinny for what you want to do. Your best bet might be to get some garment leather and cut your own lace from it. Again, Springfield has some metalics as does Tandy and I'm sure other places. For small quantities, a nice sharp knife, a straight edge and some careful work will make nice laces of whatever width you'd like. They also make specialized lace cutters which might be helpful if you intend to make a bunch of these with your own cut lace. Silver 5/32: http://springfieldleather.com/25455/Lace%2CMetallic%2CSlvr%2C5-32%22x8yd/ Metalic leather: http://springfieldleather.com/226/Metallic-Leathers/ Lace cutter: http://www.tandyleatherfactory.com/en-usd/home/department/tools/knives-cutters-splitters/3112-00.aspx Hope that helps! Bill -
Biker Get Back Whip How To And Size Material
billybopp replied to mason HFFH's topic in How Do I Do That?
I'm not sure if it's what you're looking for, but you may be talking about heat shrink tubing. It's usually used in electrical/electronics work. While usually smaller sized, it's available in up to 2" diameter ( and maybe even more) before heat shrinking if you look around for it. It does get a little pricey as sizes go up, but it may be just what you need. I have not used this vendor, but they have quite a variety: http://www.heatshrink.com/pc_combined_results.asp?pc_id=07855A7E161D497D9D2DBC838C223506 There may be others, and possibly less $$. Just look around! Hope that helps Bill -
For nose rings? Try not to fall asleep and face-plant in your nice cased leather. Bill
-
Notepad Cover
billybopp replied to LoneWolf1973's topic in Purses, Wallets, Belts and Miscellaneous Pocket Items
The whole arthritis thing really sucks. I got hit with RA about 10 years ago and it's been an exercise in learning limits ever since. I've found that hand stitching in the right amount is actually helpful. You just have to go do something else for awhile when your hands start hurting too much and then come back to it after a few minutes. That's not always easy to do, but in the end you get on with it faster that way than by trying to work through the pain. Bill -
Flat Purple Lace For Double Loops Edge Lacing?
billybopp replied to alyssaflorence's topic in Suppliers
Springfield Leather has several types and shades of purple lace available. The kangaroo lace looks especially nice, at least in their pictures as does their royal purple suede. I'd imagine that you could also dip dye natural or possibly white lace if you need to get the color just right. http://springfieldleather.com/33953/Lace%2CKang%2CClass%2C3-32%2225y%2CPurpl/ Hope that helps Bill -
Iphone Holster Case
billybopp replied to Hi Im Joe's topic in Purses, Wallets, Belts and Miscellaneous Pocket Items
A couple of thoughts just occurred to me. Depending on how you use your phone, you might want to poke a hold for the headphone jack so that you can listen while it's in the case. For that matter, a little add on headphone case for when you're not using them might be cool! Also, a hole lined up with the speaker might be helpful for hearing ring/notifications, etc unless you always use vibrate mode. Bill -
Iphone Holster Case
billybopp replied to Hi Im Joe's topic in Purses, Wallets, Belts and Miscellaneous Pocket Items
Looks good! I like the way you handled the snap using a simple leather round. It looks simple and elegant. Bill -
Looks good! Should be a lot of fun. Bill
-
Really nice! It's been a lot of fun watching this project come together. Bill
-
This might help: About 4 messages down ... http://leatherworker.net/forum/index.php?showtopic=55977&hl=%2Bthread+%2Bsize+%2Bchart#entry359041 Also: http://www.tolindsewmach.com/thread-chart.html I'm pretty sure I saw a more complete thread size chart somewhere recently, but darned if I can remember where it was. Hope that helps anyway! Bill
-
Dang! Tracking cattle by GPS! What's the world coming to. When I was a kid, I managed to find where every damned cow in the herd had been if I was out hiking in my best new Nikes. Seriously tho, you might consider plastic buckles, and possibly nylon webbing. Both dirt cheap and sturdy. http://www.countrybrookdesign.com/webbing-and-hardware/buckles/plastic/buckles-plastic-duraflex-1-1-2-inch.html http://www.countrybrookdesign.com/webbing-and-hardware/polypropylene-webbing-polypro/1-5-inch-heavy/polypro-webbing-1-1-2-inch-heavy-black.html A bit over $50 for the whole lot. And possibly cheaper elsewhere. Otherwise, http://www.weaverleathersupply.com/Catalog/ItemContent.aspx?ItemNumber=1866&CatalogId=001&CatalogDetailId=10&NSM=Y @$0.70 apiece. Hope that helps! Bill