TwinOaks
-
Posts
4,513 -
Joined
-
Last visited
Content Type
Profiles
Forums
Events
Blogs
Gallery
Store
Everything posted by TwinOaks
-
Larger needles also need a little more room from the edge to prevent edge swelling at each stitch. I've personally ruined a few projects before figuring this out.
-
Just Got My Cobra 4 Home And It Does Not Work At All
TwinOaks replied to Aycrith's topic in Leather Sewing Machines
I think that after 18 months, the OP has probably found a solution.......please note the date of most of the posts....summer of 2013. -
additionally, check everywhere that the top thread goes for burrs; the complete thread path from spool, through the guides and tensioners, the needle (I thought 138 used a #23 needle, btw), the foot, the hook, the bobbin case (where it wraps around), and the hole in the needle plate. The machine I have had a slight gouge on the side of the needle plate from where the needle was deflected and hit it. Yes, that was enough to damage the thread. Use a q-tip/cotton swab and lightly rub across all the surfaces, if there's a burr, it should find it. If you have any rough areas in the paint, dress those too. If you find a burr/rough patch, you can lightly file/sand/polish it and that should at least help. Go ahead and plan on opening up the machine to look for burrs, etc. down in the working parts.....and while there, completely clean it. There's more than a few tales of skipped stitches, broken stitches, and NO stitches.....all caused by lint in the shuttle track of some machines.
-
New To Leatherworking, No Idea How To Start
TwinOaks replied to TheBlotterOfInks24's topic in Getting Started
The above true to an extent, but like any trade/craft, tools disigned for leather work typically perform better than standard tools . The "$90 rounded edge version" is called a Head Knife or a Round Knife (depending on the sweep of the blade), and is one of the more indespensable tools. It is far more versatile than a standard utility knife, but there is a learning curve....no pun intended. Once you learn how to use one you'll see the difference. It's used for cutting straight lines, cutting curves, skiving, matching edges, et. al. The utitliy of the head knife comes from having more cutting edge in the leather than a straight blade, and being able to vary how much blade is in the leather. Does this mean you have to get 'leather working tools'? No. As mentioned above, many standard tools can be used....just be aware of the limitations. Another good example of this is an awl - a round point 'scratch awl' is not suitable for leather working. It will make holes, but not the type you should use. You'll do far better with a "diamond awl" which refers to the cross sectional shape of the blade. Not to knock harbor freight, but don't go to them for leather punches. The ones they sell are poor quality and require a lot of work to make useable - such as stoning an even edge, then reprofiling the shoulder so that it can get though the leather. Look at other craft supply stores, too.....I get waxed linen cord for sewing at Hobby Lobby (they also sell a 'basic 7' set of tools). You can also make your own tools (many of us do) from bolts, rods, flat stock metal, kitchen flat ware, pieces of wood left over from other projects.... You'll need some hand tools and sanding/polishing ability, but most basic tools are pretty easy to make. THIS SITE is probably the best tool you can get while starting out. It is the single largest compendium of leather knowledge on the planet, and the majority of the members are happy to help you learn. There is currently a "monthly challenge" thread going on, in which we use a prepared pattern (shapes, cut lines, and instructions) to build something. This month, it's a wallet...next month is still undecided. These 'challenges' are open to everyone, from beginner to advanced and may be a great opportunity to learn things like basic design layout, tolerances, and construction methods -
You might check under "Shoe Finishing Machine"....Landis makes several versions- http://www.ebay.com/sch/i.html?_ssc=1&_nkw=Landis+shoe+repair+machine Or, if that's not what you're after, maybe look for 'shoe finishing supplies' , 'cobbler's supplies', etc., and just mount one of the polising/buffing wheels to a grinder
-
Have you tried contacting the maker/seller and asking where they got the cord ends? That might prove effective.
-
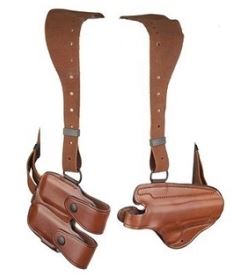
High Ride Holster Help
TwinOaks replied to RHLogan's topic in Gun Holsters, Rifle Slings and Knife Sheathes
Here's a generic pic I borrowed to show the only high ride holster style I've made with a balance point above 'center of belt'.....
-
Keep in mind the age and use of the machine....I forgot who said it, but there was some advice on here that said [paraphrased]'you can make a machine sew heavier than it was designed for....but it just won't do it as well, or as long.' Regardless, you got what appears to be a great deal on a good machine, and I hope you'll see years of use out of it.
-
I don't use suede because the majority of it is chrome tanned ( not counting sanded splits). If it isCT, and the leather gets wet while the gun is holstered, it can lead to basically washing the gun with chromium salts.....helloooooooo refinising job. For something like the later generation guns like Glock, Smith M&P, HK, Walther, Sig.....blahblahblah.....the finish is designed to be extremely corrosion resistant. This may help mitigate the effects but on a blued steel gun, it's flirting with disaster.
-
The new one probably has blunted teeth because somebody scratched themself and threatened to sue because the tool was too sharp, resulting in a redesign of the tool making it less dangerous.
-
IIRC, 138 is about as large as you'll want to go, and you'll be pretty limited on belts to 1/4" or less under the foot. It should handle the chap work just fine, but may have problems if the spur straps are too thick.
-
Welcome to the best site on the internet!
-
try clicking 'posted image'....I'm showing it as a link, but I'm on an abysmal ISP right now, so there's now way I can download a large file. The links may not be showing due to an upgrade in the forum software and the size of the posted images (digital size, not image measurements). Perhaps some of the more tech savvy members of the team can offer some input?
-
You can use resolene over the Eco-flo, but it WILL pick up the color.....unless you spray it on with a fine atomizer like an airbrush. For what you're describing, I'd suggest the "Pro-water stain" products. They are a pigmented waxy base and once dry are pretty water resistant and colorfast. They still need to be sealed, but are much better than the standard Eco-flo colors. They also have almost no odor, so can be applied inside - just use a damp sponge, and wear gloves of some sort to avoid colored fingers.
-
I'd say the type of leather is more of an issue here. That looks to be a type of chrome tanned leather, and due to it's soft, resilient temper, the marks just aren't going to be super evidient
-
Any Tips On My First Revolver
TwinOaks replied to cleanview's topic in Gun Holsters, Rifle Slings and Knife Sheathes
I recently made a holster for one of those, and had to get the bluegun ....If you need it, I can put together a 'base' pattern for the shell around the gun. After that, it's just adding attachment points. Shall I make one up? -
Looking For A Minimalist Wallet Pattern...tboyce?
TwinOaks replied to J W Craftsman's topic in Patterns and Templates
You've got the pictures right there....it's two pieces with a fabric liner stuck to the back panel. The front panel has the window slots cut in it, and a snap set in each corner. -
What Machine To Sew Wallet Interiors
TwinOaks replied to Chief31794's topic in Leather Sewing Machines
If it's JUST wallet interiors, you could get by with a Singer 111 (or variant/clone). You should be able to find those from $200 for just the head, maybe $400-500 on a table. If there's a chance that you'll eventually do more with the machine, plan for something like a Consew 205/6, Juki 1541/lu562/lu563, Adler 67...and the price ranges anywhere from $500-$2000. Those machines have more clearance, and can handle larger threads. You might even look at going with a cylinder arm medium duty machine, and add a flatbed. -
If you have a bike shop nearby, by all means.....GET A PATCH MACHINE. There's a little place in Mobile that opened up right next to a bike shop, and half of their business is walk-in, sew-on customers.
-
2015 Keep Making Stuff Monthly Challenge
TwinOaks replied to thefanninator's topic in Leatherwork Conversation
In previous challenges, there was initially mass confusion, a groundswell of ' can I join in?' questions, and the decisions of what to make were SWAGs. There was a lot more enthusiasm than planning (my bad!) for the long term 'lesson plan', so your decision to use Tom's patterns is a good one. It will keep participants on the same page. The challenges I started were more oriented to learn the tools, than to do projects, so end results were often drastically varied. For 'difficulty levels' I think it'd still be better to just have one project/month depending on difficulty. The lessons start at one point and build skills. If it's something simple (change purse) then have two options; something complicated (purse) then only that pattern. That was one of my challenge failures- too much variety to stay focused on the tool. My vote is as you said- easy to hard. Old hands can use the opportunity to show what experience has taught them, and then be the 'teacher's assistant' during Q&A. Be prepared for a drop off in participation, as some folks will get their feelings hurt others will just 'run out of time'. A rank beginner won't produce the same quality as someone with 20+ yrs experience, so limit/discourage 'ringers' from showing off (too much). Beginners may be intimidated into not participating if 'competing' with a pro or semi-pro. This is where 'winner chooses' can go wrong- if the same person 'wins' consistently, then the plan for the challenge gets altered. Thanks for taking the lead on this, I feel it's one of the best ways to help our member base. -
I've done consignment a good bit, and 20% isn't unheard of. In my case, the store owner was also pimping out my leather and effectively using 'stock' as the hook for 'custom' orders. Yes, he got 20% of that too, but he did all the marketing, customer relations, sales, etc. If YOU have someone looking to sell through your store, I'd suggest having a minimum per month that they pay you. YOU are keeping up with inventory, overhead, utilities, AND are probably going to pay city taxes on the amount of shelf/rack space you have. You also need to do some research on consignment contracts, and when you accept something.....TAKE PICTURES and preferably have the seller sign off on them. That (hopefully)protects you from someone accusing you of damaging their goods. You should either have an escape/no-fault clause, or insurance to cover the items if they DO get damaged. That's what the 'minimum' is for. Require that the seller (if local) tends to their merchandise at least twice a month, evenly spaced. If they're high volume, more frequently. If they're high price (saddles, framed art, jewelry, etc.) watch them like a hawk. They don't get to take anything from the store without a record that YOU keep. (avoiding the "hey, where's my money for the XXXXX I put in here for you to sell (but forgot that I took it home)" type of people) You might also offer a 'discount' if people are driving business your way with their websites. For example: "John Maker" has a website that includes the statement "products may also be seen at [[name of your store]]" A few points of your % would be worth the advertising...IF the site is actually getting customers in the door. Contact the local radio station (whatever is popular) and inquire about ad pricing and placement (the time slot your ad airs). Make up some "free samples" to distribute at other businesses (leather pen cups, etc.) [ a 'change tray' takes a square of leather and 4 snap sets], and include some business cards or contact info. NOTHING drives sales like jealousy and 'Keeping up with the Jones', so consider some 'freebies' for the 'popular' people....you can call it a bonus gift and hand out a braided bracelet.
-
Determining Seam Lines For A Pancake Revolver Holster
TwinOaks replied to Paramedic04's topic in How Do I Do That?
I do it a slightly different way than above - I lay out the general pattern on flat leather, but I first sandwich the revolver between two pieces of dry leather, pinch it together at the trigger guard and top strap (hold with spring clamps, clothes pins, etc.) and mark the leather where it meets. Then, when un-clamped, just measure the distance between marks. That's the size that the opening needs to be when you lay out your stitch lines. If you need to err, do it on the small side and just wet the leather well then stretch it where the cylinder is. -
For your reading pleasure, Bob Park's tutorial on casing leather: click here
-
2015 Keep Making Stuff Monthly Challenge
TwinOaks replied to thefanninator's topic in Leatherwork Conversation
Do you want to apply a schedule to the projects? Such as: "Pattern posted by the 5th of the month, all competing entries completed by the 20th, and voting/judging by the end of the month?" I'm not trying to take over your challenges, but merely trying to provide some insight from previous iterations. I would also suggest that there be a 'window' for Q&A in case anyone participating doesn't understand part of the construction methods. If I can help out on these, let me know - here or PM, and I'll be happy to do so. -
I think most folks are recovering from Christmas.....Give it a week or three, and bump it back to the top?