


Thor
-
Posts
1,038 -
Joined
-
Last visited
Content Type
Profiles
Forums
Events
Blogs
Gallery
Store
Everything posted by Thor
-
I'd be making it myself and just glue the ends with industrial glue. Only found it in German so here's a picture only.http://www.messerspezialist.de/media/catalog/product/cache/1/thumbnail/9df78eab33525d08d6e5fb8d27136e95/l/e/lederband/Work-Sharp-Ken-Onion-Lederbandset-09DX031-11.jpg This one's glued only and comes with polishing paste. The picture is a Ken Onion, so I bet it must be available in the states as well if you don't want to make it yourself. Just in case you don't see it, the flesh side is up. BTW a leather wheel is easier trued up than a felt one. If it is out again you can just use coarse sanding paper to fix it back up.
-
I wasn't talking of a strop board. Instead of a felt wheel you could make a leather wheel yourself or if you have one of these http://www.profitexx.de/Ebayfotos/Sonstiges/Bandsteinschleifer.jpg you could just put a leather belt on it. That's how we used to finish off the woodworking chissels.
-
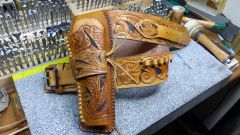
Hand Stiched Holster
Thor replied to Modad2010's topic in Gun Holsters, Rifle Slings and Knife Sheathes
Nick, it greatly depends on your design and the use as to what you want to reinforce and if there's an actual need to. If you look at this specific one here, it'll reinforce the stability of the outside leather to stand up to the pistol wanting to pull to the outside. You may have to tilt the picture a little clockwise to see what it does, as this would be the way how it'd be worn on a belt. Personally I'm missing a keeper, which would hold the gun in place, but that's a different story. You could also use heavier leather, but that would make the holster uncomfortable. Therefore a reinforcement is added. -
Well, let's put it this way - there's never a secret if it's been known between two parties unless one of them dies. Ok, enough joking. I had the idea of an automated driving protocol once. I wasn't able to code it myself and kept it a "secret". One or two years later some guy brought the exact same idea on the market and became rich. The only difference was, he went out and got some help. In other words, you will have to disclose your so called secret to someone. Further, in most of all cases you'll find something that's kind like already on the market. Just have to search hard enough and the market is huge. I'm definitely not the person to carry out your design. Belts are not my department. At least not yet. And maybe this little note on the end. Even if you disclose your design to others, there are two things to consider. First off, mark it copyrighted, which it is anyways as you created it (called intellectual copyright) and second, even if someone else has the design he/she doesn't necessarily have to be able to make it or make it the way it is intended to be.
-
If she doesn't kick her bum. They are very sweet! Wish I could make those. They might be a little too light for me though, as I prefer heavy reins, but these look really nice and one doesn't see these kinds of reins a lot anymore. How long are they? And how long did it take you to make them?
-
I wonder if you are looking for the simple answer or the accurate one. First of I'd be using leather and would prefer a belt over a wheel. Your wheel will not run true enough for the following reasons. First not exact centric. Second the weight within the felt isn't evenly distributed and will contribute to misalignment. For the same reason you see the weights being put on your car tires. Of course the jeweler's rouge doesn't make it any better. If it's not that bad, just live with it.
-
I sure like it a lot and that's why I compiled your step-by-step guide to this PDF. Hope you don't mind. Sorry, I had to compress the pictures or it wouldn't let me upload the file. If one wants to see them larger, please review them on the first page of this thread. I didn't comment all too much as I didn't see any need. We all get what he wanted to get across. Guess the only question I have for you is, what product have you been using for antiquing and if you'd like to ad the stamp numbers I could include them to the PDF file. Floral Wheel Clock Step-by-Step Guide.pdf
-
"quick Lock Buckle"? - Need Help There Please
Thor replied to Aurelie's topic in Saddle and Tack Accessory Items
Looks like U-profile soldert to a flat piece. That's not all too hard to make and fairly quick as well. -
Hand Stiched Holster
Thor replied to Modad2010's topic in Gun Holsters, Rifle Slings and Knife Sheathes
I guess he means the reinforcement piece. More to the left hand side where didn't do that additional step to finish of the weave. Not everybody will notice it and it's only 4 or 5 times. But I guess he's critiquing on a very high level as this a very nice holster. -
One reason might be that the URL is wrong. Copy and past it. Also make sure it's inserted as a link.
-
"quick Lock Buckle"? - Need Help There Please
Thor replied to Aurelie's topic in Saddle and Tack Accessory Items
What do these loops actually look like? I've seen these headstalls with a d-ring fitting, which worked very well. This is somewhat similarhttp://www.parkecountyconnection.com/tackshackphotos/_125headstallquickbitdet2.gif and it looks like there's just a square tubing secured by a leather strap or so. -
How about trying one piece without contact paper and wetting from both sides?
-
Are you having the same problem with a straight blade? I had that issue with the angled blade too once and found out that I wasn't actually cutting but rather scratching with it. I haven't gotten used to the angled blade and rarely use it anymore, but if I'm holding it in a flat angle so I'm cutting rather than scratching. Besides that,are you wetting your leather from both or just one side when casing?
-
Pretty ambitious for your first project. In my humble opinion I would suggest the following tools: 2 deep cut bevelers (wide and small) to bring out the banner stronger 1 undercut to be used on all the turn, where the banner folds over 1 pear shader to give the banner more depth 1 stylus modeler for the folds The font is nice, but... The small and narrow portions will be tricky. Also there will be the question whether to have the writing embossed or raised. There's a great thread on figure carving http://leatherworker.net/forum/index.php?showtopic=21743 ... way beyond my knowledge and way more than you need right now, but it is worth reading as it also explains the undercut process and the detail work you might want to look into. As for background, I would let it run out from the object and make it as simple as possible.
-
Hi Fix, if you're planning on future projects already, by the right stuff right from the start. I know some prefer the mallet, but I prefer a maul. For tooling a 2 lb. one is the right choice. For all stamps - it depends a lot on your pattern. Maybe you want to post your idea and someone may be able to give you an idea. You might just need smooth bevelers or get better result with checkered or lined one... You might want to get a pear shader, a matting tool and so on. You might be able to find an assortment on eBay, where you can find lots of stuff for leather working.
-
Hello Brad, where is the great white north? Alaska, Canada, Sweden? Welcome to the forum. Did you find the action on figure carving yet? Guess you'll like it just like I do and all the sudden you realize how many more tools want to get :-) Have fun on here
-
As a "retired" firefighter I would say there are only two things that are important. First it has to stand up on a call. Second any additional weight on you sucks. Besides the fact that there's a pouch on the turnout gear for a radio - I cannot speak for other departments, but I wouldn't have allowed it to others wearing one on a call, as it poses an additional risk of injury. We only accepted radio pouches to be worn on the belt. And that was only for first responder calls, where we wouldn't wear turnout gear. Looking at others I would say 7/8 oz. is just fine. However, if they are to be used on a call they would have to have a certification by the respective authority. Contact the one for your state and ask them, if it isn't based on a federal code. Good luck
-
Thanks for the feedback. You're absolutely right about the zinc poisoning. I forgot about the zinc plating. The electrician part is only true for North America. Over here here it's plastic if above surface and only in commercial buildings. Usually they are in the walls due to building code. Sometimes things suck... I will have to get some plumbing pipes or ask the plumber for some scrap pieces. But that'll work and thanks a million for the advice with the insert. I wouldn't have thought of that.
-
Regarding the DIY punches. Will the edge stand up better if hardened? Can they be hardened at all? If I'm putting a 3/4" pipe in a vise will that work out to a 1" slot punch, or am I on the wrong track?
-
Hope we're talking about the same tool. Basically you're sharpening it just like chisel on one side only. This picture http://www.listoftools.com/images/sharpening_a_chisel.pngpng explains the process.
-
Hope this helps https://www.google.de/search?sclient=tablet-gws&num=50&newwindow=1&tbm=isch&oq=&gs_l=&q=littleton+buckle Looks like they are called Cavalry belt buckles and are made by Littleton. Here's a sellerhttp://www.cart100.com/Product/39040525937/
-
How To Even Out The Distance Between Stitch Marks?
Thor replied to thekid77's topic in How Do I Do That?
Honestly I haven't had that issue yet, but if I would, I guess I would do a half stitch or a few smaller stitches in between somewhere so it wouldn't be on that corner. -
 Your holsters turned out very nice.
 -
Well without getting to fuzzy about it, I'd be using isopropyl alcohol. It's suggested as the commercial solution. If you want to read up on it you can do so here http://en.wikipedia.org/wiki/Isopropyl_alcohol. That is fairly simple reading. That's also the type of alcohol used in medical cleansing. You cannot go wrong with it. Even if you get it on your skin there's no problem. Versus Methanol, there could be a problem as it can penetrate the skin. Those are reasons I'd stay away from it if there isn't any absolute need to use it.
-
I just noticed on your pics that the neck area has different sizes than the body itself and that it's not actually half round but quarter round.