dikman
-
Posts
4,828 -
Joined
-
Last visited
Content Type
Profiles
Forums
Events
Blogs
Gallery
Store
Everything posted by dikman
-
Remove Old Oil And Rust Without Removing The Paint... Any Ideas
dikman replied to alexitbe's topic in Leather Sewing Machines
I'm sorry, thunter, are you referring to me? If so, I'm well aware of Renaissance Wax, and have been for many years. It was primarily developed for coating blades - swords, knives etc - for display purposes in museums. It is sometimes used by knifemakers/bladesmiths.Some museums have used it to try and preserve leather book bindings, but have found that it can cause long-term problems on leather. On metal, however, it does work well. If you're suggesting to use it to try and remove rust stains, then it's worth a try, I guess (although it does tend to be on the pricey side) but I doubt it will be any better than a good quality wax-based polish. It is intended to be a preservative, not a cleaner (although it does contain white spirits, a solvent). -
A Quick Question About Speed Reducer Pulley Sizes
dikman replied to OLDNSLOW's topic in Leather Sewing Machines
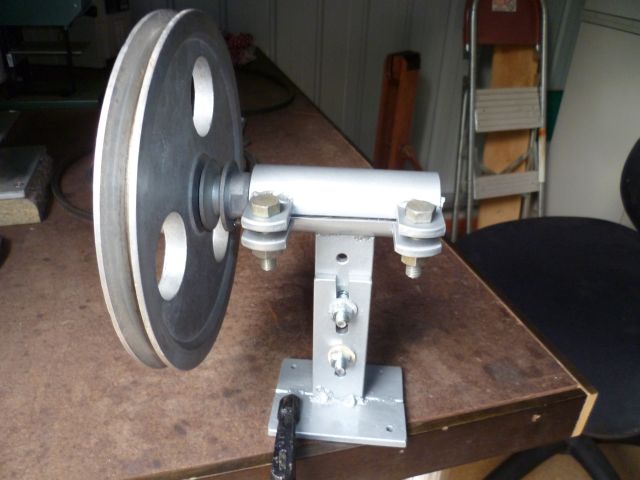
OLDNSLOW, this is a photo of the latest one I built (just for ideas?). I used a piece of black pipe that was fractionally bigger than the bearings, cut a slot down it with an angle grinder and welded lugs to it so that it can be tightened up on to the bearings. The vertical pieces have slots cut to give some adjustment and one piece is welded to the pipe and the other to the bottom piece. The shaft was turned down in two steps, one for the bearings and the other for the 3/4" needed for the pulleys (the big pulley was too big so I had to turn a sleeve to fit the shaft). This was a bit of messing around, but I was trying to use whatever I had lying around, so cost was $0. The large pulley, coupled with two small ones (one on the motor) had a dramatic effect on the speed!!!
-
Remove Old Oil And Rust Without Removing The Paint... Any Ideas
dikman replied to alexitbe's topic in Leather Sewing Machines
Thor, at the risk of being berated for keeping off-topic, I have no idea what GT85 is, never heard of it out here. Dupont Teflon spray was brought into the country some time ago but was discontinued. When queried about it by people constantly looking for it they were told that there was no demand for it so wouldn't bring it in! As for Johnson's Paste Wax, many have looked for an equivalent but again, there is nothing that is quite the same out here (I have compared the MSDS on many products and can't find a match). With regard to the OP, rust stains can be a problem due to the fact that they often get into the paint surface. Sometimes they can be polished off, but with anything other than kerosene/WD40 type stuff you run the risk of the paint lifting too. Electrolysis is a good way to remove rust without damaging the metal, but if the rust is under the paint then again the paint will probably lift. -
Steve Mcqueen Holster
dikman replied to dikman's topic in Gun Holsters, Rifle Slings and Knife Sheathes
Already been to that site, lots of good info but no help to me. Longtooth, that would be great! I'll send you my email address. I've read a lot about Andy Andersen, and his holsters/belts, and seen lots of photos - but nothing about the back of the holster. I could make it up, of course, and just do my own thing, but it would be nice to "get it right" in homage to the man. Unfortunately, I will have to make the holster a little longer than the McQueen version as while I have long-barreled revolvers I don't particularly want to remove the front sights (which will probably catch on a shorter holster). -
I'd like to make a copy of the rig used by McQueen in The Magnificent Seven. The only problem I have is with the rear of the holster as I haven't been able to find any photos of it (they all show the front!). It appears that the holster is basically one piece, with the belt loop (shank?) folding over the belt and is then attached to the back of the holster. So, how is it attached, what shape is the rear piece and how far down does it extend? Anyone know?
-
Remove Old Oil And Rust Without Removing The Paint... Any Ideas
dikman replied to alexitbe's topic in Leather Sewing Machines
My apologies, hyttogpine, it was my interpretation that was wrong. And don't feel bad, I was told by my language teacher, many many years ago, that English is actually the hardest language to learn, so you're doing well. I, too, wonder why some don't include their country . -
Remove Old Oil And Rust Without Removing The Paint... Any Ideas
dikman replied to alexitbe's topic in Leather Sewing Machines
hyttogpine, it's helpful to know where someone is from when offering advice and/or help, because there are many products that, while common in one country (the USA in particular) aren't available outside that country. For example, Johnson's Floor Wax is widely referred to on model-making forums, shooting forums, woodworking forums, just to name a few, but it is impossible to get here in Australia. DuPont Teflon spray is very popular amongst motorcyclists for lubing chains, but again it can't be bought here. If we know where a member is from, then hopefully information can be given that is relevant to that person. -
A Quick Question About Speed Reducer Pulley Sizes
dikman replied to OLDNSLOW's topic in Leather Sewing Machines
Sounds like you did well with finding that lot. Whilst I used metal to make my housings, there's no reason that you couldn't use wood to hold the bearings. Like I said, it's a lot of messing around, but I consider it a challenge. -
A Quick Question About Speed Reducer Pulley Sizes
dikman replied to OLDNSLOW's topic in Leather Sewing Machines
Sorry about the smiley in my post, it's not supposed to be there! Apparently if I use a bracket and lower case b it inserts the smiley instead. -
I just remembered that when I was buying a belt at my industrial sewing machine place they mentioned a belt material that is circular in cross-section and you buy whatever length you want and then use a special joiner to make it one piece. It's some sort of synthetic stuff. I must ask again (and write it down this time!).
-
A Quick Question About Speed Reducer Pulley Sizes
dikman replied to OLDNSLOW's topic in Leather Sewing Machines
Uwe is right, it's a lot of messing around building pulley reducers - pulleys, suitable shaft, bearings of some sort, mounting for the bearings, a method of making the support adjustable. Those commercial ones might seem a bit on the expensive side, but they're neat, compact and relatively simple to fit. As to size, if it's home-built it could be anything, depending on a) what the builder has lying around or what he can buy that's suitable. One of mine uses the typical 4"/1 3/4" pulleys that are commonly available on ebay (3/4" shaft). Another uses an 8" that I had lying around coupled with another 1 3/4". As for changing the handwheel, it's not that difficult, although it will obviously depend on the machine - my Singer 211G166 is a problem (which I'm working on). I'm a great believer in the handwheel option, although it may mean widening the belt slot on the table. -
Those frames certainly look stable enough! One thing about that type of cylinder arm machine - it makes it easier to mount when you don't have to make a rebated cutout in the table.
-
I see what you mean about info, the manual I came up with mentions 17-25 on the front but nothing about it inside! Nevertheless, looks like you did very well and picked up a real bargain there. Well done.
-
Actually, Darren, my experience has been that shipping within Australia is often on par with overseas rates, but yes, I should keep your store in mind too, thanks for reminding me.
-
It's for sale on Gumtree (our local ebay site) so I don't know if you will have much success getting the info you want. This is the link - http://www.gumtree.com.au/s-ad/west-richmond/miscellaneous-goods/sewing-machine/1099259648
-
Thanks Constabulary, it's worth knowing which places have Singer parts. I'll keep a note of them.
-
Constabulary, do you have any company names for suitable suppliers in Germany, please? Most of my searching comes up with US/UK suppliers. So far I haven't needed to order parts for the Singers to get them going, but at some point I probably will. Lumpendoodle, part of the enjoyment, for me, is getting these things going again, it's all good fun. I've made the lower thread guide (I had a devil of a time getting the retaining screw loose!! Probably hadn't been touched for 40 years) so now I just need to thread it up and see what happens. Yesterday I saw an ad for a Singer 188K for $50, advertised as a light industrial. Came with a nice old treadle table but had been motorized. I was very tempted, but 1) I've got nowhere to put it and 2) I have no need for a "light industrial" straight stitcher. Going to have to watch myself.......
-
The upper thread guide proved to be a simpler solution than I expected! Amongst the few bits that came with the machine were two short pieces of rod, one with a thread on the end (which fits the upper mount point) and the other has a hole in the end and a big blob of weld on it!! A closer look and it is (was?) the upper thread guide, which had snapped (!) at the lower guide hole and someone had attempted to arc weld it together. I ground off the weld and cleaned the metal, then silver soldered the two parts together. Drilled another thread hole, polished out the burrs and I now have an upper guide. Yay! Now to make a lower guide when it cools off, too hot outside for now.
-
He does indeed have an eloquent turn-of-phrase, and it made me chuckle a little. And yes, I have three clutch motors (including a very old Singer) kicking around. One of them will be used on one of my Singers, albeit with a rather large speed reducer, as I want to see if I too can develop an "educated foot"! (Ever the glutton for punishment, it would seem).
-
Ah, the joys of buying an old used machine. I shifted it to my Singer 211's table. First problem, no hinges so it listed badly to the rear! I swapped over the hinges - looks like I'll have to make another pair - and at least it then fitted properly. I had to fit a longer motor adjustment bolt to get enough adjustment to fit the belts. Next problem, the knee lifter didn't do anything, the connecting rod on the machine was too short. Looking at the 211 I noticed that it had an "extension" piece fitted to the end of the lifting rod and it had a small roller wheel on the bottom to ride on the lifting plate. Rather than simply fitting a longer rod I decided to make a similar fitting, using a bearing salvaged from a hard disc drive as the roller. Works well. Problem #3. Using the knee lifter I now had just over 3/8" clearance under the foot, but with the normal lifting lever I couldn't even get 1/4" of leather under it. I re-adjusted the presser foot, as it appeared to be out of adjustment relative to the vibrating foot, but that didn't help. I then noticed that the lifting lever had a lot of loose play in it so removed it . The lever had an awfully big hole compared to the pin that held it, so I guessed that it should have had a sleeve fitted around the pin. I made a suitable brass sleeve and now have over 1/4" clearance when the feet are lifted. I then ran the machine, but without thread, and it ran fine. The stitch length adjuster also worked. Next problem is the missing thread guides. The lower one will be easy to make, but the upper one is a problem (yes, I can get it overseas, and it's pretty cheap, but the shipping....). The problem is the same one I ran into with the Pfaff - the (metal) thread size, in this case, is US and I can't match it with anything I've got, including some of my US dies. I figure I'll find the closest fit to the thread on a piece of rod, drill the guide holes and then either use plumbing tape to pack out the threads or use Loctite. I'm still not quite sure what I'm actually going to use this machine for .
-
Unfortunately, some of us don't have that sort of timeframe available to us anymore......... .
-
Wiz makes a good point, clutch motors are pretty basic technology, with not a real lot to go wrong. I'm with Uwe, however, the technology is there (and most electronics are pretty reliable these days) so it makes perfect sense to me to utilise it and be able to concentrate fully on learning how to actually sew, rather than trying to tame a runaway sewing machine at the same time!
-
First Holster
dikman replied to DuncanSinclair's topic in Gun Holsters, Rifle Slings and Knife Sheathes
Up close (real close) yeah, I can see some "funny things", but from a distance it has an incredible used, aged look about it! -
My First Knife Sheath
dikman replied to Jon P's topic in Gun Holsters, Rifle Slings and Knife Sheathes
I'm not a fan of basketweave myself, but yours looks pretty good to me! Considering how cool the knife handle looks, I reckon a plainer sheath would have set it off better - but that's just my opinion, and I'm the first to admit I don't know much. And if your mate likes it, that's all that matters. -
Another Is This Sewing Machine Right For Me Question Adler 467
dikman replied to kawliga's topic in Leather Sewing Machines
Amen to that, brother!