


Sheilajeanne
-
Posts
2,752 -
Joined
-
Last visited
Content Type
Profiles
Forums
Events
Blogs
Gallery
Store
Everything posted by Sheilajeanne
-
Wallet with coin pocket
Sheilajeanne replied to ABHandmade's topic in Purses, Wallets, Belts and Miscellaneous Pocket Items
I had to read that more than once, but I think I understand. You use the cloth to burnish the edge. The leather does not move, but stays flat on the slab. Be careful to only rub the edge of the leather and not the whole piece. Burnishing thin pieces of leather is tricky. This is an interesting way of doing it, one I've never heard of before. Definitely worth trying! And yes, I will say it again: You are very talented! -
Wallet with coin pocket
Sheilajeanne replied to ABHandmade's topic in Purses, Wallets, Belts and Miscellaneous Pocket Items
Okay, so the edge of the pockets is just cut and burnished, right? How do you finish your edges? (I'm planning to put card pockets in my most recent project, that's why I'm asking all these questions!) :D The edge is not turned over. I'm not strong in this yet Really?? Could have fooled me! You are VERY talented! -
Wallet with coin pocket
Sheilajeanne replied to ABHandmade's topic in Purses, Wallets, Belts and Miscellaneous Pocket Items
You do gorgeous work! Even the interior of the wallet is first rate! And the cougar is so lifelike, you can almost hear it purr! One thing I don't get is how to get that edge on the card pockets. Is it turned over to get that line just below the edge? -
LOL! I think that's pretty universal for English speakers everywhere!
-
what can I do with a gifted singer 66?
Sheilajeanne replied to JDB's topic in Leather Sewing Machines
what can I do with a gifted singer 66? Become its agent and put it on stage? (Sorry!) You don't get given a straight line like that very often on these forums...] I, too, got a domestic machine when my mom died, though a modern one, not an antique. I am going to be using it to sew bag lining (fabric) and very lightweight lining leather. -
fredk, my mom used to listen to a radio progam called "Calling All Britons'. Its host was a Cockney broadcaster named Ray Sonin, and he'd always sign off with "Until next time, this is your old China, Ray Sonin, saying TTFN - Ta-ta for now!" That's why I thought the expression might be of Cockney origin! https://en.wikipedia.org/wiki/Ray_Sonin He was the first North American broadcaster to play the Beatles' songs on N. America radio. My friends laughed at me when I told them I'd heard the songs before they did. Guess they thought I was making it up! Glad to have that memory justified after all these years! We now return you to our regular programming...
-
IIRC = If I recall correctly WTF?? = well, I don't think I need to explain that one! :D Describes a lot of things going on in politics south of the border ATM! Most of these have come into common use as a result of the internet, and people texting on their cell phones. BRB - be right back TTYL - talk to you later TTFN - an old British expression (think it's Cockney) - ta-ta for now! YMMV - your mileage may vary, meaning you may have had a different experience with this, or different opinion WYSIWYG - what you see is what you get. An old computer term, meaning what's on the screen right now is going to be what you get when you press 'post', or are finished entering your data. Not heard so much these days. IAW [person's name] = I agree with [person] As for leather thickness, I prefer to use either millimeters or inches. Most Canadians of my generation are bilingual when it comes to metric vs. the imperial system, as the switch-over happened while we were in school! But I still prefer to use pounds for my weight and inches for my height, and think of zero degrees as being REALLY cold, and not just the freezing point of water!
-
Maybe an inch or so.
-
Plinkercases, yeah, that's exactly the book I looked at too, and the diagram that made me realize the handle was too long for me. I guess I just lack the confidence to do it... There's no tang or anything I have to worry about, is there?
-
Just wondering - I know there are some people on this board that do. I recently bought a round knife, but the handle is too long for my lady's hand. Would like some help in cutting it to the proper length! You can PM me if you wish!
-
Why you should buy a round knife.
Sheilajeanne replied to immiketoo's topic in Leatherwork Conversation
Mike, thanks SO much for that video! I just got a round knife, so this was very useful to me! -
Seriously, so much depends on what you are planning to make, and how you usually go about it! You'll obviously need cutting things like knives for cutting out blanks, scissors, cutting board, poundo board, quartz slab if you're going to do tooling. Don't forget ruler, dividers, etc - whatever tools you use to make lines to guide your cutting. Needles, thread, your favourite punches for making holes, buckles, oblong punch for buckle hole, and stamps. I have thought of making myself a tool roll for stamps for when I travel. It would have a separate compartment for each of the major stamp types: backgrounders, camouflage, pear shaders, seeders, veiners and figure stamps. For now, I just sort them into ziplock bags, and label the bag with the type of tool. When I first started leatherworking, I remember seeing a sheet that showed us all the fancy things we could do with just SIX stamps! So, look yours stamps over carefully, and winnow out the ones you use most often! As for finishes - dyes, alcohol, top coats, etc, I'd get a small tote with a locking top that I'd fill as full as possible to keep things from tipping over, and maybe even stuff newspaper between the bottles to further prevent spilling. Throw in some swabs or brushes for applying them, plus containers for mixing, and a sponge or two for wetting the leather for tooling, and that should be pretty much it! Oh, wait - sandpaper for smoothing edges. Forgot about that! Might be a good idea to cut out some blanks for belts and holsters before leaving home?
-
So, could someone explain (or speculate!) on how the edge of the card pockets were done on those wallets? I'd really like to know!
-
Tandy Catalogue From Australia
Sheilajeanne replied to Handstitched's topic in Leatherwork Conversation
Yikes! Glad to be living in Canada, then. There aren't a lot of leather sources other than Tandy in my area, and at least they are close enough that I can see the leather in person before I decide to buy! The shipping cost of leather from the States makes buying across the border a bad deal for most items. -
Tandy Catalogue From Australia
Sheilajeanne replied to Handstitched's topic in Leatherwork Conversation
That's ridiculous! One Australian dollar equals .94 cents Canadian. Here is the price of the SAME ITEMS from my Tandy Canadian sale flyer for September! https://www.tandyleather.ca/en/eflyer/1809rt-ca?utm_source=Tand-E-mail+from+Tandy+Leather&utm_campaign=6d08150e03-2018-08-31-WebSpecials-CA&utm_medium=email&utm_term=0_e267c11fde-6d08150e03-76561025 They are charging approximately a 25% markup over Canadian prices. (I used the Cumberland sides to do the math on this.) -
Chip clips....lol! Just bought two of them plus two carpenter's clips at an estate sale on the weekend! Got all 4 for 50 cents! Yes, popsicle sticks come in very handy too!
-
alpha2, no this is not a matter of it soaking in unevenly. It's a matter of the leather being discoloured in spots. I DID let it dry for 24 hours before applying the antique, so there shouldn't have been an issue. Another question: the handles for this bag are stiff as a board, so stiff and sandpapery in texture that I am afraid the leather will crack. I applied Atom Wax Leather Balm, but that only improved them a bit. My go-to remedy for softening leather has always been neatsfoot oil, but would that possibly stain clothing? What about the risk of putting it over top of dye? Would the dye maybe dissolve and cause stains? I never saw this happen with horse tack, but don't know if that's comparable to what I'm trying to do here!
-
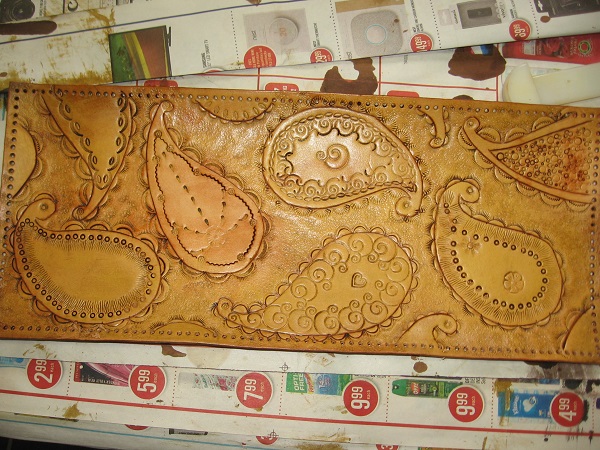
I was a biology major in uni, so I can't help but think of big, hairy amoebae or paramecium when I look at it! And of course, it begs to have your own little touches added to it...like the heart and the Celtic scrollwork in a shape that was otherwise open in the center. Leather carving is still my favourite thing, but this was a pretty easy piece to bang out with all the stamping. But oh, some of those bigger stamps need a LOT of force to get a good impression!
-
Having been very unsatisfied in the past with Eco-flo Satin and Super Sheen as resists, I finally decided to give Resolene a try. Works MUCH better as a resist! As a matter of fact, I had to work much harder to get it into all the nooks and crannies. Unfortunately, the finish didn't turn out that great. Parts of the piece are a different colour (reddish brown) than the rest of it, and they look streaky. Any way to fix this? And what would be the cause? Here's what I did: I mixed the Resolene 50/50 with water and applied with a wool dauber. I did see some areas where it looked like it had pooled, so I tried to brush those out. I noticed that it seemed the Resolene had already started to dry on some of those areas, so I am guessing that was what to blame for the uneven finish. Antique was Eco-flow tan. Wish it had turned out a bit better but will definitely try Resolene again! It's one of those things where you probably wouldn't notice it from a distance. Am very happy with how the other portions of the bag turned out. I used Fiebing's chocolate brown for the first time, and have NEVER before had a dye go on so smoothly and evenly! It only took one coat, followed by a few minor touch-ups on spots I'd missed! Made me wonder if Fiebing's had made any recent changes to their dyes, or whether it was just that this was much better than average leather for a Tandy kit! I have been wanting to do this particular bag (Molly tote bag) for several years, and was overjoyed to finally find one of them still in stock at the local Tandy's, as they have discontinued it. Will be using it as a template for future bags!
-
Padfolio #3
Sheilajeanne replied to Rossr's topic in Purses, Wallets, Belts and Miscellaneous Pocket Items
P.S. - Rossr, I have this nasty habit of editing my posts... More info above now! -
Padfolio #3
Sheilajeanne replied to Rossr's topic in Purses, Wallets, Belts and Miscellaneous Pocket Items
Nope. The other project this happened to was from a kit, so not the same hide, just the same casing method! I've had some iffy leather in their kits, believe me, but this piece wasn't one of them. The flesh side was nice and smooth, and so was the grain side. Also, when I buy a shoulder or side from them, it had better be good quality, or they are not going to get my money! I've been thinking of trying other sources for leather, but importing from the States is costly, and any other leather shops here in Canada are a couple of hours drive away. Tandy is just half an hour, and I like to actually see what I'm buying in person. -
Padfolio #3
Sheilajeanne replied to Rossr's topic in Purses, Wallets, Belts and Miscellaneous Pocket Items
Rossr, it was a veg-tan shoulder I bought from Tandy. No idea what tannery. It was pretty decent leather, and cut and tooled nicely. I just think the immersion method of casing drew some of the natural oils out of the hide, and made it hard as a board when it dried. -
I can't figure out if the edge of the card pockets has been left showing, or if it has been turned and glued? Gosh, oh to have that level of skill...
-
Padfolio #3
Sheilajeanne replied to Rossr's topic in Purses, Wallets, Belts and Miscellaneous Pocket Items
Of course, I don't NORMALLY use neatsfoot oil, but the leather was SO hard and dry by the time I finished my tooling, I was afraid it was going to crack. The same thing happened to another project I used this casing method on. That one is still sitting around, as I'm not sure what to do with it after the bad experience I had with the project mentioned above! -
Beautiful work! What type of leather is he using for the pockets and lining?