


fredk
-
Posts
5,974 -
Joined
Content Type
Profiles
Forums
Events
Blogs
Gallery
Store
Everything posted by fredk
-
Generally I find the spacing on the letter blocks are pretty much what the spacing should be, as in sign writing or printing. On either a few letters or a full name/word I write it out then mark where the centre looks best visually. eg name William. The visual centre is not the second L - the middle letter, but on the right edge of the first L, allowing for the width of the uppercase W and the width of the lower case a & m In your case it looks like you are aligning the edges of each stamp to your centre line (bottom set) but you tried to align the visual middle to your centre line (first set of large letters). That first set looks close. I would move the two stamps over to the right just a tad more. The visual centering of these two letters lies in the waste of the S stamp, almost but not quite in the centre of that waste As you have done, so I do, I test out on a bit of scrap leather how the stamping will look and I adjust till I get it the way I want it. After a bit of experience with certain letters I find I only need to do maybe one test stamping. With an awkward spacing such as yours I then use a marker pen to make an index line on one of the stamps - in this case it would be on the S stamp - to tell me where to centre it.
-
Where abouts are you located? Which 'Orange County'?
-

circular holes or holes cut out - is there a difference?
fredk replied to NeilMott's topic in Sewing Leather
I don't know what you are thinking of when you think of 'diamond' shaped holes. The diamond shape has been long proven to be about the best hole for straight stitching. The shape allows the thread to be sewn close but the holes are unlikely to tear out Here is a run of holes made with my pliers As you can see they are in a straight line, thus the sewing will be as well.
-
Sometimes you just gotta get it made for yer self. I get stamps made by a guy in China. I send him a jpeg image and about 12 days later I get my stamp. For a 1" square size it costs about £14 and I've seen Midas stamps selling for 3 x that price
-
I use that mix, and a mix of super glue & talc as a gap filler in my plastic models. But for casting I have numerous types of resin handy to me I'm thinking - stamp a regularly used word into polymer clay, turn that into a mould then cast a copy of the complete word eg. my son's car parts business is called 'willswheels', Too many letters to keep stamping on a number of things, not enough items to get a brass cut, but maybe a resin one.
-
I only did some 'worn' look by accident then had to cover it up. It was with my old favourite - cellulose thinners. I'd dyed a strap then put resolene on. But the top wasn't looking good so I wiped it down with a rag soaked in thinners. I was only wanting to remove the resolene but the thinners removed some of the dye colour as well. The strap looked like a cross between the two dark ones in your photos. Then I re-dyed it and finished it off
-
circular holes or holes cut out - is there a difference?
fredk replied to NeilMott's topic in Sewing Leather
Those pliers are the same ones I posted above. There are just two types of these available now; one with small diamond teeth for stitching and a larger set with wider teeth for lacing. There is no choice on the stitching type per teeth size and spacing, there is on the lacing type, one for 3mm and one for 4mm wide lace I've used mine for many years now. The latest jobs is through 3.6mm +2mm with the 3.6 skived and the combo is about 3.2mm, about 8 oz (1 oz = 0.4mm). The pliers had no problem going thru that. I saddle stitch with 1mm flat profile thread which fills the holes. Just now using my digital calipers the tooth size is 1.17mm along one long side of the diamond, or about 1.2mm overall. All chisels need sharpening at some point in their use. I've not sharpened mine for a while now and I've just done 6 runs each of 84cm (33 inches) = about 504cm, over 5 m and nary a problem Whatever you choose you need to match the thread to the hole. Ideally a thread 2/3 to 3/4 the size of the hole if saddle stitching, or about 3/4 if single stitching -
This sounds like separation of the top layer of the leather. It sometimes happens and nothing can be done to rectify it. Just use that leather for bag making where it will not be subject to bending If you have more of that leather, lay it out all flat and wet it, not soaking wet, just a wet cloth wiped over it to get some even wetness. Leave it for a while, say 1/2 hour, then get your eye down level with the surface. You may see ripples in the surface - thats where the top layer of the leather is separating from the main body
-
Can you get a finger nail under the surface of the leather at the crack?
-
circular holes or holes cut out - is there a difference?
fredk replied to NeilMott's topic in Sewing Leather
Small rubber head mallet, might be available in a $ store or similar. Mine was bought in a £ shop Once upon a time, in a galaxy far away Tandy used to sell them. You might find them as NOS in a Tandy re-seller or - I got mine off ebay direct from China. Available in 4 tooth and 2 tooth example of 4 tooth on ebay - https://www.ebay.co.uk/itm/1X-Leather-Stitching-Hole-Punch-Plier-Clamp-Cutter-Hoggard-Diamond-Cut-Punc-2R4/303149521011?epid=18030599939&hash=item46951e9873:g:82UAAOSwBCdc1KRI -
circular holes or holes cut out - is there a difference?
fredk replied to NeilMott's topic in Sewing Leather
After sewing the usual practice is to use a small mallet to tap down the stitching. If you use the second type there is leather to close up the hole as you tap it down. With the first type there is no leather left to close up the hole. Have you tried stitching punches with flat angled teeth, as on these pliers type?
-
Scissors Holster - What weight/type leather?
fredk replied to Wellington's topic in How Do I Do That?
That I cannot answer, There are many opinions on that. Mostly to do with where you are and your environment. Here where I am its always wet. I've left knives in leather sheaths for years and they've not rusted, but the sheaths have always been in fairly dry places. Even swords kept in scabbards which have got periodically wet and dried have not rusted. If your leather is good quality and finished off with protective coatings everything may be fine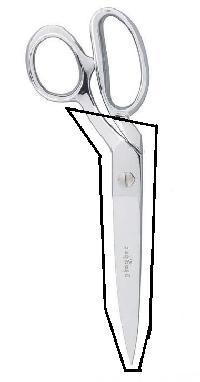
-
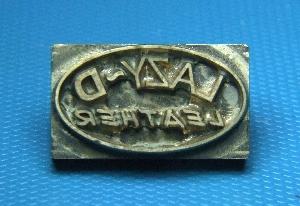
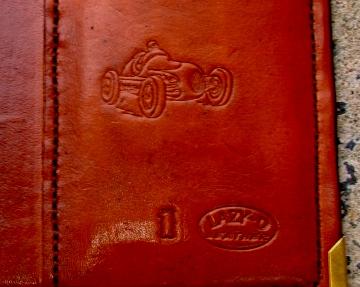
I do believe this subject has been covered many times before However: I use 'Lazy-D' as my make My stamp - In use I had it cut in brass. Its 3 cm across x 1.7 cm high. Its plenty big for most items and small enough for narrow straps and belts

-
Scissors Holster - What weight/type leather?
fredk replied to Wellington's topic in How Do I Do That?
Are you wanting a flap over the finger loops? Then look to the pattern of a US Civil War style pistol holster for a flap at an angle and adapt let me think upon it
-
I bet its good, shame I can't get it
-
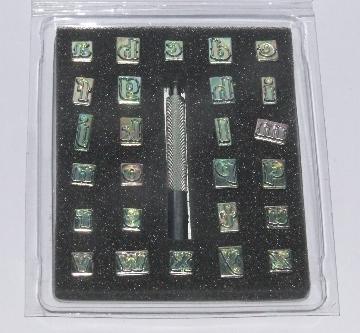
So there you are, you have to stamp a name on an item, you dig out your letter stamps You have one set of lower case alphabet. But lots of names have multiples of certain letters. eg, William, Stevie You are supposed to use another letter as a spacer or if you have them, and you don't, use a letter from your second set I have only the one set of lower case letters. What to do? I took some polymer clay, some childrens' type because when it sets its like rubber. I use this type when I need moulds. I pressed the letters I required duplicates of into a blob of the clay then cooked it. When I took it out of the oven I removed the metal letter stamps and I had moulds of the letters I need spacers of. I used polyester resin to cast some copies. I added silver colouring to the resin just so I can see the letters better. Polyester resin is the resin used in glass fibre body work. Its cheap. These casts came out imperfect but I'm only looking at copies for spacing purposes In use, like this and the finished name Another aid I made recently helps to keep the letters aligned. Please note: I do not have access to drill stands, power drills etc, everything has to be done by hand and I buy in certain pre-cut parts I made this jig for doing letters. I got some 3mm clear acrylic cut to my measurements then assembled it. A base of 10mm thick HDPE and the acrylic parts pinned to it. Overall its 20cm x 10cm from the end The first layer of acrylic is pinned but not attached permanently, then a wide piece of acrylic with a piece pinned and glued to it to make a double thickness. This wide piece is also removable. It can slide up the posts. The gap underneath it is thus 3mm, thick enough for most leather I use, but it can be raised for thicker leather. The distance from the inner edge to the outer edge is about 2.5cm. The letter stamps butt up against the double thickness acrylic. With this I can stamp at a constant 2.5 cm from the edge. But I can do other distances from the edge. I got a piece cut and made it up so I can stamp at 2 cm from the edge, and I got two spacers cut, which when put under the main piece I can stamp from 0.5 cm from the edge and if I add one to the top I can go to 3.5cm from the edge. I may get some more acrylic cut to take me up to about 5cm from the edge. In use This lot cost me under £10 to make PS. I use a Tandy Pro Hand Press for doing my letter stamping


-
Scissors Holster - What weight/type leather?
fredk replied to Wellington's topic in How Do I Do That?
I would make it something like the shape I've drawn over your image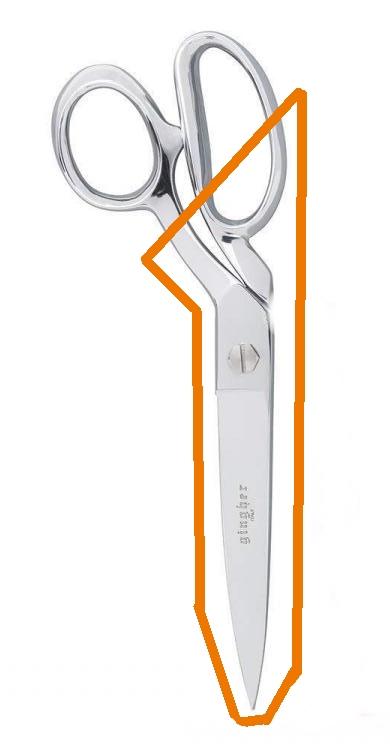
-
Scissors Holster - What weight/type leather?
fredk replied to Wellington's topic in How Do I Do That?
A few simple questions with multiple answers. 1. what type of holster do you want? a hard stiff one or a floppy one? For a hard one use no less than 2mm (5 oz ?) veg tan. You can wet it and mould it around the scissor blades and finger grips. Make it as if it was a knife sheath. For a floppy one use chrome tan upholstery leather, 1.5mm would do. 2. I don't machine sew, just hand sew. In both cases I'd glue the leather close to the shape of the blades and sew following their outline PS. others will tell you not to use chrome tan with metal items, but I have done for 20 years and never had any problems -
I cannot say about oxalic acid as I do not use it. It is not available, in any form, in my country But I can say cellulose thinners will remove any lacquer finish and can also remove some dyes. In my case above I used it on raw leather, but I also use it on dyed leather to remove the lacquer and some of the dye so I can re-dye it.
-
Thanks Tom
-
Wheres about are ye located?
-
no one is rushing to your aid If its of any help to you - just the other day I had what looked like an oil spot on the grain side. It was about the size of a quarter dollar coin / £2 coin. I used my old favourite, cellulose thinners, to clean the leather. I used a clean rag wetted with the thinners, applied plenty to the leather, not just on the spot but on the whole area around it. I rubbed the thinners into the spot and just lightly in the surrounding area. Then I let it dry. No sign of the spot and the piece took dye ok.
-
Acrylics over oil
fredk replied to robs456's topic in Dyes, Antiques, Stains, Glues, Waxes, Finishes and Conditioners.
????? -
Acrylics over oil
fredk replied to robs456's topic in Dyes, Antiques, Stains, Glues, Waxes, Finishes and Conditioners.
not forgetting that Neats Foot Oil is not actually an oil. Its a water soluble liquid fat -
The 1/4" refers to the width of the blade. All swivel knife blades have a standard sized shank above the cutting blade which fits up into the swivel knife body see here: https://www.tandyleather.eu/en/product/craftool-steel-swivel-knife-blades
