


fredk
-
Posts
5,974 -
Joined
Content Type
Profiles
Forums
Events
Blogs
Gallery
Store
Everything posted by fredk
-
I did not make an exception as I don't know how to. I cleared my cache and cookies and I got straight in without that blocking message that I got at first a few days ago. edited to add. My laptop has been shut down and restarted several times over the last lot of days, and the browser shut down even more times, and every time I restart and relaunch the browser I get straight in to this forum
-
I have straight-in access. No problems. The site is marked as 'Not Secure' in the address bar though Might I suggest that you all clear your cache then try access again
-
I know nowt about programming but I do remember when the local community newspaper I worked for got its first computer. It had a 6 inch screen. Everything we typed in was white on a black screen. Then we had to type in a load of commands to make it print out. One mistake and you had to type all those commands in again. Stupid thing was the bosses said everything had to be typed in and printed out, proof read, then sent to the printers who typed it into their printing computer. Up to then we just wrote it all on paper and sent it over. A lot of kerfuffle wasting time so it was.
-
No, no, no, no, no, no, no, no, no, no, no, Yes I prefer a double cheese
-
yeah but, no but, yeah but, no but, . . . . . . . if your computer mouse was a real mouse every time you scroll you'd be stroking its butt!
-
If the ram extends above the head you could try putting the magnets on the top end of it. You'll need more magnets for the magnetism to be effective. I did that on something (a mini-drill stand) as a temporary measure and it worked out ok.
-
me too. my browser was telling me that the site was under attack from hacking. I PM'd Joanna about it but I've not heard back yet
-
yes, versions are commonly available. some with two cutting blades. its a hole or disc cutter, for metal or wood. eg; https://www.ebay.co.uk/itm/ADJUSTABLE-CIRCLE-HOLE-CUTTING-DRILL-SAW-CHROME-/183252805928?hash=item2aaab7e928
-
When I require 'sheep skin fleece' I use the artificial species. I get it by the 1/4, 1/2 or full 1 yard from a fabric outlet. Costs about £4 for a 1/2 yard which yields lots and lots of pads
-

Tooled Iphone cover
fredk replied to YinTx's topic in Purses, Wallets, Belts and Miscellaneous Pocket Items
Questions: I presume the leather is quite thin, approx what thickness? and how did you prevent it from going out of shape whilst tooling it? -
The situation is echoed here. There is Ireland, Ireland, Northern Ireland, Ulster, Eire, Hibernia, Erin, United Kingdom and Great Britain I'll not hijack this thread with details, unless I'm asked to
-
Simplest way; get a ruler in your preferred measure, eg mm or inch. Start on the '0' line and wrap thread around the ruler, each turn tight up against the last. Keep going for a few inches or centimetres. Count how many threads there are an divide into the measure eg, if you have 80 turns over 2cm /20mm = each thread is 0.25mm
-
The Tandy press will do them with a set of dies; https://www.tandyleather.eu/en/product/press-dies-for-hand-press
-
Tooled Iphone cover
fredk replied to YinTx's topic in Purses, Wallets, Belts and Miscellaneous Pocket Items
That shore is purty -
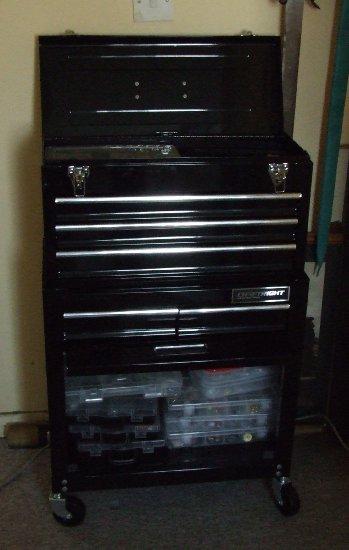
The top part of the unit is separate. It can be bought in 2, 3, 4 5 & 6 drawer sizes. The 6 is 4 uneven shallow drawers and two large ones, each half the width of the whol and each about 2.5 inches deep. With a top handle they can be carried around, but once loaded with tools they start to get heavy. Have you looked at kitchen trollies? I have 4 on which I store on-going projects and the necessaries. https://www.argos.co.uk/product/8400444
-
I don't know of any reason it would not do
-
Another very nice piece of work from you. Very nicey indeedy
-
A garage mechanics type tool box unit like this ; Although I have plenty of storage space I have two of these units. One has all my 3D and letter stamps in the drawers and boxes of conchos & bag fittings in the lower cupboard. In the other I keep my sewing and riveting hardware
-
Thats a decent set and price Tugadude has linked to. I have a pair with 4 teeth (as pictured) and a set with 2 teeth. I got mine off ebay at under £10 a tool but I think they're up to about £15 a tool Before Christmas I made some note book/diary covers, it took under 5 minutes to go round the edge of each to make the sewing holes. Occasionally I still need an awl, to open up some of the holes. They only come in one size, stitches-per-inch and you can't go more than about 3/4 inch in from the edge. But they are a handy compromise
-
There is punching and there is punching. I 'punch' holes for stitching, but these are holes which do not remove material. For these holes I usually use this, pliers with teeth; I can work around a project and punch the stitching holes in just a few minutes Punching which removes leather, eg 1 - 1.5mm holes I keep for using with round lace that size

-
I'm no expert on this matter. However what I've learnt is that the older tools were quality steel, both handle and head. Then they went to steel handles and a zinc alloy cast head, with good chrome plating over all. Then they went to zinc alloy handles and zinc alloy cast heads, again with good quality chrome plating. The latest tools are a lower quality zinc alloy handle, zinc alloy cast head and a lower quality chrome plating. Also, with the earlier tools the pattern in the head is much more sharply defined. The later chroming softens the definition as does worn out moulds making them. eg, a patterned backgrounder, A104, has a fine pattern on it. On the latest tools the worn moulding and chrome makes this almost smooth, smooth enough that the pattern hardly shows in the leather. I have an old A104, bought 20 years ago, and it was old 2nd-hand then and the pattern is more distinct Take a magnet to the tools and see which parts are steel
-
Like this one? https://www.tandyleather.eu/en/product/makers-corner-radius-card or this? https://www.ebay.co.uk/itm/Diy-handmade-leather-tool-R-ruler-round-corners-full-size-acrylic-template-NSNJ/114012751993?hash=item1a8bb08879:g:jKUAAOSwnWpb~lAh
-
My latest check it out and be honest
fredk replied to Somiskid's topic in Floral and Sheridan Carving
a. Old fashioned wax based shoe polish in the flat tin. Not the liquid type in a bottle with a sponge applicator. b. put on a rubber glove c. small bit of cloth wrapped around a rubber-gloved forefinger d. get some shoe polish on the cloth, a fair bit, don't skimp. e. apply direct to the letter lines f. Immediately buff off any shoe polish from the raised part of the letter g. set aside and allow to dry, maybe an hour or so. Not letters, but a stamping in a small valet tray done as above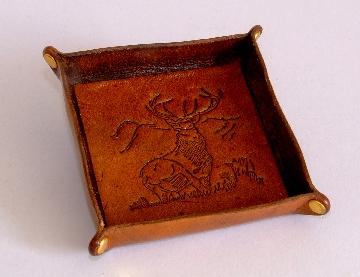
-
My latest check it out and be honest
fredk replied to Somiskid's topic in Floral and Sheridan Carving
tbh, I think letters don't need beveled around. A bit of black shoe polish rubbed into the letter lines helps to make them stand out from a brown surface -
I believe this is an annual event and afaik Le Prevo attends it