-
Posts
5,974 -
Joined
Content Type
Profiles
Forums
Events
Blogs
Gallery
Store
Everything posted by fredk
-
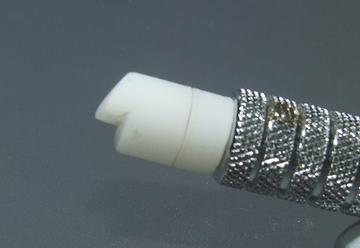
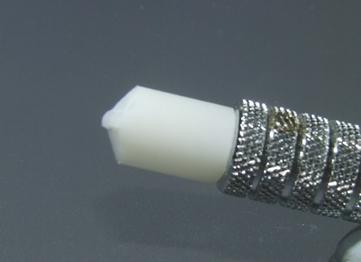
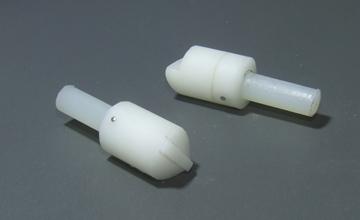
I got my materials mixed up. The nylon goes into the knife and into a hole in the delrin. The delrin is carved to the profile. tbh I've only used these a couple of times as I don't do hardly any tooling or swivel knife work 1. this has one straight cliff edge and a slope to bevel 2. this has a centre bar, about 1 mm high by 1.5 mm wide and a slope on each side to bevel both sides of a line B. The two together so you can see how I made them. Others could make them far better using a lathe and power tools but I don't have those things so I need to do it by hand With these materials I can make any profile which suits me
-
I asked Joanna about this a couple of years ago. Its been going on for years now Its a computer thing. As the computer server regularly updates it 'renews' these peoples profiles. PS. don't trust that 'last visited' date. Mine says I've not been on here since January 8th !
-

Is conditioning necessary
fredk replied to DaveP's topic in Dyes, Antiques, Stains, Glues, Waxes, Finishes and Conditioners.
Normally, just an application of a shop bought leather conditioner. On the rare occasion the customer has asked me for some of what I use; ie the beeswax/nfo mix. Applied as and when needed, or before, not years later. eg, a shoulder bag used regularly, in dry or wet conditions, should be seen to at least once a month, a saddle, about once a week If the item gets used in a dirty environment a wash down with soapy water and a rag then an application of a conditioner would be sufficient, if done on a regular basis, before it gets too dirty and/or dried out. As I said earlier I've had no problem with an item sealed with resolene accepting and benefiting from my beeswax/nfo mix. at any time, even years after -
It depends on how far the distortion has gone that you can correct it - mostly. How sound is your ply? here any ply less than 1" thick is unstable and will twist and warp. Can you glue two layers of ply together, following ply rules? Reason for using dbl side tape is a, the lower tack and b. easier to separate c. wet leather will stick to tape better than glue What I would do is; 1. mark area about 23 x 23 inches on board, draw the lines for the square 2. apply dbl sided tape to board 3. wet leather, not dripping wet but wetter than for tooling 4. apply leather to the wood, inside the marked square using the marked lines as guide for the sides of the leather 5. work around the leather, laying it straight and pushing it down. 6. use a brayer or rolling pin to press the edges only flat, trying not to push the leather out of a straight edge. Don't press it down from the centre to the edges - this will exacerbate the problem 7. when it seems satisfactory, cover with sheets of clean white paper, then put another board on top, then put lots of weight, eg books, anvils on the board, concentrating on where the edges of the leather are. 8. leave for a couple hours, check lay of leather, press down any areas still not laying flat 9. = 7 10 = 8 11. leave to dry 12. continue working on piece as it is, stuck to the board with some perseverance it might flatten out alright, you may be left with some wrinkles alternative; scrap this piece and start afresh on a piece taped or glued to MDF (or ply) Just my thoughts, and some little experience of flattening reticent leather
-
a. 22 x 22 what? b. do you intend to just have the chess board leather so you can roll it up? c. 2 to 2.4mm is on the thin size for that. 3.5mm plus would have been better d. use double sided tape to mount the leather to a piece of MDF no less than 6mm thick preferably 12mm thick
-
For you, I can do a deal. . . .free.
-
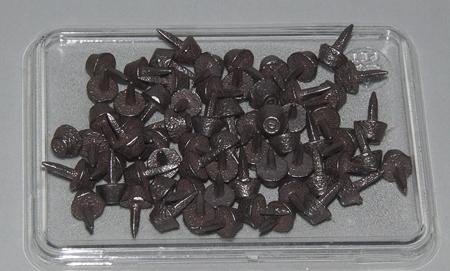
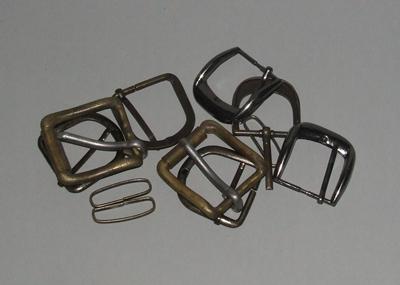
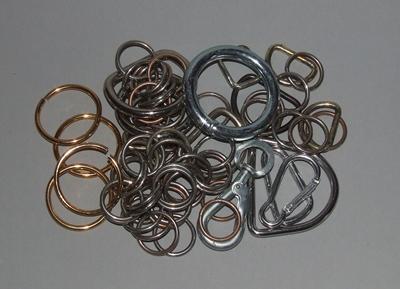
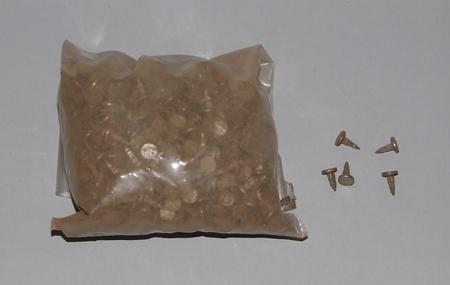
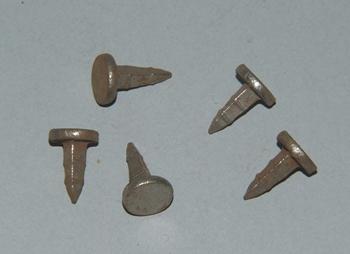
There doesn't seem to be a 'Free' site on here so here it will have to be. Sorting out my odd boxes of oddments. All the following are FREE, but to UK people only cos of postage rates. Free, as in I will pay the postage to you except a contribution would be welcome towards postage, if you desire, especially on item number 4 What you see in the photos is what you'll get. 1st up. A bag of Hobnails, totally new, unused, bought from Le Prevo years ago. I needed only about 10!. (F/p) 2. some mixed lightweight buckles (f/p) (if I come across any other odd buckles I'll add them to this pile) 3. some odd O and D rings, the 'gold' coloured ones on the left are aluminium I think, but not brass, (f/p) 4. 975g of an odd looking nail. Thats almost 1kg or 2 lb in proper money. The nails have a square shank and are about 1/2 inch long. Postage will be about £3 so a contribution towards that would be welcome This is Round 1. I have some other fittings which I need to check and count before I put them up. If there are no takers for any of this it will be heading to the odd scrap metal bin at my No.1's garage If interested in anything just PM me an address to post it to and I'll get it away asap. Remember; 1. Free 2. UK only!
-
Inspired by another thread about Tandy stores I thought I'd write up my recent experience of ordering direct on-line. A few months ago, middle of February actually, I ordered some things from a London based Tandy reseller. Their delivery time was to be by end of March. After waiting until then and more, no delivery so when I emailed them I got an auto response that they were closed from 7th March until 31st December 2020! So, I built up an order on-line with Tandy. First thing was I had a $50 voucher but the new website wouldn't recognise it. I emailed Tandy HQ late Sunday night my time. Within a few hours a chap called Cameron Goodpaster came back to me, he had sorted it out for me. I finalised and placed my order on the evening of 21st April Mr Goodpaster emailed me to tell me that due to a large amount of orders mine might be delayed by a few days. No problem for me. I received an email from Tandy late afternoon on the 22nd that my order was on its way, via DHL DHL informed me that my parcel would be delivered on 27th. It arrived mid afternoon on the 24th. The bad bit then the good bit; I had ordered some fancy conchos. The order was shy by two of them. I immediately emailed Tandy. I got no response to that email but just a few days later I got an email from DHL that my parcel would arrive on 4th May. I was confused, I already had my parcel from Tandy. But on 4th May DHL delivered a large envelope containing the two missing conchos. The Tandy order went through UK customs but no charges were made on it as afaik Tandy pays the needful at their end. This was my second order done out of Tandy, Texas. Last year was the first for both of us and it did not go totally smoothly, this year it was totally fine. I don't consider a couple of conchos left out of a big order any big deal. I was prepared to 'write' them off, not worth blowing a haystack over them. I hope Tandy can keep going. They have certain items I use repeatedly and I would like to continue getting them.
-
Cost of materials x 3 plus time at $20 per hour minimum, add in another $10 minimum for 'tool use'
-

Is conditioning necessary
fredk replied to DaveP's topic in Dyes, Antiques, Stains, Glues, Waxes, Finishes and Conditioners.
I have no ratios. I melt beeswax, put in some carnauba wax and add nfo until I get a creamy mixture. I have 2 grades; soft and hard. Hard is used as a final finish. Its put on with a cloth, rubbed in, left for a while then buffed off. The Soft is used when I think the leather needs more nfo feeding and also along stitching as its easier to rub into the stitch holes and thread. I made several pounds of each mix years ago and even when I'm generous in application I don't use much of it -
Now that you brought this up again; earlier this evening I ordered from my chap in Hong Kong a stamp for a border type pattern. Its costing me £16. We'll now see how long it takes to get to me, PS. I have to buy by import. There is no-one on the island of Ireland either willing or capable of making a brass stamp, at any cost
-
Just thought some of youse would like to know a guy in Bulgaria who makes brass stamps for leatherwork has one of Pres. Trump https://www.ebay.co.uk/itm/Leather-stamp-tool-crafting-crafts-brass-stamps-President-Trump-310/264524877842?hash=item3d96e95012:g:0jkAAOSwzp1dxALF Wot you think? a decent likeness or not? No rude or snide remarks from me. Just informing you its available
-

Is conditioning necessary
fredk replied to DaveP's topic in Dyes, Antiques, Stains, Glues, Waxes, Finishes and Conditioners.
On here many of us recommend PURE neatsfoot oil, not compound as that has petroleum distillates in it which may be detrimental to the leather -

Is conditioning necessary
fredk replied to DaveP's topic in Dyes, Antiques, Stains, Glues, Waxes, Finishes and Conditioners.
I highly recommend a 'conditioner'. All that work has drawn out the natural oils from the leather, They need replaced to keep the leather in continued good condition I use a mix of bees wax and neatsfoot oil. I rub it on with a cloth. Let it sit awhile, then buff it off. I do it as a final finish, after resolene or other sealing, it gets into the leather ok. -
Dead simple; I bought two bars of certain plastics. 1 is delrin and 1 is nylon. The delrin is the diameter to go into the knife. The nylon is smaller in diameter. It slips into a hole drilled in the delrin part. I used a modelling knife to pare away one end of the nylon bar to get the bevel shape I wanted. It can all be done on one bar but I had to be awkward. The cost of the two bars was about $3 and there's plenty to do other profiles I first saw this thing on here but found a. they were/are very costly and b (were) very hard to get. So I made one. If I find it amongst the mess on my desk I'll photo it and put it up.
-
you can get a plastic beveler tool which fits into the swivel knife instead of a blade. That might help PS. I made my own versions
-

What to do with scrap leather
fredk replied to pharescustomleatherworks's topic in Leatherwork Conversation
Another idea; cut the leather into the shape of a letter, eg, A, B, F, L etc. punch a hole in the top, tie a bit of leather lace - cut from another bit of your scrap, and sell for a $$ or two for phone or bag hangers -

What to do with scrap leather
fredk replied to pharescustomleatherworks's topic in Leatherwork Conversation
There are some simple patterns for ear-phone cable holders. Maybe you could make some of those? eg. this seller is selling an acrylic template for something anyone of use can do very easily; https://www.ebay.co.uk/itm/Acrylic-Sewing-Pattern-Cable-Wire-wrap-Board-PVC-Template-Stencil-Leather-Craft/254261771154?hash=item3b332ebb92:g:RAEAAOSwRjldAPx~ or https://www.ebay.co.uk/itm/Acrylic-Template-Cable-Winder-Pattern-Mould-DIY-Leather-Tool-Sewing-Crafts/183965261065?hash=item2ad52f1d09:g:8WkAAOSwe2Zdhoj3 or https://www.ebay.co.uk/itm/Handmade-Acrylic-Leather-Data-Line-Holder-Pattern-Stencil-Template-for-Adult/163350290101?hash=item26086f9eb5:g:qoUAAOSworNb6-nM all it takes is some imagination -

What to do with scrap leather
fredk replied to pharescustomleatherworks's topic in Leatherwork Conversation
All good ideas. Patchwork bags and stuff. My no.3 son took a load of scrap, trimmed the pieces neatly, glued them to some denim and made his then girlfriend a patchwork shoulder bag. He used up some real small pieces so he did In my place, as I make board games including the gaming pieces, as long as I can get a 5mm disc out of the piece its never totally waste. The discs are the bases on the gaming pieces. Bigger discs are the feet on boards. -
I get stamps made by chaps in Hong Kong The stamps I get made meet all your requirements Stamps are 1. flat backed 2. have a threaded hole on the back so I can screw in a handle 3. made of brass. via that threaded hole a bar can be screw in to the stamp and it can be mounted in a pyrogravure 4. made of brass 5. machine cut in brass, to a depth of about 3mm 6. Its my design they cut 7. usual average is 10 to 13 days from placing order to it dropping thru my letterbox. Its taking a bit longer now tho 8. (x2) prices start at £15 including postage, thats for a 20 x 20 mm stamp, increases by about £3 or £4 per 10 mm linear, eg a 60 x 60 mm stamp is £25. They can cut fine detail. I got >> Made in UK << cut 30mm x 4mm high. Your 1" x 0.5" comes under the 'up to 30mm' size = £14.99, and your 0.5" = £14.99 as well The place I'm currently using ~ https://www.ebay.co.uk/itm/Custom-Made-Design-Your-Logo-Leather-Seal-Wood-Stamp-Branding-Iron-Carving-Mold/324106724328?var=513156564074
-

Leather envelop for mailing a letter back and forth
fredk replied to wheeldawg's topic in How Do I Do That?
Thats what I had in mind too. When I worked in the Royal Mail we used to get pouches coming through which were made of stout PVC with a zip along one edge - just like the above - at one end there was a sewn in metal loop and a metal wire was looped from the zip pull to it and a lead seal crimped on. We had money transfer bags which were similar construction but very much bigger and for personal courier delivery only. edit to add; I forgot to say that the address label was enclosed by a frame, sewn onto one front side, like you find on luggage tags, but was only accessible from the inside of the pouch -
ah, do not be fooled. I only quote from experience, not science. I bought magnets rated as N36. They just about hold together thru 1 thickness of 0.8mm pigskin. I have also bought magnets rated at N52 and they hold thru 1.1mm upholstery leather.
-
As barrels were once the only means of packing they were easily dismantled. Knock off the rings and the staves fall apart. Good repackers wrapped a bit of cord round the staves to keep all from one barrel together, then they were packed into another empty barrel. You can get a lot of dismantled barrels into an empty one. Often train and wagon companies charged less for the empties. The rings were threaded on a length of rope. Then the barrels returned to the company of origin who passed them on to their cooper who re-assembled them. Everyone in trade paid a deposit on their barrels. Non-return and the cost came out of your deposits.
-
Actually barrels were not disposable. There was a large return fee on them. No return and the customer was charged far more than what the barrel was worth. But I can see how damaged or end-of-life barrels would have contributed staves to make other items. PS. Up to the 1970s, a place in Belfast re-used end-of-life barrels to make items such as chairs.
-
Agree with all the above. But now that you have it made; hammer down those stitches, then add lots of bees wax on the insides ones. I mean, a lot of beeswax. Then really rub that wax into the thread and leather. Use a bone folder, tip of an antler or bit of rib bone to get in there. You want to end up with an almost smooth surface, that its hard for your finger to feel the bumps made by the thread.


