


fredk
-
Posts
5,974 -
Joined
Content Type
Profiles
Forums
Events
Blogs
Gallery
Store
Everything posted by fredk
-
I use my beeswax/carnuaba wax/nfo mix. I use my harder version. I apply it with a cloth and rub it in. Takes some work but I can get a nice smooth and shiney surface, almost as good as the grain side. I do it on all belts and straps I make.
-
Spotted this on ebay UK 6 sqft of white leather, about 0.55 mm* thick for £10 per (* about 1.4 oz?) https://www.ebay.co.uk/itm/Pittards-High-Quality-Glove-Making-Leather-55mm/324201584439?ssPageName=STRK%3AMEBIDX%3AIT&_trksid=p2057872.m2749.l2649 Pick-up only from Woking area but I'm in discussion with the seller to post some to me in N.I. Ideal for lining those projects methinks
-
I might try it soon-ish as I have a couple of items I need to do and this might work on them Can you send me a scan of It?
-

3rd son, 3rd laptop bag
fredk replied to BDub77's topic in Purses, Wallets, Belts and Miscellaneous Pocket Items
That looks like a most excellent strong bag. It should last a wee while An excellent idea. I'm supposed to be making a bag, in this sort of style, for my dottir for her going to Uni. I think I'll use your idea for the strap. -
Apply Ockam's razor to your problem
-
Where are good places for beginners to buy leather online?
fredk replied to TestTube's topic in Getting Started
btw, Le Prevo has been open again the last few weeks and are looking your orders -
When I made wood toys we often had to make dowels rounded over at the ends. We started them by using a pencil sharpener. The one we had was an old office one, with a crank handle. After this we held the end of the dowel on a belt sander clamped up-side down on the work bench and rotated the dowel. We would do a few hundred at a time in stages. One day I'd put the dowels thru the pencil sharpener, afair I got it down to 1 every 10 seconds. The next day I'd do the rounding on the belt sander, again afair 1 every 20 seconds. Thus a few hundred were done in a couple of days, enough for a few weeks output. I usually had to do the rounding as the other 2 workers were too impatient to stand/sit and do them. Sometimes if I felt the urge I'd do a small stock, well in advance of requirements, just a couple of hours and I could do several dozen dowels. We were using dowels in 3mm to 6mm, 9mm, 12mm, 19mm and 24mm diameters, all but the 19 and 24 could go in the pencil sharpener.
-
you could start off the rounding using an electric/battery powered pencil sharpener https://www.ebay.co.uk/itm/Multi-functional-Automatic-Electric-Pencil-Sharpener-Battery-Operated-Home-Study/363032086113?hash=item5486660661:g:fekAAOSwNpZe9gUZ
-
There is a tool for drills. Its called a 'Plug Cutter' Its man use is for cutting a barrel shaped piece out of wood. The barrel shaped plug is later refitted into its hole to cover a screw or nail head, or to replace a damaged section. Usually the plug is straight sided and flat topped, but you can get cutters that make a rounded end. But whether you can a. find one of these types, b get one in the size you need is another set of questions
-
is not all vegtan 4-5 oz tooling leather from tandy the same?
fredk replied to codejoy's topic in Leatherwork Conversation
I'll add, sometimes, sometimes, a leather supplier will let you have a 1/2 postcard sized sample of the leather you're after. I did sometimes ask Le Prevo for a sample, but its not something I ask for very often After using them for 20 years I trust them to send me what I require -
is not all vegtan 4-5 oz tooling leather from tandy the same?
fredk replied to codejoy's topic in Leatherwork Conversation
If you use variable quality leather you won't know when its you or the leather at fault. With good leather and good tools then you know its you when it goes awry, but also you'll know you can repeat what you did right Adapt your needs to what they can supply. They are a vital source of help and information and by buying some from them you'll work up a very useful contact -
is not all vegtan 4-5 oz tooling leather from tandy the same?
fredk replied to codejoy's topic in Leatherwork Conversation
a. Tandy leather is quite notorious for not being of high quality nor being consistent. One time when I visited a Tandy and was tempted to buy some leather, checking thru the stock on the shelf I found leather soft & supple as well as hard as plywood with various grades in between. I did not buy any leather from them b. if you can, use another supplier. Others on here will recommend ones local to you. Get to know them, let them know you and you'll get what you need. -
another boring cell phone case
fredk replied to Frodo's topic in Purses, Wallets, Belts and Miscellaneous Pocket Items
OK. Usually the hole for the SB stud is O-- shaped, with the O the size of the column under the ball head. Have you done it this way? -
I just check my suppliers prices. 5 off 4 inch zips, brown in colour, £3. Thats £12 for 20, or 60p each Cost of zip length, stops, etc and the time to cut and assemble 20 doesn't compare at all well at that price.
-
Where you are located would help us inform you where to buy. My supplier measures zips by the actual zip, therefore a 4 inch will be 4 inch zip plus about 1/2 inch extra material on each end. I believe most haberdashers measure zips the same way
-
Integrity of an old tree
fredk replied to Alexis1234's topic in Saddle Identification, Restoration & Repair
One thing to check for is wood-worm. I was once given an old saddle. Someone thought I'd be interested in restoring it. But it was absolutely full of wood worm holes right through the leather. Just some shoving and pulling proved that the wood tree was only being held together by the remains of the leather. I did strip part of it back and the tree just crumbled away. I dumped it all. With mild word worm wood can be infused with polyester resin to fill the holes, pores and strengthen it. -
For one thing; I'd turn the shears over so the handles/grips sit on the back piece, then the blades will not sit too far out.
-
I'm interested on how you've got on as well
-
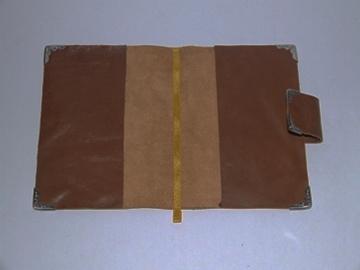
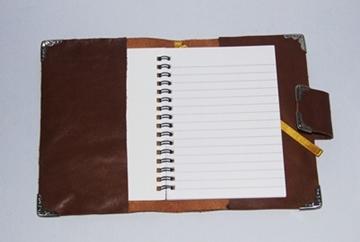
This may help with ideas. I make a cheap version of notebook cover using chrome tan upholstery grade leather. I got a great lot of this leather from my usual supplier. It was off-cuts from them recovering leather furniture. It cost me then about £1 per kilo, works out at about £0.50 sqft. I just glue the leather together, and use ready-rivets where needed. Cheap corner protectors added. I supply a note book in it. The books can be bought here in the local £1-shop, (dollar shop to you) so replacements are easy to get. This cover costs about £2.75 ($3.50 ?) to make in materials which includes £0.50 for the notebook The chrome tan leather can't be tooled but I've made these with an applique veg tan panel sewn on which had a person's name stamped on it. That added all of, maybe, another £0.10 as I just used a bit of scrap leather trimmed to size, stamped and dyed. In a way that is quite handy as I have a number of these ready-made in a box and just need to add the applique panel for personalisation The pattern for this is real simple. One large rectangle about 25 x 17 cm, and two rectangles of 9 x 17 cm for the insides. Two pieces about 3 cm x 14 cm glued flesh to flesh for the closing strap. On the reverse this strap goes thru a slot into the main piece. It has two rivets to hold it there. By going into the cover the strap looks neater and its ends do not catch on anything and they do not really interfere with the book slipping in hth

-
1. wet your leather first. wet enough as if for tooling, but not as wet as for moulding
-
Your location is important to us. But Birmingham where? There are several around the world. However, I see from another posting you made you may be in Birmingham, UK My first stop is Le Prevo, Newcastle, http://www.leprevo.co.uk/hides.htm others would go to Abbey https://www.abbeyengland.com/leather-and-materials.html
-
buckle & strap placement body or lid/flap?
fredk replied to ASAuLTCases's topic in How Do I Do That?
It depends on their use. What they are required to do. On a tool roll where you just want the whole roll not to un-roll, just about any leather will do for the strap.. Generally, on a ladies handbag, lightweight leather can be used as well, but on a dispatch rider's bag where the bag may be bulging over-filled you want a stout leather that will not stretch. an off course example; the bonnet and boot lid on my 1930 Austin 7 are held closed by leather straps. The belts need to be pulled really tight to hold the panels secure. Sometime prior to me getting the Austin someone had replaced the belts. They used too thin and too stretchy a leather, you could see the wear in each successive hole where the belts had been pulled tighter and the next hole had to be used as the leather stretched. I replaced all the belts with 3.5mm thick from a back-bone area. Very minimal stretch after 15 years of use. -
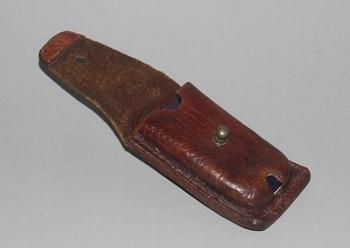
As we are sharing photos of our phone holsters, here's mine. About 18 - 20 months in daily use. The area around the hole for the stud has softened over time. It could do with improving

-
buckle & strap placement body or lid/flap?
fredk replied to ASAuLTCases's topic in How Do I Do That?
6 of one 1/2 dozen of the other. As for 'rules'; what ever suits you or the construction. On shoulder/handbags bags its better to have the buckle attached to the bottom then you're not fighting gravity to get the strap up through a buckle, but gravity helps to get the strap down thru the buckle. I always prefer the buckle strap to be short, on the 'bottom' end of anything. -
Some snaps are incredibly difficult to open. If I have any of these I run a file around the ridge above the groove which the spring grips. I take just a smidgen off it. This loosens the grip just a tad. The snap still hold tight but it just doesn't need that screwdriver to open it. Another thing I've had to do is put a piece of thin brass between two layers of leather. A hole in the brass for the snap's shaft to go thru and the brass extending to where a person grips to pull the snap open. This was on a repair - improvement where the leather had stretched and pulled out over the head of the snap