


fredk
-
Posts
5,974 -
Joined
Content Type
Profiles
Forums
Events
Blogs
Gallery
Store
Everything posted by fredk
-
I do not know the Tandy Carnauba cream. I have some made by Le Prevo. I do not know what else is in it The cream might work alright. I started making my mix before I ever bought the carnauba cream. Without knowing what else is in it I would not use it. oh, more that that, start with about 1/2 to 2/3 the amount of wax, by volume edit. you can probably get yellow bees wax in a local hardware store. If you can find some local bee keepers, and I know there are a great many in Croatia, ask them for the white 'cappings' wax. You'll pay a little more for it but its the purest, cleanest wax out of a hive.
-
As good as a commercial option might be, they can be expensive for a small tin and they have other additives which I do not want. I have two grades of beeswax/carnauba/nfo mix which I use all the time. A soft grade, like soft butter for applying after dyeing which feeds nfo into the leather to replace oils lost and a hard grade, which I use for edge burnishing and end finish polishing. After dyeing the leather should be given a feed of nfo. Getting the amount just right is a problem, too much can ruin a project. But with my soft mix I can get just about the correct amount of nfo into the leather. A precise recipe? ha, ha, I make it by - umm, 'I think that will do' or 'that is about right' Metal bowl. Heat some beeswax in the bowl until the wax is totally melted, add about a spoon full or two of white carnauba wax flakes, then add nfo. Stir well. Let the mix cool and see how soft or hard it is. Too soft - remelt and add more beeswax. Too Hard - remelt and add more nfo. If you use about 100g of besswax add about 5 or 10ml (a teaspoon or two) of Carnauba wax flakes, use white flakes and not the brown. Then just add nfo until you get the mix as you want it. This 100g/10ml/? mix will last you a lot of projects.
-
Get bees wax. The best is from a local to you bee keeper. Melt some bees wax with some carnauba wac and add in neetsfoot oil to make a paste. You can use this mix to feed your leather and as a finish polish.
-
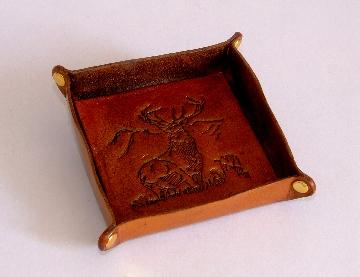
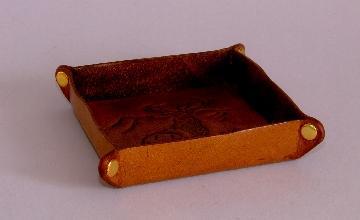
I chose these two as you can just make out the reflection of the semi-shiney surface. The Klear/etc makes the small valet tray water resistant enough for it to work as a drinks coaster
-
A thought. Punch one oval hole in thick leather. Glue two narrow strips onto that piece, one either side of that one hole and carefully aligned with it and the width apart of the belt strap. Place this 'template' over the belt strap and punch through the hole in it, move it along for each hole, or just press the punch into the belt strap to mark it, and then punch all the holes after the template is removed
-

This Art Form Is Going Straight To Hell
fredk replied to Reegesc's topic in Leatherwork Conversation
I originally did as you did, then my paid-up host blocked putting photos anywhere and demanded an increased fee. But before that I had already started to put photos on here as requested by Northmount / aka Tom I use a simple photo processing programme. I edit my original photo slightly and save it to a file on my computer dedicated to 'Share' on leatherworker.net. I take that original photo and down size it to between about 300 to 450 pixels across in the photo programme, save it in that 'Share' file and from there post it on here using the 'Drag files here to attach or choose files . . . ' at the bottom of the reply box -
This Art Form Is Going Straight To Hell
fredk replied to Reegesc's topic in Leatherwork Conversation
Another tale from me. For many years I made and repaired leather items for the members of my historical presentation group. Amongst the items frequently needing repairs were their shoes and boots. I reckon I did a pretty good job on those even though 'I don't do shoes!' One time I came across an elderly cobbler in a town near me. In short, we arranged that he would teach me some rudiments of cobbling. We set a date for when to start. Come start date the shop was closed up. I was told the cobbler had died about a week previous. Try as I could I could not find the cobbler's family as I wanted to purchase as much of the old equipment from the shop as I could afford. This shop went back to the 1860s or so and had all sorts of very old, but still working, sewing machines etc as well as loads of hand tools as the cobbler repaired horse tack as well. Over the next couple of months I kept an eye on the shop for signs of life. Then one day there was a builders skip outside it. It had building rubble. I asked one of the builders about the shop contents. They had smashed everything up with sledge hammers and sent it to landfill. I left them with the idea that the contents of that shop, which they had destroyed, was worth about £10,000 ( a conservative estimate, I had counted 12 large sewing machines and other machines, most from the 1880s to 1930s) There's more When I was in a plastic model shop some months later I mentioned this to the owner. She told me there was an old cobbler's shop just across the street, which was all blocked up. She gave me some contact details. I went to the contact who was an agent for the owners. He got me a list of what was still in the shop. Again sewing machines and tools by the score. Mostly from the 1910s to 1930s. I offered to buy the lot. I offered a low price as the machines had been sitting rusting for 20 years, unlike the other shop where they had still been in daily use. Word came back, the owners didn't want to sell to me. That was OK. What happened next wasn't OK. A few months later the owners decided to 'redevelop' the shop and the all the old shop contents were either sent to land fill or sold to a metal reclaiming company for a pittance.This I found out, eg, a 1910s treadle Singer they got for 25p, being the scrap metal price. This I'm not 100% sure of as these tales are passed on to me. We have, as you readers no doubt have, those shoe repair places in shopping malls, the 'Heel Bars'. These are operated as paid-up franchises, ie the shop person buys their equipment. I've been told, from time to time, that this one or that one has closed. What about the equipment I ask. Enquiries I've been bothered to make of the mall has informed me that if the Heel Bar unit closed with the equipment still in it either the mall or the new unit renter has dumped the nearly new sewing machines. These machines could have been given to schools or colleges or voluntary groups. I do know that a certain place called a 'Mens Shed' got 3 leather sewing machines, source unknown but they look like 'Heel Bar' ones. They asked me to come along to teach some of the men of the 'Shed' how to use them, but 'Shed' rules disallowed that plus, I had to admit to them, I don't how to use them myself. So there they sit. -
But not everything is back in it, eg the Al Stohlman books on making cases, 3 volumes, appear to be missing. Least wise I can't find them
-
Not really. It can depend on how good the glue joint is. I've separated well stuck leather pieces by finding a spot not perfectly stuck and using a fresh scalpel blade, starting at that point carefully slicing at the joint whilst peeling away one piece of the leather. I had to go with the flow, peeling back side A a bit, then maybe side B, turning the item round, sometimes just using the the point of the scalpel blade. It took absolutely ages but I eventually won over it
-
I would suggest that those are not leather straps but that artificial stuff passed off as 'real leather' By chance I was packing away some of my old film camera stuff a couple of weeks ago. I have a leather strap with is now about 45 years old. Its been abused and never cared for. It carried cameras as heavy as 5kg. It carried cameras up skyscrapers and to motor races. The strap shows its age, its looking rough but its not ripped nor showing signs of wanting to break. The strap is about 12mm wide and 3mm thick, with loops and hooks on each end, for quick change of camera bodies at events.
-
I now prefer Klear/Future/Pledge with Future shine (check the name, they keep changing it!) for sealing and waterproofing leather. Despite its name as a floor 'polish' its actually a water thin acrylic varnish. Two or three coats will do your job. The more you put on the glossier it becomes. To counter this you can add some talc powder in the final application, or go over the item with a fine grade, eg 2000, wet & dry grit paper used dry. Thin the Klear/etc with some water, about 3 K to 1w, or 1 to 1. The K dries pretty fast and thinning it will help it soak in before it does. Also, note: you can never make leather totally waterproof but you can get close to it.
-
Beats me. But I'd say its a matter of being caught. The authorities will chase a note forger quicker than a small coin forger. A forger can get a lot of coins into circulation quicker than large denom notes Here's one for the UK readers. Did you hear about the Belfast coin forger? He was making 10p coins. He was cutting the corners off the 50ps
-
If you've never had occasion to shop with them then you wouldn't know about them, We all can't know every shop everywhere,
-
I'm with Nationwide Building Society. According to them it costs them 2% of the price of whatever I buy using my Nw debit card. Same as when I draw cash out of any hole-in-the wall except their own machines. Their savings interest is pathetic but Nw doesn't charge me for me to use my money. Just after Ikea in Belfast re-opened I went in to get an item. Then I stopped at their bistro counter for a hotdog. I totally forgot that Ikea said it was totally cash-less. I placed a £1 coin on the side of the till for the hotdog. The lady serving on it, literally jumped back about 3 feet and screamed, at almost the top of her voice 'No!, no money!, card only! card only! take it away now or I call security!' I took the coin back and as soon as I stepped back the lady sprayed the whole till unit and the surrounding counter with disinfectant, She was not a local person. Contrast with a local person in a shop t'other day. I paid with a £10 note. As we chatted slightly without demur she dropped the note onto a porcelain dish on the counter and sprayed disinfectant on it. No fuss, no screaming. I think it was early last year the banks approached the UK Government suggesting that all coins under 50p, ie 1p, 2p. 5p, 10p & 20p coins should be done away with. After about 3 weeks the Gov said no, too many people rely on cash. And the Royal Mint then put out more of each coin. No.1 son only accepts cash on pick up or bank transfer in payment for car parts or servicing. There are a great number of businesses here like that
-
also clean the nozzle cups at the nose. You should have two; an outer and an inner one. One of my airbrushes was splattering and I got out of the inner one a speck the size of this . which was the problem. Get a a set of the fine airbrush cleaning brushes. They are worth the couple of $$ they cost
-
eh?? they're an England based company. Not similar to Aldi. Close to a Spar or Co-Op type shop. Or a a smaller version of a Tesco/ASDA https://www.google.com/search?q=home+bargains+in+kent&rlz=1C1CHBF_enGB883GB883&oq=home+bargains+in+kent&aqs=chrome..69i57.8874j0j7&sourceid=chrome&ie=UTF-8 and. https://www.homebargains.co.uk/products/18230-accelerate-slimline-dash-camera-audio-video-recorder.aspx
-
I've seen a motion activated camera for cars in Home Bargains for £15, Some times they have them, some times not and not all branches have them
-
Our shops used to loose a lot of trolleys. Some were stolen, others, people just used them to take their shopping home and left the trolley laying about. But after the introduction of the lock people are too tight not to want their £1 back, or their cheap plastic trolley token Sort-of back to the lead topic. My #1 son had a case where a guy saw a car my son was selling listed on Gumtree. The guy phoned my son and arranged to buy the car. A couple of days later a guy calls and #1's garage. He's not the buyer. He's just delivering an envelope. In the envelope was 3/4 the price of the car, in cash. The verbal message with it is the buyer will call in about a week to pay the rest and collect the car. The week goes by. No buyer. My son tries the phone number he has on record. Its no longer in use. Months go by. Still no buyer. Son has cash, car papers and a car, but no buyer. The buyer never gave his full name, just first name, never gave an address. My son puts the word out through the car clubs as this car is a specialist car. The buyer can't be traced, no one recognise him from what my son knew of him. Jump 2 years on. Still no sign of the buyer so my son decides to sell the car again but he makes a note that if the buyer ever turns up he can claim his money back. Due to the nature of this specialist car guys buy it, use it for a while and then my son gets buying it back, fixes it and sells it again. He told me two weeks ago this car is back with him for the 4th time. But no-one has ever turned up and said -'thats my car' PS. My son does some Church out-reach in our prisons (all two of them) and he's even asked in them if anyone, a newish prisoner, ever bought this car Where's Sherlock Holmes when you need him?
-
Its ok. We use a £1 coin or a token the same size just to release the lock on the shopping trolley. Each trolley has a short chain which locks into another trolley when they are pushed together. We get the £1 or token back when we return the trolley to the trolley parking bay. Some shops use it to stop people stealing the trolleys. Some shops use a special wheel lock which automatically locks one or more of the trolley wheels if you take it too far from the shop.
-
Lots of Medieval Knives and Sheaths
fredk replied to AlexOstacchini's topic in Gun Holsters, Rifle Slings and Knife Sheathes
Ingots are possible but prior to the heavy Industrial Revolution (about 1740) blacksmiths in Britain used 'bog iron'. Iron ore rocks found on the ground surface in boggy areas. They smelted them in their own small furnaces using charcoal. The quality of the iron and steel varied quite a bit and it was regional, ie the iron a blacksmith in the north of England used was quite different to the iron just 20 miles away in Scotland. Archaeologist specialists can place an iron/steel blade to a region by its iron compound. -
We use a coin for the £1. A couple of years ago the Royal Mint introduced a new one. Supposed to be un-forgeable. yeah, right, the first forgeries were detected less than a week after the new ones entered circulation. The forgeries use a different metal mix which makes them a fraction of a gram underweight, which is only detected by machines which recognise coins by their weight, but you or me or the shopping trolley can't tell the difference. Yup, our bank notes have all those hologram thingies on them
-
How to paint initials on leather so neatly? (louis vuitton, etc)
fredk replied to Orangestencil's topic in How Do I Do That?
I believe the likes of Louis Vuitton uses a heat embossing method. A special metal foil is used and the letter stamp is heated and pressed into the leather with the metal foil between the stamp and leather. Then the part of the metal foil not used is peeled away leaving just the letter foiled. One of our Australian members uses this method on things he makes and on their packages -
ah, but one must be wary of forged bank notes too. Allegedly there are more forged £20 notes in UK circulation than there are real ones. And the same for 10p and £1 coins. My #1 son checks every note he gets in payment. He says he's never found a forged note but he's had a few customers change their minds and took back their cash before he could check it all. One of the last scams I got was for a speeding ticket. I was caught speeding by a road-side camera in up-State New York. Pay now or be taken to court and then loose my licence. They kindly gave me a link to be able to pay. Very worrying as the last time I was in New York was for a few days about 13 years ago. Enforced lay-over because of flights. I don't remember speeding at all. I don't even remember having a car there.
-
A. Its not actually the oxygen which is making the glue set. Its the release of the solvent into the atmosphere. With the carbon-dioxide treatment the CO2 keeps the solvent vapour in the glue. b. you can buy small empty tins and jars with screw thread lids. Use the beeswax on the threads. c. consider decanting into a small container just the amount of glue you need for the job at hand
-
1. get a small tin of the glue, eg 250ml or 125ml. Use that up first then refill that tin with glue from a bigger tin. 2. when closing up the tins, if they have press on lids, take a few deep breaths, then blow into the tin as you close it. This replaces the oxygen with mostly carbon-dioxide. We used to do this all the time with photographic chemical mixes to keep them from going off too fast. 3. On tins with a screw lid, as well as blowing, wipe some bees wax, a lot of it on the tin lid threads each time you open and close it. If you don't have beeswax use vaseline 4. on your bulk supply tin pour a little solvent on the top of it before closing up. Don't mix it in, just let it lie as a barrier. Fumes from that will exclude the oxygen as well and make the tin glue friendly