


fredk
-
Posts
5,976 -
Joined
Content Type
Profiles
Forums
Events
Blogs
Gallery
Store
Everything posted by fredk
-

Aging.... blurry vision when tooling
fredk replied to chriscraft's topic in Leatherwork Conversation
This be true. In my working life I paid about 10% of everything I earned into the 'National Insurance'. The more you get paid the more you pay. But it means I can go to doctor or dentist for treatment and not worry about bills, or to the chemist (pharmacy) for prescribed drugs at no cost now to me cos I've paid up front years ago. Back on topic; I have a couple of the head-band magnifiers with lights. Whilst the magnifiers are a grand job, the lights are next to useless. They're bright enough but I can never get them to illuminate just what I'm working on. I keep reverting back to different powers of reading glasses and a big angle-poise lamp with a daylight colour 20W (= to about 150W old fashioned) LED bulb. Another light I just got in and I've yet to try is a new invention. Its called a 'hug' light. Bright LED lamps on the ends of a flexible thingy, which you can wrap around the back of your neck or somewhere and angle the lights on your work example; https://www.ebay.co.uk/itm/Double-LED-Hug-Light-Adjustable-Head-Neck-Book-Reading-Night-Lamp-Torch-Handfree/264468227616?ssPageName=STRK%3AMEBIDX%3AIT&var=564149022967&_trksid=p2057872.m2749.l2649 I'm colourblind so I like a lot of good light on what I'm doing so I can actually see what I'm supposed to be doing. eg only under very bright light can I see dark brown or blue thread on dark brown or black leather. -
Leather, with or without rouge is traditional. You can use rouge on cardboard, or some wet & dry grit paper glued to a board or something. As said above. hard = less (or no) rounding of the edge. The videos probably didn't mention the 'boiling' the leather (do not boil it! ) as they started with a thick stiff bit of leather and had no need to make it stiffer
-
As it is, its probably too soft for a good strop. Cut a piece at least twice the width and about 50% longer than you need. Soak it in really hot water, then lay it out to dry in a very warm place. Put something on it to keep it flat. You'll find that the leather has shrunk and stiffened up considerably. I would use a contact adhesive on both the leather and board to glue them together. Again put something on the leather to keep it flat until the adhesive has set. After that trim the leather and add your rouge if you are going to use any.
-
ah, the wonders of the differences in our language. Here, a poke is a piece of paper rolled to make a cone shape. Often used to hold sweeties (confectionery) or chips (fries). A poke made of light biscuit is used for ice cream. Now, I do know that many a naughty child was transformed into a cherubic angel on the promise of getting one of those 'pokes'
-
I like that With the curve in it I bet its easy on the hand when in use too
-
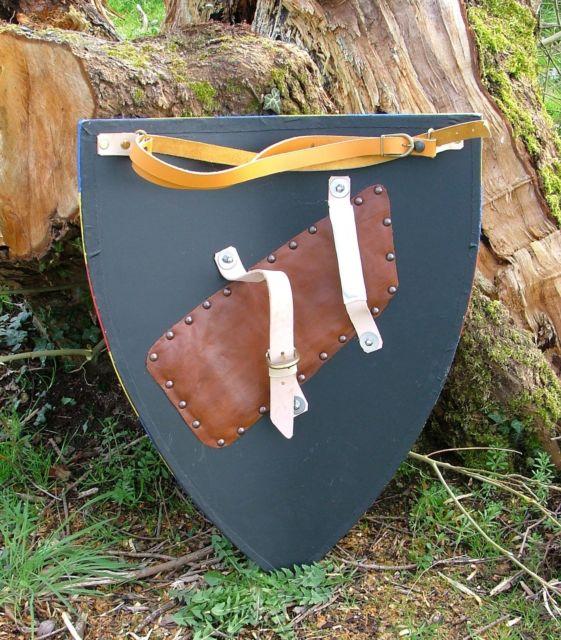
Wot he says I'll throw in my bit. How heavy is a camera and lens? about 2kg? I used 2mm chrome tan leather for the guige (the carrying) strap on this shield. The shield weighs about 5kg. The owner has thrown the shield around using the guige strap. The strap has never broken, the brass loops, the snaps nor any of the rivets have come apart or shown signs they want to If you have doubts; make the strap, hang it by its ends, the ends about 25 cm apart, maybe from hooks in the top of a door frame. Then hang a weight from the centre of the strap. Start with a weight the same as the basic camera and go up to at least twice what it'll be needed to carry, say, about 4kg. I very much doubt if either the leather or fittings will give way under test. The strap may stretch a bit, some chrome tan is a bit stretchy. The bit I used above is not stretchy at all.

-
Before eco-flo gel antique
fredk replied to D2G's topic in Dyes, Antiques, Stains, Glues, Waxes, Finishes and Conditioners.
Whatever you put on the natural un-dyed leather is going to darken it a bit. Neat-lac, resolene, Future/Klear/Pledge with Future Shine 'floor polish' which is acrylic varnish. These will help stop the antique paste darkening the un-dyed parts. Test what you have on a piece of scrap cut from the same leather as your work piece. Different leathers can react differently. -
Clever. They always give you a couple of naff stamps in those sets. I guess its the only way they're gonna make you have one, or two, or three. . . .
-
Use Future/Klear/ Pledge with Future Shine 'floor polish' Its actually a water thin acrylic varnish. It will darken raw leather. It seals paints and dyes. Two thin coats will just about water proof any leather. Three coats are even better from there on more coats give a glossy finish. This can be countered by a: rubbing down with 2000 grade wet & dry paper used dry, or b: adding some talc to a final coat. The talc becomes a matting agent. Also, the more coats you put on the stiffer the leather will become. With two to four coats the stiffness isn't too noticeable but at around 6 to 8 coats leather becomes quite stiff. I now use it instead of resolene or similar for sealing.
-
Sounds like you got a bad tool. I have two of those, each is made different but they run as smooth as silk. Have you tried working the bearing to make it run smooth? Another way to apply edge finish is to fold up a scrap of material, such as felt, grip it in a wood spring clothes peg and use the felt pad to apply the finish
-
I was thinking of this sort of material (below) and just glueing it to the leather, or use a bit of old shower curtain. https://www.ebay.co.uk/itm/Waterproof-3-8oz-Rip-Stop-Ripstop-Fabric-Kite-Nylon-Material-Cover-15-Colours/332401505545?var=541417739341 I sewed the pouches inside-out, then turned them so the seams and edges were neat. It doesn't need to be water-tight. There are two schools; one lot don't like the plastic pouch and want their baccy in the leather one only, the other group are happy that their plastic bag fits into the pouch. but both want a pocket for a lighter and the ciggie rollers want a pocket for the papers, and their rolling machine, and the . . . . btw, I used plastic snaps on the pouches. these; https://www.ebay.co.uk/itm/440pcs-Kam-Snaps-T5-Size-20-Button-Stud-Closures-Snap-Fasteners-in-22-Colours/123259119619?hash=item1cb2d0e803:g:PEcAAOSwKUVbUDhc Light weight and good for lightweight item like the pouches and small coin purses, but only on thin leather, up to about 1.2mm
-
I made some baccy pouches out of chrome tan upholstery type leather. The one thing I'd do different is to either line them with some sort of thin plasticy material or give the inside of the leather a real good coating of beeswax. I found out that the leather dries the baccy too much. Apparently there should be a bit of moisture in pipe baccy and ceegaars. If either is too dry they don't smoke at all well and just burn like tinder
-
My experience is much as above. I'm a member of a crafting group. I'm the only man in it. Once whilst sewing up a 4-card holder the ladies asked me about it. In a nice way they laughed at 'only' 4 cards. This led to a discussion on how many cards and of what type each of us had. We drew in about 6 passing males to add their input. The greatest number of cards was 18. Not all credit/debit, but a lot of Id cards. The lady works as a carer in various homes, each has issued their own Id card and lunch card. The average was. afair, 8 cards for the women and 3 for the men For last Christmas I made some book covers as prezzies. My book covers have an internal flap front and back. In each of these I made one diagonal 'card' slot pocket. Again whilst sewing one up at the crafting group. the ladies said that for them they'd want at least 4 slots front and back. I gave two of the book covers to two mechanics I know. They asked, what are the slots for? for business cards and such I tell them. Neither mechanic uses the card slots. As for colours. We did a discussion on that in the group. Each could name 3 or 4 colours as liked. Blues, reds, green, came out tops, bright browns, then dark browns on leather, blacks least liked. Only one woman, out of about 20, preferred fuschia. I played the same game at my son's garage a couple of years ago. Mechanics, all men, straight, colours preferred were; a mid-pink, pastel blue, orangey-red, navy blue (to match his car), gold, silver, pale green, darkish green There are still girly girls out there who want the 'pink' * items but by and large all this colour being gender specific has gone with the chaff in the wind * I was in a tool store recently. A young woman was buying some DIY tools. The counter chap says. 'do you not want the pink handled ones?' The woman says ' why? do they cut better, do the screwdrivers work better, are they better quality than the standard black ones?' 'no, but..' says the chap. 'Then why should I pay more for pink handles?' says the woman. Discussion over Make the girly items, they are still potential customers
-
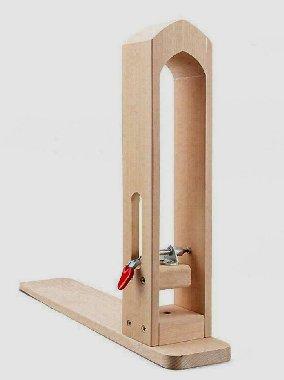
My stitching clamp is this style. I have a bar magnet on the outside of each jaw, just down from the sloped part. One magnet each side just about halfway down between the jaw and that long slot, towards an edge. These are N35 magnets, about 20 mm x 10 mm x 2 mm thick. Strong enough to hold needles and thread Inside the the uprights I have one magnet on each upright, just about near the top of the slot, but to the outside of it. On these I hang the sewing awl, the end of the handle rests on that block of wood in the centre. I also hang a wing-nut spanner. I have another magnet in the centre of one side of that block of wood. These magnets are N52, round, about 12 mm x 2 mm thick. The awl is held at its ferrule. The N52 is strong enough to hold the awl in place when it stands off by about 1 to 1.5mm You can add magnets to each other to increase their strength. You can go to a thickness equal to or below their surface size. eg, you can add 5 magnets of 12mm x 2mm together on top of each other to get the equivalence of one magnet 12mm x 10mm. Once you go more than that you start to get a reverse and get less power.
-
In saddle stitching, best practice is to hold a needle in each hand as you stitch, to pull the threads tight. On my stitching thingy I find the magnets handy to hang a needle on whilst rewaxing the thread, or just in between sewing sessions. Another magnet, inside the jaws, low down, holds the sewing awl. handy for opening holes; I pre-punch my sewing holes but sometimes an awl is needed to open up a hole
-
I used to use a newspaper wrapped around a piece of lead pipe to tap on the heads of 'nice doggies', who weren't, when I was a postie. A few taps now and then, nowt too hard, and the dogs got the message. I use cereal boxes as well for patterns. Sometimes I print a pdf pattern out on thin card from Hobbycraft or £world, and if necessary paste it with Copydex to cereal box card to thicken it up. I use a walking stick with a large brass knob grip on it. Without actually having to use it its seen off a few trouble makers and made a few others change their minds. I let them know about the brass knob just by dropping the stick on the floor and as I pick it up I tap the floor a couple of times. They get the message. I have a couple of Dieselpunks patterns. He does a good instructional video to go with them too
-
I have several magnets on my stitching clam thingy. I have some for the needles and for an awl. Use N50 or N52 grade magnets.
-
A 32 oz bottle is available. afair 32 oz is 2 US pints = 1 US Quart? afaik all the colours in the Oil dye range and the standard acrylic range are available in 4 oz and 32 oz bottles
-
Mink oil is good. I've only ever had it tins of cream as well, never seen it as 'oil' No make of nfo I can recommend as what I can get in my country you may not be able to get in yours (actually, I think my last batch is from Tandy) Whilst vegetable oil and olive oil are good enough I've found veg oil can go 'off' after a while making the leather smell whiffy, and the leather is in constant need of more olive oil, it just seems to dry out of the leather.
-
Both the water and the dye are removing the natural oils. To soften the leather again put on a little pure neatsfoot oil. On this site most of us advise to use pure nfo and not nfo compound as the compound has petroleum distillates in it which may be detrimental to the leather Don't put too much nfo on. I use a mix of beeswax, carnauba wax and nfo. I apply that, rub it in and buff it. One coat is usually enough to bring the leather back
-
It is very possible and rather easy to set a copper or soft brass rivet with a press. I've done it when relining the brake shoes for my Austin 7. The linings are held on by 8 soft brass rivets which have a flat round head which goes into a countersunk hole on the shoe lining. Where the rivet comes through the cast & welded metal shoe the rivet needs a head formed. I used to do it with a hammer and bar but if the assembly moves the lining can fracture so I started using an old vintage press tool. The press is like a C clamp. On the foot is a steel disc for the flat rivet head and on the top end is a screw bar with a concave hole in it. Simply screwing the press closed causes the rivet to squash down until it has a nice round head on it. It took far longer to type this than it would doing a rivet on the brake shoe. In fact I was able to rivet on 8 brake shoe linings in about 30 minutes, without fear of damaging either almost irreplaceable brake shoes or hard to get shoe linings.
-
@YinTx, sorry no photos. I just checked and I have no photos, nor a book cover available to photograph
-
If I may say how I do it. I take a length of ribbon, about the length of the book cover plus about 7cm. I fold each end and glue the last 1 cm of each end back on itself. One end I glue centrally in the book cover, along the top. When I then sew around the book cover the ribbon gets sewn in place too.
-
grande, loverly-jubbly and all that, but I'm still getting 'Not Secure' in the address bar. Will this change?
-
The secretary of the historical presentation group I was in had the list. An official Gov list. We had the complete list but only required the part on bladed weapons. It said afair eg. a dirk; as part of the traditional Scots dress, / single edged blade of less than 4 inches length, / chef's knives; in conjunction with work, to and from place of work / that sort of thing. It ran to several pages. Cosh, baton, night-sticks and other were in the blunt instrument section. Even the PSNI sometimes asked us for a copy of the list. Individuals who knew us had recourse to use our info as before; caveat, GB and N.I. laws can differ