-
Posts
5,998 -
Joined
Content Type
Profiles
Forums
Events
Blogs
Gallery
Store
Everything posted by fredk
-
Thats pretty good so it is I really like the rough look to the bevelling (?) around everything. I think that just makes it extra so different
-
I've used woodworkers type PVA glue which is water based. I usually use a solvent contact adhesive. One thing that I've found is that the water based glue will shrink the leather, as any water used on leather will do. I've used the PVA on re-wrapping sword grips and the nature that the leather will shrink as the glue dries out pulls the leather tight, and this needs to be taken into consideration in making sure there is sufficient leather. A solvent adhesive does not, in my experience, shrink the leather at all.
-
Measure the length you need and note the cross-section profile, then try at an auto parts store We have the same problem with our 1930 to 1934 Austin cars and thats how we get fan and drive belts for them
-
you guys need a time to have a beer ?!? I just have one when I fancy one. Its simpler that way
-
Nicely made
-
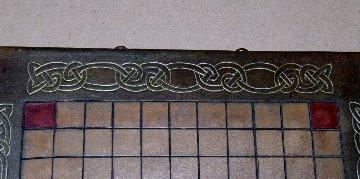
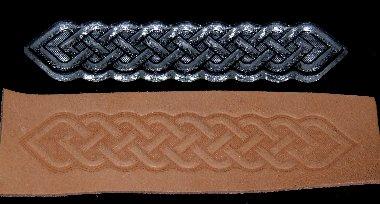
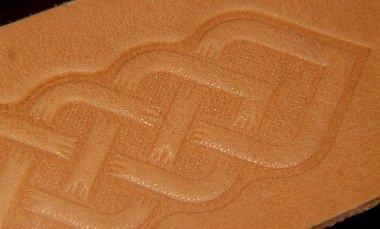
1. I use them in my Tandy press which is about 1.25 tons pressure afair 2. I use a 3mm steel plate over them to spread the load. The plate is the width of the stamp and the length of the longest piece 3. I adjust my press so that the stamp (any stamp) goes only so far into the leather 4. On the first stamp I do the centre of the stamp first to locate it then I work to the left of centre, then the right of centre. I know when its stamped well as a further pull on the press handle does not put any more pressure on the stamp 5. (See below) on the next stamps I first do the end which goes on the end of the last piece, then the centre, left and right et cetera 6. On other stamping/embossing tools I have you need to align the ends of the first stamping with the next one and so on. It needs very careful alignment to get it straight and no gaps. With the stamps this Russian chappie makes you overlap the second piece onto the end of the first. This does two things. 1. you get perfect alignment, 2. you can adjust the overlap to make the total stamping different lengths. This overlap is why in 5 above I do the end of the next piece first, to fix it in place. 7. They are excellent quality. They are thick enough for use and very detailed. As the chappie says, they are for use in a press, not for use with a hammer 8. Plenty of detail. How much do you need? I use these as a border on some game boards. It used to take me several hours to do four of these Celtic lace designs on a board Now I can do all four in about 15 minutes, and that suits super-lazy me! This is the short one piece one. I bought this one first, found it was too short for my liking so I then bought the 4 piece set. This is just a test/sample pressing which I keep with the stamp. Its on too thin a leather for the stamps best to show up A close-up of part of the stamping Plenty of detail there to keep me happy
-
Is this the one you know of? Its the chappie I've bought from. A good & helpful chap. Currently, toolmaniac https://www.ebay.co.uk/sch/toolmaniac/m.html?ssPageName=STRK%3AMEFSXS%3AMESOI&_trksid=p2053788.m1543.l2654 I've bought two items from him. 1. a single short Celtic lace: https://www.ebay.co.uk/itm/Celtic-Style-Leather-Belts-Embossing-Stamp-For-embossing-VegTan-Tooling-Leather/224174510639?hash=item3431d7922f:g:KMoAAOSww5hZNZki 2. a 4 piece Celtic lace: https://www.ebay.co.uk/itm/Stamp-Set-4-for-Embossing-Vegetable-Tannned-Tooling-Leather-Belt-Blanks/224174509535?hash=item3431d78ddf:g:KPAAAOSwEHpZNZkh edited, to add. A few years ago a friend jokingly suggested I get a table top old fashioned clothes wringer for embossing larger areas, eg book cover fronts. I've considered them but they go for top ££
-
The roller machines for die cutting card for card making have a small limit on what can go through them, max is about 4mm (thin aluminium sheet, card stock of max 200gsm, metal die of 2 mm and another aluminium sheet). I have a set of the acrylic embossing stamps by that Russian chappie. The stamps are about 4mm. Then add your belt leather, minimum of 3mm. I'll have another look at these machines when I'm at Hobbycraft next
-
Have you got any beeswax & nfo mix? rub some of that in. Let it rest in a warm place for a while then work the leather. You might have to repeat this, but that should do the necessary
-
Extreme measure; get some lacquer thinners (aka cellulose thinners). Soak a clean rag with it and apply to the spot. Get that spot really wet with the thinners and rub vigorously with the clean rag, turn the rag to a clean section as you go. The thinners should dilute and lift a lot of the dye out. You'll need to feed the leather with nfo later as the thinners will remove the oils and dry out the leather
-
To me that is not acceptable, unless you are getting it at 50c a sq ft. I've bought 'distressed' leather from Le Prevo and its quality has been not far off 1st quality with only the occasional scar or mark on it. Even their very most poor quality hides are better than that. I'd send it back for replacement or refund
-
You should have about 3mm of the stem above the leather. Actually that silver one looks just about right When I do rivet holes in multiple layers I punch the first main hole accurately, glue the layers together then use that first hole as guide for the others, first pushing the point of a scratch awl through to make sure the punched hole will still be where I want it. I rarely use a setting bar for flat head rivets. I just put one end on my anvil and whack the other end with my hammer. They end up very flat and no marks from a setting bar.
-
WIN! It'll be a real one-of-a-kind! Nothing is a total failure in this lark. We are creating art. It may not turn out the way we planned but its still all good
-

Unapoligetically color blind.
fredk replied to sonnyboone's topic in Purses, Wallets, Belts and Miscellaneous Pocket Items
yeah, I'm offended. . . . . . . . . . . . not! I was just curious -
1. brass stamp. can be hammered or pressed into cased veg tan leather 2. can be heated, via a soldering iron or pyrogravure for pressing or stamping into chrome tan leather. Mine came with a M5 tapped hole on the back and a short stud which goes into either a soldering iron or pyrogravure 3. I got mine made in China for £14. size is 3cm across x 2 cm high, other sizes pro rata roughly
-

Unapoligetically color blind.
fredk replied to sonnyboone's topic in Purses, Wallets, Belts and Miscellaneous Pocket Items
That is nice work, very colourful But why the 'color blind' in your title? I'm colour blind but I see those colours as a nice mix -

1760 - 1780 North Carolina - leather research
fredk replied to Simeon54's topic in Historical Reenactment
The Scots never had the Guilds that England had. Look also to the Ulster-Scots of that era. A great many of the Scots who went to the North American Colonies did not go direct from Scotland but from Ulster. The Scots settlers in Ulster, from approx 1605 to 1845 were known as the New Scots. They were, and still are, very Scottish in speech, habit and tradition. The point of a cobbler not knowing how to make a saddle is not true in this case. Scots, Ulster-Scots, and Ulster-Irish could, did and still do, turn their hand to whatever is required by their community. The blacksmiths would make knives, swords, shears, pikes as soon as make farm gate fittings. The farrier would make his own horse/ass/donkey shoes and fit them - they are not made by blacksmiths. Leatherworkers, even up to the 1970s, made shoes, horse tack, school bags, brief cases, and more. -
If you don't want to wire it, sew on an edge piece, folded over top to bottom, made of thin veg tan. Wet it after its sewn on, then let it dry with weights on it to keep if flat, or any shape you want. When dry seal it well. That should stiffen the brim and make it keep its shape but also be very flexible
-
1. for medieval type stuff and also for small modern items I sew up a leather draw-string bag. I have absolutely loads of off-cuts of upholstery leather which is suitable for these bags 2. for some modern items I buy in cotton material draw string bags, like these, https://www.ebay.co.uk/itm/100-Plain-Drawstring-Cotton-Bags-Xmas-Sack-Stocking-Storage-Laundry-Bag/143068706266?ssPageName=STRK%3AMEBIDX%3AIT&_trksid=p2057872.m2749.l2649 I have a stock of these in sizes from 8 x 10cm up to 40 x 50 cm. In these usually go my board games. Playing pieces in the very small bag and the boards fit into the larger bags Most shoulder type bags I've done have been for medieval history presenters and they've either collected from me or not required extra bagging. Only a few times I've wrapped a bag in tissue paper then boxed it. Getting a suitable sized box is a real nightmare so I prefer the cotton drawstring bags Although I've just mentioned bags, hat et al go into these cotton bags if the buyer is not going to wear or use the item. When I did some market stall selling I never once used any packaging for main leather goods. Small items like beads or card wallets occasionally went into a small paper bag, like the ones used in sweetie shops. https://www.ebay.co.uk/itm/White-Kraft-Food-Paper-Bags-White-Paper-Bags-Market-Sandwich-Food-Paper-Bags/392504666365?hash=item5b6319e8fd:g:jS0AAOSwGLZcctWy I keep a small stock of these plus some better ones with handles on them https://www.ebay.co.uk/itm/Kraft-Paper-SOS-Carrier-Bags-Brown-or-White-with-Flat-Handles-Takeaway-Gifts/152603517592?hash=item2387e0e298:g:Z6gAAOSwBPNXSG-c Although that link will hi-lite brown bags, white ones are better looking for our stuff hth
-
Please give me more info on your actual requirements and I can suggest certain bags in better detail
-
'Astonish' is available in most Home Bargains shops. About £1 for 750ml. Its a water thin acrylic varnish meant for floors. Its exactly the same as 'K;ear', Future' and 'Pledge with Future shine', only a lot cheaper. I use it as sealer on leather now as well as a varnish on a lot of hobby/craft items
-
Both are good but I prefer polyester. Mainly Gutermanns Top Stitch thread. Gutermanns because they've been supplying thread to the auto industry for over 100 years. If its good enough for BMW, Mercedes et al its good enough for me.
-
To me thats even more reason to just have about 5 sq feet of thin leather on hand. Two pieces for a sheath would be 1/2 sq ft, so 5 sq ft would do 8 to 10 sheaths, 5 sq ft would cost $20 to $25 or so, a recoverable cost.
-
My thoughts again. Time is money. If doing just the very occasional inlay its ok to take the time to just skive a piece of leather down. If its going to be a regular offering, let the tannery do the work. Buy in thin leather. Have it on hand. Laminate the inlay within the thinner leather. The thinner leather is often a good bit cheaper than the thicker, even when using two pieces of the thinner to one of the thicker All these Heath-Robinson set ups to skive a piece of leather can't beat a skiver built for the purpose. A 6 inch wide bench mount skiver costs as little as £100.($130) At $15 per hour pay say, it works out cheap. By the time you've mounted a piece of leather up safely, set up your planer you can have had several pieces of leather thru that bench skiver or have cut a year's worth from a thin leather Do you buy in 3/4 inch thick steel to reduce it to 1/8 inch for blades? (just sizes to illustrate the point), No, you buy in 1/8 inch. So you'll buy in to use 2.4 to 3 mm for the sheaths. For inlay laminations you'll use 1.2 to 1.6 mm, buy that and have it on hand, Stored carefully the leather lasts a long time. I'm currently using some 3.5mm Water Buffalo hide I bought about 15 years ago. Its darkened slightly over the years but its still perfectly good Edited to add PS. In the picture above for the video imo that is the wrong use for a French Skiver. Its for edges and small areas. For larger areas the Super Skiver is the better tool https://tandyleather.world/products/super-skiver?_pos=1&_sid=685be2ee6&_ss=r
-
If this is the type you are looking for; I made my own basic one over 20 years ago but I bought a smaller one a couple of years ago. It cost me all of about £10 https://www.ebay.co.uk/itm/Leather-Working-Desktop-Vise-Hand-Lacing-Stitching-Sewing-Pony-Horse-Wood-Clamp/133093839308?epid=5029623263&hash=item1efd02d1cc:g:mB0AAOSwES1cowY6


