


fredk
-
Posts
5,994 -
Joined
Content Type
Profiles
Forums
Events
Blogs
Gallery
Store
Everything posted by fredk
-
Whilst searching ebay for a cheap airbrush I came across this https://www.ebay.co.uk/itm/Mini-Action-Air-Brush-Airbrush-0-3mm-Kit-Gun-Compressor-Paint-Art-Nail-Art-/402246944638?var=&hash=item5da7c9477e An airbrush with a mini rechargeable compressor. Seems to charge through a USB port. ~~ I have a few items which 'charge' off a USB but I run them off a USB adapter plug which goes into my mains electric socket Potential as a starter set? Handy to have around the leather work area. No need to dig out the bigger compressor and the hoses There are a great many of a variety of this set up currently on ebay, different types of airbrush and styles of the compressors
-
yes, I've noticed that too. I glue, clamp up, sometimes tap with a rubber mallet then sew it up. I leave a margin for cutting off so after sewing I use a good sharp knife and straight edge to cut that allowance off, which cuts thru the glued section and if I've done it right the leather there is well glued. I bevel the edge corners then slick it up.
-
Its a block of crepe rubber material. Sometimes it can rub off contact or surface glue. Remember crepe? shoe soles were made of it in the 1950s - 'brothel creepers'
-

Made a Newb Mistake
fredk replied to garypl's topic in Gun Holsters, Rifle Slings and Knife Sheathes
Looks nice Right hand carry, trooper's twist draw? -
Important Customs news for UK/Eu leatherworkers
fredk replied to fredk's topic in Marketing and Advertising
You'd need to put a 'Custom's Declaration' label on it declaring it a present. Without the label the package will be opened and examined and HMRC will decide if taxes are liable. If they think you are cheating they will inform Oz post who will prosecute you for fraud. The US IRS are novices at collecting taxes compared to HMRC, who have several hundred years head start Its seems the answer is almost yes; Amazon and ebay, but not etsy which is a sales window. -
Important Customs news for UK/Eu leatherworkers
fredk replied to fredk's topic in Marketing and Advertising
1. When you sent the items to the UK, it arrived and went thru the courier's system. They looked up a formula table they have which told them how much import duty and VAT had to be collected, then they added an administration fee. The courier would inform the customer, 'you have to pay £xx before we can hand this over to you'. After the customer had paid the taxes were paid to HMRC eventually. You never knew of it. 2 The £15 allowance was a cert, but sometimes, actually quite often items worth up to £50 slipped through without taxes being collected. This now stops as everything will be checked 3. Having been in the Eu, anything bought within the Eu going to another Eu country, ie UK, VAT was not collected as it was a common-area trade tax and had been paid already in the country of origin, and as a common-trade area no import taxes were collected either. No longer 4. Some of us in the UK were used to adding the taxes and fees onto items from US, Japan and other places. Basically anywhere from 1.5 x to 2x of the item's price for a guide of what it'll cost on arrival, eg I bought some letter stamps out of US. They cost £31 inc shipping. Taxes etc were £18. = £49 -
About a month ago I was made aware of the new UK customs regulations which will come into effect on January 1st 2021 https://www.gov.uk/government/publications/changes-to-vat-treatment-of-overseas-goods-sold-to-customers-from-1-january-2021/changes-to-vat-treatment-of-overseas-goods-sold-to-customers-from-1-january-2021 Essentially, if a UKer buys goods, up to the value of £135, from outside the UK the supplier must register and pay the VAT on the goods, except if the goods are bought via an on-line market place, eg. ebay, the OMP, which will be liable for collection of the duties The previous threshold of less than £15 value being VAT/import fees excluded is scrapped and all goods are liable
-
That would be for veg tan My bit you quoted was for chrome tan
-
I have moulded chrome tan by taking a very much larger piece than required, soaking in warm water, tacking over the shape and then speed drying it in a very warm kitchen cooker oven. The leather shrinks and hardens and also takes on the shape its over. Care and experimentation is needed as 1. the leather can shrink too much, 2. it can harden too much, but each of these can be used in their own way. eg. I made some hardened leather 'scales' for a chap who wanted some for Roman type armour
-
The leather looks like veg tan to me, but chrome tan can be moulded if the right amount of heat is applied to it
-
That would be no big problem. Its an ancient shoe making technique 1. get a wood last exactly to the foot size required but deeper than a foot 2. cut a piece of leather much bigger than needed 3. soak leather in warm water 4. put leather over the wood last, pull it around the last and tack it into place 5. Allow leather to dry 6. cut leather with a margin allowance around the sides for to sew the vamp to 7. sew vamp pieces to sole
-
Heritage Crossdraw Holster
fredk replied to JWheeler331's topic in Gun Holsters, Rifle Slings and Knife Sheathes
Nice. indeedy even a plain black leather holster is very much nicer than a plastic or nylon one -
Can't Get The Edges To Burnish Like Glass
fredk replied to CoteCraftworks's topic in How Do I Do That?
Proops sells on ebay as well, under the name spoorp -
@LumpenDoodle2, @Squilchuck , if you put your cursor over a persons name a wee box magically appears, at the bottom of which in the middle is 'ignore user. Click on that. It takes you to page where you choose how much of that person you can ignore. I've done that so I don't see the political postings now. If that ignored person posts something in the main leatherwork discussion I/you has the option to view that posting, or not I've done it before and when things settled down I un-ignored the people.
-
No, I've not got around to trying it out yet edit to add; maybe I'll do something soon just to test the idea
-
Another idea. One I've been toying with. A 3D 'Doodle' pen. It uses a plastic filament which it melts and its meant for children to doodle-draw. I bought one of the pens and some filament for under £10. Use one of these to lay down a filament line on the lines of your drawing. You may have to go over the lines a couple of times to get some height to them. Once hard again the plastic filament will be hard enough to impress into cased leather
-
Try to find someone with a 3D printer. They might be able to do one for you
-
I just spotted this one on ebay https://www.ebay.co.uk/itm/V-shaped-Leathercraft-Edge-Beveler-Skiving-Craft-Tool-Leather-Beveler-Tools-DIY/164310336173 Looks to be adjustable afaik its not a new design but I've not seen a new version of it for many-a-year I think I'll buy one as I'm always looking for a good groover
-
most excellent Thank you. Will access to it be by request like the funny leather stuff section? er, I mean the 'adult' leather section
-
I got my set thru ebay https://www.ebay.co.uk/itm/24-39-pcs-Style-Hole-Hollow-Cutter-Punch-Set-For-Handmade-Leather-Craft-DIY-Tool/363027217264?_trkparms=aid%3D1110006%26algo%3DHOMESPLICE.SIM%26ao%3D1%26asc%3D20200520130048%26meid%3D32515d191e044be4b3ea2afdf2b83d33%26pid%3D100005%26rk%3D8%26rkt%3D12%26mehot%3Dpf%26sd%3D133431273133%26itm%3D363027217264%26pmt%3D1%26noa%3D0%26pg%3D2047675%26algv%3DSimplAMLv5PairwiseWebWithDarwoV3BBEV2b%26brand%3DUnbranded&_trksid=p2047675.c100005.m1851
-
If you have a lot to do invest in a 6 inch bench mounted skiver or one of these, if the straps are narrow https://www.ebay.co.uk/itm/Leather-Paring-Machine-Edge-Skiving-Peeler-Manual-Leather-Splitter-Skiver-Blade/274310614756?hash=item3fde2fcee4:g:oaQAAOSwj~VcyAYC or one of these, which will do up to about 2.5 inches wide https://www.ebay.co.uk/itm/Handheld-Manual-Leather-Skiving-Machine-Skiver-DIY-Leather-Splitter-Leather-Tool-/373107824448
-
Are the 'machine rivets' at Le Prevo the same type? http://www.leprevo.co.uk/rivets.htm email them and find out
-
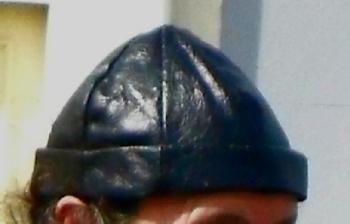
This hat started out a mid-brown colour of chrome tan upholstery leather. I cleaned down the uncut pieces with cellulose thinners which removed the top coat lacquer and some of the brown dye. I then gave it a few coats of Fiebings acrylic black dye, then a couple of coats black Resolene. After it was sewn up it got one coat of the acrylic varnish Its a good deep black and theres been no bleed off of the dye
-
What is 'the best'? What is best for me might not suit you. I use the standard Fiebing's black dye. A couple of coats of that followed by black coloured Resolene and that followed by 1 or 2 coats of an acrylic varnish.