


fredk
-
Posts
5,974 -
Joined
Content Type
Profiles
Forums
Events
Blogs
Gallery
Store
Everything posted by fredk
-
You can see the stitching for the zipper along the top on the outside. You can't see it on the inside because its covered by the lining
-
On thin people and women I add about 4 inches from the last hole. On big guys and fatties I add 6 to 8 inches from the last hole, depending on just how big they is
-
 Depends who you Pm'd. Northmount and Wiz respond pretty fast. Johanna can be fast too Is the mod you PM'd active? I usually look to PM a mod who is currently, or recently been, posting.
 -
1. a lot of men going west after 1865 carried their arms from the War between the States, aka the Civil War. These were mostly flintlock rifles and basic revolvers of ball & powder loading. If they had holsters for the pistols during the war they kept them. 2. In the early movies very many of the 'cow boys' were actual working drovers and used their own equipment, bought during the 1890s and later 1880s. The main makers of the leatherwork for the early movies were the same people supplying those drovers in the 1880s - 1890s. They continued to make for the films and embelleshed their work for the 'stars'. There is a direct lineage to the leatherwork. 3. Contrary to the movies, a ball & powder pistol is not accurate. You can hit a barndoor at 30 paces. You need to be only about 10 feet from a man to hit him. A rifle is of more use. On cattle drives drovers carried rifles and the chuck wagon carried the pistols in case of need, as well as extra rifles and ammunition 4. Each region had variations of holster work which could identify where the wearer was from or where he bought it. 5. Wearing pistols with butts forward is not necessarily 'cross-draw' but it could be what was called 'the troopers twist'. J.B. Hickok wore two 1860s butt forward but drew by 'troopers twist' . If you have a pistol handy, try it. Butt forward. Use your hand on the side you wear the pistol. turn your hand palm outwards, grip the pistol, draw and turn it as it passes your belly, to present and fire. I've timed it and drawing one or two pistols this way is actually faster than 'cross-drawing'
-
Use silk. Readily available for lining clothes. Bond it with iron on heat activated sheets of adhesive. Forgot what thats called. I'll add it later if I remember or someone else will name it.
-
A couple of books to look out for are the reprints of Sears Roebuck catalogues of the late 19th C. They have sections dealing with firearms, hardware, holsters, ammunition, holsters etc all with prices. The above book is worth its price, but not readily available in the UK. I bought mine off someone on here and it ended up costing me about £120 - customs and VAT got their share!
-
Removing smoke smell from saddles
fredk replied to CarolinaTackMan's topic in Leatherwork Conversation
Lemon juice is a mild acid. Its good for cleaning and degreasing. It will cover up unwanted smells for a while. Its also a good for a person body wash to remove smells, eg if you've been working around farm manure, food waste or in a chip shop etc, but on materials its only a temporary smell blocker Smells are carried on oil and grease particles. Remove these oils and grease and replace with fresh new ones and eventually the unwanted smell will be removed. Remove the smell carrying grease on the human body, the body usually re-oils naturally. On leather remove that smell carrying oil and replace with nfo in a good leather feed. -
Removing smoke smell from saddles
fredk replied to CarolinaTackMan's topic in Leatherwork Conversation
yup, the modest onion has many good properties. Its juice is a natural antiseptic. Odors in your fridge or cupboard? cut a fresh onion in half and leave in there and the smell will be gone. Painting a room? use onions cut up around the room to get rid of the paint smell. Clothes rinsed in a diluted onion juice will relieved of strong smells such as smoke smell from bonfires or barbies or caused by sweat or working around farm manure -
Removing smoke smell from saddles
fredk replied to CarolinaTackMan's topic in Leatherwork Conversation
I would suggest washing them down a few times with a strong water / vinegar & onion juice solution and allowing them to dry in a sunlit place where a lot of fresh air can get around them. Apply the usual leather feed and oils after drying -
After 10 years its probably been archived or culled
-
I have. No results to show you cos the item went into the scrap bin. Don't think 'baby blue' nor 'french blue' but think of a dark 'royal blue', just a bit lighter and brighter than a navy blue. I could not get it any lighter than that despite everything I tried - thinning and dipping, thinning and spraying, thinning even more and trying. With the thinning I had to do multiple coats/dips to get the colour even, then it was dark again. I ended up buying a bit of factory pre-dyed pale/light blue leather for the job - which was similar to yours, a customer wanted a light blue shoulder bag PS; I may have something with this blue on it, or maybe not. I'll look
-
I also have this jig. Its made of 4 pieces of 3mm thick clear acrylic. Three bolts are not full tightened, the one on top right is a wing nut, or butterfly nut. Loosen that to pull the four pieces of acrylic to the size of the letter stamps - in the picture they are 1/2 inch size. Tighten the wingnut and its all solid. afair this cost me about £3.50 to make.
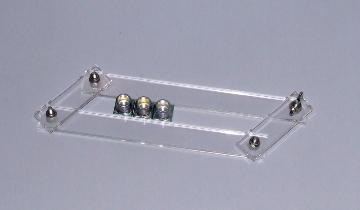
-
I also have this jig. Its made of 4 pieces of 3mm thick clear acrylic. Three bolts are not full tightened, the one on top right is a wing nut, or butterfly nut. Loosen that to pull the four pieces of acrylic to the size of the letter stamps - in the picture they are 1/2 inch size. Tighten the wingnut and its all solid.

-
You'll need to sew the seams
-
I had a sort-of similar problem. When I had a small-holding I cleared a field that had been used as a metal dump. I went to a few scrap metal merchants and said - 'free if you take it away' No one showed. A few months later one of the drivers from one of the dealers turned up on the look out. I told him £50 per ton. I got £250 out of it. Go figure! as is said by some
-
Mini padfolio with a long face
fredk replied to Stetson912's topic in Purses, Wallets, Belts and Miscellaneous Pocket Items
very nice indeedy -
Who is an European supplier of heavy beehive springs?
fredk replied to Gymnast's topic in Leather Sewing Machines
I've bought a few springs from this company (below). Perhaps they have something in their range https://www.eurosprings.co.uk/ -
Nice Just be sure to remind him to use it. He may think its 'too nice' to use daily
-
very excellent find
-
It looks like thin leather, tooled and laminated with a bit of card* in the middle and some sort of material for the insides. *Is that white card showing in the bottom left of the 2nd picture? Looks like stitching up the left edge in the top picture, maybe across the top and whats left of stitching holes across the bottom of it (where the leather is curved) I think whoever takes this on needs to have it in their hands whilst doing it
-
Build up the features with scrap leather and duck tape. Exaggerate them. Then when the leather is moulded over them the exaggeration is lost due to the thickness of the leather
-
I'm thinking that was made by a Navajo craftsman
-
I think visitors are not allowed to post photos nor send PMs. But you are signed in as a member. You may need to reduce the size of your photo. If you are using a phone send the photo to yourself first then try putting it on here.
-
I keep my spare spools in a couple of plastic boxes on a shelf unit. Thread for ready use is kept in the top part of my 'sewing' tool box along with my plastic box containing needles and other sewing needs
-
or. . . . a rare thing but you can get leather that has coloured metal foil bonded to it. I have some 'crinkly' gold & silver. afaik its available in smooth versions a well. If you can get this perhaps you can glue it on. Le Prevo usually has some Main page - look down for Metallic Leather : http://www.leprevo.co.uk/hides.htm colour example page: http://www.leprevo.co.uk/photos/metallic-colours.htm It is very thin and the plain gold is quite bright and shiney