Dwight
-
Posts
5,247 -
Joined
-
Last visited
Content Type
Profiles
Forums
Events
Blogs
Gallery
Store
Everything posted by Dwight
-
That's good looking, Stacy, . . . keep it up. May God bless, Dwight
-

Reinforcing Mouth Of Iwb Holster
Dwight replied to asbandr's topic in Gun Holsters, Rifle Slings and Knife Sheathes
When I was in the military, . . . we had our handy dandy, flap over, push the button through the hole, leather holster for our 1911's, . . . that were older than most of us and weighed almost as much as did the pistol inside it. One hand re-holstering???? You must be kidding, . . . unless you have 3 or more extra appendages on that one hand doing the re-holstering. Fast forward to civilian life and a CHL: Get up in the morning, . . . put on clothing, . . . add holster, . . . get ready to meet the day. Go to town, . . . maybe stop at the post office, . . . maybe visit your kid's school to watch a practice or a game, . . . stop at any one of a half dozen government buildings for licenses, license plates, election posters, etc. I do this at least once a week, . . . sometimes more often, . . . and I have a few places I shop that do not allow handguns. No, . . . I am not going out into my shop and create some dufus looking wannabe holster that requires two hands, 13 fingers, and the ability to bend over completely backwards and kiss the floor just to put my 1911 back in my holster. I want one that creates, . . . exemplifies, . . . allows, . . . and promotes one hand re-holstering. Why? Because I am lazy for one thing (I freely admit that, . . . ) and except for the first time in the morning, . . . standing beside my bed, . . . all the other re-holstering opportunities are in my vehicle, . . . sitting in the driver's seat, . . . and it is really hard to pull my left arm around my body, . . . past the steering wheel, . . . over the seat belt, . . . so it can hold the holster open while my right hand inserts the weapon. THAT, . . . is the reason I designed, . . . created, . . . and manufacture a holster that "creates, . . . exemplifies, . . . allows, . . . and promotes one hand re-holstering". It is not necessarily, . . . "tacti-cool", . . . but it is "practi-cool", . . . and it makes life just a little bit easier. May God bless, Dwight -
That's a good one, . . . BUT, . . . cutting up furniture in my wife's house, . . . ummm, . . . probably not a good idea. But, . . . the creativity is outstanding,.................A+++++ all the way. May God bless, Dwight
-
If you have the 2 inch or so round one, . . . don't do it. The edge speed will still be too fast to burnish, . . . it'll just burn, . . . no "ish". Rather, . . . take a 1/8 inch drill bit, . . . put it into a drill, . . . drill down through a 2 inch length of hardwood 1/2 inch dowel, . . . glue the drill into the hardwood, . . . put this contraption into your Dremel, . . . then take files and cut grooves into it, . . . put some bees wax on it, . . . and it will make a really good burnisher. I've made a number of them for friends and students, . . . they work great. May God bless, Dwight
-
A Pocket Holster Prototype...
Dwight replied to Double Daddy's topic in Gun Holsters, Rifle Slings and Knife Sheathes
FWIW, . . . all my pocket holsters will fall off the gun if held outside the pocket, . . . this doesn't seem like it would. Personally, . . . I would also never make a pocket holster with a forward cant, . . . getting to a weapon under stress is bad enough without the forward cant. Third, . . . I would put a cover in front of it, . . . probably not in jeans, . . . but every pair of my dress pants, . . . that thing would print worse than a $5 computer printer bought at a yard sale. Last, . . . it is obviously for a right handed person, . . . who now has to shift the weapon to his / her left hand so they can extract the extra mag, . . . so they can swap the two during an encounter, . . . while trying to watch bad Bob, . . . reload, . . . etc. This will sell on Etsy, . . . but in the practical world, . . . and please don't take this personally as though I'm really whacking you, . . . but the idea is just not well thought out, . . . IMHO. May God bless, Dwight -
I took some thinner, . . . wet down an old rag, . . . rubbed down my brown boots, . . . let em dry, . . . now I got black boots. You need to get the wax off for sure, . . . and I had plenty on there, . . . plus whatever was the original factory finish, . . . it all came off with the thinner. May God bless, Dwight
-
Reinforcing Mouth Of Iwb Holster
Dwight replied to asbandr's topic in Gun Holsters, Rifle Slings and Knife Sheathes
C'mon, Red Cent, . . . 11 gauge is closer to tank armor than flashing,........ that stuff is an eighth of an inch thick, . . . well, . . . almost armor anyway May God bless, Dwight -
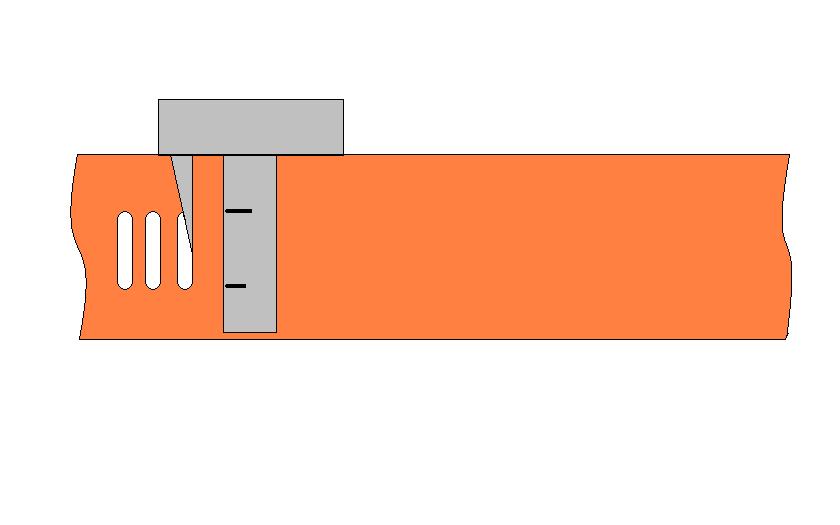
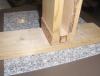
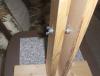
Right on my friend, . . . the leather is not a lining, . . . it is the hinge, . . . follow the picture, . . . it goes down under all three pieces there, . . . one upright is screwed to the bottom, . . . as well as the spacer, . . . the leather is just tacked onto the 1 x 4 with some little brass brads, . . . acts as a hinge. In case you haven't figured it out, . . . I am a scrounger, . . . don't always have to have "the thing", . . . I can usually figure some way of making something do, . . . in this case it was the hinge. May God bless, Dwight
-
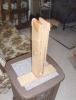
This is my little pony, . . . it is 18 inches tall, . . . base is about 14 inches long. It is cut out of one 1 x 4 pine board, . . . about 51 inches long or so (actually was a piece of scrap out in the wood shop, . . . a cutoff from another job). I lined the jaws with scrap leather, . . . used a cut off 1/4 x 20 piece of all thread (probably also a longer bolt cutoff from the shop), . . . and some nuts. Bottom hinge is another piece of scrap leather. Probably took me an hour to make. It sits on my chair, . . . between my knees, . . . and goes under my workbench or desk when not in use. May God bless, Dwight

-
There is also a Tippmann Boss stitcher on Ebay, . . . current bid is $610,................I love mine.
-
Two thicknesses of 12 oz leather becomes 3/8 of an inch, . . . of dry leather, . . . which will take a heavy duty treadle machine. As Constabulary pointed out, . . . most treadle machines on CL are dressmaker type machines that will at best sew a couple layers of 2 oz together, . . . and will not handle the thread you need. On the other hand, . . . take a couple of pieces of the leather you want to use, . . . make a change purse out of it, . . . stamp it a bit, . . . tool it a little, . . . then take it in to a larger JoAnn Fabric store, . . . ask one of the demonstrators there to show you how well their machine works (or won't work). You might be surprized. I do have a little "Brother" machine that I use for some light leather sewing, . . . I paid $25 for it to a lady who bought it for less at a yard sale. But, it will not do 2 pieces of 12 oz. Good luck, may God bless, Dwight
-
I'll try to answer best I understand the questions: 1. Yes I do, . . . in "most" cases. I can do that with full confidence as I always cement the pieces together, . . . sand and bevel the edges, . . . before I stitch groove. That gives me the ability to run a stitch groove on the front and the back and know that they will line up. 2. Yes, . . . if you do your part in punching them straight through. For the little bit of hand stitching I do, . . . I run both grooves, . . . mark it with a stitching wheel, . . . and punch through the front, . . . while watching the back. I use a pony most of the time for this. I watch for the point to appear, . . . if it is not in the groove where it should be, . . . I back up the awl a few thousandths, . . . re-push, . . . until I get the point to come out where I want it. 3. Lay down a piece of virgin bees wax, . . . stroke the awl on the beeswax (both sides of the awl) before starting in. That will fix your problem. 4. Take a look at the little drawing, . . . it'll show you how to clamp down the edges to get rid of the space you are having. On another note, . . . that is a good looking piece of leather work. May God bless, Dwight
-
I didn't know Ruger put rails on their bricks,........... Just kidding, . . . of course, . . . personally I don't think it would make a big difference on that particular model of gun, . . . there are some out there that would, . . . but I think you might be able to slide this one by with or without. May God bless, Dwight
-
Reinforcing Mouth Of Iwb Holster
Dwight replied to asbandr's topic in Gun Holsters, Rifle Slings and Knife Sheathes
I'll play the devil's advocate, . . . take a look at a Versa Max 2 holster from Milt Sparks, . . . take a look at my Cactus on my website, . . . we both use a reinforcement piece, . . . and I do know for a fact it makes a difference. My Cactus will stay open with that reinforcement piece, . . . and it does not need a piece of steel or anything else sandwiched in between. I cannot speak for the VM2 as to whether it has or does not have metal in it, . . . but the extra leather does far more than add thickness. It adds strength, . . . and it does also aid in keeping the mouth of the holster open so the re-holstering can be accomplished with only one hand, . . . something that cannot be done if the mouth collapses. But it is a "to each his own", . . . Lobo makes all sorts of holsters, . . . without reinforcements. May God bless, Dwight -
A stitching pony is very easy to make, . . . and it makes a world of difference if you do have to hand stitch something. May God bless, Dwight
-
Sewing on loops like Will showed produces a very pretty gun belt, . . . and it will carry the cartridges, . . . But if you get John Bianchi's video series on making western gun leather, . . . his process is much cleaner looking, . . . and from my personal experience, . . . is a better way to do it. Of course, . . . Will's process is geared mostly to the hand sewer, . . . John's is to the machine man. Either will work, . . . but neither is as durable as the #2 post from Bruno Rock above. May God bless, Dwight
-
I've still got an undyed right hand holster laying in my "project" box. I finished sewing the doggone thing, . . . all formed and boned of course, . . . but could not kick the "nagging feeling" that something was not right. Checked the fit, . . . AOK, . . . straps, . . . AOK, . . . dye I was going to use, . . . AOK, . . . anticipated fnal finish, . . . AOK. Re-read the order and determined that I needed to make a new one, . . . this time for a left handed individual. Some right handed fellow will come along some day. May God bless, Dwgiht
-
I haven't had a "learning experience" holster lately, . . . but does a rifle scabbard count? I had marked where to punch the holes for the conchos, . . . punched the holes. Only one of the holes, . . . of course on the front, . . . in the singularly most obvious position, . . . was in the wrong place, . . . and it was only off by 3 inches. I made a new scabbard. I think I'll just keep the other one for myself, . . . use it on Sunday, . . . call it my holy scabbard. Just don't let it get to you, . . . laugh, . . . spit, . . . drink 2 liters of Mt. Dew, . . . do something to get over it, . . . then, . . . yeah, . . . get over it. Folks been making learning experiences since Cain whacked Abel and found out that wasn't in the original script. Leather work is just a different way of making them. May God bless, Dwight
-
Thanks, Bill, . . . I make all my cowboy belts with a curve in them, . . . makes the top a tad shorter than the bottom, . . . makes it hug the hips better, . . . keep it from falling off. Cowboys really hate it when their gunbelts hit the dirt. I made the square originally so I could get that straight down slot from any place in the curve, . . . just have to make sure the front edge and the back edge of the top piece are equal distance from the edge you measure from. . . . May God bless, Dwight
-
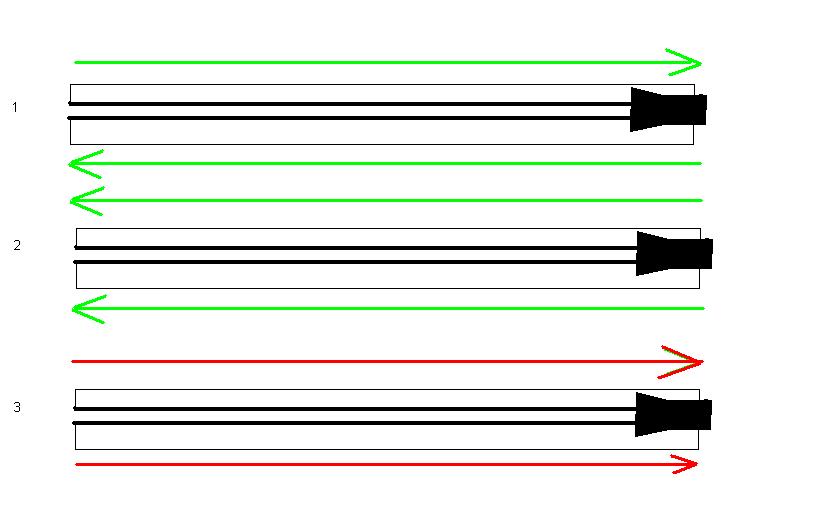
From the picture of the OP, . . . it seems he is doing style # 2, . . . which IMHO, . . . is THE way to do them. They will not get loose if done right, . . . they keep the rim of the cartridge from digging into the belt itself, . . . and they will get to a place where the cartridge is easy in / easy out, . . . but if you lay it down, . . . or tip over, . . . they won't fall out. Stitches on that style is just overkill, . . . and a lot of extra work for nothing. Actually the slots are pretty easy to cut, . . . if you have the "tool". It is a little home made "T" square that has marks for the top and bottom of the slot. It also has a little piece coming down from the top that shows the exact spacing for the next one. Makes the whole process a whole lot simpler. May God bless, Dwight

-
If I understand you correctly, . . . looks good to me. The stitching around the back of the zipper end is for me one of the most important parts, . . . as an unbroken line of stitches will keep it all together and from shifting around. Show us the finished project when you get it done. May God bless, Dwight
-
First Shoulder Rig
Dwight replied to Eaglestroker's topic in Gun Holsters, Rifle Slings and Knife Sheathes
As others have said, . . . good looking rig, . . . good looking work. Lobo definitely is one of the good guys, . . . May God bless, Dwight -
Gun Belt Questions
Dwight replied to glockanator's topic in Gun Holsters, Rifle Slings and Knife Sheathes
Glockanator, . . . If I understand correctly, . . . you are talking about a cowboy gun belt, . . . something similar to what John Wayne wore in his westerns. If that is the case, . . . the generally accepted rule of thumb is to make the gunbelt 4 inches longer than the belt the person wears to hold up his britches. That recommendation comes from himself, John Bianchi, . . . and so far it has not failed me. May God bless, Dwight -
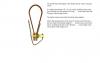
I found a long time ago that the most dangerous part of zipper installation is the direction it is sewn. I usually use example # 1 as it allows me to continue my sewing (sometimes at least) around the one end, without stopping, . . . it is a continuous sewing path. # 2 works well also, . . . the way of course I generally sew chaps. # 3 will work on chaps, . . . or something like that, . . . but if you use this sewing pattern on a billfold, a purse, a jacket, . . . you will often wind up with a zipper that looks like it was not put in correctly. And since I sew almost exclusively by machine, . . . they are always contact cemented in place before I start the first stitch. But even there, . . . sometimes, depending on the material, the cement has been known to come loose, . . . Zippers look good when done and done right, . . . but the can be a pain. More than anything else, . . . take your time. May God bless, Dwight

-
Actually, . . . not meaning to disparage TexasJack, . . . but if it is done correctly, . . . that cannot and will not happen. First, . . . make sure the leather you are using for the loops is about a good 1/16 wider than the slots you punch. They then get pinched into the slot and don't move because of that pinch at the top and bottom because of the excess width. Second, . . . pull the loops tight around the cartridges as you go. Third, . . . contact cement your loops to a liner and sew the edges together to make your belt. There is then no feasible way the loops will become loose by taking out a cartridge here and there. That is simply an internet rumor, . . . as far as I am concerned, . . . and if anyone saw it happen, . . . I'd chalk it up to sloppy workmanship on the belt. May God bless, Dwight