Dwight
-
Posts
5,262 -
Joined
-
Last visited
Content Type
Profiles
Forums
Events
Blogs
Gallery
Store
Everything posted by Dwight
-
I don't do a lot of stamping on my gun belts I make, . . . most folks want em plain and simple (don't make me mad either). BUT, . . . when I do have to do one, . . . everything else is done but the staining and finishing. It's glued, screwed, buckled, punched, sewed, . . . Reason is simple: that is the part I'm confident in, . . . the stamping is the part I cannot afford to screw up with one of the other processes. If it has to be stamped, . . . I do it then, . . . because it forces me to take my time, . . . be careful, . . . not "mess up a good thing". But, . . . that's just me and my way, . . . May God bless, Dwight
-
Welcome to the forum, . . . from one of them Buckeyes, . . . Glad to have you aboard. May God bless, Dwight
-

Magazine Carriers
Dwight replied to cleanview's topic in Gun Holsters, Rifle Slings and Knife Sheathes
OTOH, . . . I can knock out a wooden mag in something close to 15 minutes, . . . or at least something that will make the pouch for me. Biggest part of the time is looking through the scrap bucket for a "right sized" piece to make it from. Cut, . . . sand, . . . form, . . . use, Of course, . . . having a cut off saw, . . . jointer, . . . router, . . . band saw, . . . belt sander and an orbital drum sander, . . . and a pile of lumber always at hand does sort of help too. May God bless, Dwight -
It is not what you want to use as much as what your customer wants to have their chaps made from. I've made them from suede, . . . from 3 oz upholstery leather, . . . chrome tanned, . . . Let your customer define what they want. I took a chance last year for a very special pair, . . . for a very special young lady, . . . really soft milk chocolate upholstery leather, . . . they are still the talk of her group, . . . and if I tell you she looks good in em, . . . not even half the point. OTOH, . . . mine, my two riding partners, . . . all out of suede. Try suede for your first pair, . . . for you. AND, . . . a trick I use for new customers, . . . I make a trial pair out of the heavy vinyl that is sold at JoAnns fabrics. I get their 40 or 50 off coupon and go in buy a yard to 2 yards, . . . that material fairly well imitates 1 or 2 oz leather, . . . and it gives you a really durable pattern. They can even go riding in the pattern if they want, . . . and when you're done with their pair, . . . you have a pair of "trial chaps" that the next person can try, . . . May God bless, Dwight
-
Determining Seam Lines For A Pancake Revolver Holster
Dwight replied to Paramedic04's topic in How Do I Do That?
Paramedic, . . . the easy way is to make the back of the holster flat. Prepare the back by outlining it, . . . cutting it out. Make up the front edge (closest to the belt buckle) with both of the pieces there, . . . sewn, . . . just don't pop out the belt loop yet. The actual "front" of the holster at this point will be the leading edge, . . . and a big glob of leather, . . . specifically cut too big, . . . so you can put that Python in a baggie, . . . soak that front piece of leather, . . . and hand mold and form it to the Python. Don't be gentle, . . . do it, . . . do it right, . . . make that leather mold into the cylinder flutes, . . . front of the trigger guard, . . . front of the cylinder, . . . down the edge of the ventilated rib. Then, . . . gently remove the Python, . . . and hang the holster up over a stretched out string, . . . along the sight track, . . . let it dry for at least 24 hours. Come back, . . . put the bagged Python back in the holster, . . . clam shell it shut, . . . mark and cut away the excess, . . . glue, cut, bevel, gouge, stitch, . . . and you will have a holster you will be proud of. This is how I make all my revolver pancake holsters, . . . never had a customer come back yet and say it was uncomfortable. Actually, I wish I lived near you, . . . would love to do a "joint project" on a 4 inch Python. I had one once, . . . let it slip away, . . . have kicked myself more times than you can ever imagine. If you really want to cheat, . . . just lay a piece of soaked leather down on the bagged Python, . . . put it all in a vacuum bag, . . . on a cutting board bigger than the backside of the holster, . . . turn on the vacuum sealer, . . . and you can get the form of the front, . . . then cut it out, . . . add the back to it, . . . and you have a holster. I've done it that way too, . . . and it does work, . . . I just use a semi-pro vacuum rig. Make sure you post some pics of the thing when you get it done. May God bless, Dwight -
Contact Cement Timing
Dwight replied to ejcrist's topic in Dyes, Antiques, Stains, Glues, Waxes, Finishes and Conditioners.
Contact cement directions clearly state that the cement is supposed to dry BEFORE you put the pieces together. Putting it together while it is still wet, . . . may result in it not curing for several days if not weeks, . . . and will never bond together like it should. Course, I could be wrong, . . . only been using this stuff for about 50 years. May God bless, Dwight -
Magazine Carriers
Dwight replied to cleanview's topic in Gun Holsters, Rifle Slings and Knife Sheathes
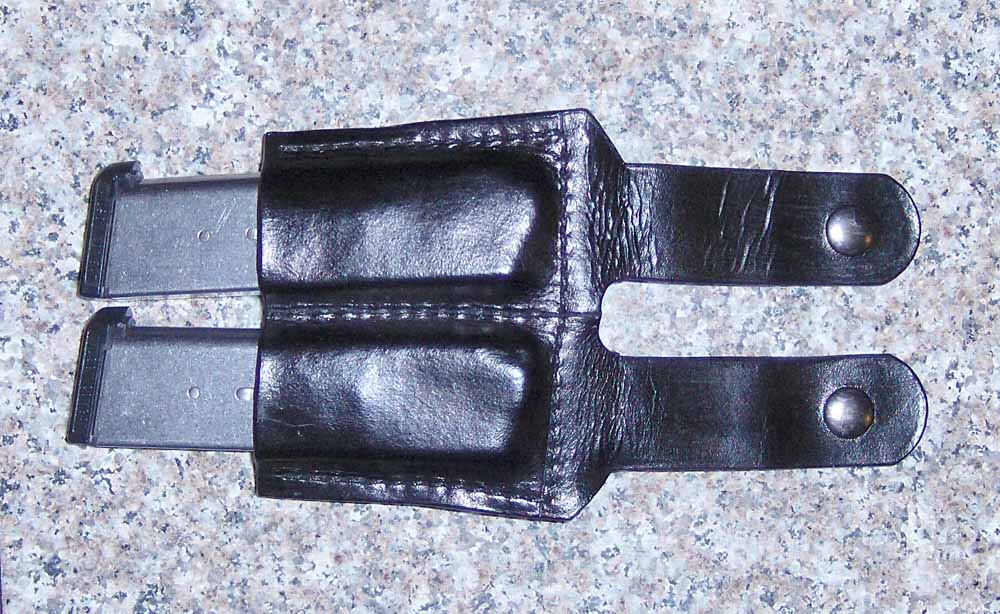
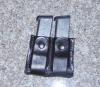
The vast majority of mine are simple white pine, spruce, or fir, . . . cut from a scrap piece of 2 x 4, . . . sanded to fit. I found out that the single most important part of it is the sanding. They need to be slick and free of splinters. I've also got a double mag pouch I made a number of years ago for an XD 45, . . . it's a double stack .45 ACP. I had not used it in several years, . . . needed a black double stack for a special assignment, . . . grabbed it and put it on, . . . it works with the single stacks as well. My mag carriers are simple things, . . . see the pics. As you can see, . . . just two pieces of leather, . . . sewn together to make two pockets. May God bless, Dwight
-
Magazine Carriers
Dwight replied to cleanview's topic in Gun Holsters, Rifle Slings and Knife Sheathes
And when you get done using Troy's method (it's also my method) you'll have a box of fake mags as big as my box, . . . Seriously, . . . that is the way to do it. May God bless, Dwight -
Rear Conchos Won't Budge - Need Help
Dwight replied to Saddlebag's topic in Saddle Identification, Restoration & Repair
Just in case you made that into a motion, . . . I'll second it, . . . only had to mess with them once, . . . that was twice too many times. Can we somehow get a binding vote on it,..................lol May God bless, Dwight -
I started to tell you how I do it, . . . but he's already laid out "our" way of doing it. May God bless, Dwight
-
Rear Conchos Won't Budge - Need Help
Dwight replied to Saddlebag's topic in Saddle Identification, Restoration & Repair
Personally, . . . I'd like to thank everyone for the useful tips. I don't and haven't done a lot of saddle work, . . . but my channel lock pliers works wonders on a stuck concho, . . . pulls nails pretty good too. May God bless, Dwight -
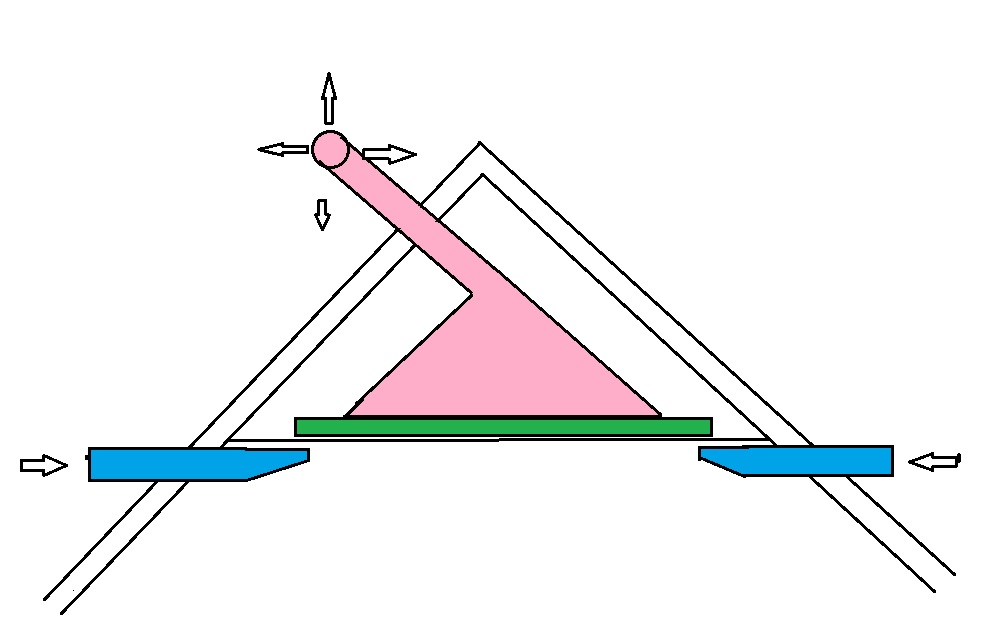
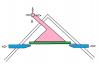
Just remember when you are doing that "exhausting", . . . and equal amount of make up air has to come from some place. With the winter here, . . . that's a lot of cold air coming inside. I usually just leave for a while, . . . go do something else, . . . come back and the fumes have dissipated to a tolerable level. I used to work in a paint factory, . . . we had a "bunch" of spray booths, . . . I'm building mine later on and it will look like the little drawing. Blue is make up air, pink is exhaust, green is the air filter. It will be about 30 inches wide, . . . and about 30 tall, . . . sitting in the corner of my shop, . . . over my sink. Since that is where the gluing, spraying, finishing, etc is all done, . . . it'll keep the fumes down to a mild roar. I'm hoping to have it done by spring, . . . ready to install when the weather gets better. Basically the make up air is throttled, . . . to pull more from the room when doing glue work., . . . then let go wide when you are spraying a finish or a dye or whatever. There'll be some trial and error, . . . but I've seen em work, . . . so it'll just be a matter of getting the flow right. The fan sits behind the filter, . . . the filter is to protect the fan from getting too much stuff on it. Fan has to be type of motor with no exposed brushes, . . . should be sealed too. May God bless, Dwight
-
Help, Lookin' For A 4" Ruger Security Six Dummy Gun
Dwight replied to snubbyfan's topic in Leatherwork Conversation
That can be a trick sometimes, zuludog, . . . with several thousand different makes / models / barrel lengths, . . . hard to have one of each, . . . but at 35 to 50 dollars each for "blue guns", . . . we can have one of each of the most popular ones. And the blue guns do an excellent job of mimicking the real one. Snubbyfan, . . . let me look, . . . I might have a 3 inch, . . . with a little finageling, . . . it should work, . . . I'll be out in the shop maybe this afternoon, . . . and if I don't forget, . . . I'll check. May God bless, Dwight -
You Never Know What You Are Going To Get In To
Dwight replied to taintedelephant's topic in All About Us and Off Topic
Nahhhhh, . . . that's not ADD or OCD or any other alphabetically concocted malady, . . . it is indeed "condition normal". Or at least it is in my family, . . . all my brothers & sisters (5 bros / 4 sisters), . . . my wifes family (5 sisters / 3 bros), . . . mom's family (4 sisters / 3 bros). I would go out the door a screaming bonkers whooooo-dooooooo if "normal" was putting everything back in it's place as soon as I'm done with it, . . . OR, . . . if there was no "place" and everything just always got left where it was last used. Right now I'm a bit overwhelmed, myself, with "where is it", . . . as we have been building our carport / garage / leather shop for the past 16 months, . . . and the "putting stuff away" has kinda not been done, . . . but it will be. Either I'll do it, . . . or just before the estate sale, . . . my executor will see it's done, . . . after I'm ground temperature. And I don't get all wrapped around the axle worrying about which way it will turn out. May God bless, Dwight -
For what you are doing, . . . some home machines will do it. Go to JoAnns fabric and buy their upholstery thread, . . . set you stitches for as long as your machine will make them to start with. You also will need a #18 or so needle, . . . ask them at Hobby Lobby for leather needles. I have two machines that will, . . . two that won't. May God bless, Dwight
-
Looking at it with 70 year old eyes, . . . it looks like it is hand stitched, . . . and the stitches look rather good from what I can see. But you probably did not glue the two together before you started sewing is my guess. I machine sew, . . . so I don't have any choice but to glue first and sew later, . . . and it works for me. No puckers. May God bless, Dwight
-
Tanners Bond Contact Cement Problem. Please Help.
Dwight replied to NewYorkerInSydney's topic in How Do I Do That?
No, . . . the mask is only required if you are subbing as a terrorist while the glue dries. May God bless, Dwight -
Tanners Bond Contact Cement Problem. Please Help.
Dwight replied to NewYorkerInSydney's topic in How Do I Do That?
I have never used Tanners Bond contact cement, . . . but I have used others for the last 50 years, . . . and if Tanners Bond acts like everyone has said above, . . . it is junk and should rest easy in the local land fill or city dump. Weldwood is what I use on my holsters, belts, purses, sheaths, straps, . . . shoes, shoe soles, etc. I have shoes I wear that have new soles applied with Weldwood, . . . never sewn, . . . ABSOLUTELY no problem. A friend has a .380 holster that was put together with Weldwood, . . . never sewn, . . . ABSOLUTELY no problem. Weldwood is applied to both pieces, . . . and dried until it is DRY to the touch. Not tacky, . . . not wet, . . . DRY. It is then positioned and placed together, . . . then pressed by hand, by a rolling pin, by a wall paper roller, by thumbs, . . . and some even put weights on it if the application allows it. I actually dry most of my pieces with a small, low wattage heat gun, . . . then put them together. May God bless, Dwight -
From north / central Ohio, . . . welcome, . . . grab an old dead cow and set a while,............ May God bless, Dwight
-
It only takes over the whole house long enough for you to build a separate building for it. That only took me 5 years, . . . and about 3 grand. Oh, . . . and that word you used, . . . uhhh, . . . "Expert", . . . well, ummmmm, . . . money doesn't buy that. You can become really good at one or two things in a couple of years, . . . but even then, . . . "Expert" is a long way down the pike. I'm 70, . . . been messing with leather on and off for almost 60 years, . . . and will be ground temperature long before someone tags me with "Expert". Very few attain that status, . . . and that is not meant to dissuade you, . . . just inform you. May God bless, Dwight
-
Bob, . . . I only use Resolene on my belts, . . . unless it is an "old" looking one, . . . which gets beeswax/neetsfoot oil compound. I like Resolene, as it is one tough finish. And, yes, . . . I use it on the whole belt, . . . both sides, edges, . . . the whole thing. The flesh side still maintains a bit of a rough texture which is important for some of the things I do. May God bless, Dwight
-
Don't laugh, . . . but I have what would easily pass for a shoulder purse, . . . that I made especially for blackpowder hunting. It holds all the "stuff" needed to keep old Betsy ready out there in the field. That (and the fact that my wife has a shoulder bag she has had since about 1972) both convinced me. Mine has a very light coat of Resolene (cut 50/50 with water), . . . my wife's purse seems to be oiled only. Both work very well. Sealing the fibers down is a moot point, really, if you start out with a really good piece of leather for the strap. Those fibers will be down, . . . and will stay down. May God bless, Dwight
-
Hey, TB, . . . how many do you need? May God bless, Dwight
-
I'm going to have to respectfully disagree with not using the flesh side. Go to any large store that sells leather purses, . . . even high end, . . . EXPENSIVE, . . . purses have the flesh side revealed on many of their straps. If it is properly sealed and dressed, . . . and you start out with a top grade piece of leather, . . . it will be a plus for the strap. Flesh to flesh veg tan straps are very slick, . . . tend to slide around on shoulders, etc, . . . flesh side has a little purchase power and will be less apt to slide off. May God bless, Dwight
-
How To Burnish A Belt Edge If I'm Not Beveling The Edge?
Dwight replied to Rancho5's topic in How Do I Do That?
Several coats of resolene on the edges alone might do that, . . . but it also might produce an edge that will cut you, . . . it's pretty hard stuff. May God bless, Dwight