Dwight
-
Posts
5,257 -
Joined
-
Last visited
Content Type
Profiles
Forums
Events
Blogs
Gallery
Store
Everything posted by Dwight
-
Show me what you want the mold made for, . . . I have made several for other leather projects. May God bless, Dwight
-
I do it the simple way: 1) prepare the belt, . . . sewing / tooling / stamping / and dress the edges with the proper edging tool 2) burnish the edges with water and a wooden burnisher on my motor or with my dremel 3) dye the belt, . . . dip dyed in whatever solution I choose for the product, . . . if it is Feibings oil dye, . . . it is generally cut 50% with thinner, . . . let dry 24 hrs, . . . lay on bottom edge of belt in a circle on cardboard for 10-20 minutes, . . . turn it over, . . . leave on the top edge for an hour or so, . . . hang up by one end. If you hang it up right out of the dye tank, . . . dye will migrate to the lower end, . . . giving you a dark end / light end / multiple shades in between. 4) apply 1st coat of Resolene, . . . cut 50/50 with water, . . . applied with cheap 1 in bristle brush, . . . flesh side, . . . then top, . . . hang it up, . . . touch up edges where you handled it 5) re-burnish the edges / add hardware / if I want it to have a high gloss finish, . . . 50/50 mix of neatsfoot oil and bees wax applied to the outside and edges with my finger, . . . let dry, . . . buff, . . . kinda like using shoe polish. That's my way, . . . works for me. May God bless, Dwight
-
Another voice saying Thank You,................... May God bless, Dwight
-
I use a ball point pen on the hair side. I fooled around for a long time, . . . trying not to "make cutting mistakes" by just lightly marking on one or the other side, . . . made more mistakes that way than I am now. Besides, . . . marking the flesh side makes you slide it around on the hair side, . . . too much chance of creating a burr, scratch, etc. I figure if I commit to doing it, . . . well, doggone it, . . . do it, . . . do it so you can see it, . . . May God bless, Dwight
-

Revolver Holster Questions
Dwight replied to cleanview's topic in Gun Holsters, Rifle Slings and Knife Sheathes
Quite honestly, . . . constructive notes, . . . if you wear either of these daily for 2 months, . . . the gun will probably fall out of either of them when you lean back in your recliner. The artwork is good, . . . stitches are definitely passable, . . . and while the molding is more than I prefer, . . . it's good. Where you missed it is the single most important part, . . . your stitch lines are in Mississippi, . . . the gun is in Alabama. Tighten those stitches all the way up to the edge of the molding. If you don't, . . . because the holsters are outside the waist band, . . . there is nothing to "hold them steady", . . . the butt of the gun will rock back and forth as you walk, turn, sit, or otherwise move. It will waller out the excess you left and make it more of a bag than a holster. But, . . . this is the fun of learning a new craft. You are on your way, . . . looking good so far, . . . just tighten em up. May God bless, Dwight -
Do You Have To Oil Dyed Vegetable Tanned Leather?
Dwight replied to lwika16's topic in How Do I Do That?
You need to determine if it is the leather or the finish that is cracking. Then, . . . dampen the leather before you dye it, . . . and make the fold, . . let it dry, . . . dye it. That should take care of the cracking either way. You didn't say what you use for the final top coat, . . . finish, . . . and since I don't deal with pinks, . . . I have no real suggestion, . . . but you might try out some Resolene, . . . two very light coats, . . . 50/50 mix with water. The only pink I have done lately was a very special pair of spur leathers for a very special little young lady, . . . I used Resolene on them and was satisfied with the result. May God bless, Dwight -
Do You Have To Oil Dyed Vegetable Tanned Leather?
Dwight replied to lwika16's topic in How Do I Do That?
Simple answer, . . . don't oil it. I almost never oil my products, . . . unless the leather feels extremely dry. Most of the leather I work with is acceptable without the oil. For something as artistic and delicate as you are doing, . . . as they would say in Joisey, . . . fugeddabouddittt. May God bless, Dwight -
Or a larger pulley on the machine, . . . usually pretty hard to do. May God bless, Dwight
-
Well, . . . I've never been enlikened to Paul Harvey before, . . . but thank you, . . . he certainly was one of my favorite personalities of yesteryear. I used to make sure at 12:00, . . . I was somewhere near a radio, . . . I've even pulled off the freeway, . . . opened up my brown bag / balogna / PBJ / and chocolate milk lunch while I listened to him. I'm not sure I ever really learned anything from him that made a great difference in my life, . . . but in a dull and dreary world, . . . he was certainly a bright light of entertainment for me. Thanks again for the compliment, . . . may God bless, Dwight
-
Brett, . . . In a one word answer, . . . "Yes", it is a business you can break into and make a living. I don't make a living at it, . . . it's a hobby for me, . . . but there are just too many successful stories to say no you can't. But it is like any other product, . . . you have to have a good product, . . . know your market, . . . know your competition, . . . be flexible, . . . and for at least a while, . . . you will have to work some long, long hours. Get an internet presence, . . . (mine is with GoDaddy, . . . a good place to start I think), . . . get a Gunbroker.com account, . . . get an Ebay account. From what my ears tell me, . . . brick and mortar is fading fast, . . . E-commerce is the wave of the future, . . . and that has been my experience. The one serious exception I have found, . . . is gun shows, . . . if you can handle it. I've done well at local gun shows, . . . but again, you have to pre-guess the customer's desires, . . . and that only comes through experience. And the reason I say, . . . if you can handle it, . . . it will take up both of your weekend days, . . . from about 6 in the morning until 6 or 8 that night, . . . and you WILL have to put up with some people that you would just as soon you never, ever, met in your lifetime. I sat across a room one Saturday, . . . selling $50 to $100 holsters, . . . fellow on the other side of the room was putting a kydex and leather thing together (it seriously looked like the blanks were cut with a table saw) and selling them for 20 bucks a pop. He had more sales in units, . . . and probably took home more cash, . . . and put out a product I would not have had my name associated with. I prefer custom work, . . . I have a muzzle-down shoulder holster to make for a young man, . . . with a double mag holder on the other side, . . . and his Glock has a flashlight on it. CHALLENGE, . . . yeah !! I'm also making his fiance a holster for hers, . . . but it will be just a plain vanilla job, . . . little challenge at all. Start out slow, . . . do a "bang up" job on the work, . . . price them accordingly, . . . you'll do all right. But remember, . . . you will never be able to compete with the trash being sold at Walmart, and even some of the high end gun stores. Good luck, may God bless, Dwight
-
I make my patterns usually out of file folders (thank you John Bianchi), . . . and some of them I have transferred to the material Tandy sells and calls bag stiffener. It is a lot stiffer, . . . and holds up really well to a heavy fisted old coot like myself. I gave up a long time ago on scribing, or using a pencil, . . . I get out the ball point pen, . . . outline my pattern, . . . then I don't have to go searching for where my wife put my reading glasses, . . . or wonder if the cat grabbed em. By the time I put the pattern back in the file and step back over to the table, . . . the ink is dry and I can both cut and see what I'm cutting. The really neat thing about ball point ink is you get a good line, . . . not too wide, . . . not too narrow, . . . and you can see the doggoned thing. Oh, . . . and a side benefit of using a ball point, . . . you will learn after only a couple of mistakes, . . . make sure that you want THIS piece cut out of THIS leather. You will suddenly begin to make really good decisions in that department. Enjoy,.............. May God bless, Dwight
-
Need To Fold Leather And Get It To Hold But...
Dwight replied to thekid77's topic in How Do I Do That?
I don't recollect where it came up the first time, . . . but after a similar complaint / statement, . . . someone chimed in "well, think about how many years it took the cow to make your leather in the first place". Kinda puts the whole thing in a different perspective. And besides that, . . . as Pops always used to say "Builds character, son". May God bless, Dwight -
It has to be slightly longer, . . . if not, . . . there is no room for it to crimp over, . . . holding the other piece in place. You don't say what you are doing, . . . but I very seldom need anything different from the bulk packs I buy at Tandy's. May God bless, Dwight
-
Just a word of caution, . . . be careful about molding the trigger guard real deep on striker fired weapons. That trigger can move very quickly with very little pressure, . . . and of course you understand the effects of that happening. But, . . . otherwise, . . . it certainly is a ton better than my first one. May God bless, Dwight PS: I still have it, . . . but NOBODY sees it.
-
Flat Back Holster Help
Dwight replied to 40Rock2's topic in Gun Holsters, Rifle Slings and Knife Sheathes
Sounds like you have the process in hand. That's the way I do it, . . . but use a cutting board instead of the 1 x 6. First one I ever did, . . . I thought I was going to have to resort to surgery to get my weapon back. May God bless, Dwight -
My first was made of some very expensive, thick, felt, . . . was supposed to be "the best". It worked. Tried a plastic burnishing tool from Tandy, . . . cheap. It worked. Made some out of hardwood dowels. They work . . . Personally, . . . I think it is more the person doing the work than the tool, . . . but I am partial to my home made wooden ones: pine, ash, maple, . . . whatever is available when I need it. May God bless, Dwight
-
Need To Fold Leather And Get It To Hold But...
Dwight replied to thekid77's topic in How Do I Do That?
Fold it, . . . lay it on another piece of leather, . . . put a third piece on top of it, . . . then stand a concrete block on it for a couple of days. May God bless, Dwight -
Have you thought about going to some place like Salvation army, . . . Goodwill industries. Take a shot at what they have, . . . if they have "THE" boot that fits your bad foot, , . . and another that fits your good one, . . . buy both pairs, . . . take em home, . . . fill em full of plaster of paris or something similar. Take a razor knife and cut the boots off the plaster cast, . . . sand it down a bit and cover it with a very light covering of fiberglass, . . . when that dries and is sanded smooth, . . . I would think the last would work to make the pair you need. You may have to do a "trial and error" pair first, . . . but if you make them as a lace up, . . . you could still use them. Once you get your pattern adjusted exactly to your feet, . . . you can then make your pull on pair with confidence. Anyway, . . . if I were doing it, . . . this would be my first attempt. Just remember that you have to make some sort of cut out and hinge part in it so that when your actual "foot" portion of the boot is made on the last, . . . you can then extricate it from the leather. May God bless, Dwight
-
Gunbroker is also a good source. I just finished a pocket holster for a Polish P-64, . . . owner took photos with ruler beside the weapon, . . . did a few quick caliper measurements, . . . I scaled it up on my printer to full size, . . . glued it to a piece of pine that was the right thickness, . . . glued another printer pic that was reversed to the other side, . . . cut out the pieces on a band saw, . . . rounded it with a router and some work on my power sander, . . . Customer was thoroughly pleased with the outcome. Now, . . . if I ever need it again, . . . I have a Polish P-64 mold. I've done several like this, . . . including revolvers, . . . AND, . . . don't quote me on this, . . . but if my memory serves me correct it is very similar to a Bersa Thunder 380, . . . but just a tad more beefy than the Bersa. May God bless, Dwight
-
Best Method To Cut Internal Holes And Finish The Edges
Dwight replied to jshill's topic in How Do I Do That?
I have also found (mostly by bad experience) that I can about 99% of the time NOT need a hole with square corners. Slightly rounded corners work in just about everything I do. That said, . . . I use a round punch to do all four corners, . . . then connect the cutting like you talked about with the awl. The punch actually starts that burnishing process in the corners, . . . by compressing the leather there, . . . and using a little burnisher I made by putting a 1/2 inch dowell on a 1/8 in drill bit (long ways), . . . and by notching it, . . . I can burnish those little holes very well. I couldn't find the pictures I have of them, . . . so here is a little drawing that shows kinda what it looks like. The 1/8 inch drill bit fits exactly in my Dremel, . . . works like a champ. I drilled the dowell, . . . glued the drill bit in, . . . put it in the dremel, . . . turned on the dremel, . . . and used it like a little wood lathe, . . . taking out the grooves and shaping it with files, etc. May God bless, Dwight burnish tool.bmp -
Marie, . . . you would probably be better off looking for alternatives to dye, . . . Depending on the "color" you want, . . . strong brewed coffee can make a nice brown, . . . vinegaroon does one of the best blacks available. There are alternatives. Stop at a Tandy store, . . . some of their water base stuff is pretty light on aroma. May God bless, Dwight
-
I'm Told That This Does Not Actually Exist..
Dwight replied to tboyce's topic in Patterns and Templates
I thought about photo shopping my face into the picture, . . . sending it to my daughter in law, . . . Maybe I'll wait until I become Pawpaw, . . . might work out better. May God bless, Dwight -
Revolver Holster Questions
Dwight replied to cleanview's topic in Gun Holsters, Rifle Slings and Knife Sheathes
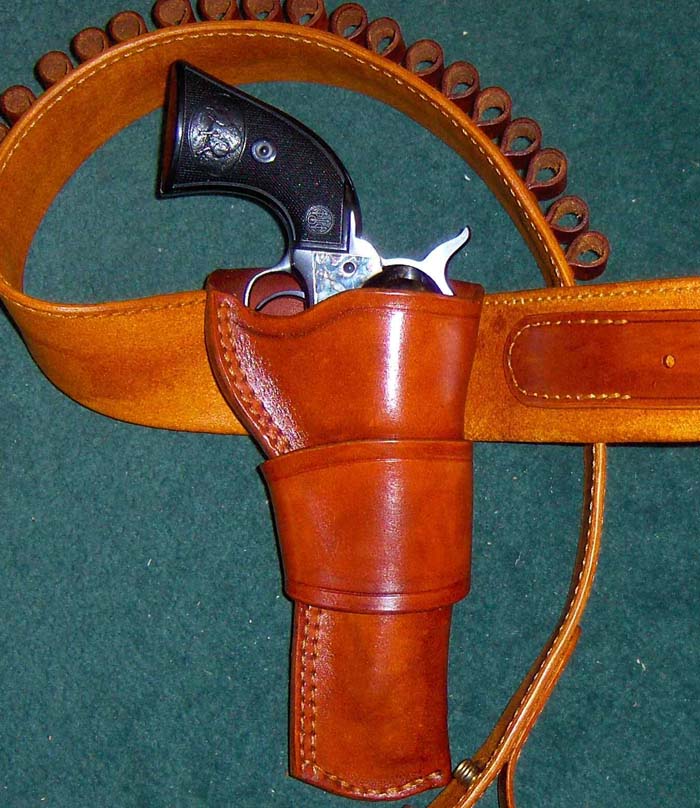
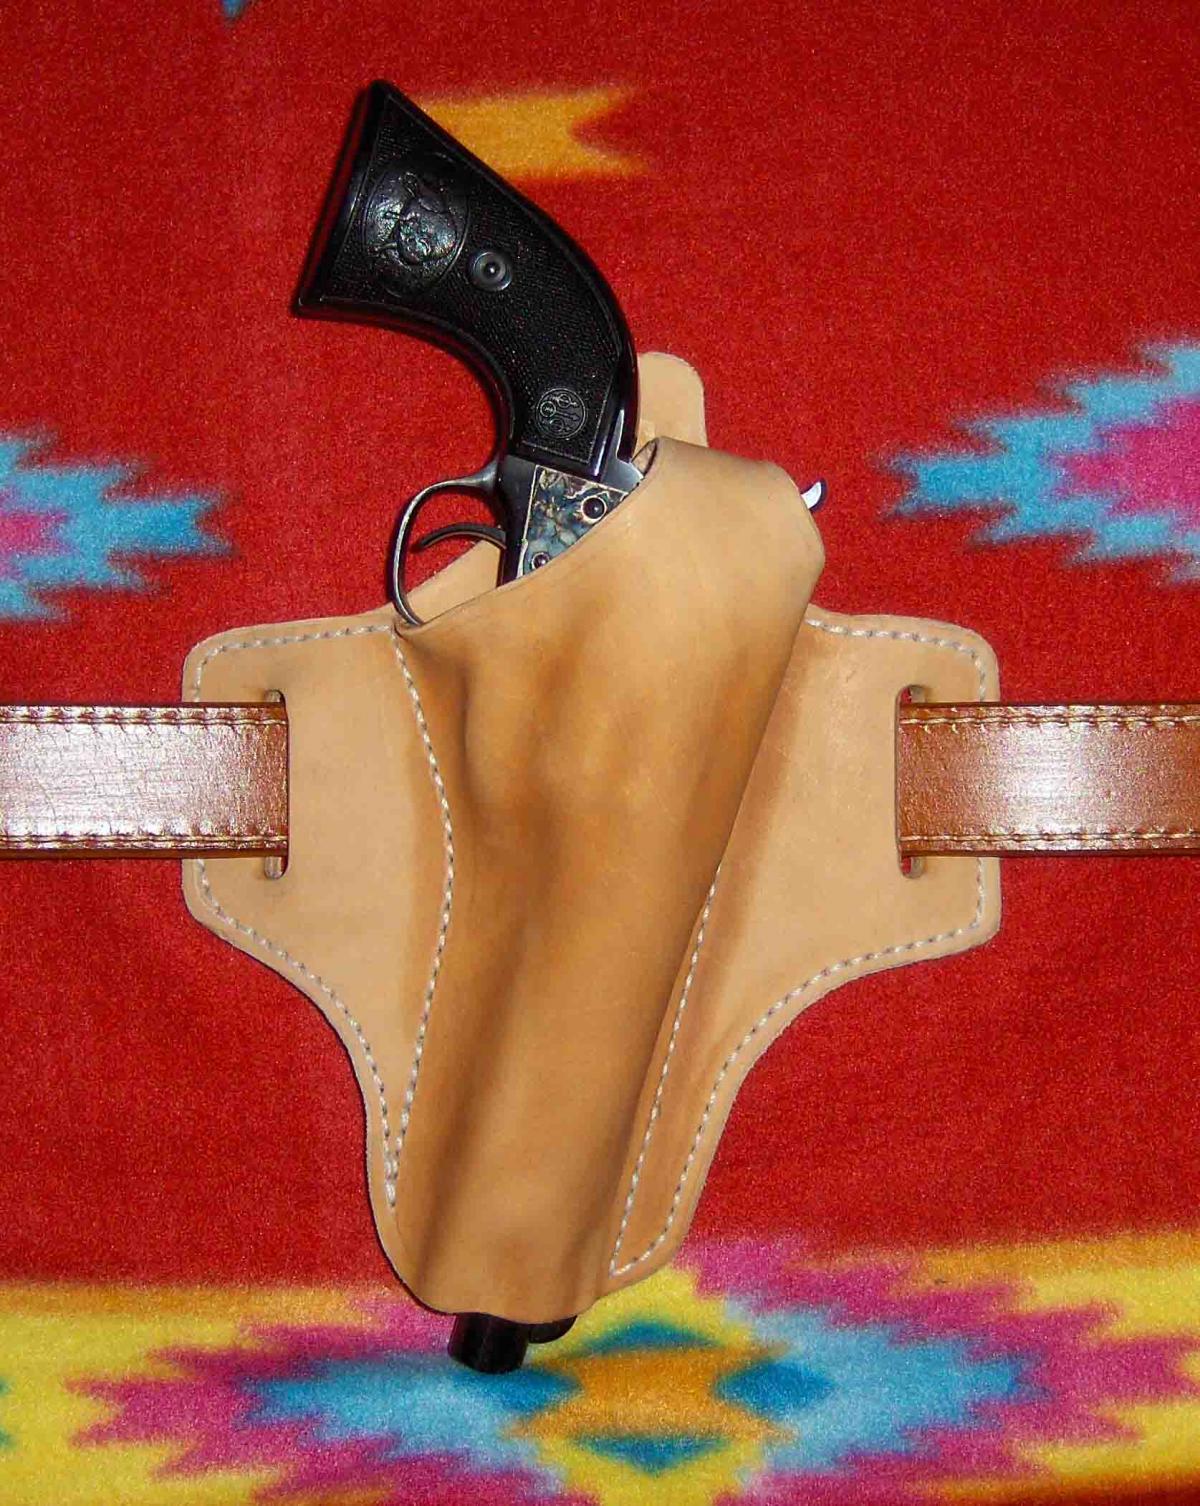
I also do not make a lot of holsters for revolvers, . . . few of my customers have or carry them. I couldn't quickly find any other pictures but these two, . . . one of course is a cowboy rig (Duke rig to be specific) and it shows how deep I generally do my revolver holsters. The second one was for a cowboy out west who had a revolver, . . . just like mine, . . . but a shorter barrel. He uses his single action .45LC for concealed carry, . . . in a pancake style, . . . with a thumb break. Personally, . . . I like the old style clam shell holster for small revolvers, . . . when I carry my Colt Det. Spec, . . . it is in a clam shell. May God bless, Dwight

-
At the risk of sounding like a broken record, . . . I think it needs to be said that talent is first and foremost: an inherent trait / attitude / ability / or edge of some kind that one person has, . . . and not everyone else does, . . . nor can they all ever get it. There is a young man in England who can hear a tune, . . . play it on the piano letter perfect, . . . in any of a multitude of different styles, . . . has been on 60 minutes several times, . . . but cannot remember to eat, shower, or change clothes. Music he has, . . . social order he does not. So are ALL other talents to one degree or another. I have no talent for decorating, tooling, stamping leather, . . . nada, zero, zilch, none whatsoever. I can fake it enough to get a piece passed, . . . because I can do the mechanical part of making, lacing, sewing, stitching, dyeing, finishing, etc. I make holsters, belts, knife sheaths, and an occasional purse or billfold, . . . and they are Aunt Jemima plain, . . . nuttin' fancy. I said all that to get to this point: everyone has talents, . . . the real trick is finding where they are, . . . unlocking them, . . . using them. As an example, . . . I have 3 brothers, . . . all raised in the same household, . . . ate the same food, . . . drank the same water, . . . got whooped with the same switch from time to time. Two of us are very comfortable working on anything mechanical. Myself and another are comfortable working on plumbing and electric. The youngest can do numbers in his head like it is a 40 column spreadsheet, . . . us other three can forget our house numbers. We've all taken different paths because we found out long ago what our talents were, . . . and were not. And that is a shout out to our mother, . . . who encouraged us to try all sorts of things, . . . find out what we could or could not do. Bottom line, . . . find out where your inherent, God given talents lay, . . . business, mechanical, people skills (where would Odufus be if he could not manipulate people????), . . . maybe in the outdoors with animals, or creating things. Nourish them as you find them, . . . encourage them, . . . stretch them to their limits. You'll be glad you did. May God bless, Dwight
-
Yes, . . . and I would not bet that it isn't older than I am (70), . . . If you have access to one, go to a Brother sewing machine dealer, . . . tell him you want to look at an LS1717 or it's equivalent. I have one I paid a whole $25 for (from a lady who bought it at a hard sale), . . . I have sewn chaps with it, . . . several layers of thick canvas an leather combinations, . . . and I believe right now I have a # 18 needle in it, . . . sewing JoAnn's upholstery thread, . . . It is one tough little plastic machine. There is one on Ebay that is an LS2020 for about $40, . . . and the 1717 looks identical to it. There probably is a difference, . . . I just don't know what it is. Take a sewing example to the Brother dealer, . . . have him try sewing it for you, . . . you might be surprized to find it works. I know I was surprized as all get out with this little plastic wonder I have, . . . May God bless, Dwight