


Dwight
-
Posts
5,252 -
Joined
-
Last visited
Content Type
Profiles
Forums
Events
Blogs
Gallery
Store
Everything posted by Dwight
-
 Well, Julie, . . . two votes for dying first, . . . then clear finish (I use resolene), . . . then do the paint thing. I refuse to do it any other way, . . . simply because this does not cause me any grief. I also put the full finish on it, . . . not a "light" coat, . . . but rather a finish coat. Then when the paint drys, . . . voila, . . . done !!! May God bless, Dwight
 -
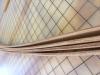
FWIW, . . . had 4 belts to sand, . . . edge, . . . groove, . . . stitch, . . . and dye. Done ! This pic is after they have been sanded and edged, . . . should have taken the picture before edging, . . . didn't think of it. May God bless, Dwight
-
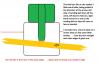
Doug, . . . I come from a carpentry / woodworking background, . . . so I've used just about every type of sander that is made. Honestly if someone brought me a horizontal sander, . . . it would go into the corner until I found a buyer for it. I just don't like them. Look at the little drawing, . . . that is how I use the HF belt sander for belts, purses, leashes, holsters, . . . everything but my fingernails. It was drawn as though you were up looking straight down over top of the top pulley. I can control the "cut" with this sander, . . . wider ones I cannot as well, . . . but probably something in that may be due to using this kind more. I can do everything except an inside curve smaller than about 4 inches, . . . then I go to the drum sander. What I really like about it, . . . it works for all my stuff, . . . I'm constantly making little wooden jigs, . . . adjusting a mold, . . . stuff like that where a sander is needed, and it does double duty by doing the wood as well as the leather, . . . I even sharpen my drill bits on it, . . . my chisels too. May God bless, Dwight
-
Hey, Glockanator and humperdingle, . . . You guys made my day. I have a project where I need letters and images in only black and red on a wood background. THIS, . . . will solve the problem I anticipated, . . . in a proverbial "heartbeat". As the Brits would say, . . . good show, mates !!! May God bless, Dwight
-
80 and 120 May God bless, Dwight
-
I own two of the Harbor Freight $49.95 or thereabouts belt sanders, . . . I think it is a 1 inch belt sander. They are worth their weight in gold for me: holsters, purses, belts, . . . you name it. I don't know what problems others have with it, . . . I can sand down the edge of a 44 inch belt in about 4 minutes, . . . perfectly straight, . . . square, . . . and ready for the edger. Anything wider cuts far too much of the leather, . . . leaves valleys, . . . etc. Drum sanders for me are only good for inside curves, . . . something I do not do a lot with. I got one from Menard's with a coupon, . . . would probably take it back if I could, . . . it oscillates, . . . which doesn't do well for my leather work. I also have a big 12 inch disc sander, . . . very rarely use it with leather. My suggestion is to try the Harbor Freight belt sander, . . . I give it 2 thumbs up. May God bless, Dwight
-
Photos Of Old Harness And Saddle Shop, Circa 1910
Dwight replied to Wallyphyfe's topic in Leather History
Just wanted to chime in on that second bunch of pictures, . . . the middle one. I love that plank floor and the t&g wooden ceiling. My wife would never go for that in our home, . . . but if I was a bachelor, . . . I could definitely see that in my life. Simple, rugged, good looking. I know there were other things that really complicated life back then, . . . but some of the things they did were just plain simple, easy, and not complex at all. Again, . . . many thanks for the pictures, . . . it makes history come alive. May God bless, Dwight -
Rifle Sling/liner Thoughts.
Dwight replied to artwithapulse's topic in Gun Holsters, Rifle Slings and Knife Sheathes
For me, . . . inspiration on that is simple: I've used a 1 inch wide sling since the late 60's and it has done me well so far. May God bless, Dwight -
Tallbald, . . . Bubba, . . . you are doing something wrong. No, . . . I don't know what the heck it is, . . . but I just made 4 belts the other night, . . . did not have to double coat any of them, . . . they will in all liklyhood NEVER, EVER, EVER, come apart, . . . and I maybe used 2 ounces, . . . maybe. When you coat it, . . . use a bristle brush, . . . think metal handled acid brushes used by plumbers, . . . and just cover it, . . . believe me it does not "soak in". It forms a grabbing surface that will grab another like surface, . . . and if you roll it with a rolling pin or press it with the palms of your hands, . . . you will rip the leather off one side or another taking it apart. You can tell by the color, . . . if you are putting it on right. If the leather you are coating turns brown, . . . you have used WAY, WAY, too much. It'll be brown when it is wet, . . . but 20 minutes to 40 minutes later, . . . it should be very close to the natural color of the leather. That is when it is dry enough for you to put the palm of your hand on it and it not stick to you. THAT is when you stick it together. Edited: Acetone is the product you use to thin this with. It too is nasty stuff, . . . so read the label. A very little bit is needed to thin out the bottom of the can when it gets down there. I usually thin mine just before using it, . . . and you have to stir it real good. At first it will not look like it is thinning, . . . but you keep stirring, . . . it'll be OK. And, . . . I checked, . . . maybe 1 1/2 ounces used for a 47 inch belt, a 40 inch belt, and two 38 inch belts. Thats something under 3 square feet, . . . covered with 1 1/2 ounces of weldwood contact cement. May God bless, Dwight
-
My process: Cut the straps..........rough cut both ends.........contact cement them together. Sand edges, . . . run edger around all the way . . . do the stitch groove thing on both sides Burnish edges on electric motor burnisher Sew, . . . dip dye, . . . let dry, . . . burnish, burnish, burnish, . . . did I mention burnish??? Burnish edges again, . . . resolene, . . . let dry. Add buckle, . . . keeper, . . . do final inspection. Send or take to customer. I don't have any complaints on my belts, . . . got one repeat customer order pending right now. May God bless, Dwight
-
Photos Of Old Harness And Saddle Shop, Circa 1910
Dwight replied to Wallyphyfe's topic in Leather History
I could easily step into the first picture and feel at home. Wouldn't know how to use it all, . . . or make most of their stuff, . . . but I could learn. Too bad somebody ain't come up with a workable time machine yet............ May God bless, Dwight -
I use upholstery thread from Joann Fabric, . . . run it in a simple home type sewing machine for the most part. May God bless, Dwight
-
Michael, . . . go to Joann's Fabric, . . . check out their upholstery thread. It is "some kinda tough" to say the least. I use it for simple light leather projects, . . . for vinyl, . . . and for heavy canvas. It works in all three of my "regular" machines, . . . usually in the 8 spi range. And a spool of your favorite color is less than $5 if I recollect correctly. May God bless, Dwight
-
I'd go find the local prosecutor, . . . see if he couldn't help you out. That amount of money is big time felony fraud, . . . he could learn to make bunk saddles while in the slammer. May God bless, Dwight
-
OTB works for me,.......... Sorry about your loss, . . . our most heartfelt condolences to all of you. May God bless, Dwight
-
This is what I use, . . . works great for me: It is accurate to within 1/32 of an inch, . . . May God bless, Dwight
-
I use a ball point pen. May God bless, Dwight
-
Where To Find Tension Spring For Vertical Shoulder Holster?
Dwight replied to bennadatto's topic in How Do I Do That?
I wanted one several years ago, . . . bought an old worn out one on Ebay for about $10, . . . cut it out, . . . used it. May God bless, Dwight -
I used to have a bit of trouble with this same problem, . . . found out if I glue, edge, burnish, and stitch the raw leather first, . . . it works out better for me. I then dye the thing, . . . and I just dip dye it, . . . give it a good soaking, . . . then curve it into a circle a bit smaller than the belt size, . . . maybe 2/3 what it should be. Next I let it dry for about 10 minutes laying on the bottom edge, . . . then flip it and leave it for about an hour on the top edge. It then gets hung up by the buckle end for the finish drying, . . . which is all night or so. When I add the Resolene, . . . sometimes I'll get a very slight rippling of wrinkles, . . . but by allowing the belt to dry about 80%, . . . I can then work it over the edge of my hand in the direction of the "bend" and 90% of the wrinkles work themselves out. Anyway, . . . that's how I do it and it works for me. May God bless, Dwight
-
I'm sorry to hear that, . . . my local 2 Hobby Lobby stores are wonderful places to shop. Often times I find things there I did not know existed, . . . It also makes a 1 stop deal for me, . . . as I have so many different interests, . . . sometimes am all over the store. May God bless, Dwight
-
Go to Hobby Lobby, . . . buy this tool: http://shop.hobbylobby.com/products/5/8-heavy-duty-fastener-plier-kit-733006/ It will solve your problem, . . . no matter how long the shaft is (provided it is not too short of course). I won't use any other tool for 95% of my snap situations. May God bless, Dwight
-
I bought the servo from Toledo, . . . wasn't enough drop for some of the stuff I mess with, . . . so I added a 3/1 reducer to the servo, . . . I can go down now to maybe 12 stitches per minute if I want to. Not everyone's cup of tea, . . . but I love it. May God bless, Dwight
-
You can also buy it in both a gel form and liquid form. For certain applications, . . . the gel is really great, . . . but it is a bit more pricey. May God bless, Dwight
-
Sorry to see you hanging up your awl, . . . but I certainly wish you the best in your next endeavor. You've been a good friend, . . . mentor, . . . and sounding board for many of us on here, . . . and if nobody else says it, . . . I will, . . . I'll miss seeing you on here. Take care, . . . may God bless, Dwight
-
Weldwood contact cement will put shoe soles on without stitching. Mine have been on for something near 4 years, . . . have not come off yet. I don't use any other glue or adhesive for 90+% of the stuff I do, . . . and the others are simply exceptions for a special use. That includes belts, holsters, sheaths, phone cases, Ipad cases, purses, and probably something I can't think of at 11:20 PM. May God bless, Dwight

