Dwight
-
Posts
5,254 -
Joined
-
Last visited
Content Type
Profiles
Forums
Events
Blogs
Gallery
Store
Everything posted by Dwight
-

Gator On Horse Back (Butt)
Dwight replied to camano ridge's topic in Gun Holsters, Rifle Slings and Knife Sheathes
Eh, . . . Camano, . . . thassa gooda worka you do, Bambino, . . . mebbe you comuh uppa to Shytown, . . . we getta you somma work, . . . mebbe somma inna de Bronx too. Da boss, . . . he lika whata you do. May God bless, Dwight -
If you are using a sail needle (round handle with spool in the middle, needle out front), . . . you are not allowing any slack in your thread. To use one of them and not get dye, dirt, gunk, trash all over your pretty white thread, . . . the piece pushed through should be at least a foot longer than the whole final piece. Once you push it through, . . . make the stitch, . . . then pull out the slack. Yeah, . . . I know, . . . wastes thread, . . . but it WILL keep your thread from getting all gunky. That also works if you are saddle stitching, . . . sometimes folks will needle up real close to where they are sewing, . . . and that will get your thread dirty. Put your needles out on a piece of thread you are going to cut off and add to the trash barrel. And you don't want to know how long it took me to learn those UGH ! May God bless, Dwight
-
Another trick, . . . use an inside mold, . . . I do that with my holsters, mag pouches, and lots of other "stuff". The marks are on the inside, . . . for a fold like you have in the front or back, . . . I simply hold it in my hands (with inside mold in place) and hold it down as I roll from back to bottom then from bottom to front. It makes the sharp bend I want, . . . I do it on a perfectly smooth counter, . . . there are no marks, . . . and I would just leave the piece inside and lay it flat on it's back for an hour or so, . . . then gently remove the inside mold and allow it to finish air drying. May God bless, Dwight
-
Personally, . . . I'd go with another 6 oz, . . . which only makes a 12 oz belt overall, . . . which for concealed carry is just on the lower edge of my belts. Most of my bets are made of an 8 and a 7, . . . or thereabouts. May God bless, Dwight
-
Aart, . . . Here's one simple pattern, . . . index finger into left hole, . . . middle finger into center hole, . . . ring finger into right hole. The arrow is held between the index and middle finger, . . . that is why the slot. Make it out of suede or veg tan, . . . May God bless, Dwight

-
Plain, . . . common, . . . generic, . . . rope from the hardware store is my choice. Don't make many, . . . but it's what I use when I do. Buy the white nylon stuff, . . . hemp can have chemicals in it that may affect your dyeing process or leach out when it gets wet. May God bless, Dwight
-
Dip Dyeing
Dwight replied to Red Cent's topic in Dyes, Antiques, Stains, Glues, Waxes, Finishes and Conditioners.
Me too, . . . but if it turns out like it should, . . . sure beats trying to color them with a sharpie marker. Here are two belts I made today, . . . one is saddle tan, . . . the other is sunburst. Both dip dyed in a 9 x 14 pan in about 3/4 of an inch of dye (about a pint and a half). Both dyes were 50/50 mix of dye and thinner. Somehow, . . . one of us is doing something the other one is not doing, . . . But even though I don't like the process, . . . I like the product. May God bless, Dwight
-
Questions Posed On Another Forum
Dwight replied to Red Cent's topic in Gun Holsters, Rifle Slings and Knife Sheathes
I couldn't have said it better, . . . so here it is a second time: what ^ ^ ^ ^ he said ^ ^ ^ ^ May God bless, Dwight -
Blackey, . . . I too used to do a lot of drawing, . . . as a maintenance planner / scheduler for a 45 man mechanical / electrical maintenance shop in a UAW factory. I used both a $29 drawing program, . . . and a light version of Auto Cad. BUT, . . . when I began trying to put those skills to use in the leather work, . . . quite honestly, . . . it was far more trouble than it was worth. What I do now is work up my patterns using legal size manila folders, . . . pencil, eraser, rule, . . . and one of the best friends anyone drawing ever had, . . . an Epson digital scanner. You can digitize anything you want in a heartbeat, . . . scan it, . . . save it, . . . send it, . . . pull it up and modify it, . . . and without the Auto Cad learning curve. May God bless, Dwight
-
Dip Dyeing
Dwight replied to Red Cent's topic in Dyes, Antiques, Stains, Glues, Waxes, Finishes and Conditioners.
Well, . . . I have to admit I've never had that kind of trouble, . . . the worst problem I ever had was doing a bunch of belts one time, . . . not thinking, . . . got in a hurry, . . . dipped em and hung em up by the buckle ends to dry. The next day they (except for one black one) were dry, . . . and the color ran from very light at the buckle end, . . . to very dark at the other end, . . . the dye had migrated. What I do when my brain is in gear, . . . lay the belt on the down side edge for about a half hour, . . . flip it and let it dry for the next 24 hours or so. All of them come out nice and uniform, clean looking, and the correct color (most of the time anyway). I also only use about 3/4 of a quart of dye, . . . isn't so messy that way. May God bless, Dwight -
In three words or less: just do it. Unless you have some kind of kinkydoodle pig skin, . . . you should have no problems. I used to use pig skin, . . . got away from it as I didn't like the way it took the dye compared to veggie tan. I don't do a lot of lined holsters, . . . but when I do, . . . they are all veggie tan now, . . . and you just get em wet, . . . pigskin or veggie tan, . . . mold em, . . . and let em air dry, . . . kinda plain and simple. May God bless, Dwight
-
Seriously, . . . I would have to write a book to tell you how I lay this out, . . . and I don't do very many of them either. BUT, . . . the whole secret is in the layout, . . . that particular belt has (the way I count it) 7 sections and the tongue. My template is a piece of manila folder, . . . cut out to the shape of the part circle, . . . and folded so it rides on the edge of the belt. I would outline the belt tongue area first, . . . then divide up the rest of the belt back to the buckle, . . . in this case, . . . by 7. Using my calculations and my specs, . . . the tongue area would be 9 inches from tip of belt back to the center of the first little diamond shape. If it was a true 40 inch belt I would be making, . . . that would leave 31 inches, . . . then minus 2 for the buckle, . . . it is 29 inches, . . . divided by 7, . . . is 4 inches, . . . (the extra 1 inch is hidden behind the belt tongue when it is buckled). I'd make my oval shaped piece that would span that 4 inches, . . . lay it along the bottom, . . . trace the bottom pieces, . . . turn it over, . . . trace the top pieces, . . . get a cup of coffee, . . . take a break, . . . then go to sewing. I really don't like doing these, . . . but will for a friend or a good customer. They are nerve wracking because one misplaced stitch and the whole thing goes into the scrap bin. But have fun with it if you like, . . . just remember that the layout is the key to it, . . . May God bless, Dwight
-
That is the very reason I use a hand setter and a mallet. I've always perceived that machine and others like it as a solution looking for a problem. May God bless, Dwight
-
All dog collars I do (which is not a lot) are finished with Resolene, . . . with special emphasis on the backs and edges. Have never had any problems with it, . . . I do "everything" else before the resolene, including slicking/burnishing the edges. That makes a hard edge that looks really good too. May God bless, Dwight
-
My vote goes to papaw, . . . 9/10 is for cannon covers, . . . not Bible covers. My covers go inside the Bible only half way of the page, . . . it allows papers to be placed between it and the cover, . . . and it is a subtle reminder not to put too much in there, . . . as many would do with a full fledged "pocket" inside the cover. Most covers I have seen that have a full fledged pocket, . . . have it on the back, . . . it takes up the lower half of the back. This little drawing is kid of crude, . . . but you get the idea of how to make one, . . . quick. May God bless, Dwight
-
Iphone Case - What To Do About The Bottom Corners?
Dwight replied to FlHobbyist's topic in How Do I Do That?
For I phones, this is the only type case I make, . . . open top, . . . bottom has stacked & glued leather to make a solid bottom about 5/8 inch tall and as thick as the phone+1/16 of an inch. This one obviously is for a cell phone, . . . but it is all the same in the construction, . . . and is a really neat little case. May God bless, Dwight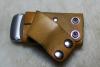
-
First off, . . . for dip dyeing, . . . go someplace like Goodwill or Salvation Army, . . . buy several (at least 3) 9 x 14 (or so) oblong cake pans, . . . about 2 inches deep. I use something between a pint and 3 cups when I am dyeing a project, . . . belt or holster. Pour it in the pan, . . . and roll your object around in it if it is a holster, . . . belts I just snake through, . . . trying to allow about a 3 second amount of time that it is immersed. I then hold it level in my hands on one edge and watch it in the light to see that all the dye has soaked in, . . . belts get laid on a piece of cardboard on the BOTTOM edge, . . . just like it would be worn. If you hang the dumb thing up by one end, . . . the dye will migrate and you will have a "dark to light" colored belt, . . . and you will not be happy. i have a poly deep sink in my "backroom" over which I do my dyeing, . . . and it looks it. Various and sundry shades of black, brown, blue, red, and many others. I have a large thick piece of cardboard that spans the sink, . . . the pan sits on it, . . . dyeing done, . . . excess gets poured back into the bottle via a funnel, . . . pan gets rinsed out with hot water, . . . everything then goes back up on the shelf. Now if you really want to learn how to be careful doing this, . . . wear a real nice pair of $100 tennis shoes, . . . and your favorite light colored Tee shirt. Somewhere in the first few times you do this, . . . you will become fairly proficient, . . . or you will wear spotted clothing and spotted tennis shoes. I change shoes and put on a blue Navy work jacket as well as rubber gloves when i do this, . . . most of the time. Since that room is off limits to everyone but my wife and myself, . . . she allows the sink to be "as is". But then again, . . . it is the home equivalent of the factory "slop sink". As far as the question about dipping resolene, . . . my results when I have tried it were not satisfactory to me. It does put on a coat, . . . but it is too thin, . . . and will leave little runny patches, . . . looks ugly. I prefer to brush it on with a Harbor Freight, 1 inch, el cheapo bristle brush. On the other hand though, . . . several on here and other sites will own up to dipping in a bucket of Mop and Glo. I believe the mix is 50/50, . . . but do a search on here for Mop and Glo, . . . you'll probably find it. Or, . . . send a PM to Katsass, . . . I know he does that. May God bless, Dwight
-
We use different pans, . . . but the same process, . . . and yes, it does work. May God bless, Dwight
-
Uhh, . . . no, . . . that is the one I use to apply contact cement or glue. The bristle brush I use has a wooden handle, . . . is about 1 inch wide, . . . and the bristles are kinda yellowish / tan, . . . I buy em by the box I was able to find it, . . . it is this one, . . . http://www.harborfreight.com/1-inch-chip-brush-39627.html And I am fairly "picky" about how my belts look when they leave my shop. I have pulled out stitches for half a belt (42 inch belt at 5 stitches per inch is a bunch of stitches) because one was dropped and I didn't see it, . . . or I ran out of thread in my bobbin, . . . I also dip dye my belts, . . . because mine aren't intended for the rose garden, . . . they are intended for the sheepdog guarding the rose garden, . . . carrying a full size 1911, two full mags, maybe a set of handcuffs, cell phone, and flashlight. I want that belt to carry all of that, . . . keep his/her britches from falling down, . . . not scratch up and look like it came off Omaha beach, . . . and last longer than I will at almost 70. I tried the dauber, . . . brush, . . . etc, . . . finally figured the best I could do for my customer was to dip dye them, . . . make it deep, . . . make it uniform, . . . and make it so if they order one for a buddy in 5 years, . . . it will be equal to the one they got back when. My belts are stiff, . . . hard, . . . practical, . . . and i think they look pretty good too, . . . Feibings oil dye & Resolene are the products I use on the vast majority of my belts. May God bless, Dwight
-
Paddle holsters are easy on, . . . easy off, . . . and you just got about all the good things I know to say about them. They bulge out, . . . they sway back and forth, . . . it's hard to get one to ride "comfortably" (I've owned 2 of them, . . . still have one). I like the snap holster if the snaps have a belt ridge just above the rivet hole, . . . but I don't like a straight snap. The straps that wrap completely around the belt is IMHO, . . . the most secure of the three, . . . rides more comfortably, . . . and does not "bulge" out as do the others. YMMV May God bless, Dwight
-
In a one word answer: yes, . . . you are doing something wrong if using resolene and you are still getting dye bleeding onto your clothing. I have been making belts for over 5 years now, . . . only one ever bled, . . . it did not get Resolene, . . . the ones that did not bleed, . . . got Resolene. I use a 1 inch bristle brush (Harbor Freight, . . . about 50 cents each), . . . I use Resolene at 50/50 strength with plain old tap water. I put a coat on the back, . . . brushing on product until I get a good lather, . . . brush out the bubbles, . . . left / right / up / down / left oblique / right oblique / repeat and continue until all bubbles are gone. Turn it over and put a coat on the front, . . . same process. Turn it back over again, . . . another coat, . . . once more, . . . do the front. You wind up with two coats on each side. Hang by the buckle end, . . . handling by the edges as you hang it, . . . touch up those areas you touched. Leave it for 24 hours, . . . it should NEVER allow dye to leach out again. You will also need to form the buckle end, . . . doing the "fold over" while the belt is wet, . . . I do it usually after doing the back the first time. A long time ago, . . . I lost track of how many belts I've done, . . . narrow, . . . wide, . . . natural, . . . browns, . . . blacks, . . . black cherry, . . . etc., . . . no bleeding with this process. May God bless, Dwight
-
Well, . . . I don't use much chrome tanned leather at all, . . . mostly just veggie and suede, . . . little pigskin now and then. But what little I have done, . . . it worked just like it was veggie tan. But then again, . . . I don't worry about where I put the glue, . . . because where I put it, . . . will be covered by another piece with Weldwood on it also. The glue surface will never be seen if I do it right. Now I did mess up a piece some time ago, . . . glue went outside the line, . . . dye would not take in that area, . . . and the top of the leather looked funky, . . . but that is the worst. The worst part of using it, . . . ya gotta scratch up the hair side of veggie tan with a wire brush a bit if you want a "real" hold. If I'm sewing it, . . . most of the time, I don't bother. May God bless, Dwight
-
I'm going to have to go back and reiterate that you will not find anything that does a BETTER job than a contact cement like Weldwood. Yeah, . . . if you poured a pint of it in a plastic bag, . . . and tied the bag over your head, . . . you probably should use a respirator. I've used it as a carpenter, . . . furniture maker, . . . leatherworker, . . . for some 50 years now, . . . no, i don't have a third hand growing from my head, . . . nor do I have 3 legs. I use simple common sense things like not using it while sitting over an electric heater, . . . not using it in the furnace room, . . . and certainly not smoking (haven't done that since '85 or so) while using it. Thinning it a tad with Acetone will make a light and easy to use product, . . . strong, . . . and if properly applied, . . . the leather will rip before it will let go. For the last 6 or so years, . . . I have almost every time, . . . used an electric heat gun (glows red at the hot end) to hasten the drying process, . . . and I turn it on high. No problems. Use a little common sense with it, . . . you will not find anything out there that is better. May God bless, Dwight
-
My "go to" material for mock ups comes from Joann Fabric shop. Get their 40 or 50% off one item coupon, . . . go buy a yard of their really heavy, fabric backed vinyl, . . . it mimics leather in many ways, . . . sloppy wet is just one of them. New chap ideas, . . . radical holster ideas, . . . etc, . . . all get the vinyl before the cowhide. May God bless, Dwight
-
A Clear Plastic Pouch On A Leather Vest To Display Patches?
Dwight replied to Ebchamorro's topic in How Do I Do That?
And cast my vote for the velcro, . . . that would be my solution. Sew the velcro to the leather jacket with upholstery thread from Joann's Fabric, . . . use a short basting stitch, . . . most leather jackets can be done with a simple needle and thimble. When you get it all done, . . . it will look professional to all but those who know the difference, . . . which is some 1 % of the population. May God bless, Dwight