Dwight
-
Posts
5,250 -
Joined
-
Last visited
Content Type
Profiles
Forums
Events
Blogs
Gallery
Store
Everything posted by Dwight
-

Need Help With Stitch On Backside Of My Belts
Dwight replied to Mark Moss's topic in Leather Sewing Machines
I would certainly try the bed, . . . when I added one to my Tippmann Boss, . . . EVERYTHING started looking better on the back. There are times I cannot use it for a certain project, . . . but the 90% or so that I do use it on, . . . it looks SOOOOOOOOOOOO much better. Then I mounted my Boss so that after sewing, . . . it has a 60 inch table to go out and lay on, . . . it got even better May God bless, Dwight -
Chink Makers: Question About Cutting Fringe...
Dwight replied to thenrie's topic in Clothing, Jackets, Vests and Chaps
1. I didn't invent this thing, . . . someone else (I think on this website) gave me the idea, . . . but that is how I made my template. And get the BIG rotary cutter, I think it might be 60mm, . . . around 2 inches in diameter. I have a little one, . . . don't like it anywhere near as well as the big one. Also be careful, . . . they ARE sharp, . . . and will cut you bad, . . . quickly. 2. I start out with a downward slant, . . . probably something near 45 degrees, . . . as i hit the corner, . . . I add a few degrees to each cut, . . . and it works out. I did take out a wedge on at least one pair, . . . then tried just sliding around, . . . it seemed to work as well, . . . and is a lot quicker. I mean, . . . how many judges are going to walk up to a contestant with a pair of calipers and say "Let me measure the width of your fringe, . . . gotta be perfectly equal all the way around". 3. For now it is just eyeball, . . . gimme a couple years, . . . then we'll call it experience too. May God bless, Dwight -
As usual, . . . top shelf work. I would have knocked a couple of slots in the back just for the heck of it, . . . just in case someone someday wanted to attach it to a belt, . . . but it wasn't my call, . . . so you did well. May God bless, Dwight
-
Sewing Vs Stitching--Which Do You Prefer And Why
Dwight replied to leathervan's topic in Sewing Leather
Tex, . . . I don't know what you got, . . . but that kind of therapy is devastating to an old coot like me. Don't get me wrong now, . . . there are times when I eyeball my 16 oz framing hammer while sitting behind a recalcitrant Tippmann Boss, . . . but I usually go get a cup of coffee, . . . chill a bit, . . . finish the project, . . . and thank the Good Lord for my sewing machine / stitcher. And I do enough belts, . . . I'd just quit them if I had to hand sew them, . . . or else the belt price would have to be like Mike's, . . . and seriously raised upward. May God bless, Dwight -
Applying Fiebing’S Usmc Black (Alcohol Based) Dye?
Dwight replied to Rocket6R's topic in How Do I Do That?
On the very few occasions I use USMC black, . . . I dip dye it, . . . and it eliminates the browns, . . . streakiness, . . . and the multiple coats. Other than it being a pain to buff out, . . . it is indeed BLACK, . . . and will give a good penetration for leather that has to hold up to some serious working. Again, . . . I don't like to use it, . . . but it does work, . . . kind of like a snow shovel, ya' know? May God bless, Dwight -
C'mon St8line, . . . hands are for hamburgers, . . . machines are for stitching I don't know what "pleather" is, . . . this actually was real leather, . . . just had a hard coat of some sort on it. I looked up "blue leather" some time back, . . . it's not processed correctly, . . . cheaper to make that way, . . . I'm thinking that was what it was as it hit all the description I had found. It wouldn't glue right, . . . it wouldn't sand right, . . . stitching was at best "OK", . . . and that coating was something else to cut It'll work for what I need it for, . . . but somebody will really have to have the next one. May God bless, Dwight
-
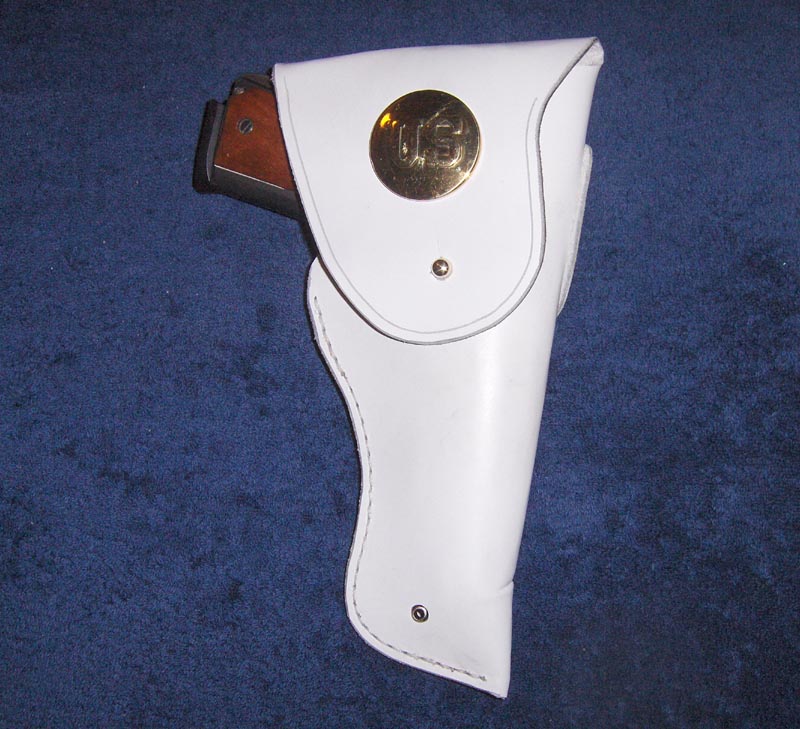
Actually, it wasn't a problem at all to keep it clean. It is some kind of "manufactured" leather, . . . has a real hard finish on it, . . . back and center is blue, . . . all but the outside edge is really soft like belly leather, . . . I bought the piece to do some white slings for a Veteran group, . . . had some left over, . . . like I said, . . . probably first and last. May God bless, Dwight
-
Just finished this white parade holster, . . . Made out of "blue" leather, . . . junk stuff, . . . super pain to work with. Glad I don't get these ordered every day. May God bless, Dwight

-
In a clear tub, . . . under my desk, . . . the only "organizational" part of my process, . . . it ALWAYS goes back in the tub as soon as the molding is done. Not a perfect system , . . . but it works for me. May God bless, Dwight
-
Chink Makers: Question About Cutting Fringe...
Dwight replied to thenrie's topic in Clothing, Jackets, Vests and Chaps
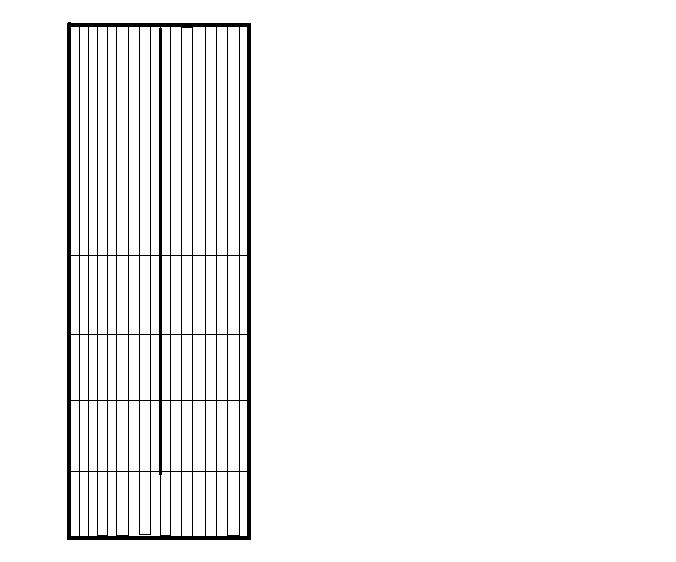
I took the advice of someone somewhere (maybe on here) and made myself two fringe cutting templates. They are clear plexiglass, . . . with lines spaced 1/4 inch apart on one, . . . 5/16 on the other one, . . . lines scratched into the surface. In the center of the piece (about 4 inches wide, . . . 9 inches long) is a cut with a hack saw. I roll a rotary cutter down the hack saw cut, . . . move it to the left to see the cut line covered by one of the scratched lines, . . . and just keep rolling down. I have lines going across it to indicate different lengths for the fringe. Using my system, . . . it's pretty hard not to make good looking fringe. And yes, . . . fringe cutting is THE last thing done. Otherwise, . . . I'd somehow sew some of it up somewhere, . . . somehow, . . . cause I know me. AND, . . . it lets me know that the work is almost done when I'm doing the fringe, . . . I can chill and enjoy the experience. May God bless, Dwight
-
Chief, . . . you live up to your name. This little indian just does not possess your skill or patience, . . . really good looking. May God bless, Dwight
-
I had some cases some time back, . . . and I made a yellow pine insert for each one, . . . just the size for the inside, . . . but not too snug. I then added 1/16th inch by 1 inch flat stock steel pieces where the rivets would be set. I used a stick and grabber to stick the rivet in the hole, . . . slid in the insert, . . . set it on another piece of leather, . . . capped and whacked the rivet. Worked perfectly. May God bless, Dwight
-
I read an article the other day, . . . some gun mag, . . . all about the full shelves in the gun mfg warehouses. They have caught up, . . . maybe even running ahead, . . . and the stocks are full. One LGS i see occasionally has all but quit carrying long guns except for AR's and M4geries, . . . and a couple of shotguns. Lots of handguns though, still. My competition in this area is mainly a handful of people with stacks of kydex and a couple of toaster ovens. They hack saw off a hunk of tandy belly leather, . . . rivet a piece of toaster oven kydex to it, . . . smile and say "twenty bucks please". May God bless, Dwight
-
To Belt Makers: What Is The Proper Formula To Measure For A Belt?
Dwight replied to Jess Jones's topic in How Do I Do That?
Ramrod, the center hole of the holes you punched is the "correct" measurement point. Go halfway around the belt from there, . . . perfect center point for that belt. May God bless, Dwight -
Stitch Line Placement On Holsters. A Few Questions Please
Dwight replied to Tallbald's topic in How Do I Do That?
The ONE tried, . . . true, . . non guessing way to do it , . . cut out the rough holster,. . . wet the leather, . . Mold the holster, . . . let it fully dry, . . glue the edges together, . . . mark and sew. Never fails, . . . period! And you ca forget worrying about leather thickness, . . . etc. May God bless Dwight -
Leather & Canvas Ammo Belt
Dwight replied to Eaglestroker's topic in Gun Holsters, Rifle Slings and Knife Sheathes
"Beautiful" does not do the work justice, . . . I think "Stunning", . . . kinda like Cinderella stepping out of the pumpkin coach that very first time, . . . describes it for me. Keep up the good work. May God bless, Dwight -
Thanks for the good words, guys, . . . been putting it off, . . . finally just DID it. Be wearing them in the parade this weekend probably, . . . Always wanted a pair, . . . finally got em. . . . now to make another pair for weed eating, . . . but out of vinyl. May God bless, Dwight
-
First off, . . . my dying is limited to holsters, belts, mag pouches, an occasional purse. All kinda flat stuff, . . . all small, . . . and all easily handled. I have two 2 inch deep by 9 by 14 (more or less) cake pans. One is for black, . . . the other is for other than black. I pour a 50/50 mixture of my desired dye into the pan (50 dye/50 reducer), . . . . usually a good pint plus, . . . then begin inundating the item. I dip it straight into the liquid, . . . it get "baptized" so to speak, . . . but not left to soak. Its 4 to 5 seconds at the most. Pull out, . . . belts or long items get laid on their edge, . . . curled, . . . bottom edge down, . . . on a piece of cardboard. Holsters go on their back, as well as purses and knife sheaths, and mag carriers. Let em dry for 24 hours, . . . if they are brittle dry, . . . add a coat of neatsfoot oil to the hair side (thank you Lobo) and let that dry for 24 hours. Burnish as necessary, . . . finish 90+% of the time with 50/50 Resolene/water. The dye is for the most part very predictable, . . . and very uniform. Occasionally a piece will be darker or lighter, . . . but we are playing with leather from different cows, . . . different tanneries sometimes, . . . whatcha expect???? I'm happy as a fat rat in a cheeze factory with my process. May God bless, Dwight
-
Anyone Done Any Hotrod Pinstripe Tooling?
Dwight replied to The Grizzly's topic in How Do I Do That?
Probably if it were my project, . . . a set of plastic (clear) French curves, . . . and a hand stitch gouger would by my approach. Figure out which part of the curve to use for which lines, . . . lay out the start and end points for each line beforehand with a pair of dull dividers, . . . use a piece of masking tape at the beginning and the ending of each curve to mark where you start and where you end. Depending on the size, . . . that shouldn't take too long that way, . . . and following the French curve, . . . it's hard to mess that up if you take your time and really, really pay attention. Painting in the stitch gouges is kinda tricky, . . . but it would look really nice when it was done. I'd probably use a hypodermic needle and some really thinned down paint, . . . maybe have to do a couple of coats, . . . but just track through the gouge line, . . . emitting a bit of paint as you go. May God bless, Dwight -
What Thread Should I Purchase
Dwight replied to vanillagorilla's topic in Gun Holsters, Rifle Slings and Knife Sheathes
If you want to make it an easy process, . . . go to a local Tandy store, . . . they have large spools of thread from 346 down to I think 207. Or call Kevin up at Springfield Leather, . . . he'll help you in a heartbeat. May God bless, Dwight -
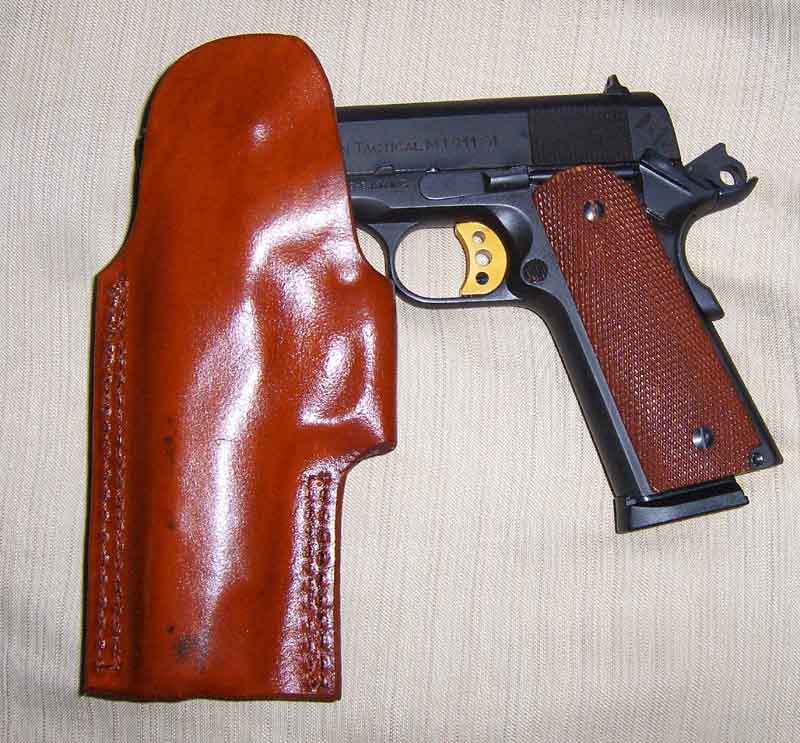
Welt Construction Question
Dwight replied to harley45's topic in Gun Holsters, Rifle Slings and Knife Sheathes
C'mon, Red Cent, . . . you still can't out draw Matt................... And if you did, . . . Festus would get ya......... Not meaning any disrespect or add adverse feelings to anyone, . . . and I do know that sometimes they are probably necessary, . . . but the screw in the bowl washer, . . . with the rubber rings below it, . . . for tension, . . . it just throws the whole picture off for me. Kinda like watching some cowpoke riding along in his Hoss hat, . . . on a purty lookin' bay, . . . got his vest and his chaps on, . . . six gun at his side, . . . rifle in the scabbard, . . . rope hanging off the saddle, . . . saddlebags in the back, . . . and totin' a turquoise transistor radio with the antenna extended up 48 inches, . . . blaring out some old rock N roll Beachboy's tune. But that's just me, . . . probably don't have that effect on everyone. May God bless, Dwight -
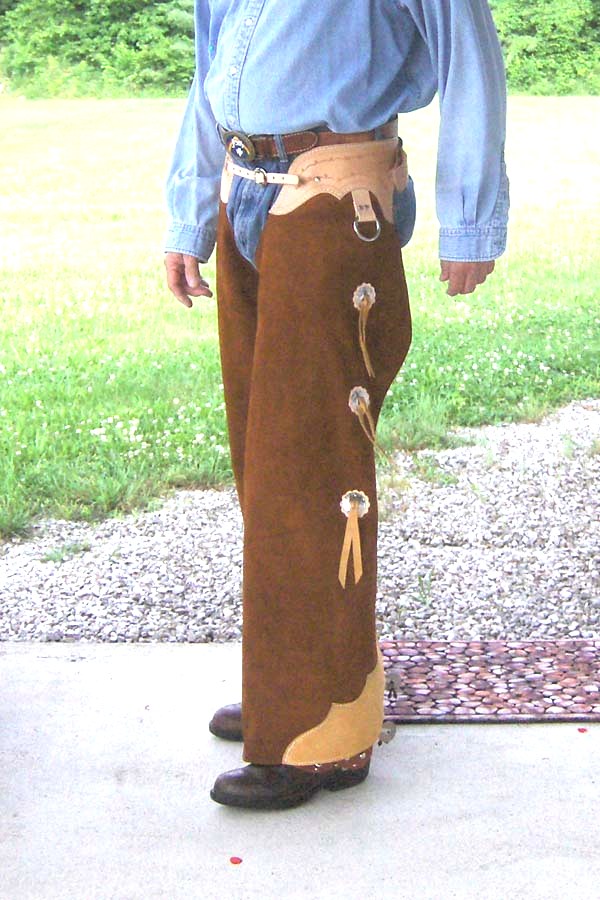
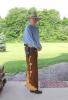
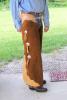
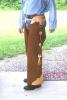
Been a while in the doing, . . . finally got my chaps ready for the parade this Saturday. 4/5 oz legs, . . . 2/3 oz accents, . . . 6/7 veg tan for all the other pieces. Cabbaged the pattern off a pair sold on Ebay some time back. Now if I can just get to the parade, . . . and back home, . . . without someone trying to buy them off me May God bless, Dwight
-
Welt Construction Question
Dwight replied to harley45's topic in Gun Holsters, Rifle Slings and Knife Sheathes
Actually a much different construction technique, . . . mine is wrapped around the trigger guard, . . . the other one is open. Mine is basically one piece of leather for the holster body, . . . theirs is multiple, . . . plus welts, . . . Mine is also TIGHT, . . . does not need a phillips head screw to keep the gun in. But from 30 feet, . . . they probably do look alike. May God bless, Dwight -
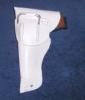
Welt Construction Question
Dwight replied to harley45's topic in Gun Holsters, Rifle Slings and Knife Sheathes
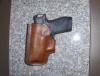
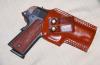
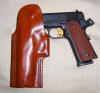
1. I hate to hedge on the answer, . . . but the weight is dependant on the person, . . . use, . . . weapon, . . . suffice to say that most are in the 6/7 or 7/8 weights. If it is going to be worn outside the belt, . . . I go thicker, . . . an IWB gets thinner leather. 2. I use the Rhodesian style of holster mostly for small automatics, . . . (see pictures), . . . which seldom have belt loops, relying on a metal clip to hold them onto the wearer's clothing or belt. 3. A long time ago in my holster working, . . . I found that reversing the molding / sewing process, . . . would give me a better fit to the weapon. I know there will be those who argue, . . . but it works for me, . . . I know ABSOLUTELY, . . . EXACTLY, . . . where to put the stitch line, . . . and am confident that it will not come loose some day in the forseeable future. Folks who make the same holster day in and day out have the luxury of a proven, guaranteed pattern, . . . whereas a lot of my work is custom, . . . 1 of 1. That makes the process have to be different. I hope this helps. May God bless, Dwight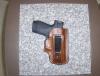
-
Welt Construction Question
Dwight replied to harley45's topic in Gun Holsters, Rifle Slings and Knife Sheathes
The only thing I would put in a welt for (only along the sight track) woudl be for a handgun that had a sharp & wide or tall front sight, . . . just go give it clearance. With the automatics, . . . the sewing creates a little valley for the sight, . . . no problem for it. May God bless, Dwight