Dwight
-
Posts
5,250 -
Joined
-
Last visited
Content Type
Profiles
Forums
Events
Blogs
Gallery
Store
Everything posted by Dwight
-
My bag punch was made from a piece of electrical conduit, . . . sharpened on a belt sander, . . . and pounded down to a flattened 5/16 by 1 1/2 inch oblong hole. I make the 1 1/2 inch hole, . . . then place the heel of the punch about 3/16 from one end, . . . ease the rest of the punch down into the hole already made, . . . then gently tap, tap, tap, until I get the other 3/16 or so cut out. My total cost for the punch was something in the neighborhood of maybe 1/3 of a cent for the electric to sharpen the conduit and the lights to watch myself do it. Now I've only punched a couple hundred holes with this punch, . . . so it may not hold up in the long run, . . . but that's OK, . . . I can make another in all of about 5 minutes. May God bless, Dwight
-
I have used the drill press in the past, . . . it, in my opinion, is a bad choice. Why? Because on the bottom of the project, . . . there are always little leather goobers dangling from the holes. If you are going to use a drill press, . . . put an awl blade in it, . . . unplug the machine, . . . and simply use it to make the holes, . . . WITHOUT turning it on. Your holes will be MUCH prettier, . . . and your stitching will also reflect that. The only time you can get really nice ROUND holes with a drill press is when you use a piece of metal tubing, . . . sharpened so it looks like a punch, . . . then you simply bore the tubing through the leather with the machine running, . . . it makes wonderful little holes. A regular drill bit was made for wood or metal, . . . May God bless, Dwight
-
I don't know what is available to you, . . . but one of the things I have to do occasionally is hand stitching (boo, . . . hiss, . . . ugh). When I do, . . . I run it through my Boss sewing machine first, . . . without thread, . . . to make the holes, . . . make them perfectly perpendicular, . . . evenly spaced, . . . and it makes hand stitching go sooooooooooooooooooo much faster. May God bless, Dwight
-
 It's definitely pretty work, . . . something that sometimes needs a "while" to pick up on. You may want to keep the 1911 holster and wear it seriously every day for a couple of months. By then you will see that it has loosened up considerably as your stitch line is seriously too far away from the frame of the weapon itself.. I also seriously suspect that the item you used to form the sight tunnel was overly large, . . . which again will allow a lot of slack into the holster's chamber. The fact that it is an IWB will help it retain it's usefulness, . . . but if it were an OWB, . . . the weapon would be falling out of it fairly soon unless the owner was very careful with it, . . . which most folks just are not. Other than that, . . . looks pretty good. May God bless, Dwight
 -
I use 3 Arrow staples, . . . and a pair of long nosed pliers. May God bless, Dwight
-
Take a look at this, . . . it is pretty much what you want to do, . . . but for a holster. May God bless, Dwight
-
Freehand cut everything, . . . drywall knife, . . . and I cut it on the line. All of my patterns are pretty much "on the money" so I don't have to cut extra or anything like that. The only thing I do not freehand is straps, . . . got a strap cutter for that, . . . everything else is freehand, . . . assembled, . . . sanded, . . . beveled, . . . gouged, . . . and Boss stitched. May God bless, Dwight
-
Jim, . . . Resolene is an acrylic finish, . . . and it order to work properly, . . . demands a surface to which to attach (think white house paint). If the surface is not the item itself, . . . then it has to be something that will not "let go" of the item itself. Wax is not one of those surfaces. When the wax lets go of the belt, . . . the Resolene will come off with it. Additionally, . . . Resolene DOES alter the final color, . . . generally darkening it. Some people swear that the new water based dyes will not bleed, . . . I cannot say that, . . . just passing on what I have been told. I do know if you use Tandy's professional oil dyes, . . . and IF YOU BUFF it like there is no tomorrow, . . . you can get it to a place where dye will not come out of the item. Keep buffing with a terrycloth wash cloth, . . . until swiping it with a clean, white, paper towel, . . . gives you clean, white, paper towel. May God bless, Dwight
-
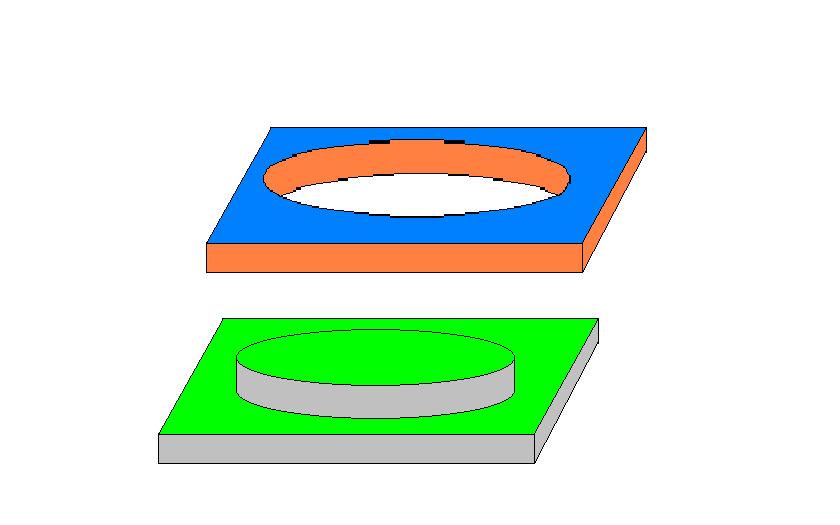
Look at this little drawing: the green and grey is called the male mold, the orange and blue is the female. It will make an item like a little dish with an edge. The male is made to the exact dimension you want of the depth of the dish, . . . and the diameter of the opening in the dish. The female is made to those same dimensions, . . . except the hole has to be increased in diameter by twice the thickness of the leather. If this were a 6 inch dish we are making, . . . 1/2 inch deep, . . . making it out of 8 oz leather, . . . the male mold would be 6 inches in diameter, . . . and 1/2 inch tall. The female circle/hole would be also 1/2 inch deep, . . . but would be 6 and 1/4 inches in diameter. Get the leather real good soppy wet, . . . lay it over the male mold, . . . force the female mold down around the leather covering the male, . . . clamp all four corners, . . . leave it for a couple of hours, . . . remove the clamps, . . . gently slip off the leather, . . . place it near a fan or in a drying oven, . . . when it is dry, . . . trim the outside edges to the size you wanted. Remember when you make a mold, . . . any imperfections in the mold will be transmitted to the leather, . . . so sand it good. I don't put any finish on my molds, . . . wanting the wood to leach out the water from the leather, . . . and that works really well. Have fun, may God bless, Dwight

-
They actually are very simple to make in most cases. My first one was for a .45 magazine carrier, . . . had it working in about 1/2 hour. PM me if you want, . . . with some "ideas" as to what you want to mold, . . . dimensions / description / etc. I'll give you an idea on a price for a mold if you don't want to make it yourself. May God bless, Dwight
-
Hands are for hamburgers, . . . machines are for sewing. I would probably drop down to key fobs and ankle bracelets if I had to go back to hand sewing. I traded off a stainless 1911 to get my Boss, . . . and, yeah, . . . there have been times when I questioned the move, . . . but my son can put it in the yard sale when I'm gone, . . . for now, I'm using it. May God bless, Dwight
-
My lined pancakes are 2 pieces, . . . flesh to flesh, . . . bonded and used as one piece of leather, . . . works fine, . . . no wrinkles, . . . no problems. My Western holsters are the same: 2 pieces, . . . bonded flesh to flesh, . . . then cut, folded, edged, gouged, sewn, laced, or whatever. Occasionally, I have seen small wrinkles in the underside of the bend where it forms the belt loop. Occasionally, I have seen small wrinkles down the inside of the holster in what would be the sight channel. Most of the time, . . . that is taken care of by first lightly skiving the INSIDE piece of leather, . . . about 1 inch or 1 1/4 inch wide. Then bond, . . . and use. Additionally, . . . when I do the bending in those areas, . . . I roll it over a round rod, . . . forming the bend as a roll instead of a flat out "bend" in the leather. And of course, . . . I've never had anyone ask one of my customers out on the trial, . . . "Would you mind letting me see if your Dwight's Gunleather holster has any wrinkles under the belt?" For an Avenger style holster, . . . I would follow the same above ideas, . . . FWIW, . . . my best results have come from using the same leather, . . . cut from the same hide, . . . as much as possible when I make this type of holster. May God bless, Dwight
-
I'm not sure I understood exactly what you wanted, . . . here is another recent conversation about cutting surfaces: http://leatherworker.net/forum/index.php?showtopic=56005&hl=coupon#entry359269 May God bless, Dwight
-
First guess: virgin beeswax and neatsfoot oil. I make mine using a 50/50 mix by weight, . . . blended together in a glass jar heated in hot water, . . . poured into muffin papers, . . . made into little cakes. Mine looks very similar to his, . . . hope this helps. May God bless, Dwight
-
Things I've Learned From Leather Working
Dwight replied to CTaylorJr's topic in Leatherwork Conversation
If you are not Doctor Joe, . . . you do not need patience, . . . or patients, . . . You just need to keep plodding on, . . . cut a little here, . . . carve a little there, . . . dye some of this, . . . Resolene on that, . . . The Good Book tells us that "tribulation worketh patience", . . . and if we look at the OP's ideas, . . . he must have a bunch of patience May God bless, Dwight -
How To Select The Proper Thread For A Material (Leather)
Dwight replied to Evo160K's topic in How Do I Do That?
Actually, in today's leather goods market, . . . the propriety I place on the stitching, . . . is the look one wants to achieve. In years past, . . . not having some of the strong materials we have today, . . . size and strength sort of went hand in hand. Today, . . . some very small threads are as strong as yesteryear's large threads. I generally use 346 thread on all my holsters and belts, . . . even on one particular billfold application, . . . because of the "look" it gives. I tried 207 and 277 but was unhappy with the visual results, . . . although I am sure the physical strength was quite adequate. I even use some 415 occasionally, . . . as it is a bold look that adds to the "macho" flavor of some of the things I do. But again, . . . I really believe in today's market, . . . one could use most any size (relatively speaking) and if the pieces were properly bonded beforehand, . . . there should be no real fear in using whichever size looks the best. May God bless, Dwight -
Tandy sells several different clips, . . . this being my favorite: http://www.tandyleatherfactory.com/en-usd/search/searchresults/1239-24.aspx It will work for most holsters (especially on blue jeans) without actually going over the belt, . . . it grabs the seam underneath the belt. That way the belt is not scratched up by the clip, . . . AND, . . . the clip is not showing. I use this for my tuckable little holsters. May God bless, Dwight
-
Finished A Pair Of Chinks
Dwight replied to ranchmom77's topic in Clothing, Jackets, Vests and Chaps
I'd be happy with them, . . . good job. May God bless, Dwight -
Grooving On The Inside Lines?
Dwight replied to JDM's topic in Gun Holsters, Rifle Slings and Knife Sheathes
I have three groovers, . . . one is permanently set and cut off so it grooves at app 3/16 and is used for edges on almost anything and everything. The second is an easily adjustable one, . . . unscrew the hold down nut, . . . move in or out, . . . tighten, . . . and groove. Normally it is set for the second line, . . . and is appropriately spaced to give a parallel line to the first. NOW, . . . the free hand one, . . . used to mark and groove the trigger guard and barrel area on my holsters. I don't groove the back sides of my holsters. If I do anything, . . . it is to take a pair of dividers and make indented grooves in stead of gouges. For the trigger guard and barrel, . . . I don't do anything. May God bless, Dwight -
Blueberries and / or black berries can be used for stain also, . . . if you want a blue or purple color. They work especially well if they are over-ripe. You can get a very pretty light tan, . . . just parking the leather in the sunlight for a while. 50/50 neatsfoot oil and virgin beeswax (by weight, not volume) heated together will form a paste near the consistency of Kiwi shoe polish, . . . put it on the same way. I suppose that formula is 150 or more years old from what was told me. May God bless, Dwight
-
Go get a piece of 3/8 inch steel, . . . a 4 inch square piece will do the job, . . . cover it with one layer of masking tape. Set it square over top of the leg on your table top, . . . and pound away. Also, . . . copper rivets, . . . for me, mind you, . . . respond much better to the soft, tap, tap, tap, tap touch than they do to the whack, whack touch. It also takes practice, . . . and maybe 5 bucks worth of copper rivets in a small piece of throw away leather. It actually is a good financial investment. Only screwing up one project with a really bum rivet job, . . . have to take it out, . . . then ruin the piece, . . . and you'll see why I said that. May God bless, Dwight
-
Take a look at this information, . . . it may help. http://www.saddlebackleather.com/Leather-101 May God bless, Dwight
-
Use contact cement to put the edges together first, . . . then sand the edges perfectly smooth, . . . then punch the holes, . . . then put in the rivets. Secondarily, . . . I find it always works best if the punch I use on rivets is just a tad smaller than the rivets. I like to put them in the hole, . . . turn the piece upside down, . . . and none of the rivets fall out. May God bless, Dwight
-
Chaps, . . . moccasins, . . . draw string bags, . . . floppy hats, . . . vests, . . . clutch purses, . . . shoes, . . . Think more about what you would like to have, . . . and make some thing(s) that YOU want, . . . in most cases, each of us is our own worst critic, . . . therefore if you are satisfied with the "possibility bag" that YOU made for YOU, . . . a customer may also be happy with it. May God bless, Dwight
-
Cowboy Holster
Dwight replied to JBLeatherworks's topic in Gun Holsters, Rifle Slings and Knife Sheathes
TexasJack said it well, . . . My Western rig holster is very similar, . . . May God bless, Dwight