Dwight
-
Posts
5,252 -
Joined
-
Last visited
Content Type
Profiles
Forums
Events
Blogs
Gallery
Store
Everything posted by Dwight
-
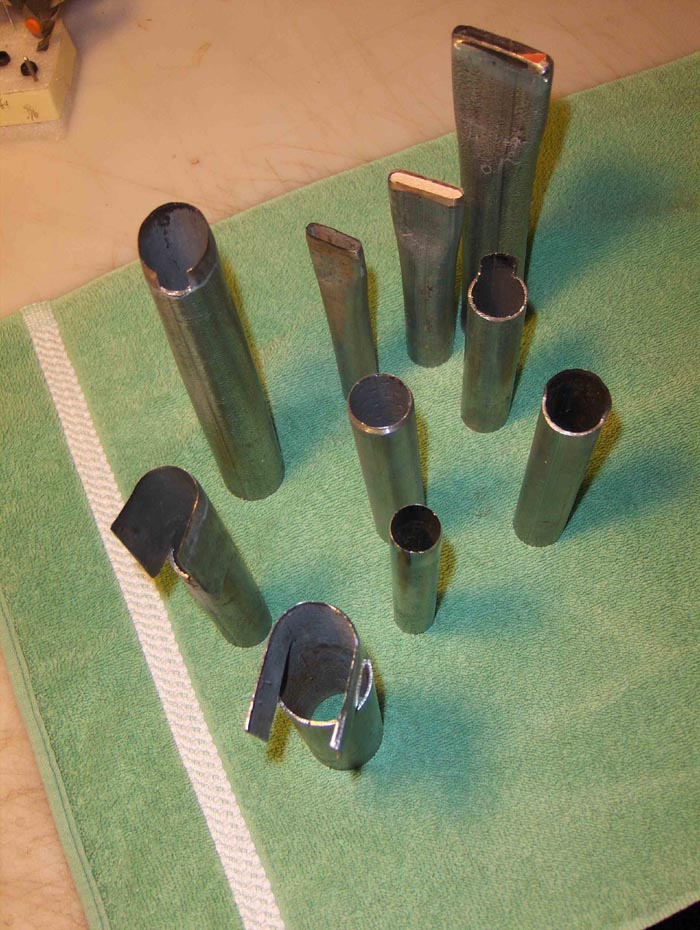
I have had real good luck with some of my home made punches, tools, etc. You can easily make one just for that job, . . . or similar ones. I start with a piece of galvanized EMT tubing (electrometallic tubing, . . . or conduit as it is called in the electrical trade), . . . comes in 1/2, 3/4, 1, 1 1/4, 1 1/2, 2 inch. I sharpen the outside of it by holding it up against a disc sander, . . . then cut, bend, form, . . . whatever necessary to get the shape I need. They sharpen fairly easily with a file & sandpaper, . . . putting a piece of scrap leather under the piece I'm punching helps safeguard the cutting edge, . . . and while you may not be able to make it a "perfect" shape, . . . at least it will always be the same imperfection, . . . and you can "fix" it from there. I use a piece of steel, . . . a pair of pliers, . . . end of an anvil, . . . first one thing then another to get the shape the way I want it. One of my favorite successes is in the upper left corner, . . . it makes an oval, but doesn't cut it completely out. I make two parallel cuts from the opening of the oval, . . . about 6 inches long, . . . it puts a tail on the oval, . . . makes a gorgeous hammer thong for Western holsters. Another one in there is only 1/4 of a circle, . . . makes the slickest rounded corners around (no pun intended), . . . and in the total, . . . I've probably got a $2 cash investment. May God bless, Dwight

-

How Do I Make A Cheap-Ish Imprinting Machine For Big Stamps?
Dwight replied to lightingale's topic in How Do I Do That?
Just holler if you need a more detailed diagram. May God bless, Dwight -
How Do I Make A Cheap-Ish Imprinting Machine For Big Stamps?
Dwight replied to lightingale's topic in How Do I Do That?
This can be made out of a couple of 2 x 4's a couple bolts, and if you have any kind of shop at all, . . . about a half hour of work. Basically, . . . the brown leather is placed on the mat, . . . the red imprint is made by pushing down on the handle. It wouldn't take too long to figure out about how much pressure, . . . and once you get that "touch", . . . they should all be pretty much uniform. Approximate cost: $5 May God bless, Dwight
-
Manny, . . . what are you going to do with the strap? What size is the strap, . . . long vs wide? That can make a difference. May God bless, Dwight
-
Actually in one of John Bianchi's videos, . . . he put the whole holster and belt down in a heated oil bath, . . . pulled it out, . . . let it dry. I've always been under the assumption that the oil is often bleached out of the leather by the molding and dying processes, . . . so I add some to most of my stuff to keep it from drying out, cracking, and prematurely ending it's useful life. So far it has worked for me, . . . one light coat with a paint brush, . . . go over it once, . . . get away from it, . . . let it dry, . . . add the finish. Others do it differently. May God bless, Dwight
-
A Couple Of "different" Holsters
Dwight replied to Dwight's topic in Gun Holsters, Rifle Slings and Knife Sheathes
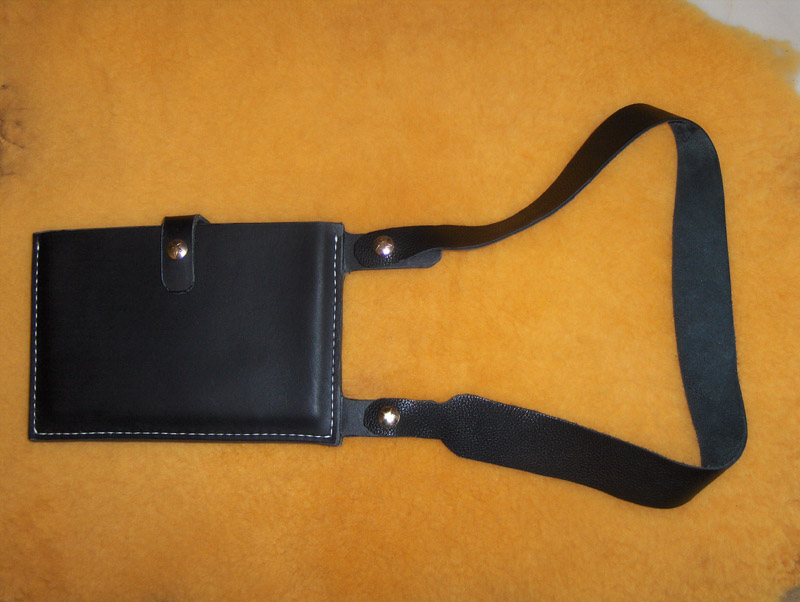
Thanks, Benlilly, . . . I went through a bunch of electronic devices before I settled on the Ipad mini, . . . and I actually wish it was just a bit smaller. I'd love to put it in my suit coat, sport coat, or shirt pocket. The shoulder holster was just my way of compensating, . . . I totally detest carrying things in my hands, . . . mostly because I lay them down and leave them. This allows me to carry it under a vest, jacket, whatever, . . . handy to get to, . . . but not in my hands. I also used 9 oz drum dyed leather, . . . I think it could take a 6 foot fall to the concrete and not hurt it. May God bless, Dwight -
Yessir, . . . good looking work. May God bless, Dwight
-
Questions For The Experienced
Dwight replied to Zooker's topic in Gun Holsters, Rifle Slings and Knife Sheathes
John Bianchi did a couple of videos on VHS, . . . and I suppose by now they are on DVD, . . . and what he shows you is really, really worth while if you want to make a Western rig or two. I make all of mine according to those instructions, . . . double layer belts, . . . double layer holsters, . . . the only thing different I do, . . . I use a laced cartridge belt instead of a sewn one. So far, . . . no complaints from any of my customers. May God bless, Dwight -
Holster Style Ideas.
Dwight replied to gottaknow's topic in Gun Holsters, Rifle Slings and Knife Sheathes
Eric, Shoot me an email at ciminod@midohio.net, . . . I'll send you some info. It is the basic "how to" that I hand out to my students when I teach the holster making class at Tandy's. I would do it here, . . . but it is rather large, . . . don't want to tie up the facilities, so to speak. May God bless, Dwight -
Holster Style Ideas.
Dwight replied to gottaknow's topic in Gun Holsters, Rifle Slings and Knife Sheathes
One of the easiest patterns: a flat backed pancake. You basically make the back, . . . glue & stitch the leading edges together, . . . mold the gun, . . . let it dry, . . . glue and stitch the trailing edges. Instead of slots for a belt, . . . you put loops on that attach to your belt. I know, . . . that is the cliff notes version, . . . if you are interested, . . . I can send you some better info. May God bless, Dwight -
You will find that a 20 ton press is FAR more than enough to press holsters, . . . I did it for years with one made out of 2 x 4's and used a small 6 ton bottle press, . . . it gave me way more pressing ability than I could ever use. The bottom and top plates can be made out of 3/4 inch plywood, . . . a double layer, . . . screwed & glued wil be quite sufficient. The reason that the latex rubber is used, . . . it does not mar the surface. ANY foam that is not perfectly flat, . . . no bubbles, . . . WILL mark the leather. I gave up using a press a couple of years back, . . . I get much better results with a vacuum bag, . . . less space taken up, . . . and I never have to worry about the possibility of messing up a gun when I use the vac bag, . . . Make one extra, too many pumps on the press, . . . break a gun or somehow mess it up, . . . and a $50 holster profit just became a $1000 business liability, . . . to say nothing of the bad press he'll give you. May God bless, Dwight Take a look here: http://leatherworker..."holster press"
-
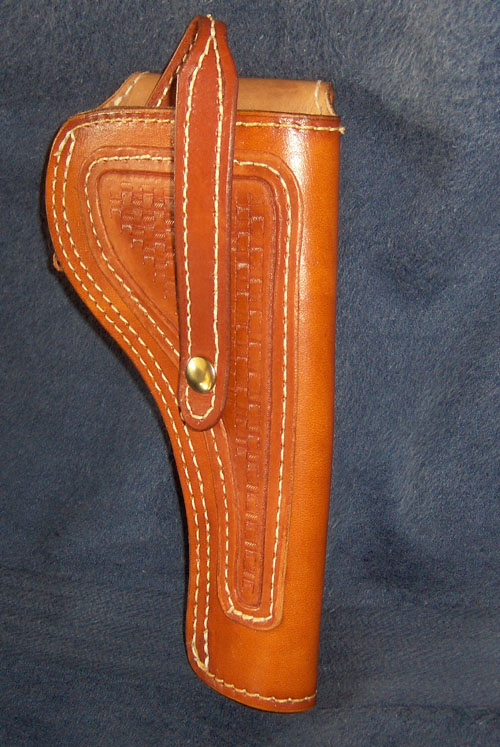
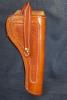
One is for a S&W K22, . . . the other is a shoulder holster for my I-Pad Mini, . . . I hate to carry things in my hands

-
Making A Cutting Table - Advice Appreciated
Dwight replied to daveydude's topic in How Do I Do That?
There is probably a plastic "seller" or "distributor" somewhere close to you. What you are looking for is a high density polyethylene, . . . it is what you get when you buy a white or light grey cutting board. I paid $40 US for a 3 foot by 4 foot piece that is 1/4 inch thick, . . . have used it for about 6 years now, . . . it doubles as my desk top. I'm planning on moving my shop to a different location, . . . and I'll just turn this piece over, . . . get a few more years out of it. What is really nice about it, . . . the leather does not slip, . . . the plastic is "self healing" sort of where it is cut, . . . and it wipes clean with Windex. Rubber will dull the tip of your cutting instrument very quickly, . . . also will drag against your cutting tool also, . . . I'd shun it like the plague. May God bless, Dwight -
Fiebing's Dye Help
Dwight replied to Rock's topic in Dyes, Antiques, Stains, Glues, Waxes, Finishes and Conditioners.
Just in case you missed electrathon's post, . . . dye the whole belt black. Carefully paint in the red letters. One caution with USMC black, . . . make sure you BUFF that belt from end to end, . . . edges, . . . both sides, . . . then do it again. USMC black is a good dye, but it leaves a ton of unused pigment on the surface of you item, . . . it has to be buffed off. Go to the tandy store, . . . get some Eco Flo red, . . . be sure to put whatever top coat you are using on the belt, . . . then paint in the red. You should be good to go. May God bless, Dwight -
Belt Measurement
Dwight replied to SooperJake's topic in Gun Holsters, Rifle Slings and Knife Sheathes
I cannot tell you where I saw it, . . . but it was just so "right" that I cabbaged it onto my website. Look at the belt page, . . . it will tell you how to measure for a belt, . . . and "almost" never go wrong. The one time it did not work out right, . . . was a western style gun belt for a rather plus size customer. In the time it took to make his belt & holster, . . . he had gained 3 inches of girth, . . . and complained that it didn't fit Fortunately, . . . I was able to remake the tongue, . . . and got away with that one. May God bless, Dwight -
first art work
Dwight replied to ironarmknives's topic in Gun Holsters, Rifle Slings and Knife Sheathes
She certainly has my vote, . . . and I think the word is "creative", . . . that is something that cannot be taught, . . . cannot be learned, . . . but can be squashed by those who don't understand it. ENCOURAGE her to go on with it, . . . she'll need to refine it a bit, . . . but that is really neat. Oh, . . . and by the way, . . . if that was MY daughter's first one, . . . the devil would be handing out ice cream cones in 27 flavors before I would give it away. Her friend's dad could get the 2nd one, . . . but NEVER that first one. May God bless, Dwight -
In a one word answer, No, , , . if you want to form and tool, . . . you have to form first. After tooling, leather should virtually never become wet again, . . . the tooling will suffer in varying degrees, . . . mainly attributed to the degree it gets wet. I have had "some" success, . . . limited at best, . . . by only seriously "dampening" the inside of the leather I wanted to form after tooling, . . . and it kinda, sorta, almost maybe worked out. I ONLY do it when I have a customer who is adamant that he/she wants a tooled & formed piece. Good luck. May God bless, Dwight
-
You're certainly welcome, Tassie, . . . but I can't take full credit. I learned how to do that watching a video of John Bianchi's on how to make Western style holsters. Just out of curiosity, . . . are you near the Gold Coast, . . . south of Brisbane? I had the privilege of spending the better part of a week there one time, . . . and it was great. May God bless, Dwight
-
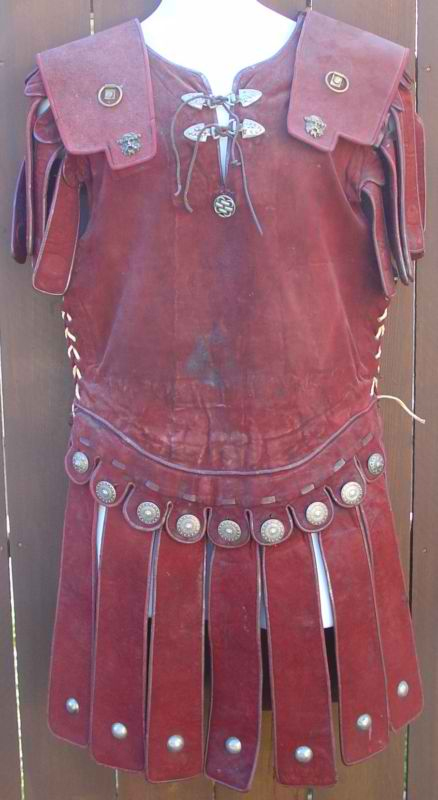
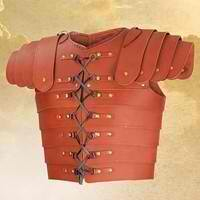
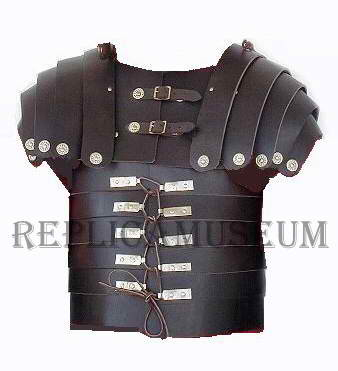
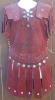
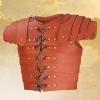
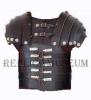
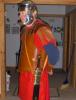
Some time back, I picked up my alter ego, the "Centurion of Capernaum", and had to create my own armor for that. I used the three different styles I've pictured to get an idea of where I wanted to go. The black one and the tan one are both made up of strips of leather, . . . they are laced together up front and in the back, . . . and use tabs that are secured by the rivets you see next to the lacing taches on the front. The tabs are separate pieces of very supple (like suede) leather, . . . Those styles are very, very, comfortable, . . . easy to move within (I guess that's why the Romans love it so well). As you can see I chose the red roman style, . . . the one pictured is made of very thin, supple leather, . . . mine is made of about 14 oz leather, . . . treated with resolene finish, . . . heat/water molded, . . . and is really stiff. Have fun, . . . don't get in too much of a hurry, . . . To add to what immiketoo said, . . . if you go to a Tandy shop, . . . they sell a product called bag stiffener, . . . it's kinda like cardboard, . . . but much, . . . so much better for making the type pattern you will need. It can be riveted, buckles put on it, you can REALLY see what this piece of leather will turn out to be like pretty much if you use that product. I would also just caution you a little on the second choice (the dummy, not the lady), . . . THAT piece will be pretty stiff and unforgiving if you do not make it spot on for fit, . . . and if you gain or lose any appreciable amount of weight, . . . I would bet it would be troublesome to you. But this is not a perfect world, . . . and we are here to have fun, . . . May God bless, Dwight
-
Sorry, Tassie, unless you have a patch machine or something of that nature, . . . you pretty much have to do it by hand. I make double layer "cowboy" belts that also gets a keeper sewn into the buckle end of the belt, on the back side. The way I do it is I put my keeper in between the layers, on the bottom of the belt, with the outside of the belt facing up. I remove the thread from my needle, . . . and use the machine to make about 5 holes before the keeper, . . . all the holes for the keeper, . . . and 2 or 3 after the keeper. I pull the belt out of the machine, remove the keeper, put the thread in, pull out an extra 10 inches of bobbin and spool thread, then begin my sewing process. I sew starting at the last hole I made by the keeper, . . . around the buckle end, . . . and this time when I come to the keeper on the top side of the belt, . . . I sew it in place (I have also previously added contact cement so it is ready when I put it together). Then I continue sewing the belt all the way around to the keeper on the other side, . . . then stop within about 2 holes of the keeper, . . . pull out 10 inches of bobbin thread and spool thread, . . . cut the threads, . . . remove the belt, . . . and hand sew the 6 or 8 stitches it take to put it into place. Review what I said: there is an extra 10 inches of thread before and after the keeper, . . . I hand sew the keeper on the bottom both ways, . . . making a double stitch at the keeper. This not only camoflages my overlap, . . . but gives me a secure place to lock the stitches, . . . Hope this helps. May God bless, Dwight
-
Ok....what Do I Need To Get Started Doing Leatherwork?
Dwight replied to mcdanielCFL's topic in Leather Tools
I made my own armor for my "Centurion of Capernaum" alter ego, . . . sandals, skirt, lined a steel helmet, made a shield, . . . if the Romans ever resurrect the 6th Legion of Megiddo, . . . I'll be ready Sounds like you are in with a bunch of fun people. I'm gonna dabble a bit in some blacksmithing (hopefully) beginning this spring, . . . can't find a hawk I like, . . . can't find a knife I like, . . . just figgered I'd up and make one. FWIW, . . . gimme a holler if you get stumped or whatever, . . . take a look at my website www.dwightsgunleather.com and you can see some of the stuff I do, . . . May God bless, Dwight -
Ok....what Do I Need To Get Started Doing Leatherwork?
Dwight replied to mcdanielCFL's topic in Leather Tools
Tim, . . . most leather workers I deal with are pretty much "self" taught. By that, I mean that they have purchased a couple of say "Al Stohlman" books, maybe the Bianchi video series, or taken a couple of classes at a Tandy shop. They then take what they are shown and run with it. Leather work is far more akin to having a picture and a 20 pound bag of Lego blocks than it is a recipe for fudge and a kitchen to make it in. There simply are no "recipes" in leather works, . . . just more or less a compass pointing in a general direction, . . . you have to figure out how to get around whatever obstacles jump up. If you happen to be one of those people that believe there should be a school for every thing, a precise recipe, a perfect trip route, etc, . . . then basket weaving or snake handling will be better for you than leather work. I haven't the foggiest notion of what SCA stuff is, . . . hope it isn't contagious If you are going to do knife sheaths, belts, holsters etc, . . . the first thing you will need to learn to do is make patterns. If you can make a good pattern, . . . you can make a good product. If your patterns are less than optimal, . . . well, we both know where that will wind up. Start in holsters with a simple pancake, . . . go to gun shops and inspect them hanging in their plastic bags on the wall. Look at how that craftsperson put it together. Then go look at Al Stohlman's holster book, see how he showed making one similar. Knife sheaths are the same way. You can also get some good tips and ideas at flea markets and yard sales. Buy a holster or two that you might like, or a knife sheath, . . . take it home, . . . use a razor knife to cut the stitches, . . . tear it apart, . . . see how that other guy made it. Then in YOUR mind, . . . figure out the steps needed to make it. THERE WILL ALWAYS BE VARIATIONS, . . . DON'T make the fatal mistake many do starting out in leather work, . . . buying cheap leather scraps, . . . bargain hides, etc. Buy good leather, . . . and resign youself that you WILL throw away a couple hundred bucks worth of leather learning how to do this stuff. Tools? Start out buying ONLY what you need for THIS project. There are tons of "kits" out there, . . . most have tools that will never be used again, or couldn't be sold any other way. As you move up, . . . your tool inventory will increase, . . . you will know what you have, . . . you will know how it works, . . . and you will know how to use it. Finally, . . . don't be afraid to ask questions here, . . . most of these folks are of the Southern "good old boy" cut, and are more than willing to help out. May God bless, Dwight -
If you are at all handy with tools, . . . a piece of steel 15 to 20 mm wide, and 1 to 2 mm thick could be bent into the exact size circle you want, . . . welded together, . . . and the edge sharpened to form a "cookie cutter" tool. I have taken galvanized electrical conduit and made several of these type punches, . . . though smaller than you need. They work great, are easily sharpened, and certainly did not cost a high price. May God bless, Dwight
-
First "gun" Belt... Questions
Dwight replied to Sixer's topic in Gun Holsters, Rifle Slings and Knife Sheathes
My apologies, . . . started to do this a long time ago, . . . got busy eating cookies or something. Anyway, . . . here is "my" burnisher. The tool on the end of the shaft is the same as the one used for those cloth polishing wheels, . . . you just use a longer bolt. I actually bought mine in a truck stop, . . . they sold them over where the wheel & rim polish and wax was, . . . for them big sooper truckers and their Cragar chrome wheels. Find a 1 inch or 1 1/4 in dowel, . . . drill it down the middle, . . . same size as your bolt, . . . you want it snug. Fit the whole thing onto a 1/4 hp motor, . . . 1725 rpm, . . . put a switch on the motor, . . . bolt it to your work bench, . . . grab a hand full of round files and a couple of flat files, . . . go to work. Turn on the motor, . . . first thing to do is take a flat file and make the whole thing round. When you drilled the hole, . . . it was off center, . . . and the wood is wobbling, . . . NEEDS FILED DOWN SMOOTH. Next, . . .file grooves in it to match the curves of the edge of your belts. SAND EM SMOOTH, . . . uhhh, . . . in case I didn't say it before, . . . SAND EM SMOOTH, SLICK, USE STEEL WOOL TO GET IT "NICE" SMOOTH. Take a little beeswax, . . . scrap leather sewn together, edged & beveled, . . . practice & have fun. Now all the way out on the end away from the motor is one trick I didn't plan, . . . but it sure is slick. Notice the big washer on the end, . . . it allows you to lay something up against it, . . . and use the flat piece of wood there to really polish a flat surface. Somtimes I have to use a thick welt, . . . leaves a flat place in the edge of the holster, . . . this little shelf is perfect for polishing those flats. Run the back edge of the holster lightly up against the washer, . . . and burnish to your little heart's content. Total cost of this tool (excluding motor) is around 20 bucks, . . . and is IMHO well, wellllllll, worth it. FWIW, . . . I can burnish a 52 inch fat boy gun belt in all of about 10 minutes on that rig. Used to take me about 30 or 40 when I was only using my Dremel. May God bless, Dwight
-
Contact Cement Oops
Dwight replied to cleanview's topic in Gun Holsters, Rifle Slings and Knife Sheathes
One quick note, . . . if you have a piece of thick glass, . . . might want to use it. CC comes off of glass, . . . but some other smooth surfaces it just wants to "hang in there" on it. Otherwise, . . . super-duper idea. May God bless, Dwight