Dwight
-
Posts
5,248 -
Joined
-
Last visited
Content Type
Profiles
Forums
Events
Blogs
Gallery
Store
Everything posted by Dwight
-

Figuring Gun Belt Length
Dwight replied to justken's topic in Gun Holsters, Rifle Slings and Knife Sheathes
As a case in point, . . . I made myself a belt a couple of years back (first one in a long time, . . . too, . . . ) by just laying it beside my favorite belt. It fit, . . . no problems, . . . all is well. THEN, . . . I decided I wanted another belt, . . . a harness belt this time, . . . knowing it is a different process, . . . took off my new belt and laid the measuring tape on it. "UGH," I cried, . . . my tape has shrunk. It says I'm wearing a 39 in belt, . . . but my jeans are 36's, . . . something is surely wrong. Yeah, . . . it was, . . . and it was not the tape. Jeans had ballooned up with me, . . . tape sat quietly in the drawer awaiting its day of glory. Long and short, . . . use a measuring tape, . . . or a belt you know fits. No other way is really reliable. A "kinda, . . . mmmm, . . . sorta, . . . good" rule of thumb, . . . OWB holsters need no additional belt size, . . . IWB for a 1911, XD, Glock, most revolvers: add 2 inches, . . . cowboy gun belt: add 4 inches. May God bless, Dwight -
As long as one does the tooling and stamping before the dyeing and finish coating, . . . I am not sure it makes a difference, . . . at least none that I have seen. Madmax saves his stitching for later, . . . he wants to be sure his tooling is good. I save my tooling for later, . . . because if I'm going to mess up on a belt and make a training aid out of one, . . . it will be with the sewing machine. Once I have a belt blank ready for tooling/stamping, . . . it is cut, punched, edged, glued to the liner,. . . and sewn, . . . but there has been no dyeing or finish applied. So far, . . . most of my customers have been semi oblivious to my proceedure, . . . just the product. May God bless, Dwight
-
The stitches would only decorate as far as I can see, . . . but there is one thing to keep in mind, . . . especially with only one layer of leather. If you stitch any line close to 90 degrees across the belt, . . . you will also build a perforation line, . . . and will possibly weaken the leather to the point that it may fail prematurely. Any line I sew that goes across the belt is done at less than a 45 degree angle simply for that reason. May God bless, Dwight
-
I had to get up and go find a ruler to answer your question, . . . but 3/16" is where I have my stitch groover set. The border will be something a bit wider than 3/16" because 3/16" is my stitch line dimension. I cut the blanks, . . . punch all holes at the buckle end and cut whatever shapes necessary there, . . . cut the tongue end about 1/2 to 3/4 inch longer than necessary, . . . glue up the pieces, . . . sand the edges smooth and even, . . . shape out the tongue and punch the buckle holes, . . . edge the belt, . . . then stitch groove, . . . sew, . . . decorate/carve/stamp, . . . dye, . . . burnish, . . . and finish the thing. Since I make em basically one belt at a time, . . . this works for me. My next project is to figure out how to glue up an 18 to 24 inch slab of face/liner leather, . . . and still be able to do what I do now at the buckle end. May God bless, Dwight
-
Just a short "Thank You" for Troy, . . . I like those business cards. I had wanted to do something more dramatic at first, . . . dropped back to plain practical, . . . just may follow your lead and do something more colorful and dramatic. May not also, . . . but thanks for your post, . . . at least it has gotten me to thinking more about it. May God bless, Dwight
-
I just made a 50/50 mix of pure beeswax and neetsfoot oil to use on some experimental stuff I'm doing. I put a heavy glass jar in my "fleamarket" crock pot, . . . filled the crock pot up about half way with water, . . . plugged her in, . . . it was even easier than using a double boiler, . . . and instead of cleaning the jar, . . . I just set it up on the shelf until I need it again. Just a little tip there to maybe make it a bit easier on all. May God bless, Dwight
-
Paxton, . . . I have about a 9 x 14 inch aluminum cake pan my wife donated to my leather shop. It is the one I do the browns in, . . . I have another one for blacks. I pour about a half inch of dye in the bottom of the pan, . . . put on two rubber gloves, . . . they go in buckle end first, . . . and they just stay in long enough to absorb the dye. I run em through with the flat of the inside against the bottom of the pan (put a wet paper towel under the pan to keep it from sliding, . . . or tape it down with masking tape) looks like a flat snake taking a bath in dye if you can visualize that. It takes all of about 30 seconds per belt, . . . when I'm done, . . . put the funnel in the dye bottle, . . . pour the rest back in, . . . rinse out the pan, . . . done . Most of the time, I'm doing one belt at a time, . . . but I got sick of trying to daub, or sponge, or dab and get it to suit me. This way it is uniform in color every time. The one thing you have to do though if you want lighter shades, . . . experiment with thinning the dye. I found one really beautiful reddish brown that way, . . . and it is my biggest seller. May God bless, Dwight
-
Most of my leather work tends more toward practical use, . . . and my business card reflects that. Mine are done on Microsoft Publisher, printed on a laser printer, on standard office supply store business card computer stock. May God bless, Dwight

-
I finally was able to get my website pieced together and published: www.dwightsgunleather.com I understand that there are services who are able to "submit" a website to the major search engines in such a manner that you can wind up in the first few pages, . . . which would obviously enhance the possibility of sales. If anyone has done that and would care to share your experience, I would certainly appreciate it. I've spent a couple hours looking at various offerings, . . . and came away probably more confused than when I went into it. My goal is to just get noticed out there, . . . get some traffic, . . . and not spend the kings gold to get it done. Thanks, may God bless, Dwight
-
Take a small bottle, . . . mix a 1 to 1 ratio of Resolene and tap water, . . . shake it enough to get the two well mixed. Then take a small, . . . 1 inch or 1 1/2 inch bristle brush (NOT Nylon or other man made stuff), . . . you want to liberally coat the whole thing, starting with whatever parts of the holster have the flesh side open. I usually start in the inside of my holsters, especially if they are unlined. Coat it liberally, using a back and forth motion, up and down, side to side, cross hatching, etc. You'll know you have enough on when you begin to create a small froth on the top of the holster. Quit adding at that point and brush, brush, brush, . . . until there are no more bubbles. Check the item for streaks or drips and especially go back and coat all edges before you quit. Hang it up to dry over low heat or (I prefer this) hang it in a window where the sun will hit it. Just how I do it, . . . works for me. You can see examples at www.dwightsgunleather.com May God bless, Dwight
-
I quit fooling around a long time ago with my belts. I dip dye em, . . . every last one, . . . from tongue to buckle. Clear coat em with a 50/50 mix of resolene and tap water, . . . and I haven't had any complaints from any of my customers at all. I brush the resolene on with a bristle hair brush, . . . making sure the back really gets a good dose, . . . when they dry, . . . they're done. May God bless, Dwight
-
If you would post a picture of the bag your grandfather did, it may make a difference. Some designs are easy, . . . and, . . . ummm, . . . some are not. Also, you may want to have someone else do the actual tooling for you, . . . sell you the panels, . . . you do the punching, lacing, and finishing, and it is a case that you have made yourself. May God bless, Dwight
-
Some I dip dye, . . . some I don't, . . . those I do, . . . get a good shaking before I hang them up to dry. You also may be leaving it in the dye too long, . . . pardon the pun, . . . but "dip", . . . "don't drown". Leaving it in the dye more than long enough for it to change color will sometimes produce a pooling at the lower end of the item. May God bless, Dwight
-
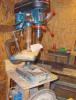
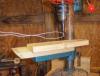
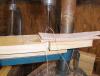
I don't remember who it was that asked for pictures, . . . here they are: It may sound problematic, . . . and may look hokey, . . . but my fingers and wrists are beyond hand stitching. I had to figure out another way, . . . and it makes a stitch that is equal to my Tippmann, . . . and of course, . . . if I want to, . . . I can do designs on the face of the leather, . . . sorta like embroidering. Anyway, . . . just another tool for those who need it. May God bless, Dwight

-
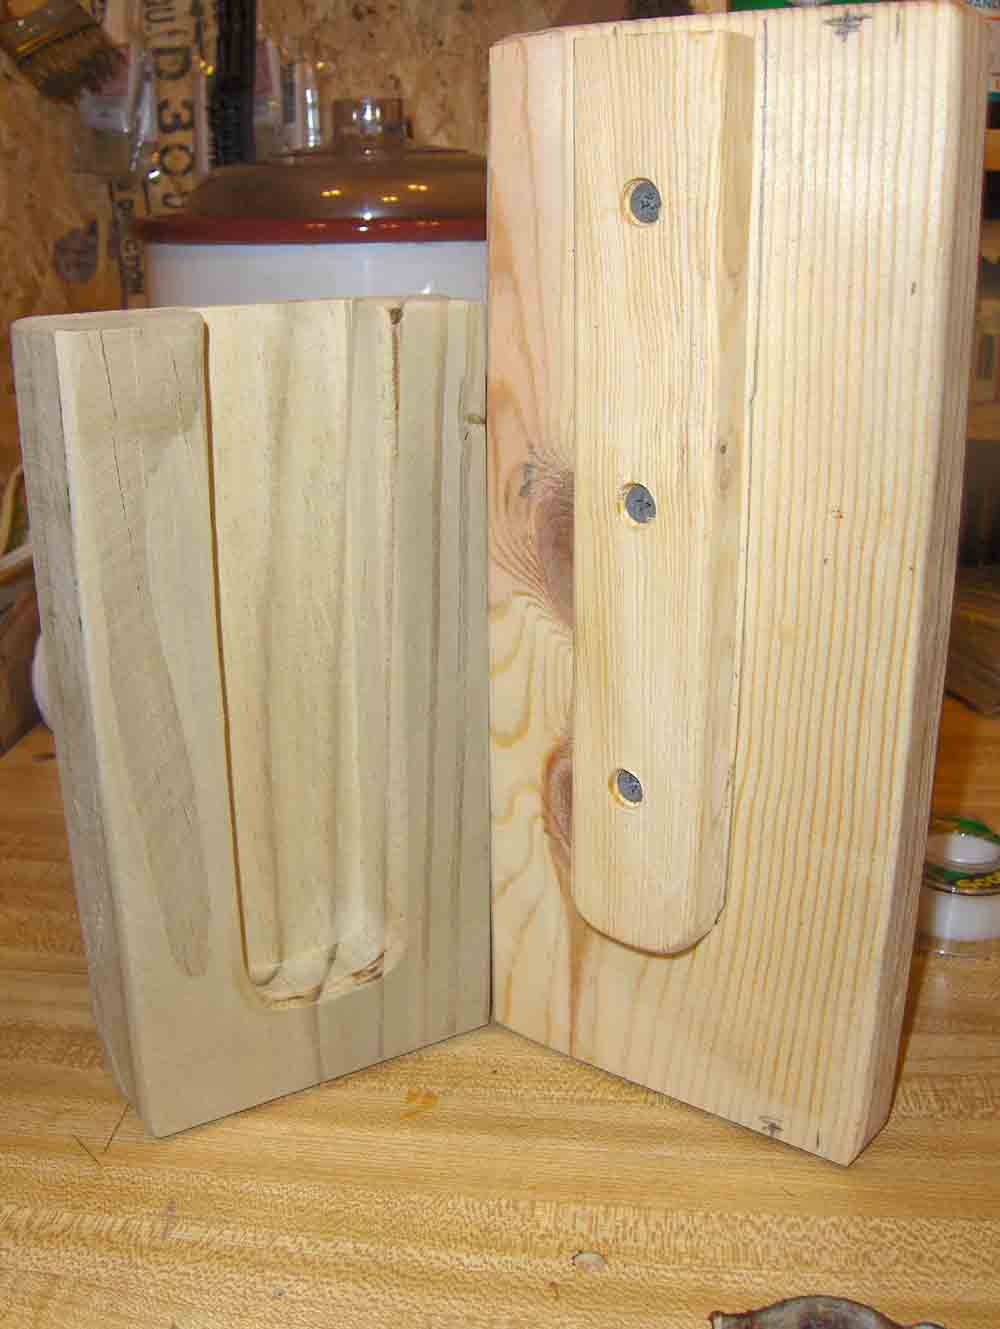
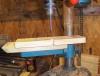
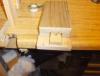
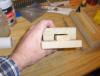
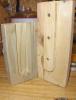
swirve, . . . ummm, . . . I'll try the picture thing, . . . 276 shows the mold pieces apart, . . . 277 shows and end view and clearly depicts the clearance needed for a good mold. I usually make mine one full oz wider than the anticipated weight of the leather I will be using for the project. Picture 278 just shows the mold laying down together. I, . . . ummm, . . . SOAK or DROWN the piece of leather I will use in my molds and I use the HOT water straight out of the tap. It's not hot enough to scald you, . . . but it is too uncomfortable to be in it very long. Obviously I lay the female mold down, . . . cover it with the soaked leather, . . . force the male form down into the leather, . . . whack it real good on the rounded end to force the rounding to work, . . . tighten up a heavy duty 8 inch "C" clamp on the whole thing for about an hour, . . . loosen the clamp, . . . remove the leather, . . . hang it up to dry for a day or so, . . . then cut, sew, . . . whatever to finish the project. Hope this helps. PM me if you need any more details, . . . it may take a day or two, . . . but I'll try to answer your questions best I can. May God bless, Dwight
-
Finding Model Guns
Dwight replied to TheSensei's topic in Gun Holsters, Rifle Slings and Knife Sheathes
I don't make a lot of different styles, . . . nor do I make for many makes/models. Custom work is only done for THE gun the customer supplies to me for molding purposes. However, . . . every now and then I need a new Blue Gun, . . . and THE best place to get em I have found is http://www.letargets.com/thanks.aspx . There is a sales lady there named Cathy, . . . who makes purchasing a fun situation. Our whole economic recovery could get a boost in the arm if all sales people were as helpful and considerate as she is. Their prices were $36 each for 3 I ordered the other day, . . . which is at least 4 or 5 bucks cheaper than many other places. To the OP, . . . if you want to make a seriously good holster, . . . you need a seriously good mold, . . . and these are in my opinion at least, . . . seriously good. May God bless, Dwight -
Prefered Buckle
Dwight replied to rickeyfro's topic in Gun Holsters, Rifle Slings and Knife Sheathes
Buckles, I have found, are really a personal matter with the wearer, . . . so I make the belt, . . . but it is BYOB (buy your own buckle). Very rarely have I had THE buckle the buyer wanted, . . . but I do have some just in case. I personally prefer a small Western type, . . . May God bless, Dwight -
Tom, . . . I had the privilege of making a couple of cell phone holsters a few weeks ago, . . . guy was pretty certain of what he wanted: Completely covered all around (used 7/8 oz shoulder) with a flap over the top, only about 1/2 inch coming out the top for two "I" phones he carries, one on each side of his belt. Instead of a clip or a regular "pass through" belt loop, . . . I riveted a loop of leather to the bottom of the case and put snaps on the bottom of the loop. He had the beauty of a full size loop going across the back of the holster, . . . and with the snaps on the bottom, . . . didn't have to take off his belt to take off the holster. He was thrilled with them. Any more that I do, I'll do the same, . . . clips can ruin a beautiful belt, . . . to say nothing of ripping off a fingernail if you aren't careful. May God bless, Dwight
-
Neatsfoot & Beeswax
Dwight replied to Dwight's topic in Gun Holsters, Rifle Slings and Knife Sheathes
Hey, Lobo, I was hoping you would chime in, . . . and I had surmised pretty much the history you spoke of above. I did a western rig for a friend of mine last year, . . . and while it was a good job, . . . he was simply thrilled, . . . it was a personal thing with me, I just wanted to do it a bit better. I want to tone down on the "plastic" feel on the western stuff and re-enactment gear, . . . and my thought pattern was that if I could find a process that used "natural" products like this one, . . . it may be the answer. How's the new shop, . . . got it all broke in yet? I'm maybe a year from doing the same or similar, . . . wife is about to have a fire sale on my leather working in the living room. May God bless, Dwight -
Neatsfoot & Beeswax
Dwight replied to Dwight's topic in Gun Holsters, Rifle Slings and Knife Sheathes
Yes, . . . but the two things that should be stressed about neatsfoot oil: it is a natural bovine product, being an oil extracted from the legs and feet of cattle, . . . and secondly, . . . it does not congeal at room temperature. It seems the Good Lord intended for it to be a part of His cattle He created, . . . so maybe we should just add some of it back when we get done altering the cattle, . . . and their hides. Anyway, . . . that's what I found out on Google. May God bless, Dwight -
The first thing you will need is the "female" portion of the mold. Get someone to rough out a hole in a piece of walnut that will take out the major portion of the wood to form the outside of that rounded punkin shaped thing. Your walnut piece needs to be at least 1 1/2 to 2 inches thick at all points around the finished mold. The sides could even be 3 inches. Then you get youself a couple of very sharp gouges and begin to gouge out the rest of the wood until you have the shape you want. Make it just about 1/4 inch longer than you really want it to finish up being. Next, . . . go to work on the inside of the thing, . . . sanding it smooth as a baby's bottom. This next step is pretty critical, so don't mess it up. Drill 4 holes the full length of the mold, at least a half inch away from the mold hole, . . . two on the top and two on the bottom. They should be 1/4 inch holes. When you get done, . . . run 1/4 inch steel rods through the holes, cut them off and thread the ends for nuts. Now, . . . verrrrrrrrrry carefully, . . . cut the whole thing in half (remove the steel rods first). This cut should be across the middle of the center or "belly" of the thing. This gives you two halves of a perfectly formed mold (hopefully). Sand the cut edges just smooth, not taking any more material than necessary. Bolt the halves together so your mold is complete. Then build a top to go over it, . . . but leave a slot in the back for the top of the purse to come out. The mold top will be bolted on with bolts, . . . two top plates and two bottom plates, . . . held on by bolts. Drill a 1/4 in hole in the center of the mold top. Get yourself a piece of veggie tan leather, . . . cut it to the proper shape, . . . get it sopping, gooey, dripping wet in as hot a water as you can stand. Force it down into the mold as well as you can. Line you mold with saran wrap. Strap on the top. Open and shake a can of triple expanding foam, sold in hardware stores. Fill the mold with the foam and go horseback riding, . . . go to bed, . . . take a nap, . . . do something for about 10 hours. Take off the top, . . . loosen the 4 "through bolts", . . . and dismantle your form. You should have a rounded product with a flap to make a top from. Annnnnnnnd, . . . iffffff, you can have the sides straight (the picture shows them apparently bulged) you can make the male portion of the mold out of another piece of walnut, . . . make it about 1/8 of an inch smaller overall than your female mold, . . . you can wet the leather and form the purse by forcing the two pieces together in a vice. I make my magazine carriers in a similar male/female mold. Good luck. May God bless, Dwight
-
Holster And Sheath Sewing Thread
Dwight replied to NewYorkerInSydney's topic in Gun Holsters, Rifle Slings and Knife Sheathes
Several years back, I was trying to decide what size thread to use for my work. I bought several smaller spools from www.stleather.com in St. Louis, . . . they were good people to deal with. They also used to have a really neat on line catalog, . . . don't know if they still have that, . . . but their thread spools were smaller, hence cheaper. I use size 346 on most all of my holsters and belts. I used some 270 for a while, and have a large spool of black that I'm probably going to give to some fisherman or something some day just to get rid of it. The next size bigger than 346, I believe is 400. Oh, and yeah, . . . Tandy has the 270 and the 346 in white, . . . about $25. May God bless, Dwight -
Neatsfoot & Beeswax
Dwight replied to Dwight's topic in Gun Holsters, Rifle Slings and Knife Sheathes
ps0303, . . . you DID IT !!!!! I had found Lobo's post, . . . but the other one I couldn't get to come up for some reason. As soon as I saw her holster thumbnail, . . . I knew that was it. Time to get the old crock pot fired up, . . . I thought it was 50/50, . . . but wasn't sure enough to commit the resources until I saw it in print. Shoot me a PM with an address, . . . once I get it all made up (and I know it works like I want it to), . . . I'll send you a sample, . . . you can "smearymint" too. Thanks for the help. May God bless, Dwight -
There is another way, . . . one that has been real good to me. AR and tap water, 50/50, room temperature to start with. Take a 1 inch or so, CHEAP, bristle brush. Nylon don't work well for me. Dip the brush and slather on the mixture, inside and out, . . . I usually start on the flesh side, . . . soak it good, . . . and just keep brushing. You will work up a bit of lather, . . . nice little piles of bubbles all over. Quit adding liquid at that point, . . . just keep brushing, . . . left, right, up, down, sideways, . . . keep brushing until there are no more bubbles. Hang up to dry, . . . if it isn't glossy enough for you, . . . do it again. I like to hang mine in a window and let the sun's heat do the drying, . . . but in the winter, it's over the heat register. May God bless, Dwight
-
OK, . . . I give up, . . . need some help. I did the "search" thing for the past hour or so, . . . could not find the post I was looking for. Some time in the last 8 months or so, someone posted about using (if I remember correctly) a mixture that is neatsfoot oil and beeswax, . . . kept it in something like a crock pot, . . . used it I thought for special deal old west looking holsters. Anyway, . . . I've got a bunch of beeswax, . . . an old crock pot, . . . some neatsfoot oil, . . . but I wanted to re-read the post or at least get a better handle on how they used it. Just got the itch to "experiment" but wanted to get boosted off in the right direction. Anybody got a handle on this? Thanks! May God bless, Dwight