Wedgetail
-
Posts
308 -
Joined
-
Last visited
Content Type
Profiles
Forums
Events
Blogs
Gallery
Store
Everything posted by Wedgetail
-
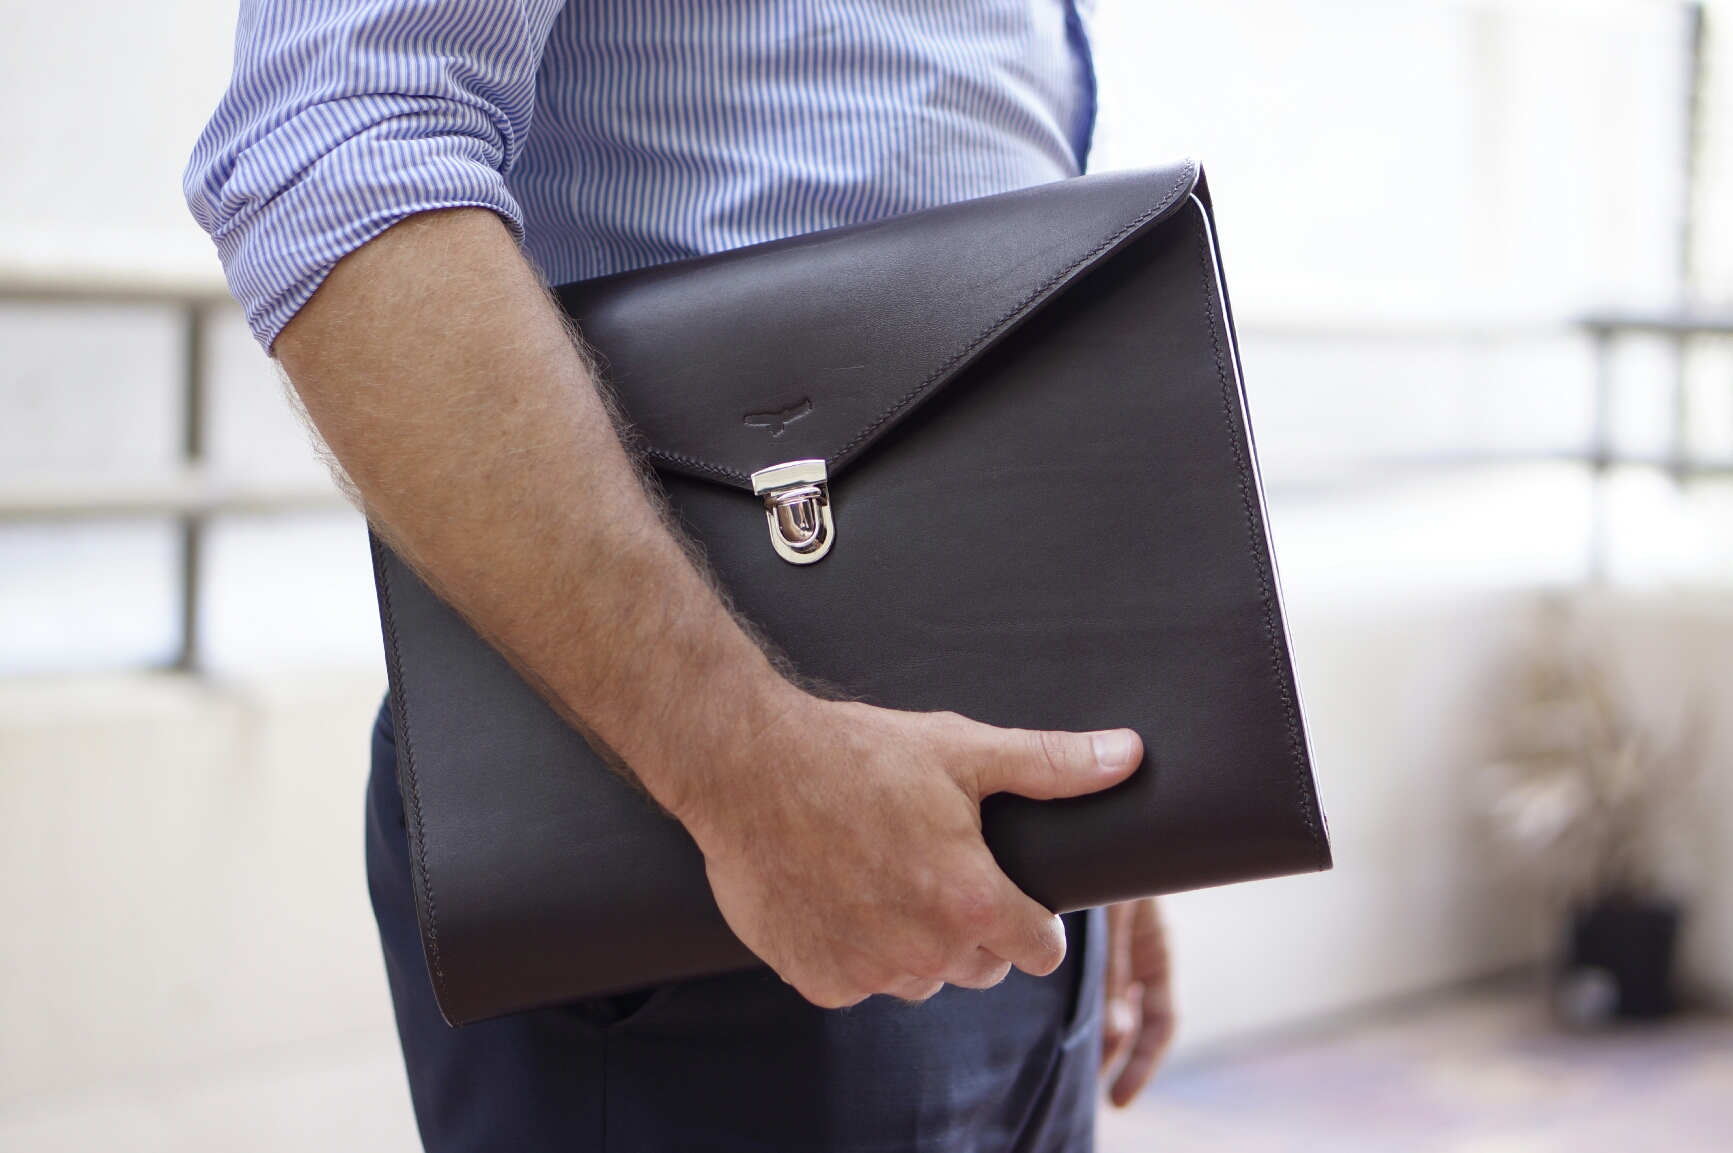
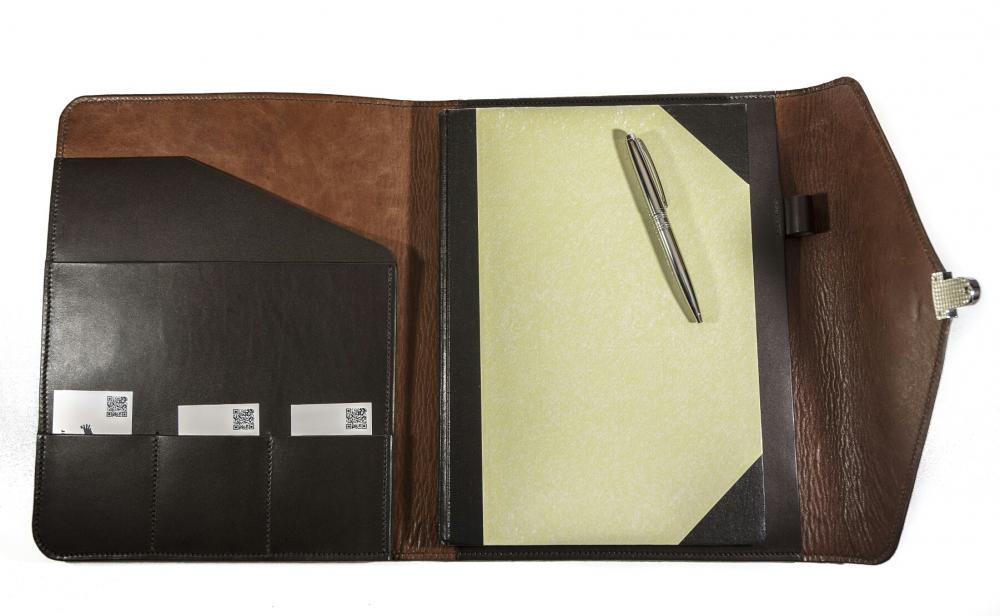
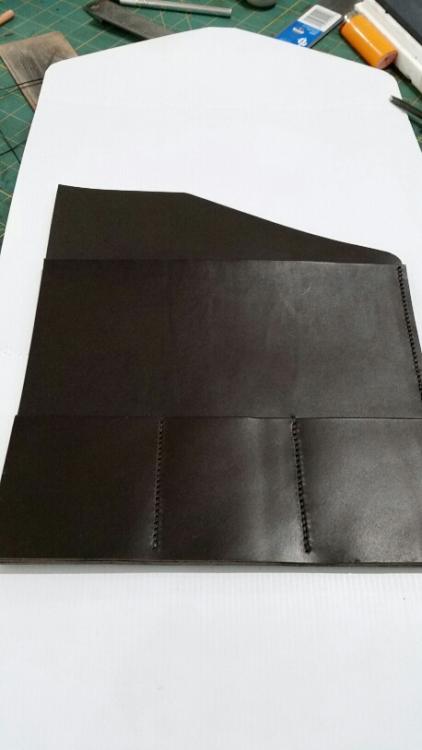
Alright guys, I posted some WIP shots of this one earlier. Now done, and ready to hand over to the client. It is 2mm italian veg tan, with a pigment finish coat. Beautiful stuff, and great to work with. It is stacked up to 4 layers thick where the cardslots are on the left side, so it is a fairly substantial feeling piece, and punching those stitch holes with the awl was both character building, and a great learning experience! The lining is 1mm chrome tanned kangaroo skin in a tan colour. The whole thing is hand stitched, with waxed linen thread. There is a tuck lock closure, which adds a nice bit of bling. Enjoy! Comments, questions, and feedback is always welcome: I'm here to learn, and share what i have learned the hard way.

-
Yeah the difference beteen this and yours appears only to be layers of stiffener and a lining. FYI guys, Craftsman gus youtube channel also just released a video which used a similar approach. I'm like you @RockyAussie, self taught... except I had the benefit of youtube to get me started.
-
Genius...
-
 How exciting! That's pretty awesome.
 -
Yeah, I'm pretty cheap and just use a garden paver that cost me $2 from the hardware store... it's heavy, makes punching easier, and reduces noise too. But you do need a nice scrap of leather between your work piece and the paver, or it'll scuff up badly. For my pointed anvil, well... this is it:
-
I feel like i am driving past this post with my windows down, wolf whistling and shouting "show us ya tracks!" ... i feel so dirty... But so right.
-
Show me your wallet
Wedgetail replied to Joseph1836's topic in Purses, Wallets, Belts and Miscellaneous Pocket Items
Haha, just about! Head down to the nearest golf course and pick one out. Two good distributors here are birdsall leather and packer leather. -
Show me your wallet
Wedgetail replied to Joseph1836's topic in Purses, Wallets, Belts and Miscellaneous Pocket Items
Thanks Gotta make one for myself yet. Haha everyone else gets the good stuff I make. The kangaroo comes really thin, which is perfect. This hide was about 0.8-1mm (2-2.5oz) The cowhide was heavy stuff I had leftover from making some sheaths (started about 10oz), so i had to split it down. I got it to around 1.2mm (3oz). -
Might try using tallow fat on an offcut if you have one. English bridle leathers are made with oils and tallows. Usually the oils are some sort of fish oil I think. Tallow fat is literally rendered from offcuts of beef or pig fat. For finishing leather i make a blend of tallow and beeswax that is about 50/50... been using it on pieces in my everyday carry without concern of spoiling for about 6 months now. Where do I get tallow fat? Well here in Australia I get it from the supermarket. It's next to the sticks of cooking butter, in a packet called "superfry" and costs under $5. I am certain there would be an equivalent in most locations.
-
Show me your wallet
Wedgetail replied to Joseph1836's topic in Purses, Wallets, Belts and Miscellaneous Pocket Items
Kangaroo inner, cowhide outer.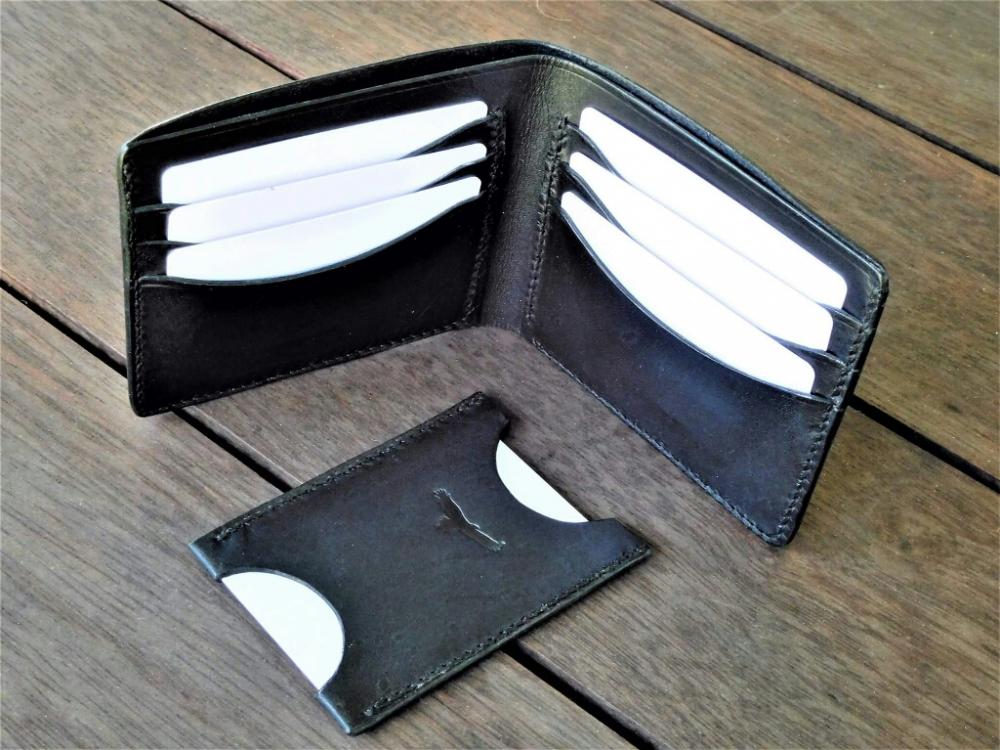
-
What's Your Handle? (Origins of your maker marks)
Wedgetail replied to Mjolnir's topic in Leatherwork Conversation
Haha i designed it, literally it is the bird in my avatar blacked out to create a silhoette and converted to a vector image.... simple, but effective! Can't claim credit for making it though. I had it made by these guys: http://gelandangan.weebly.com/leather-stamps.html -
Not done yet... but here are some progress shots. Using italian veg tan with a pigment coating. It's really nice stuff! Stitching by hand with waxed linen thread. Lining with a chrome tanned kangaroo skin.


-
31 Pen Pouches
Wedgetail replied to Rolandranch's topic in Purses, Wallets, Belts and Miscellaneous Pocket Items
Definitely need a press... bashing the die with a mallet will just damage it in short time. There are a "tonne" of options though (pardon the pun) Clicker presses are the most efficient, and ready for use. Also the most expensive. And those can be manual or hydraulic. Next, maybe a book binding style screw press. But those are pretty slow going. Other options are a large arbor press, or a shop press (hydraulic or bottle jack style)... both of which you'd need to modify to use, such as putting a wide foot on the post so you don't just damage the die, and to spread the pressure evenly across the die. Also a nice flat plate to press onto that will accept the load. In other words, if youre only considering it for one thing, it's probably not worth the investment... and if you are not using a clicker press, or arbor press, then it would simply be faster to cut around a hard template. But if you are clicking out pen sleeves, wallet parts, etc in sufficient volume, thenworth considering. Of course, you could get a suitably sized laser cutter... but that's another conversation. -
31 Pen Pouches
Wedgetail replied to Rolandranch's topic in Purses, Wallets, Belts and Miscellaneous Pocket Items
Lookin good! And moving that fast is excellent too! If you can't afford a steel rule die and a clicker press (or something else to punch them out with) straight away, then you could start with a laser cut acrylic template.... or just shape one yourself out of thin plywood with a jigsaw and some sand paper. It takes almost as long to reset some presses as it does to cut around a simple template shape with a rotary cutter. -
What's Your Handle? (Origins of your maker marks)
Wedgetail replied to Mjolnir's topic in Leatherwork Conversation
Ok, wedgetail leather. For starters, I'm Australian and the wedge-tailed eagle is an Australian Aquila. It is actually the largest aquila in the world. My dad was Royal Australian Air Force (RAAF) for 30 years or so. Every time he came home he was wearing the cap, with the RAAF emblem on it, which features the wedge-tailed eagle. My favourite park to sit at for lunch, has a monument to the RAAF, which is basically a big bronze wedge-tailed eagle. Later, I started working for Boeing on defence contracts. I was the configuration manager on the 737 AEW&C Wedgetail Modification Project. While working on the wedgetail project, I met the woman who became my wife... get this: her name is Skye. It seems to be a pretty significant symbol that keeps appearing in my life, so I ran with that.
-
What's Your Handle? (Origins of your maker marks)
Wedgetail replied to Mjolnir's topic in Leatherwork Conversation
Can you just sand it down? -
That would be worth a try....
-
Great job! I'm working on a portfolio now too, no tooling just a nice italian veg tan with a pigment coat... so much stitching.
-
Ok, so belts and most strap goods usually have a few processes that are all the same. First things first, I'd spend some time watching other leathercrafters make them and you will get an idea of what tools and skills you lack... my own channel on youtube (wedgetail leather) has one up about making dog collars that has a lot of info relevant to belts too, but some videos by ian atkinson (Leodis leather) and others have videos that specifically focus on belts. Process wise, it depends if I am making lots of small items or one big item from a strap whether I will do bevelling and burnishing before or after trimming the ends... because it is faster and easier to burnish one long strap than many smaller ones (i.e. dog collars). For a belt though, my process is: 1. Cut the strap (or buy one), and if this is the first from your leather you'll need to cut a straight edge first. 2. Measure length from buckle to centre hole, and then mark out your belt holes, tongue length, and turnback length to find the cut points (taking measurements from a currently used belt is a good idea, but if the belt is thinner then allowing just a bit more)... you might need to experiment a bit to learn how much turnback you will need for your buckle and keepers. 3. Cut ends and end punch 4. Bevel edges, both sides 5. Punch holes in belt tip, and oblong hole for buckle 6. Dye edges and holes 7. Burnish edges and holes 8. Skive turnback to half thickness 9. Fit buckle 10. Fit keeper(s) 11. Apply makers mark. 12. Take pictures for the forum .... as you can see, most of the special know how is in step 2... the rest is just regular stuff. Tool wise, i usually use: A strap cutter (if not buying pre-cut straps) A knife (i use either round knife or scalpel) A skiver of some sort, An edge beveller, A dye mop / dauber, Burnishing stuff (canvas, sandpaper, wood slicker, tallow fat, beeswax) hole punches (usually need one for any rivets and one for the tongue end for the buckle pin), Rivet setters OR stitching chisels depending if securing the buckle and keeper with rivets or stitching. Optional tools would be: An oblong or crew punch, but you can just punch two holes and join them with a knife to make an oblong hole for buckles. Strap end punch, or you can just copy the tip of another belt you like and cut it with a knife like you would any rounded corner/curve. Bench mounted skiver, just speeds things up and makes a more consistent thickness. .... that's about it... really you don't need many special tools. Now for leather... when I make a jeans belt for men, I tend to use 8-9oz bridle leather. For a gun belt you are going to want something much thicker. At least 12oz I'd say... that's a thick bit of leather! So unless you have need of a side of leather that thickness, I'd look into buying a strap. It's not the cheapest way to get straps, but it is good to see if making belts is something you want to do before spending up big. Hope that helps!
-
Well I suck at skiving. Straight up... but one thing I have learned as I blunder through it myself, is it is as much about a sharp knife as it is about technique. Particularly when it comes to thin/stretchy leather, you want the knife to do the work for you; not your muscles... If you're the kind of person who pushes the knife along, then thin/stretchy leather is going to bunch up real easy and is going to tear out. Instead try just a gentle pressure and use the slicing motion of your knife to do the cutting for you. Always the slicing down and away so it cuts on the stretch and doesn't bunch up. If it stretches a lot, use less pressure, or try using a block of wood or a bone folder to weigh down the edge you're working toward (anything will do, just don't want to slice your fingers if you happen to slip!) Think a bit like cutting a soft tomato. If you just push your knife into it, it will cut it but it will also crush down. If you slide your knife forward as you gently push down, it will slice cleanly. also try to do it on a hard smooth surface. I don't have a good marble slab, so do my skiving on a smooth glass cutting board someone gave me as a Christmas gift in a cheese knife set... Can get one just like it for $5 at the shops. if you are doing all of that and it still won't work? *shrugs* I got nuthin'!
-
Non Shiny Sealer
Wedgetail replied to f1humlam's topic in Dyes, Antiques, Stains, Glues, Waxes, Finishes and Conditioners.
If you're a tandy leather kind of person, then Eco flow satin sheen works pretty well and is easy to get your hands on. It says it is non-glossy, and the way I applied it last, it had only a slight shine to it but overall a Matt finish. I don't use it often, but when I have, it has been sprayed in two coats or more through the airbrush... so couldn't say how it goes when applied by cloth/dauber. But for things like key chains (regularly handled, flexible), it has lasted at least a year so far. if you're not into Eco flow products, then there are other options out there and I am sure others would have good suggestions... But also depends how water resistant you need if to be. If you need it to stay dry at any cost, try Vaseline! Will go on shiny, but dull down between applications, and as a petroleum jelly product it is hydrophobic.... But it won't let your leather breath well, which could accelerate its wear. I'd put fiebings Aussie leather conditioner in the same category as that, and it's well regarded by a lot of people (myself included) as a good all-purpose finish. -
Made a scrap offcut of square steel tube into an anvil to reach into the bottom of bags and things. Made a video on it here:
-
On a wallet, kangaroo is fine because it is stiff. As a liner, it's probably a bit too stiff for folding around easily... Unless you get the chrome tanned kangaroo, then you'll be right!
-
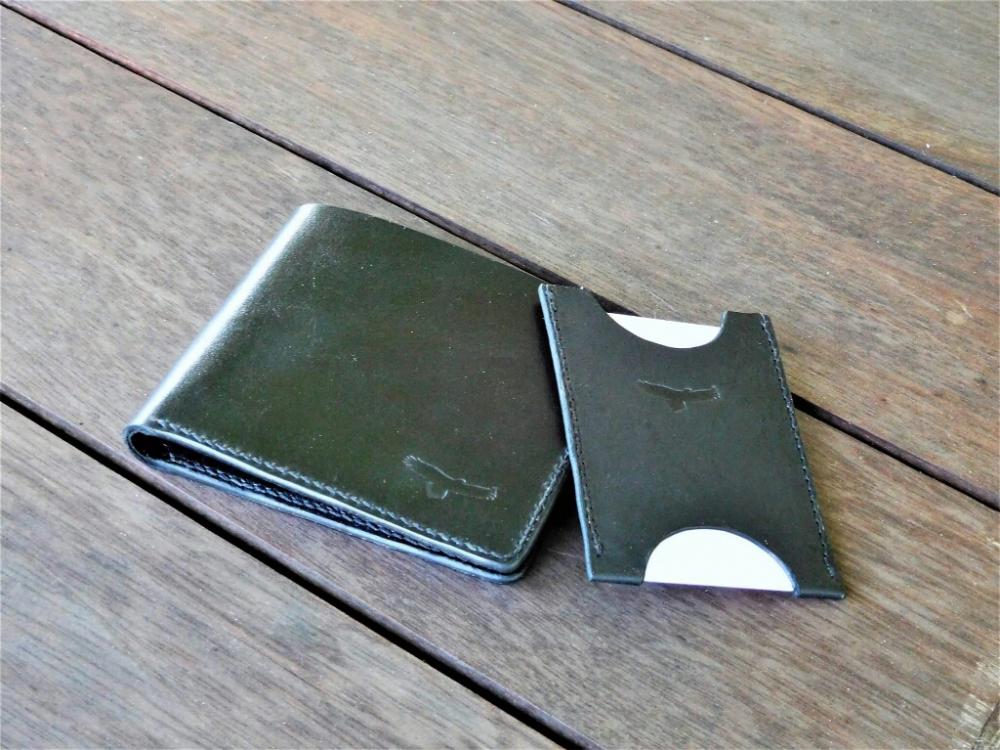
Hey guys, Finally getting around to sharing this here. My first crack at a bifold wallet with T pockets. Black cowhide outer, black kangaroo skin inner, saddle stitched with black braided polyester thread from lekoza. The cardslot is for the customers site access pass which he carries separately, and is made from kangaroo leather. Let me know what you think! Also if you like, you can follow me on facebook: https://m.facebook.com/wedgetailleather/ And on YouTube where I am sharing my leatherworking journey, as well as some tips and tutorials. https://www.youtube.com/channel/UCV1h2k3aSVrjAaLddck_NdQ


-
Maybe I will take some stills after this christmas when I do my big tidy up and reorganise But in the meantime, you can see mine being built in my "operation wedgetail nest" vlog on youtube! Channel is called wedgetail leather. Project follows getting a shed built, so if you're not interested in that, or in me building storage shelving etc. Then probably the last couple of vids in the series would be the best starting point. I also have some quick tips and a couple of tutorials on that channel for anyone interested in the most basic basics of leathercrafting... I'm no pro, that's for sure.