GatoGordo
-
Posts
150 -
Joined
-
Last visited
Content Type
Profiles
Forums
Events
Blogs
Gallery
Store
Everything posted by GatoGordo
-
3:10 to Yuma. Worn by Russell Crowe in the film. And the pattern is by Will Ghormley.
-
I was a bit curious about this so I checked with FedEx Office. For an A0 print (approx. 3'x4') their price is $9.
-
Rifle stock cover and scope caps
GatoGordo replied to Ddat's topic in Gun Holsters, Rifle Slings and Knife Sheathes
Wow, you are right! I used to buy Angelus dye until they stopped selling it in pints. Just checked and they no longer ship to California. -
Rifle stock cover and scope caps
GatoGordo replied to Ddat's topic in Gun Holsters, Rifle Slings and Knife Sheathes
The problem is the VOC level. This is limited by the California Air Resources Board (CARB). Fiebing's Pro dye is a definite no no. For the Leather Dye, some online vendors will sell it, others will not. There is a similar problem with the Fiebing's Antique Paste. Some vendors will sell it, others will not. -
Design software for pattern making?
GatoGordo replied to Queipo37's topic in Leatherwork Conversation
I use Fusion 360. While it is not designed for this purpose, there are videos on YouTube that explain how it can be used to make leather patterns. As long as you are not a professional and do this only as a hobby, Fusion 360 is free. If you are a professional, look elsewhere. -
I received the M&P Shield blue gun today. Looks great. Thanks for a good deal.
-
Interested in the S&W M&P Shield. Message sent.
-
Thumb hole sling
GatoGordo replied to Rossr's topic in Gun Holsters, Rifle Slings and Knife Sheathes
Yes. -
Thumb hole sling
GatoGordo replied to Rossr's topic in Gun Holsters, Rifle Slings and Knife Sheathes
I put a thumb loop on my shotgun sling and I like it. It allows me to hook my thumb in the loop and relax my hand and arm while stabilizing the sling and preventing the shotgun from sliding back. -
I was in the same boat. I wanted to make a portfolio but needed a primer as to how it goes together. I purchased portfolio 9B from Holly at https://www.leatherdiystudio.com/product-page/portfolio-no-9. Once I made one from her pattern, I was able to design my own with a different interior layout.
-
I purchased Don Gonzales's Introduction to Leather Floral Design eBook for $20. While it is not bad, he has a YouTube video that covers the exact same information.
-
Anti slip for shoulder strap / gun sling?
GatoGordo replied to HavnerDesign's topic in How Do I Do That?
I line the back of the sling with suede. It provides grip and a padding for the shoulder. -
looking for GOOD men's acrylic wallet templates
GatoGordo replied to DaveP's topic in Patterns and Templates
If you have a 3D printer you can just print your own for a lot cheaper than someone else's acrylic set. -
That little shield you use when removing your stitching chisel ...
GatoGordo replied to OldCanuck's topic in Leather Tools
I use a wooden paint stirrer. It is free, light, and when working in a narrow area, can be used on its side. -
It can't be too bad if you can recognize it. Great tutorials for both the pancake and avenger. Thank you for making them available.
-
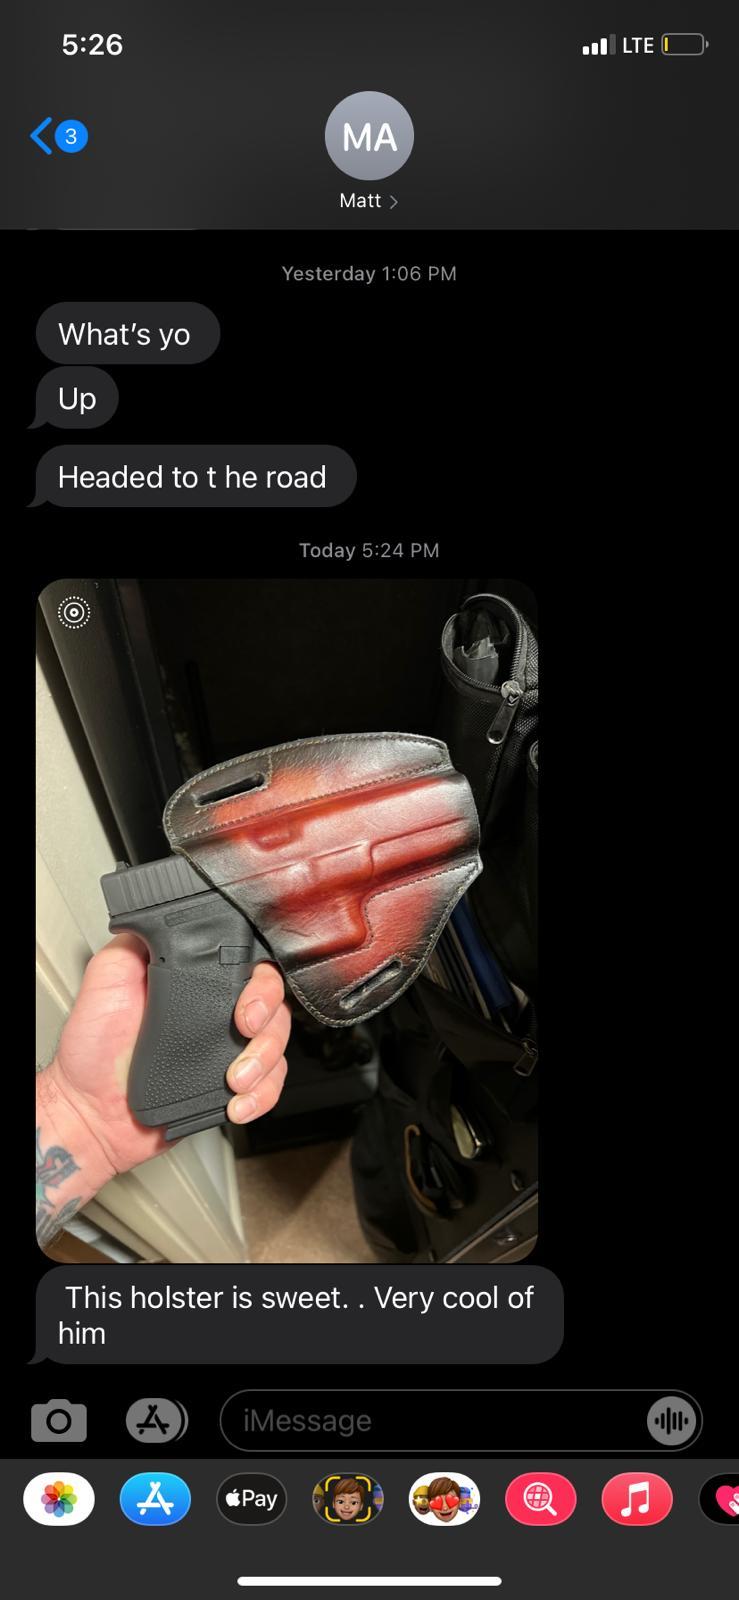
While I printed several guns and made holsters, I only reality tested the Glock 17. Here is a holster I made from the printed model with a real Glock 17 in it. I assume the others are as accurate.

-
If you have a 3D printer you can download the stl files for both from thingiverse.com.
-
Long Hand-stitched runs - Thread Management?
GatoGordo replied to MtlBiker's topic in Sewing Leather
Once I sewed a belt using one length of thread. It is nice to know that I can do it, but I will never do it again. Now, I sew like tsunkasapa describes, only I start out with two fathoms of thread. Unless I really look for it I do not notice where the threads overlap. -
Tool pouch with belt loop
GatoGordo replied to riy's topic in Gun Holsters, Rifle Slings and Knife Sheathes
I also made one of those. It seems to be a convenient size for general purpose. I am sure he will appreciate it.
-
From their Facebook page: Additional contact info http://www.sinabroks.com/ +82 31-352-8589 sinabroks.jin@gmail.com
-
TomE, that is exactly what I want. Thank you.
-
I want to make a handle like the one in the picture, but I am not quite sure how to do it. My guess is that there is some kind of core (wood or 3d printed). The leather is then cut into something resembling an O, folded over the core, and stitched. Does anyone have details regarding how to make this handle or a link to a video?

-
I use either an 8B pencil or a Stabilo All pencil.
-
I tried a silicon brush like the blue one in fredk's post. Using Barge cement, the brush only lasted a few days before I threw it out. It appeared that the solvents from the cement permeated the silicon to make it more flexible and the head would fall off the stick. This is the brush I purchased. https://smile.amazon.com/gp/product/B009OCEBD2/ref=ppx_yo_dt_b_asin_title_o01_s01?ie=UTF8&psc=1
-
No. I saw your thread asking if anyone had any experience with it. I too was hoping for a reply.