


Silverd
-
Posts
489 -
Joined
-
Last visited
Content Type
Profiles
Forums
Events
Blogs
Gallery
Store
Everything posted by Silverd
-
Hummmm, kydex. I looked at a You Tube video...I was hoping I might use a sewable material. Silverd
-
Hello Helpful Members I have a client that has requested a custom knife sheath made from a synthetic material as frequently encounters wet conditions hich leathet may not be suitable. Anyone know of what is commonly used for this application? Any and all assistance will be greatly appreciated. Silverd
-
Hey, thank you. These guys have good pricing too! Silverd
-
Strawberry Short Cake I-Pad Case
Silverd replied to Silverd's topic in Purses, Wallets, Belts and Miscellaneous Pocket Items
Good luck. Have fun! Silverd -
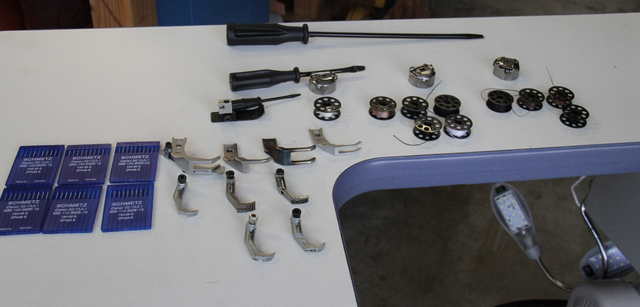
Hello I'm looking for a Supplier of needles for use in a Claes 30 Long Arm Patcher. Needle system: 88DU x 1 need them in just about all sizes but the smaller sizes are the ones I use the most of. Silverd
-
Strawberry Short Cake I-Pad Case
Silverd replied to Silverd's topic in Purses, Wallets, Belts and Miscellaneous Pocket Items
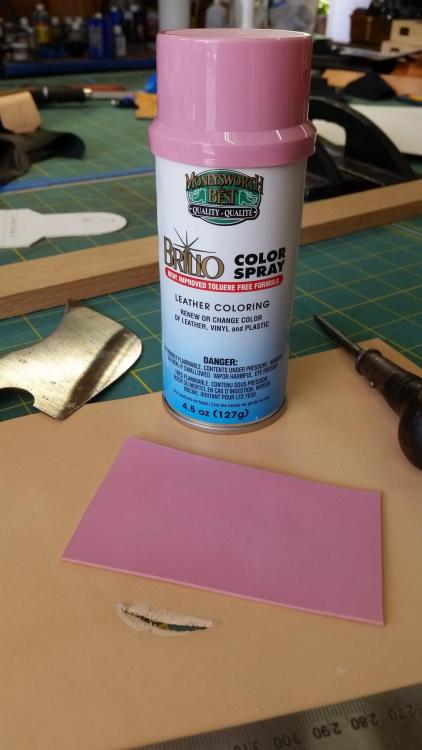
In this case I applied white color Brillo paint as a color "Primer" as it seemed to cover better. The paint appears to be of good quality and applies easily; it also blends well so there was no evidence of over spray. The first coat really soaks into the leather so I dont think that pealing will be an issue. Did not apply oil. The leather I was using is a Tandy's Superior Oak Veg Tan in the 5-6oz range and was plenty supple with out additional conditioning. The Pockets are made from Herman Oak and I wanted these with some temper to resist collapsing during user handling...so no oil on them either. I applied three coats of pain in total if I recall and did some patching of three extra needle holes by gluing into each hole a sliver of leather, then trimming it and sanding it smooth and respraying that effected area. Similar to repairing a car fender! Can hardly tell the accident occurred. I give the VOCs of the previously applied paint layer a chance to evaporate before applying the next layer. But did not let it dry completely. I think it is referred to as being open. This is done so that the 2nd layers chemically bond to the previous coat. if the previous coat was to dry completely then it would be a good idea to sand the surface first which provides a profile for the new paint to grab onto. I think multiple thin coats are better than one thick coat. Its pretty basic stuff and was quite easy. Surprisingly nice results. I had issues with a lot of the design and execution elements of this project but the paint was not one of them. I don't know if the paint will allow oil to pass as it was much thicker than the clear acrylics that I also use over stained leather. More experimenting is required. Good Luck! Silverd -
Strawberry Short Cake I-Pad Case
Silverd replied to Silverd's topic in Purses, Wallets, Belts and Miscellaneous Pocket Items
-
It is however shipping may be delayed due to im in the middle of a project using this machine. My appologies Silverd
-
Strawberry Short Cake I-Pad Case
Silverd replied to Silverd's topic in Purses, Wallets, Belts and Miscellaneous Pocket Items
I'll let you know. The fragility factor of the product has been a concern from the start. I've not had too much previous experience with cow hair skin and even less with painting leather but I gave her a one year warranty should it all go south. The quality of the paint appeared to be excellent...and for the cost it should be. I spray lots on leather including stains, clear coats, adhesive, water, goofproof and now paint. So far so good. Silverd -
Strawberry Short Cake I-Pad Case
Silverd replied to Silverd's topic in Purses, Wallets, Belts and Miscellaneous Pocket Items
Thank you! Much appreciated Silverd -
Strawberry Short Cake I-Pad Case
Silverd replied to Silverd's topic in Purses, Wallets, Belts and Miscellaneous Pocket Items
Ebay and Amazon both sell leather paint in rattle cans. Mfg is Brillo. Small cans run about $10.00ea. I use white to help cover then pink over the top as a final coat. Silverd Thank you -
There are good set-up instructions for the Landis 30 splitter on the web. The two machines share the same basic functionality. Let me know if you can't dig them out and I will scan my copy for you. In the meantime: Start by setting the blade gap above the bottom roller to about the thickness of a Credit card (0.025" ???) or less. Gap must be even all the way across. Set the die spring tension (these are the big springs that support the lower roller) to provide enough pressure on the leather so that it doesn't slip on the pinch rollers as its being pushed / pulled through the blade. The amount of pinch roller traction required is dependent on the temper of the leather and the sharpness of the blade. if the leather you are splitting is thin to start with there will be a tendency for it to slip inn that case more spring tension may be required or thicker leather to start with. I have also used an advanced technique of adding a 2nd layer of thick leather on top of the thin piece I'm splitting and run them both through at the same time. This has the effect of splitting a thick piece and generates more pinch roller pressure for better results...sometimes! It is important that the spring tensions on both sides be the same and that the lower blade carriage is free to slide. Disassemble, clean and lubricate the lower slide blocks and journals. Ensure the blade is sharp across the entire width and don't expect 100% consistent results. The gauge on top is not calibrated and is only used as a reference. You will ruin some leather on this machine unless your work is shoe soul thick as this is what these machines were designed to handle. That said, I've used mine successfully on many projects which I split 4mm thick leather for wallets down to 1mm. Works great for in a pinch but you should not rely on it for projects that require a lot of material splitting. Buying the right thickness is in the long run the better way to go. Blade must be SHARP. Hope this helps! Silverd
-
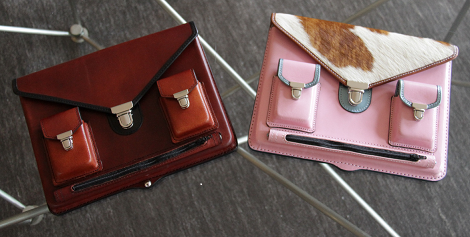
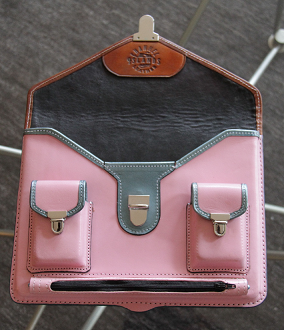
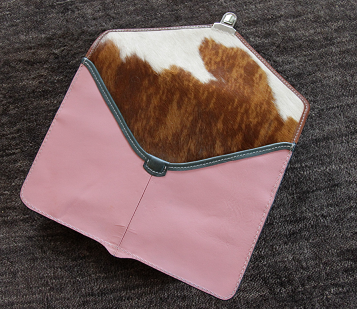
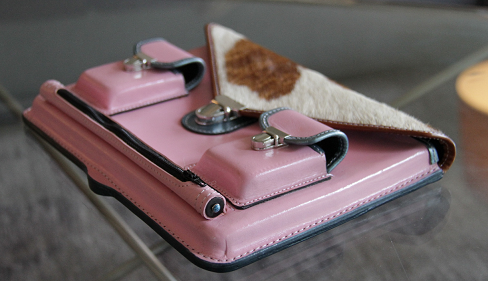
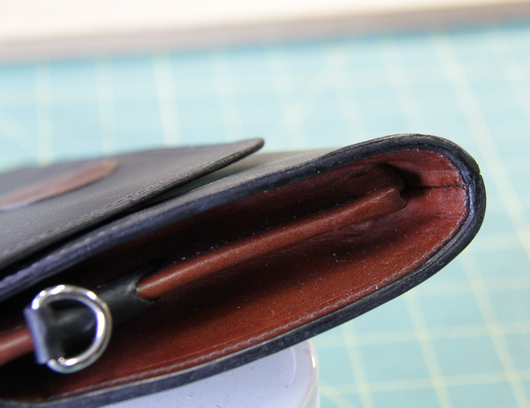
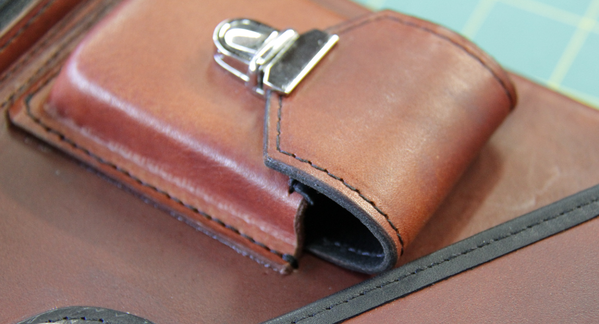
I find that my clients are very creative and sometimes have more interesting ideas than do I...so I go with it! When the young woman saw my standard 11" I-Pad Pro case in traditional Mahogany with Black trim she immediately asked if I could make her one in Pink with a Hair-on Cowhide Main flap. "Of course I can" I said! As the details of the project unfolded I suggested Blue trim, the rest was hers. It took a lot of hours to actualize the end results but it was fun and since I'm only 3 years into this leather thing I considered it a learning experience. Aren't they all? BTW: The pockets hold a special compact charger and charging cables and the zipper tube holds the writing stick. Silverd
-
How about a 335 P model? Got one of those? Silverd
-
English stirrup leather buckle - unusual?
Silverd replied to Xanthoria's topic in Saddle and Tack Accessory Items
I can mail you a couple of the bent buckles. I have them in 1.0" and 1 1/8" wide I believe...Or I can make you a custom set of leathers with these buckles from the English Stirrup Butt. Silverd -
English stirrup leather buckle - unusual?
Silverd replied to Xanthoria's topic in Saddle and Tack Accessory Items
I'm not an expert on this topic but I've made-up many stirrup leathers for clients and they have been happy with them so far. I use Cast Stainless Steel Buckles in 1" and 1/1/8" wide from Abbey England along with their Stirrup Butt leather and Spun wound Poly Cotton thread. Stirup butt is tanned specially to reduce stretch under high loading conditions. The Spun Wound thread is designed not to abrade and both are more expensive but both are very tough and I think work very well compared to the more popular straps today that are a composite design. Today, most stirrup leathers sold in USA use a nylon strength member sewn between two layers of skirting or bridle leather. The solid Stirrup Butt approach is traditional where as the nylon core is modern... Which I suggest is less costly. Most of the leathers I sell are to replace nylon core style leathers that have abraded from the inside out. As for the buckle I photo shared, it is an Abbey England Stainless Steel buckle in 1" that I quickly formed using simple tooling in my shop. I did not purchase it in this form. I don't believe the stress of deforming the material into this shape will cause a problem with the material failing under load since the cast steel is quite malleable. If you consider the actual loads your stirrup leathers see they are not that high actually. For a rider that weighs 200 lbs and a 3g peak load = 600lbs. There are two sides so you can say divide the 600lbs by 2 = 300lbs per side. Convert to metric if needed. Re Preventing the tongue tip of the buckle from digging into the underside of the flap. I would suggest that you look closely at the curved buckle as the way I see it a flat buckle may present more stress on the strap but I think has less profile which should translate into less protrusion of the tip into the underside flap. This is suggesting that sacrificing the stirrup leather is better than damaging the flap. Sanding the Tip down a bit to remove the sharp point I see on some might also help. I also think it would be something that could be prevented by using similar guard as is used on the Billet straps. This is not a conventional solution and will add a bit more bump to the flap on the outside as a result but will protect the flap. Make the guard from thin leather and replace it as needed. Hope this helps! Silverd -
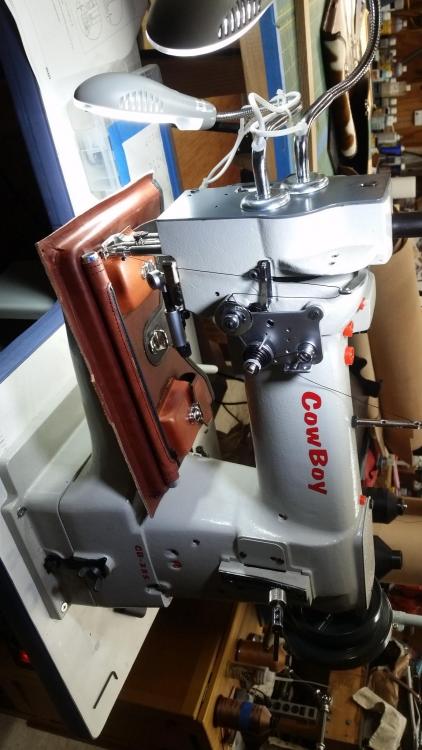
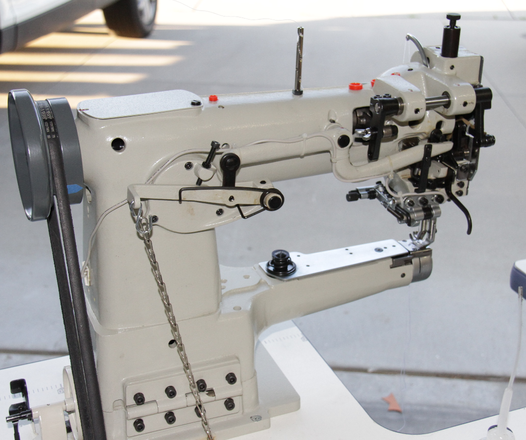
I recall the spec is 15mm with the knee lift. Sewing thickness max is probably 3/8" its a relatively light machine. I have a Uwe Flat Bed attachment that didn't make it into the photos (never used) and a servo motor and NP system that would also be included. Machine sews very nicel, very smooth and is easy to set-up for use on different materials and thread. Bob Kovar timed it for 138 per my request prior to delivery but I have not ever used that thread size in it. From what I understand it will handle 138 but does better using T90 in the bobbin. never actually sewed with either combination however; only read this somewhere. I have the service manual and reset the Hook timing to accommodate T90 thread with a #19 needle. It sews this very nicely now as well as #69 thread. The little I have used this machine this is what I have sew in it. I also have a new and different needle plate and feed dog set that I had ordered a week ago coming I would include. You understand that this is a unison feed machine. So the dog slides back and forth timed with the needle and needle foot but the dog does not drop down below the needle plate surface on its return stroke. Because of this, it matters a bit what the material thickness is and its temper and the presser foot type (single of double) that you are using. These factors influence how effective the feed dog is. This has nothing to do with why the machine is for sale. That said. Bob Kovar has schooled me on the art of optimizing this machine for a particular application. The machine comes stock with a very high profile feed dog and users will typically grind them down a bit to a height that works best with their application. These dogs are only $10.00 or so on Ebay and It quickly became apparent the benefit of customizing them to a specific use. I have only modified one dog and it really improved the performance of the machines general ability to feed the materials I have used...better than in its original high profile state. So there is a tip that not a lot of folks understand. The cylinder is so small on this machine that there is no room for a cam and drive shaft that is needed to support a drop feed style dog. Juki does have a machine , the DSC-244, 245, & 246 series that feature a 50mm arm and a drop feed dog but I could not find one used and could not afford the $4800.00 cost of a new machine. This machine is 95% of the juki for a fraction of the cost. Like I said, I'm very impressed with how this little guy does. I also own a 5100 Techsew, a Juki 1541S, a Claes 30 Patcher and a Landis 16 and have been working in leather for about 3 years. This is a great little machine that works very well on light material used in making wallets, and purses. I sew all of the edge binding and the perimeters on my wallets and clutches. Hope this help! Silverd

-
English stirrup leather buckle - unusual?
Silverd replied to Xanthoria's topic in Saddle and Tack Accessory Items
seems reasonable... Silverd
-
English stirrup leather buckle - unusual?
Silverd replied to Xanthoria's topic in Saddle and Tack Accessory Items
I don't see them on the Abbey England site... Silverd -
English stirrup leather buckle - unusual?
Silverd replied to Xanthoria's topic in Saddle and Tack Accessory Items
If you were to use cheap pot metal plated buckles yes....not cast stainless steel. Common place method of metal forming. Silverd -

-
English stirrup leather buckle - unusual?
Silverd replied to Xanthoria's topic in Saddle and Tack Accessory Items
Standard buckles can be curved using a press and simple form tooling. Silverd -
Will include servo motor with controller and packaging at no charge. Buyer pays for shipping only. Head weight about 80lbs. Additional pics or information upon request. Silverd
-
Understand. Thank you. Silverd
-
Asking $1200.00 Shipping from Oxnard CA. 93030

