


Mulesaw
-
Posts
798 -
Joined
-
Last visited
Content Type
Profiles
Forums
Events
Blogs
Gallery
Store
Everything posted by Mulesaw
-
I managed to get my finger caught in a rotating bit on a spindle moulder. That didn't look so pretty. But nothing was really harmed, so just a bit more scars to the collection. :-) I have always been a bit scared of the Z-blades for the moulder, those things are aggressive, once a board got caught while I was shifting it around, smashed the end into a wall and made a big dent in the mortar covered wall.
-
@mbnaegle ouch.. That is some really ice cold thinking under pressure, to be able to tell someone quietly that they need to step on the pedal to loosen the brake and getting them to back the handwheel!. Kudos to your dad! I agree completely with the problems of making things safer without messing up the utility. Brgds Jonas
-
Thanks Tom, I had seen that continuation sewing somewhere on this forum, and I immediately liked it, Brgds Jonas
-
Glad to be able to help :-) The Tandy Paper pattern pack is a bit different from this one. Most noticeably is the shape of the yoke for the shotgun patterns. On the old (pdf) pattern the yokes are much more dramatic. I haven't compared the actual leg patterns, but I think they are pretty alike, at least the measuring instructions are similar, so they should end up fitting well. Brgds Jonas
-
@UnderTheRedMoon Hmm, if your character needs to be able to use the scimitar, then tying a lot of leather (braided and strips) to the pommel will just get in the way. Could the character make a cover for the sheath that is made from the leather and braids? That would be how I would do it in real life. If it has to be tied to the pommel ring, then I would use silver thread or gold thread or something valuable that I could later break a piece of to use for payment (I have never played DND, so I don't know if you need some sort of valuables to pay for stuff in the game) Brgds Jonas
-
@Appalachiancowboy38 Tandy has a free pattern pack in their leathercraft library https://leathercraftlibrary.storage.googleapis.com/Archives/PDFs/2664-Batwing-And-Shotgun-Chap-Patterns.pdf I made the shotgun patterns for my daughter a couple of years back, and they fit pretty well. To make batwings that fit like shotguns, I'd take the shotgun pattern and just substitute the zipper for some snaps. Perhaps you should add 1" more to the leg width, but apart from that just go with the shotgun pattern. Admittedly I haven't made batwing chaps for anyone yet, but as far as I can see, they seem to flare out a good deal more at the lower part of the leg, and that plus the closing mechanism seems to be the only real difference. Brgds Jonas
-
@jcuk Thanks for the nice comment :-) To me it is also sort of a relaxing experience to sew it, just one stitch at the time, a bit like a zen moment I guess? Out here there is no pressure on speed, and it isn't like wrestling a saddle trying sew on a new girth strap in where they put the fabric strap so high up under the flap that you can't see what youy are doing. Nope, this is just pure straight down the road and new leather etc :-) I rarely listen to anything while I am working, just never gotten into it. I tried to listen to some historical podcasts, and that worked pretty well, but I like quiet time, being able to hear my Newfoundland dog sigh or snore next to me. I have used 4.5 SPI, It is the coarsest wheel on my stitch roller. Given that it is a fairly thick thread (1 mm), I think it looks good with a bold large stitch. Brgds Jonas
-
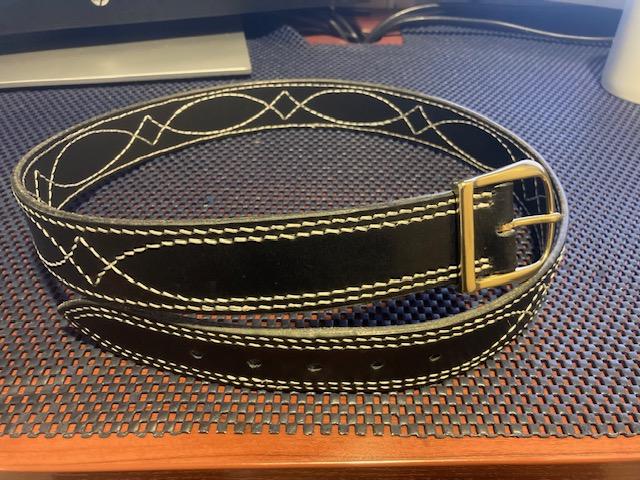
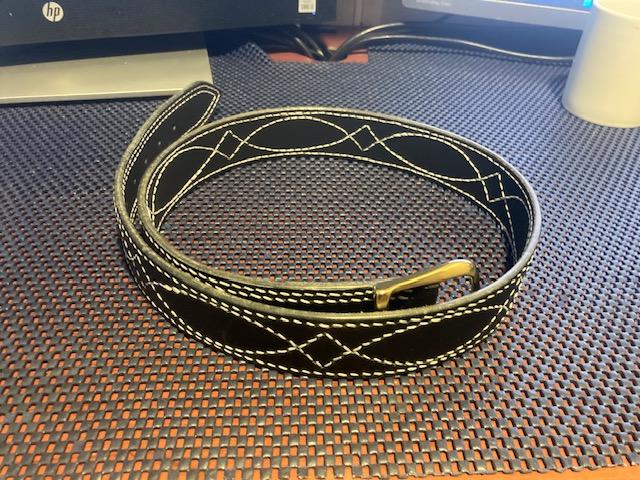
Thanks for the nice comment. Glad to be able to inspire a bit. The only thing I would like to have done a bit differently is that I would have liked the leather to be a bit thinner. It really is a hefty belt. But it was the thickness of leather that I just had brought with me, so I guess I'll just have to wear it till it softens. Brgds Jonas
-
@TonyV Thanks, I really missed my stitching horse, so I had to go about it by stabbing all the holes first, which is also doable, but I prefer to do it the other way :-) I have started wearing it, and so far I have avoided it getting too dirty Brgds Jonas
-
@JDFred Thanks for the nice comment :-) Brgds Jonas
-
Great find! Some saddlemaking books are really hard to find and expensive, like @chuck123wapati says, some of the patterns aren't reproduced, so I'd also just keep it. If you find that there are patterns/books for something that you have zero interest in, you could always offer it up for sale at this forum. Brgds Jonas
-
@PastorBob Thanks, I did manage to get a small crack in the little finger from tightening the thread. I did the sewing over a couple of days to keep it enjoyable. Brgds Jonas
-
@AlZilla Thanks for the nice comment, it is just a regular length strap, I mean it is only doubled for the 2.5" around the buckle. So the sewing is purely decorative for the rest of the belt, but I read somewhere, that stitching can help make a belt a bit less flexible to prevent it from sagging. (I don't know if that is true though, so I guess I'll just have to wear it for a couple of years and see) :-) Brgds Jonas @chuck123wapati Thanks Chuck, it is without a doubt the flashiest work belt on board Brgds Jonas
-
Thanks, I suppose that one could skip the outer stitching, but I had seen a belt in here with the same design, and I wanted to challenge myself a bit :-) I decided from the start that it would probably go wrong if I tried to sew it all in one go. So I just did like Stohlman suggests, with a couple of yards of thread each time, and when you run out of thread - you just start 3 stitches back and that locks it. Maybe if I had made bigger holes, it might have been possible to do it all in one go, but there's going to be a lot of abrasion on the ends of the thread if it is going to be pulled through the leather that many times I think. If you look closely you can see where I have stopped and started again. On the lower picture: The fishtail in the middle on the back of the belt, that one I ended up having both the outer edge and the fishtail being started and stopped the same place. I tried to avoid that for the rest of the belt, since I was afraid that it would look clumsy. But when the two start/stop points are a bit away from each other it blends in better. And I think that if anybody look that close to my belt while I am wearing it - they probably know what to look for anyway, and they would know why I did it Brgds Jonas
-
Thank you Brgds Jonas Thanks, It did keep me occupied for some hours for sure Brgds Jonas
-
Thanks, I saw a belt (on this forum off course ) where someone had made the ending like this. I never thought about doing it like that before, but I thought that it looked cool and like an elegant way to do it. Brgds Jonas The good thing is that it gives me something to do out here :-) And it is at least a manageable project to hold while sewing Brgds Jonas
-
@FrankHester Thanks :-) @rleather Thanks :-), as a Scandinavian something with this amount of ornamentation is almost unheard of, but I decided to take a chance
-
I can't remember the last time I made a belt for myself to use. My best guess is that it was in 1994, and I haven't used that belt since probably 1997. So this time I decided to make a belt out here on the ship, mainly to use as a everyday work belt (to keep my work pants up), and secondly to have a cozy small project to do. The fishtail pattern was made using a cardboard plate, all stitching is done by hand, and a diamond awl was used to make the holes in the leather. The belt is 1.5" wide and I used Serabraid 1 mm thread for the stitches. I haven't got a stitching clamp or a stitching pony out here, so sewing takes a bit more time since one hand needs to hold the leather, but all in all I am pretty happy with the way it turned out. (My photo skills suck, and natural light isn't in abundance in the engine control room)
-

Ropers Pride saddle
Mulesaw replied to morningskye's topic in Saddle Identification, Restoration & Repair
@morningskye Admittedly I know very little about western saddles, but if you have a picture it might help some of those in here that really knows about this stuff. Based on European saddles, I suppose that the brass plaque could be either the horses name or the owners name (maybe not in this case) Brgds Jonas -
Looking really good. I like that that the rivets have some texture. That is a nice touch. Also the creasing on the top part of the strap (the part with the rivets) looks really fine and consistent. Brgds Jonas
-
Ouch, jamming a fingernail is really not recommended. I never really thought about it until now, but that is an advantage with foot powered machines. Best wishes for a speedy recovery Brgds Jonas
-
Perhaps we ought to make a post with "get rich quick" business ideas (just kidding)
-
Vintage Champion Shoe sewing or stitching machine?
Mulesaw replied to aml311's topic in Leather Sewing Machines
@aml311 If it is in working condition, there normally is a market for it. Do you by chance have some pictures of it? That would help a lot for someone in here to give a more educated guess about model and how sought after the machine is etc. You can try to advertise it for sale on this forum too. https://leatherworker.net/forum/forum/82-machinery-sewing-and-stitching/ The Forum rules in the "for sale section" are stated on the top of this site: https://leatherworker.net/forum/forum/71-items-for-sale/ Brgds Jonas -
@Steve75 I fully agree that we should continue to share knowledge and especially to someone who is new to the forum. Generally I think there is a very civilised and helpful tone in here which is just as it should be :-) It is just that I am genuinely puzzled: Did the OP expect another answer?, Should we have offered more help? Was the OP in reality looking for a turnkey operation business plan to make a fortune making holsters? I guess it is just that I always gets so astonished when people don't acknowledge that someone is trying to help them. A simple "thank you" would suffice. Just plain old fashioned regular courtesy. Brgds Jonas
-
@Calidora There is a German classified page that usually has some spare parts on it: https://www.kleinanzeigen.de/s-junker-ruh-sd/k0 I just searched for "Junker Ruh SD" at the moment there are two parts for sale. But there have a seller that had a bunch of parts. I know that shipping will be a bit expensive,but I hope that you'll be able to find the parts. Brgds Jonas